In this blog post I’m going to deep dive into the end-to-end activation, deployment, and consuming of the managed Tanzu Services (Tanzu Kubernetes Grid Service > TKGS) within a VMware Cloud on AWS SDDC. I’ll deploy a Tanzu Cluster inside a vSphere Namespace, and then deploy my trusty Pac-Man application and make it Publicly Accessible.
Previously to this capability, you would need to deploy Tanzu Kubernetes Grid to VMC, which was fully supported, as a Management Cluster and then additional Tanzu Clusters for your workloads. (See Terminology explanations here). This was a fully support option, however it did not provide you all the integrated features you could have by using the TKGS as part of your On-Premises vSphere environment.
What is Tanzu Services on VMC?
Tanzu Kubernetes Grid Service is a managed service built into the VMware Cloud on AWS vSphere environment.
This feature brings the availability of the integrated Tanzu Kubernetes Grid Service inside of vSphere itself, by coupling the platform together, you can easily deploy new Tanzu clusters, use the administration and authentication of vCenter, as well as provide governance and policies from vCenter as well.
Note: VMware Cloud on AWS does not enable activation of Tanzu Kubernetes Grid by default. Contact your account team for more information.

Note2: In VMware Cloud on AWS, the Tanzu workload control plane can be activated only through the VMC Console.
- Official Documentation
But wait, couldn’t I already install a Tanzu Kubernetes Grid Cluster onto VMC anyway?
Tanzu Kubernetes Grid is a multi-cloud solution that deploys and manages Kubernetes clusters on your selected cloud provider. Previously to the vSphere integrated Tanzu offering for VMC that we are discussing today, you would deploy the general TKG option to your SDDC vCenter.
What differences should I know about this Tanzu Services offering in VMC versus the other Tanzu Kubernetes offering?
- When Activated, Tanzu Kubernetes Grid for VMware Cloud on AWS is pre-provisioned with a VMC-specific content library that you cannot modify.
- Tanzu Kubernetes Grid for VMware Cloud on AWS does not support vSphere Pods.
- Creation of Tanzu Supervisor Namespace templates is not supported by VMware Cloud on AWS.
- vSphere namespaces for Kubernetes releases are configured automatically during Tanzu Kubernetes Grid activation.
Activating Tanzu Kubernetes Grid Service in a VMC SDDC
Reminder: Tanzu Services Activation capabilities are not activated by default. Contact your account team for more information.
Within your VMC Console, you can either go via the Launchpad method or via the SDDC inventory item. I’ll cover both:
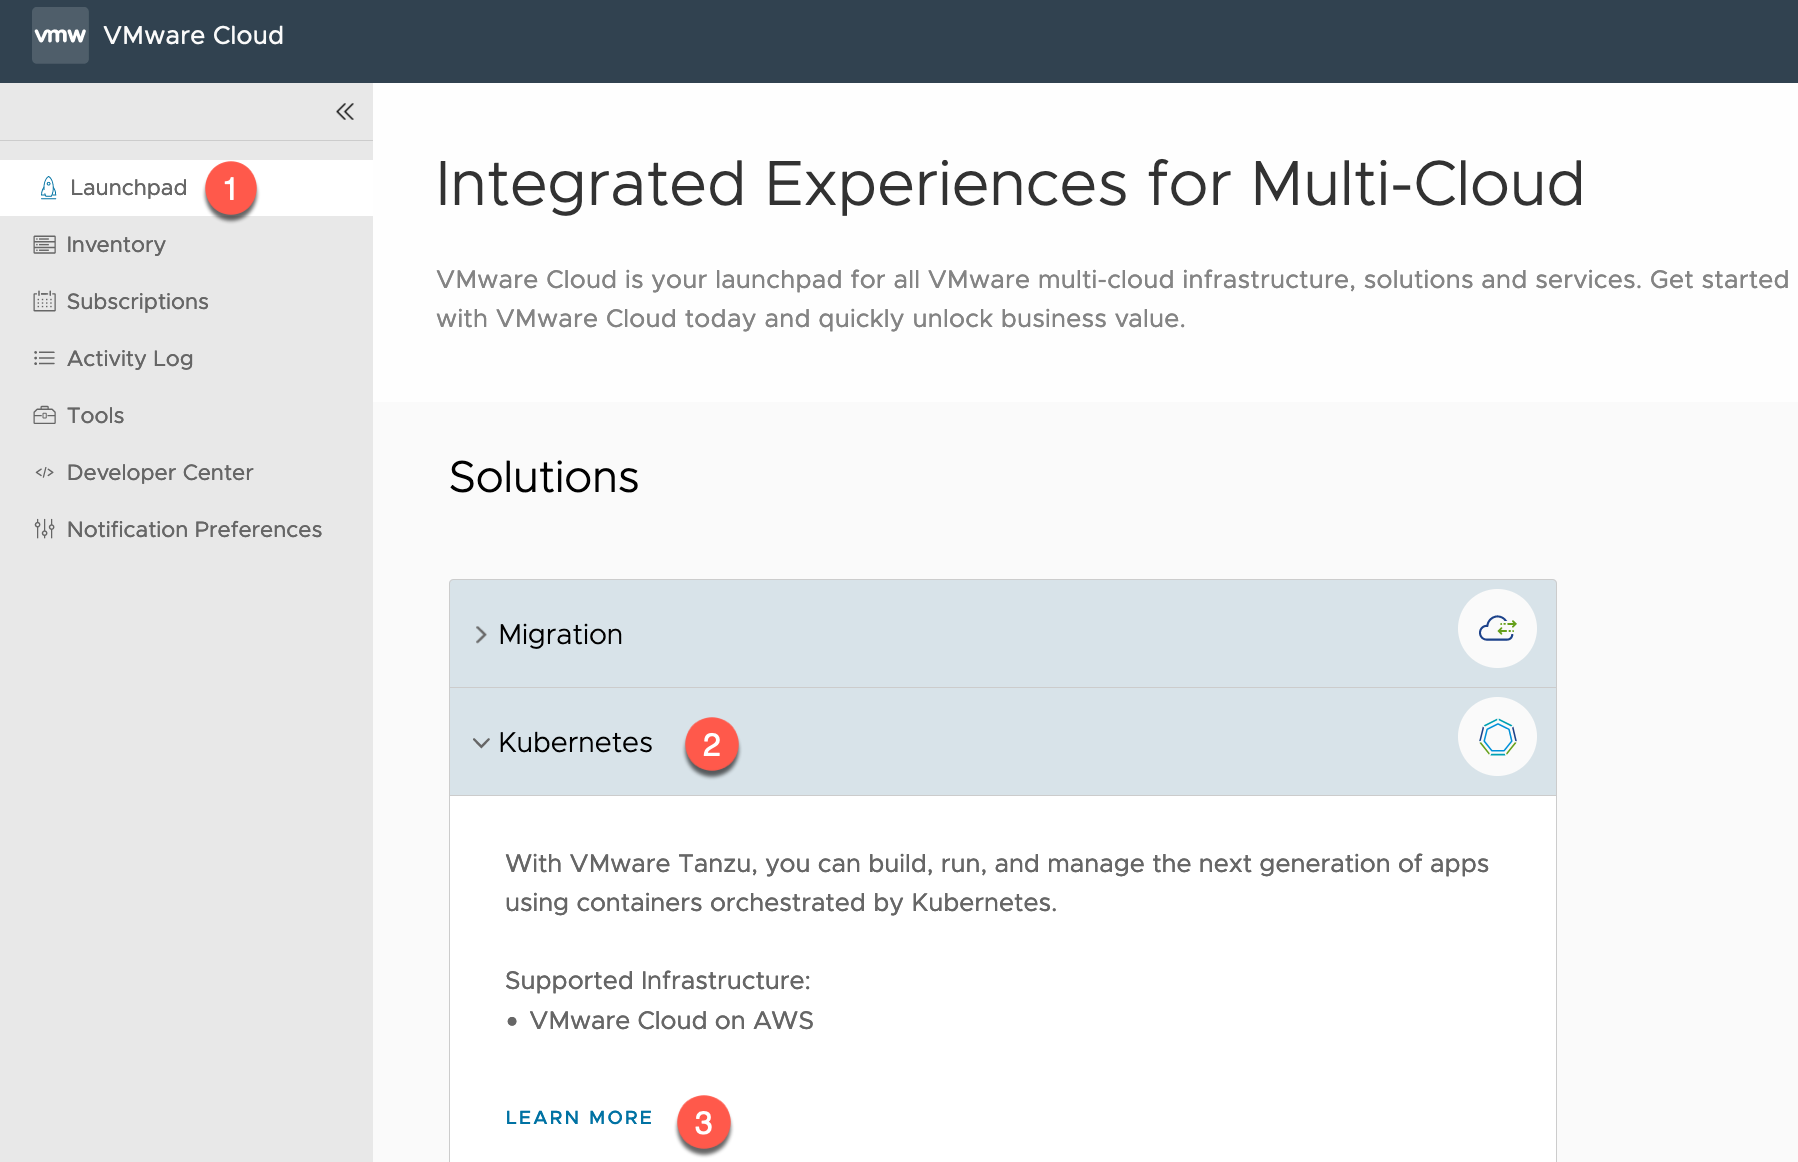
- Click on Launchpad
- Open the Kubernetes Tab
- Click Learn More
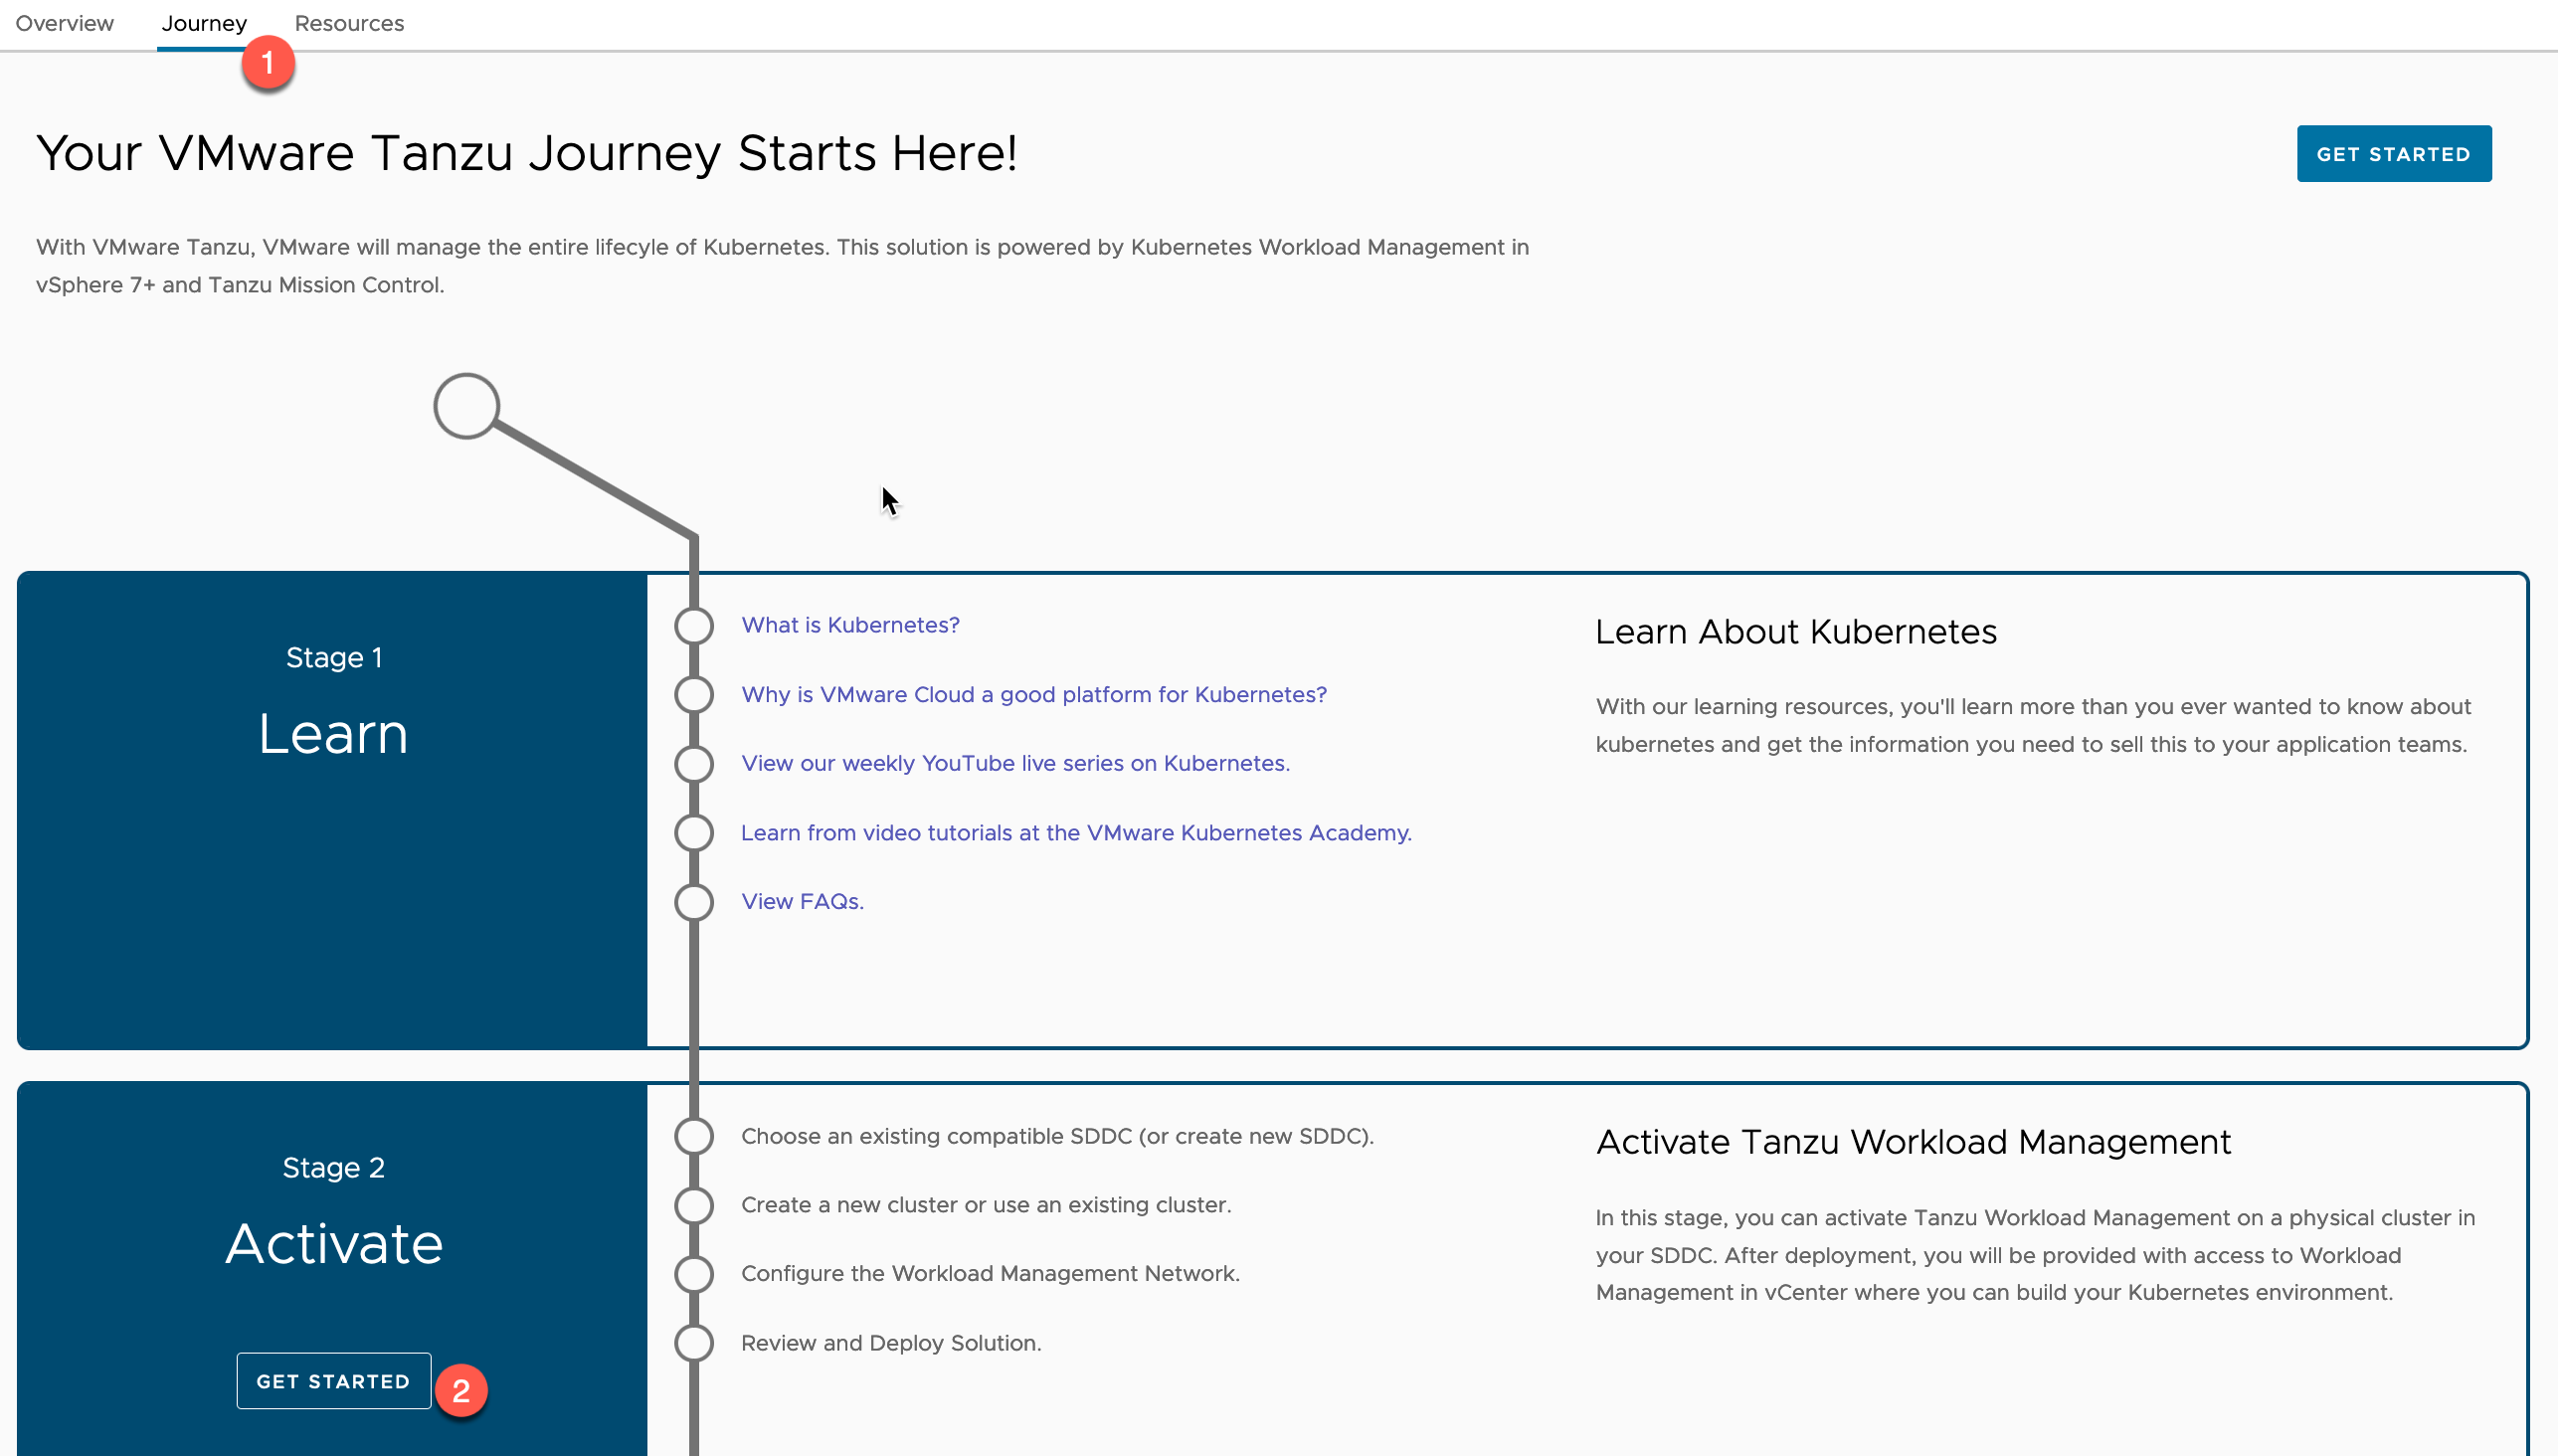
- Select the Journey Tab
- Under Stage 2 – Activate > Click Get Started
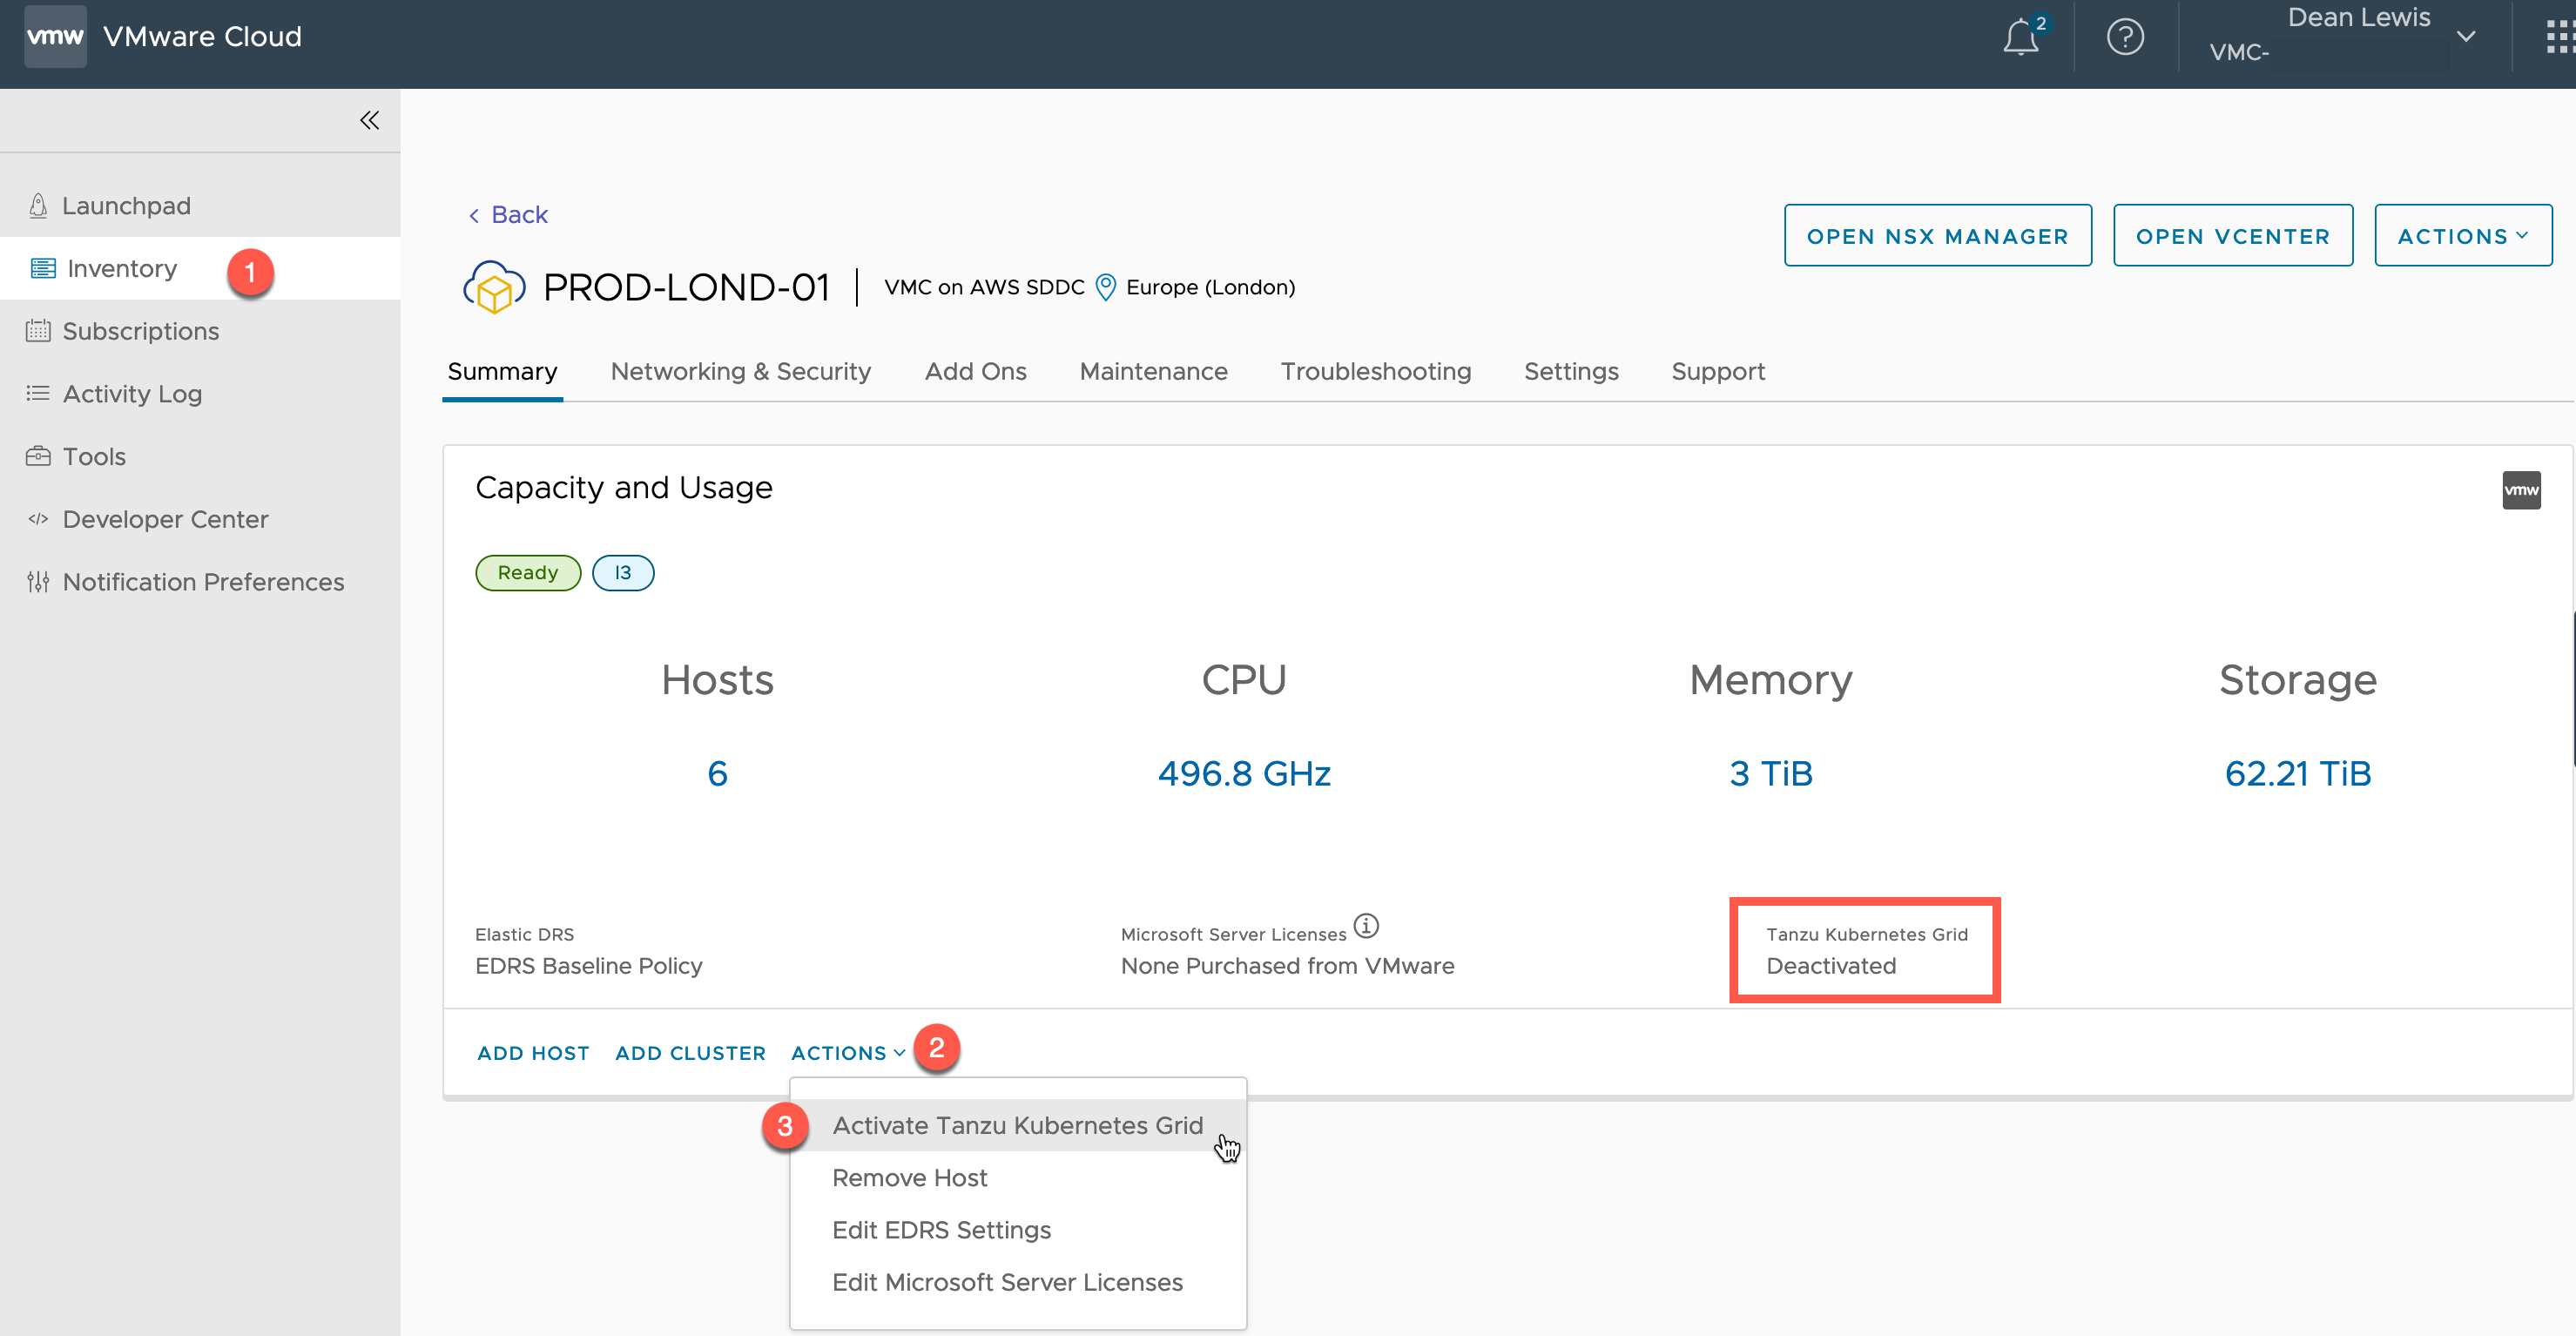
Alternatively, from the SDDC object in the Inventory view
- Click Actions
- Click “Activate Tanzu Kubernetes Grid”
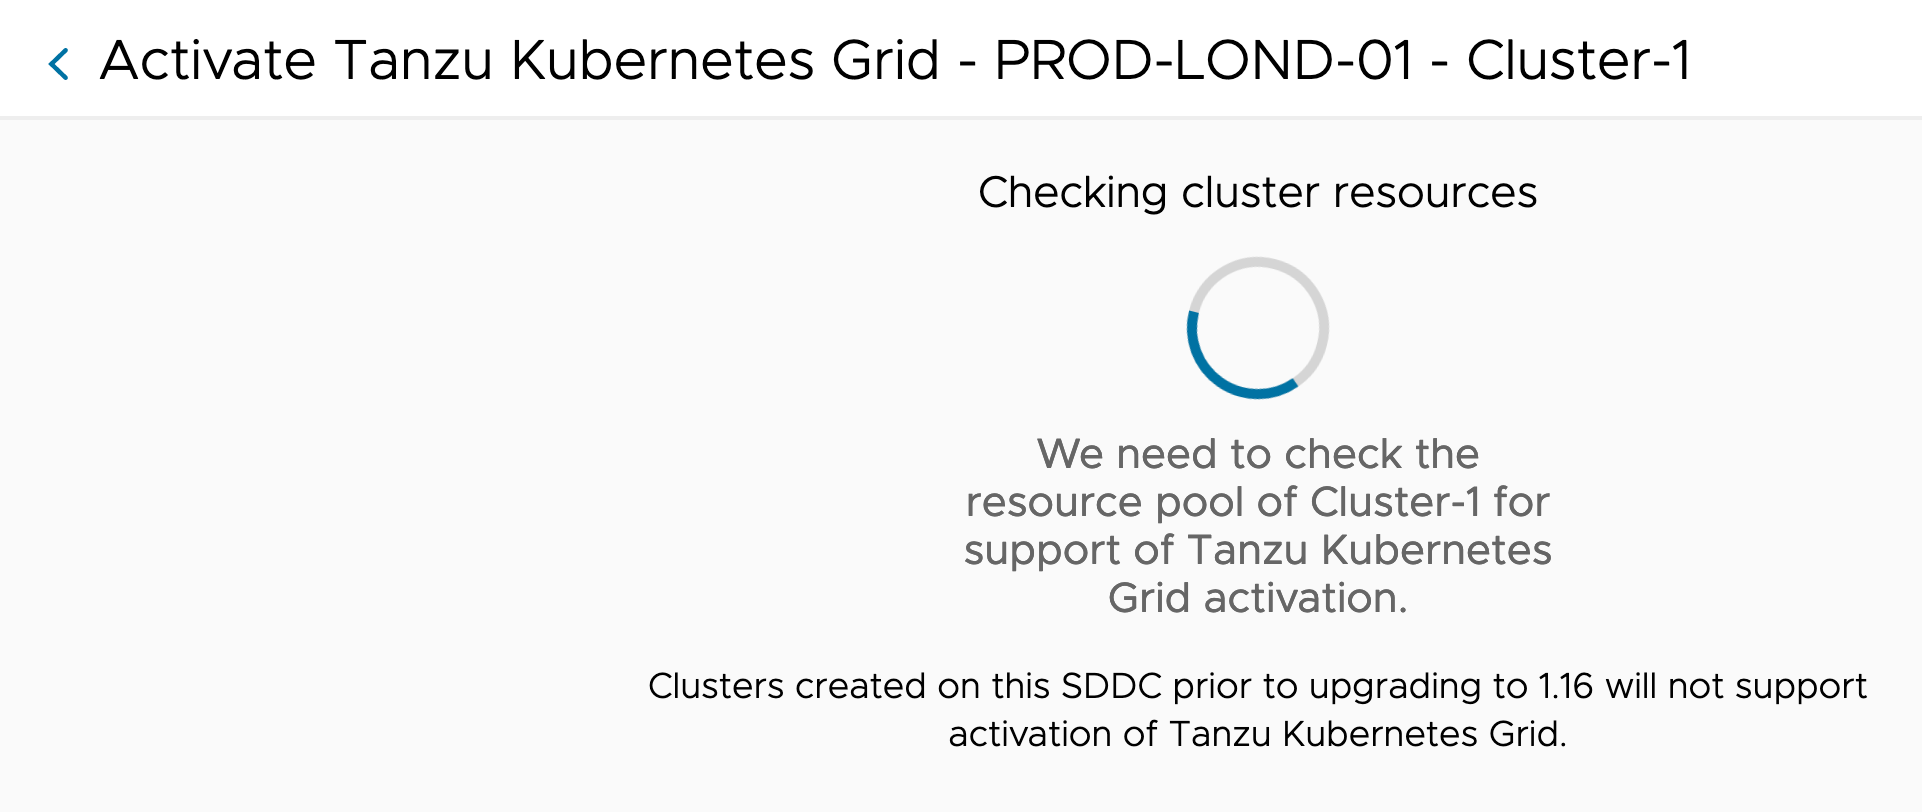
You will now be shown a status dialog, as VMC checks to ensure that Tanzu Kubernetes Grid Service can be activated in your cluster.
This will check you have the correct configurations and compute resources available.
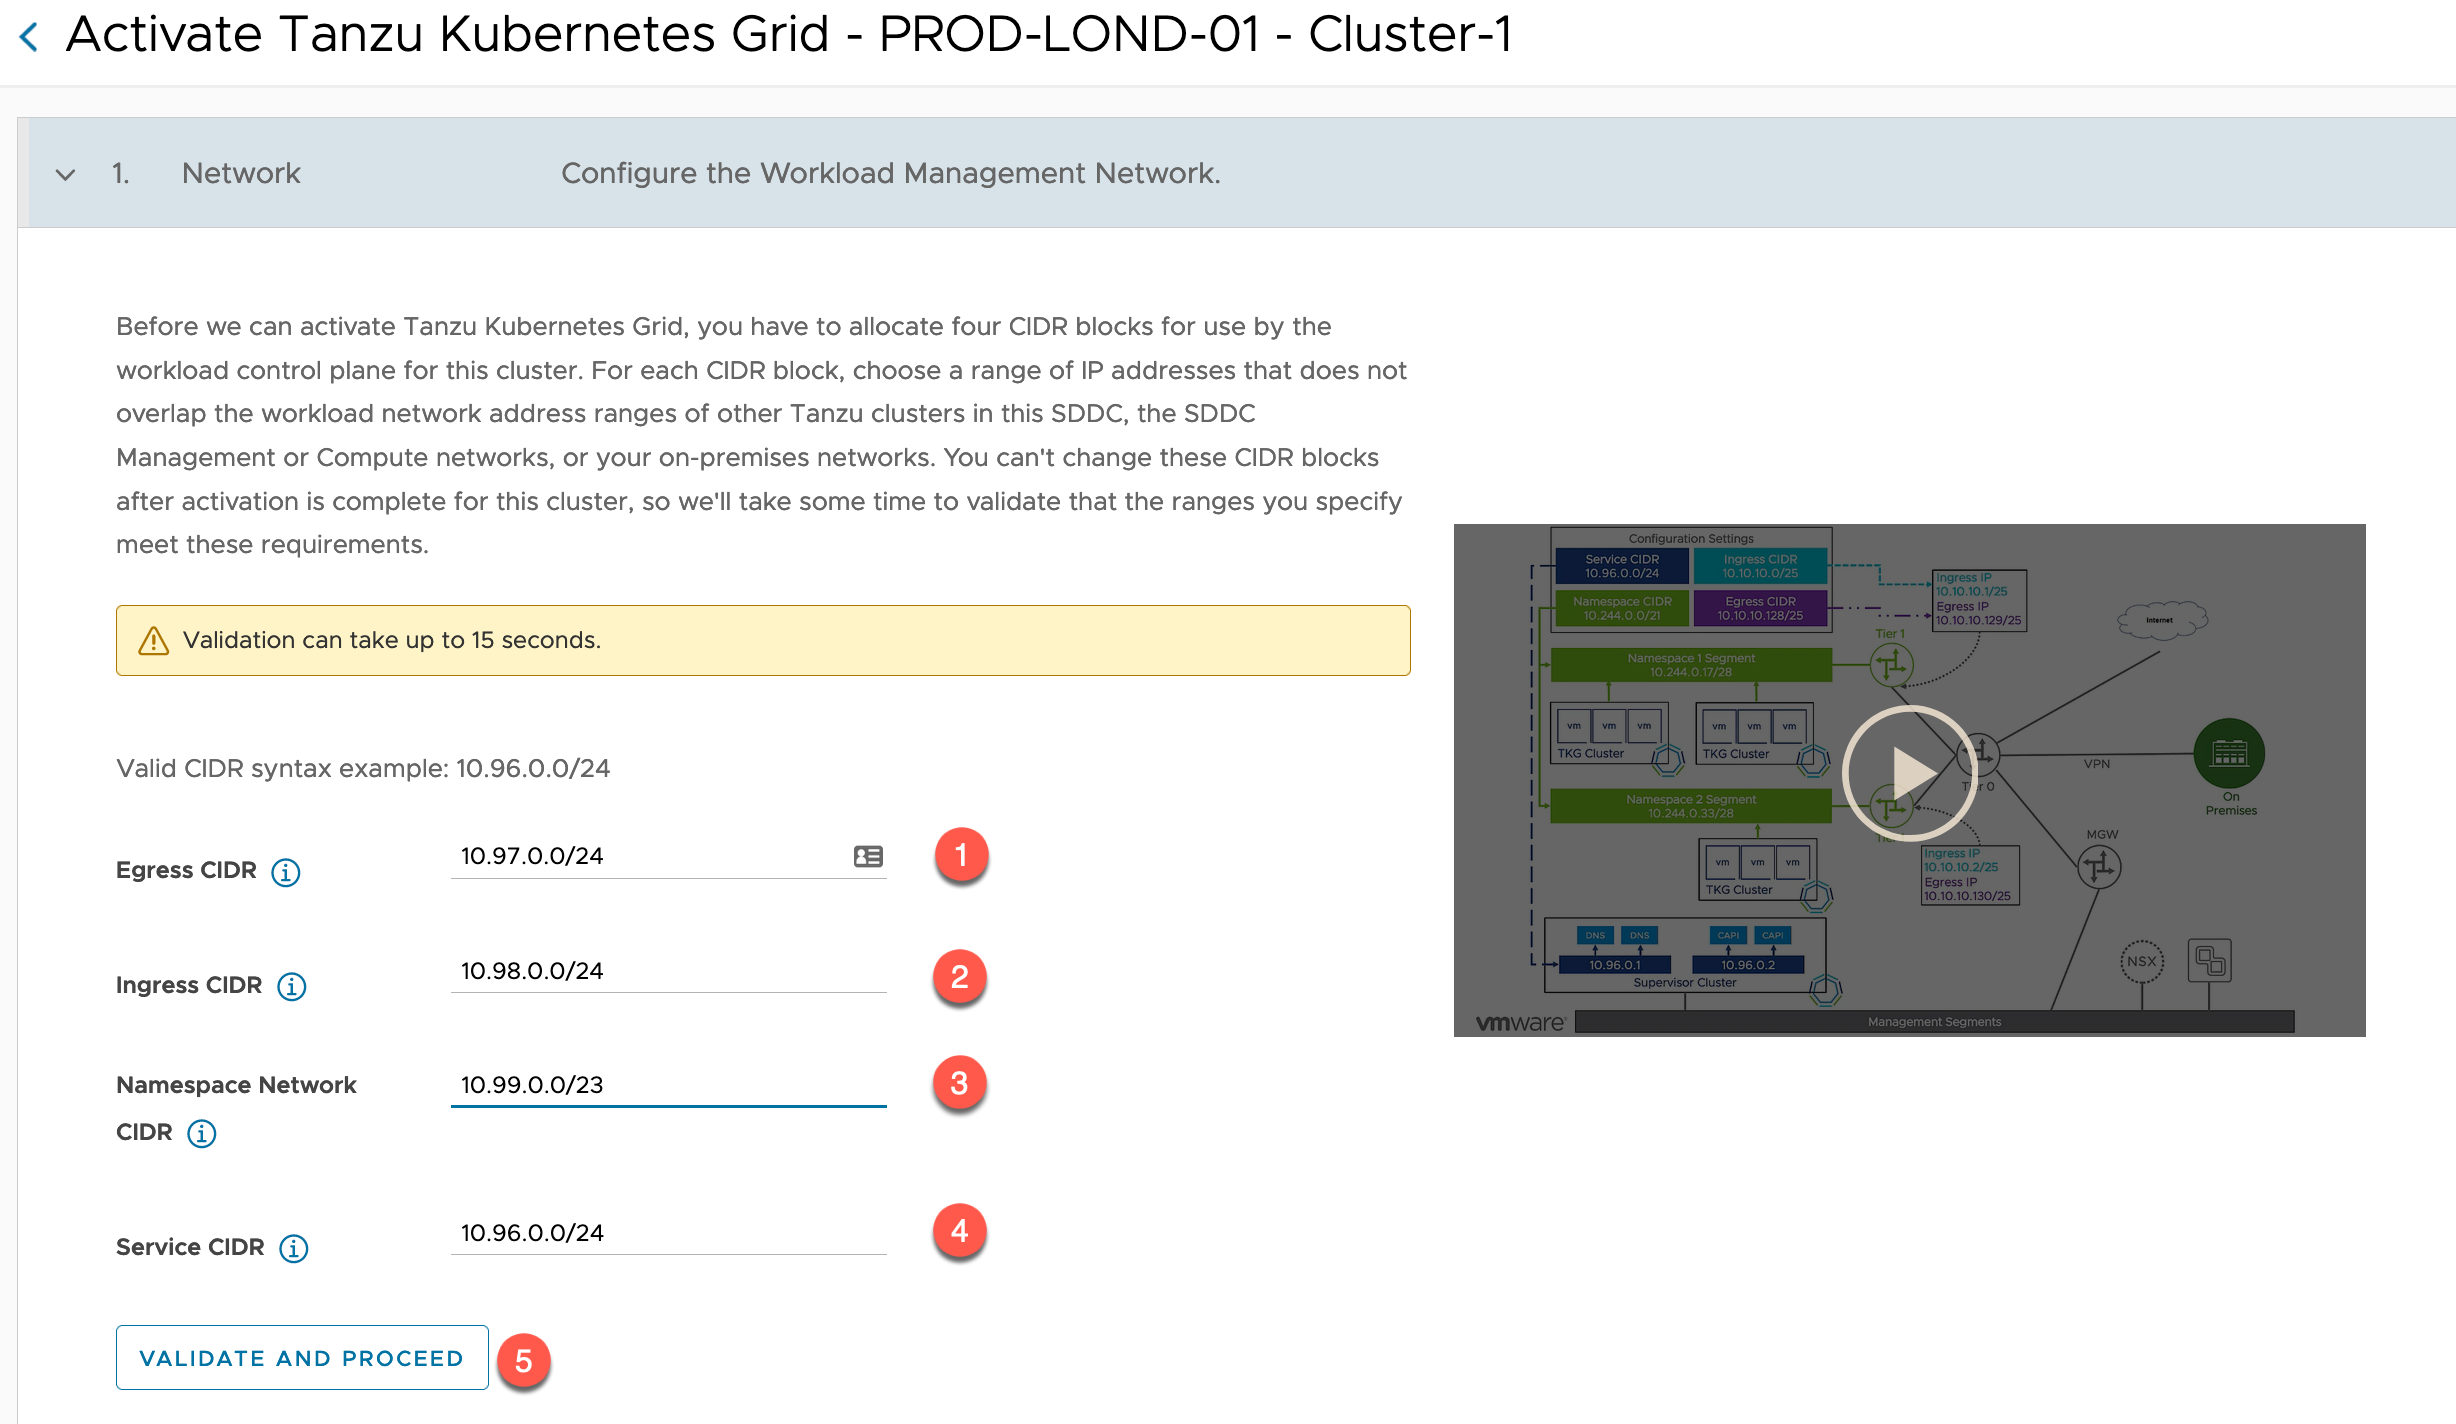
If the check is successful, you will now be presented the configuration wizard. Essentially, all you must provide is your configuration for four networks.
- Official Documentation – Tanzu Kubernetes Grid Service Networking in VMware Cloud on AWS
Enter the Network CIDR for your:
- Egress
- The network in which clusters and pods will NAT via for outbound connectivity
- Such as pulling container images from a public registry
- The network in which clusters and pods will NAT via for outbound connectivity
- Ingress
- The network that you will expose your applications on for inbound connectivity
- Such as hitting the web front end of your application from your internal clients
- The network that you will expose your applications on for inbound connectivity
- Namespace Network
- The network range that will have provide IP addresses via DHCP for Cluster nodes created within a vSphere Namespace
- Service CIDR
- The internal networking range within the Supervisor Cluster nodes
- Note 10.96.0.0/24 is the default range used by Tanzu when creating new Tanzu clusters, if you choose this as your Supervisor Cluster Network Range, then you will have to specify a different range each time you create a Tanzu Cluster rather than use the default settings.
- I cover that additional configuration in this blog post, if like me, you cause the overlap by mistake, or by design.
- The internal networking range within the Supervisor Cluster nodes
Click Validate and Proceed.
The activation service will ensure the ranges provided do not overlap or are in use within your SDDC.
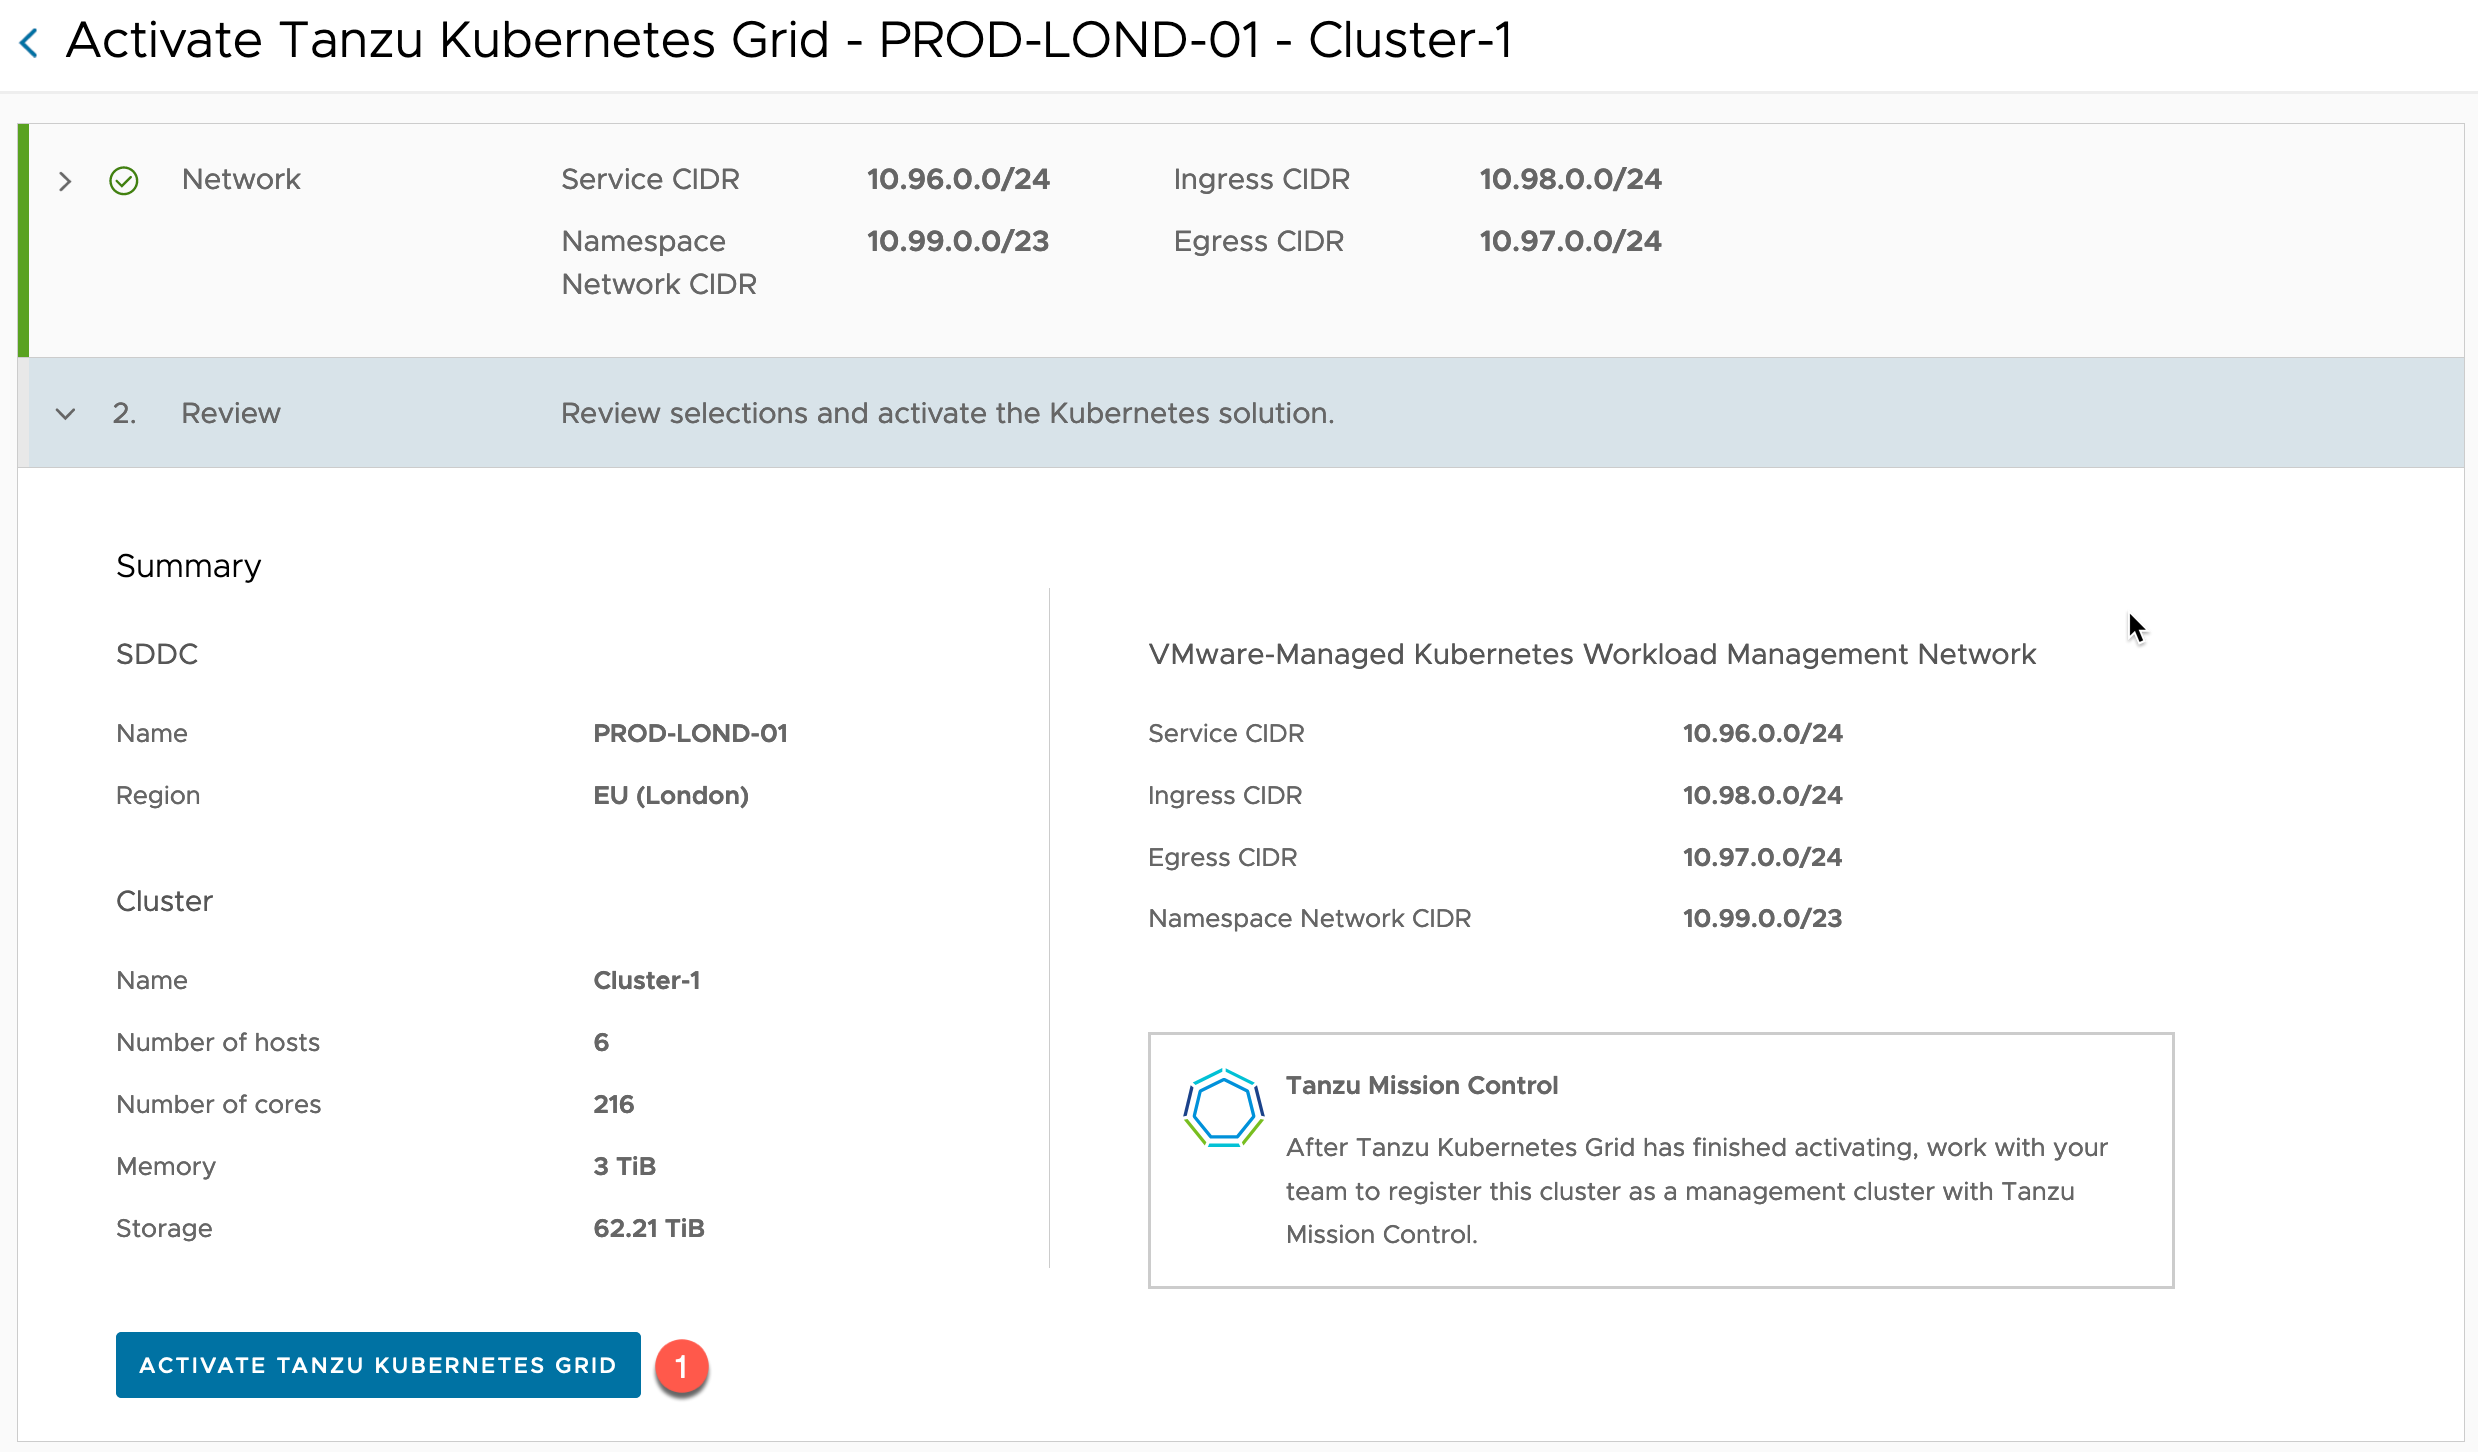
Once validated, review and click to Activate Tanzu Kubernetes Grid.
You will see a small notification appear to show the service is being activated.
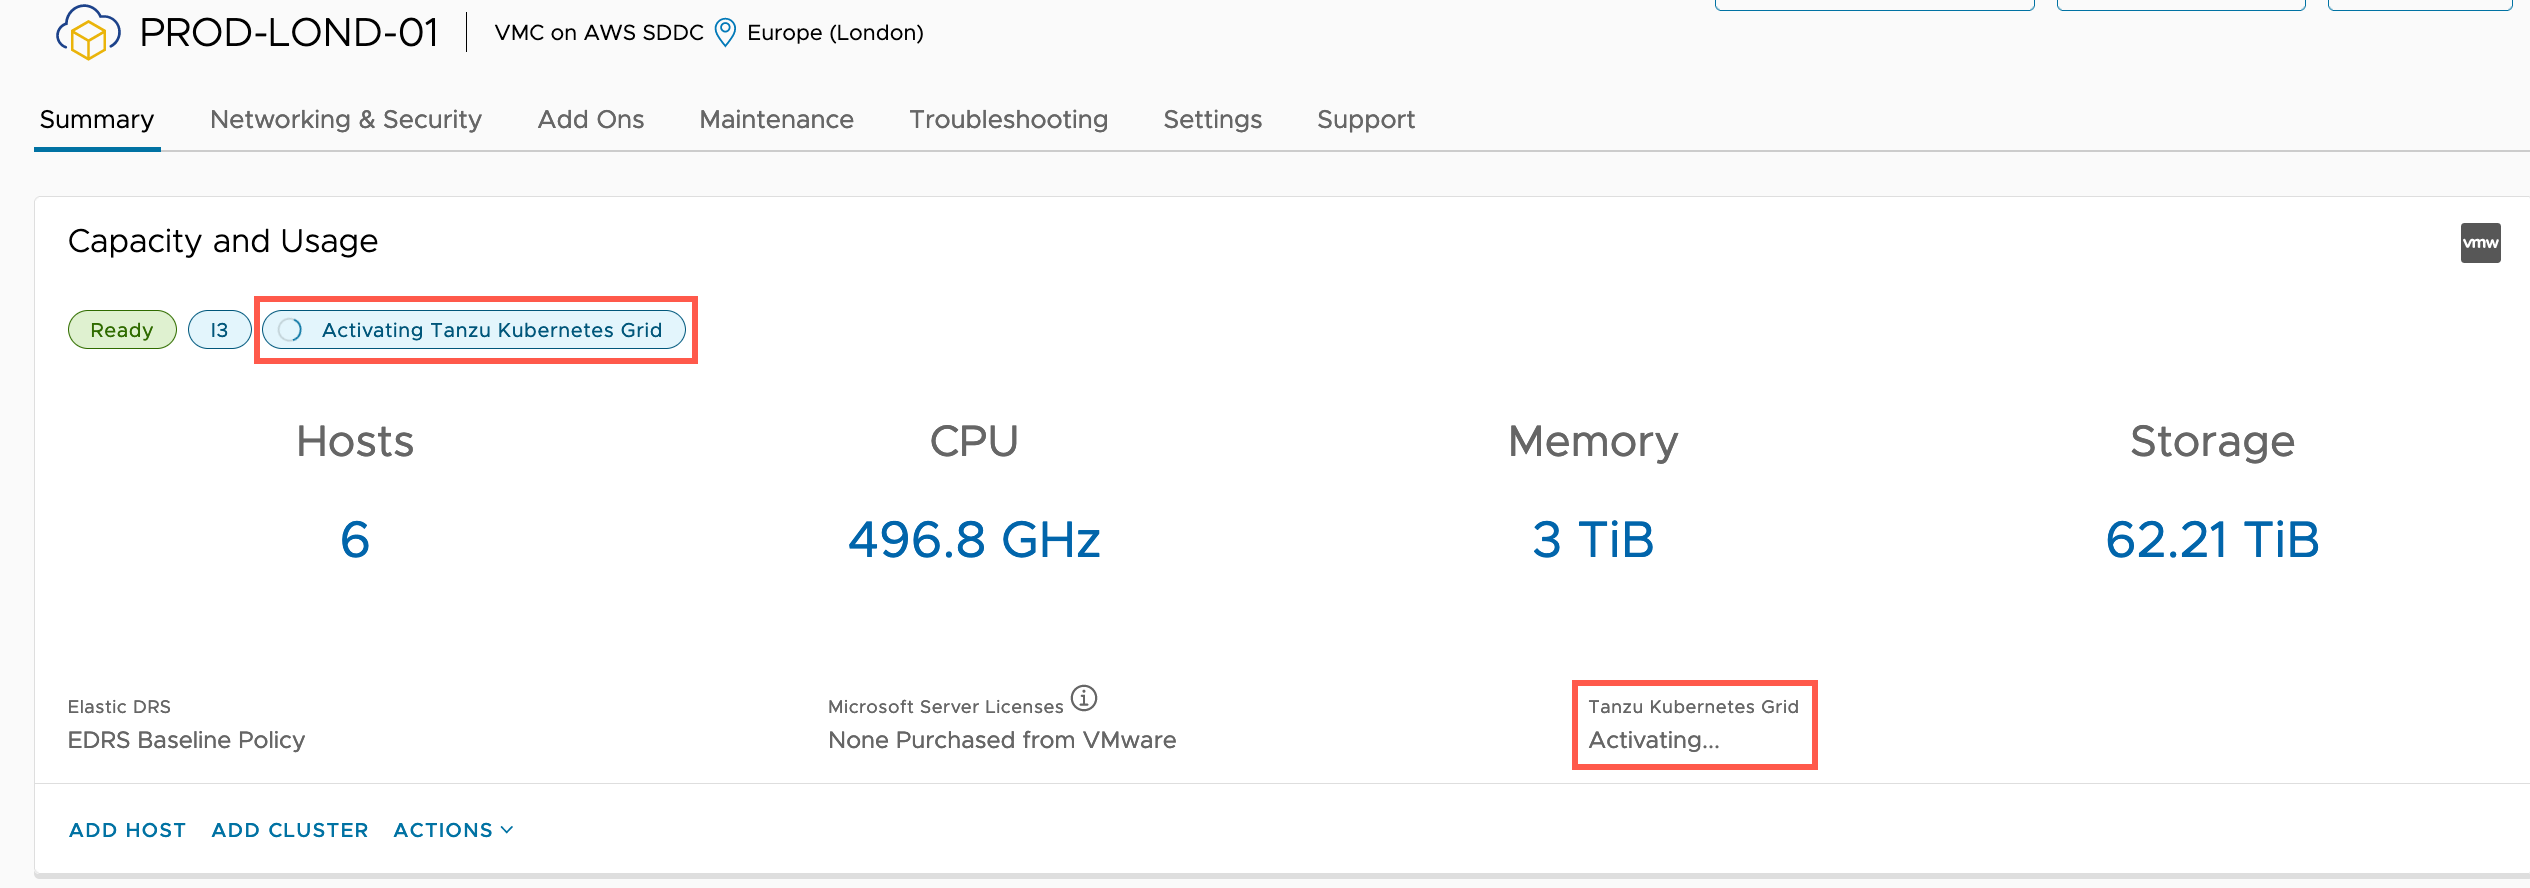
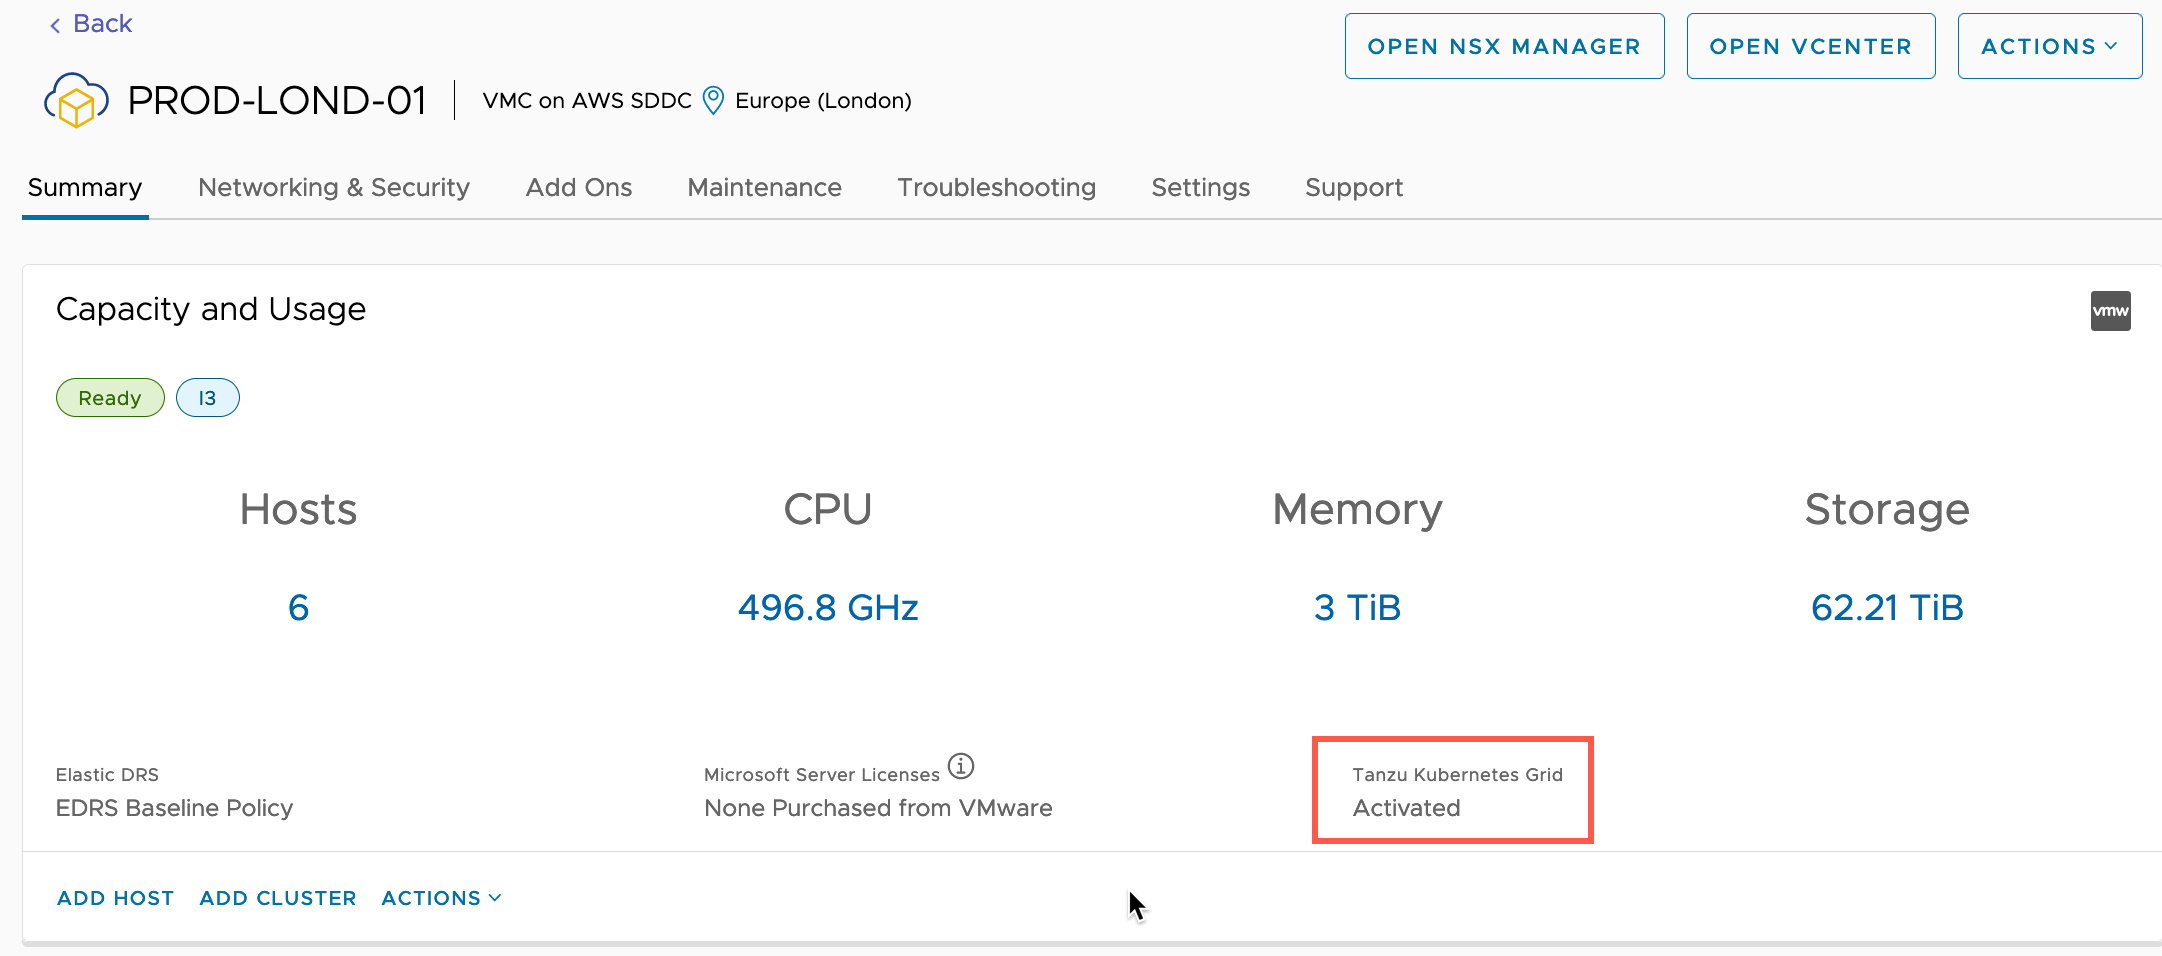
On the inventory object, you’ll see new status markers indicating the service is being activated.
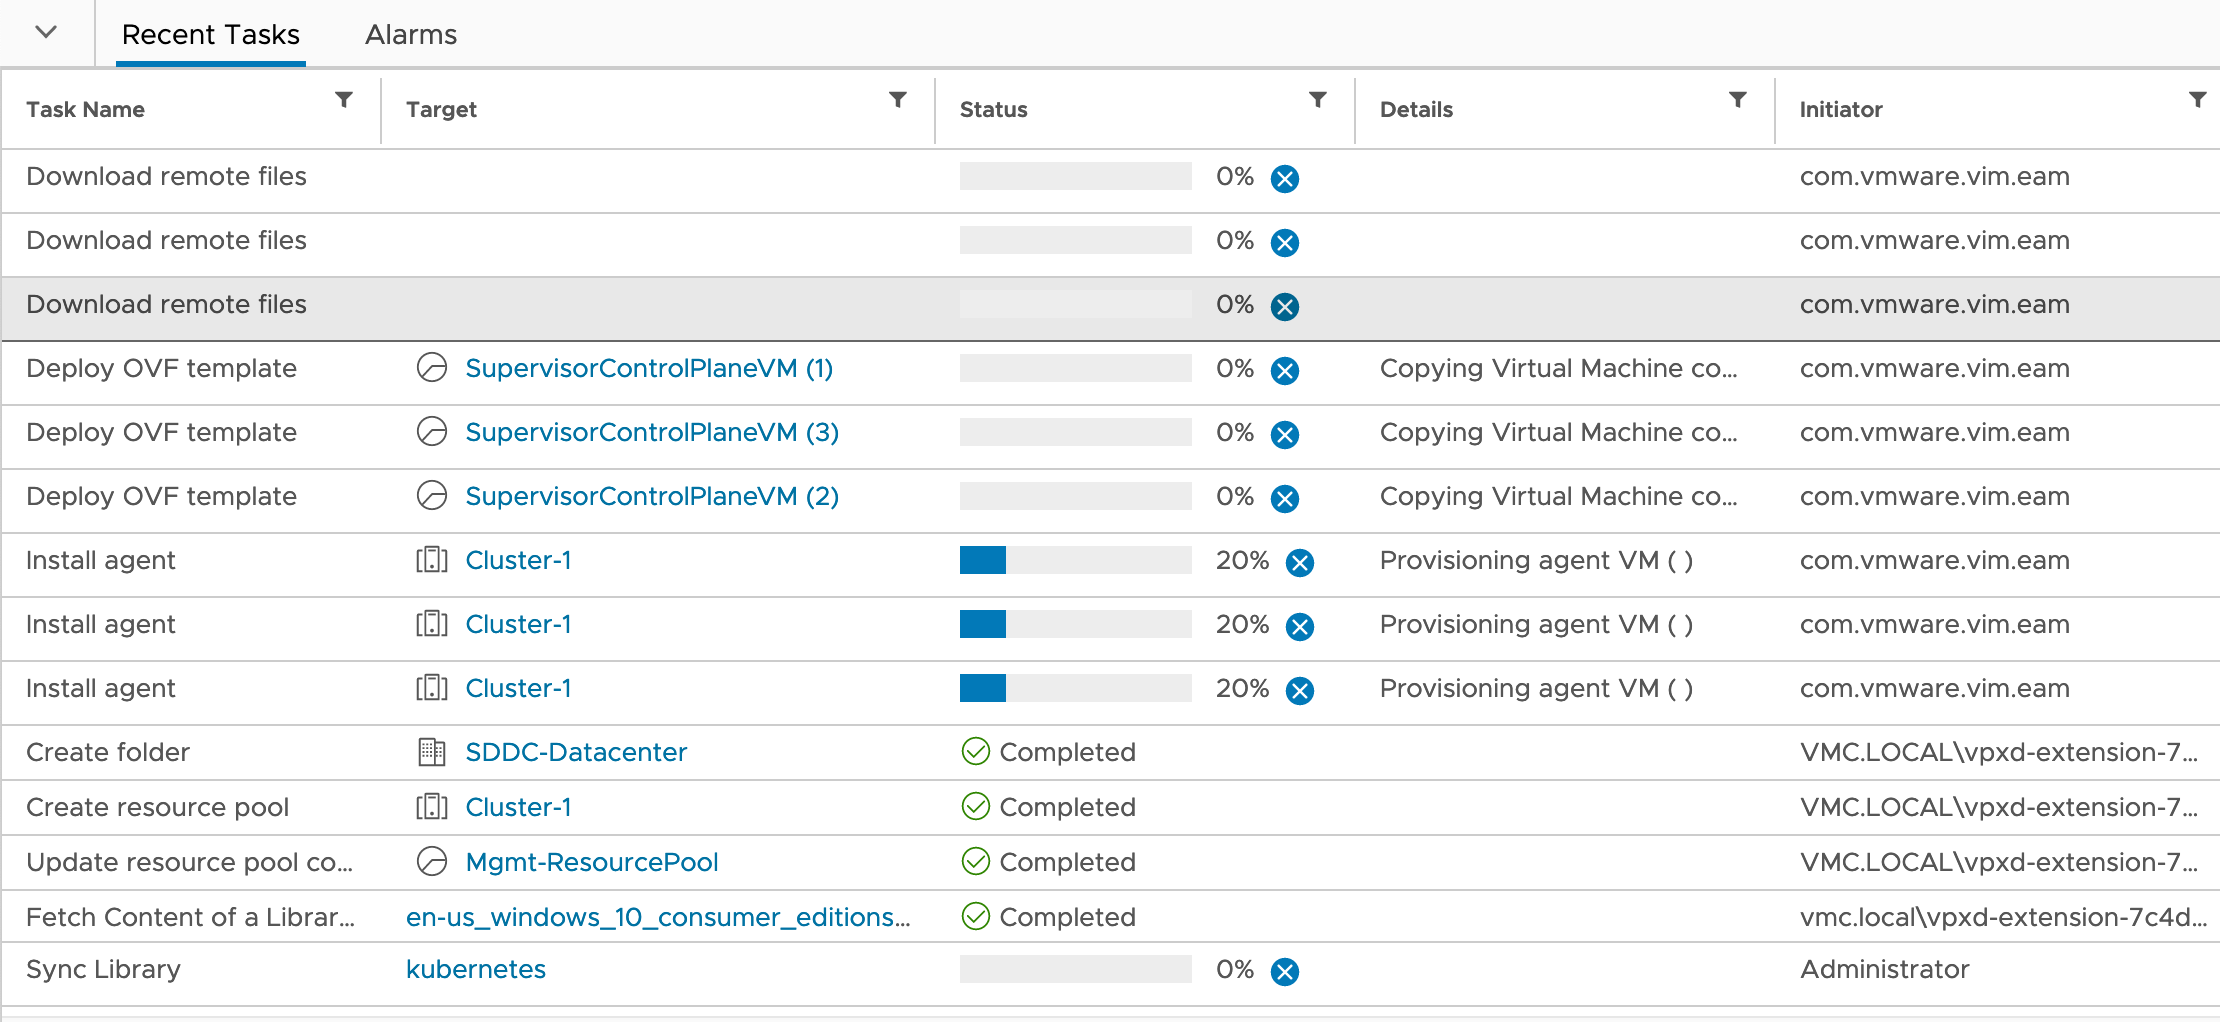
Within the vCenter console, you’ll see tasks popping up for the deployment of the Supervisor Cluster VMs and other configurations.
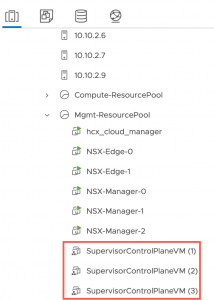
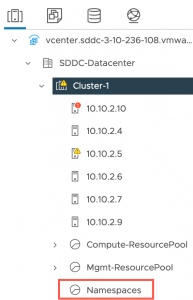
Below you can see the VMs and the new Namespace resource pool in the vSphere Inventory.
Finally, after some time, the service will be activated.
I went out to lunch during this activation period, by the time I was back, everything was configured. So, I cannot comment on exactly how long everything took.
We are now ready to start using our Tanzu Kubernetes Grid Service.
Using Tanzu Services in an SDDC
In this section, I’m going to cover up accessing the TKG Service, creating a vSphere namespace and configuring it, ready to deploy a Tanzu Cluster for my workloads.
Configure networking access to the Supervisor networks
This will be already setup for any internal SDDC Network to allow connectivity. Meaning your jump host will need to be running in VMC preferably, or accessible to the SDDC networks over VPN/AWS Direct Connect.
For this blog post example, I am accessing the TKG Service from a Ubuntu Jump-box located within the same vSphere Cluster.
It is not recommended you try and open public access to these networks for your Tanzu Cluster API or the Supervisor Cluster APIs.
Once Workload Management features are enabled, you will see within the VMC Console, additional configurations for the T1-Gateways.
- Open the VMC Console
- Select your SDDC
- Select Networking & Security Tab
- Click Tier-1 Gateways under the Network heading on the left-hand navigation
Here you will see a new gateway created for your Supervisor Cluster Services.
To view the default firewall rules:
- Click Gateway Firewall under Security heading in the left-hand navigation
- Click Tier-1 Gateways tab
- Set the Gateway to the correct gateway
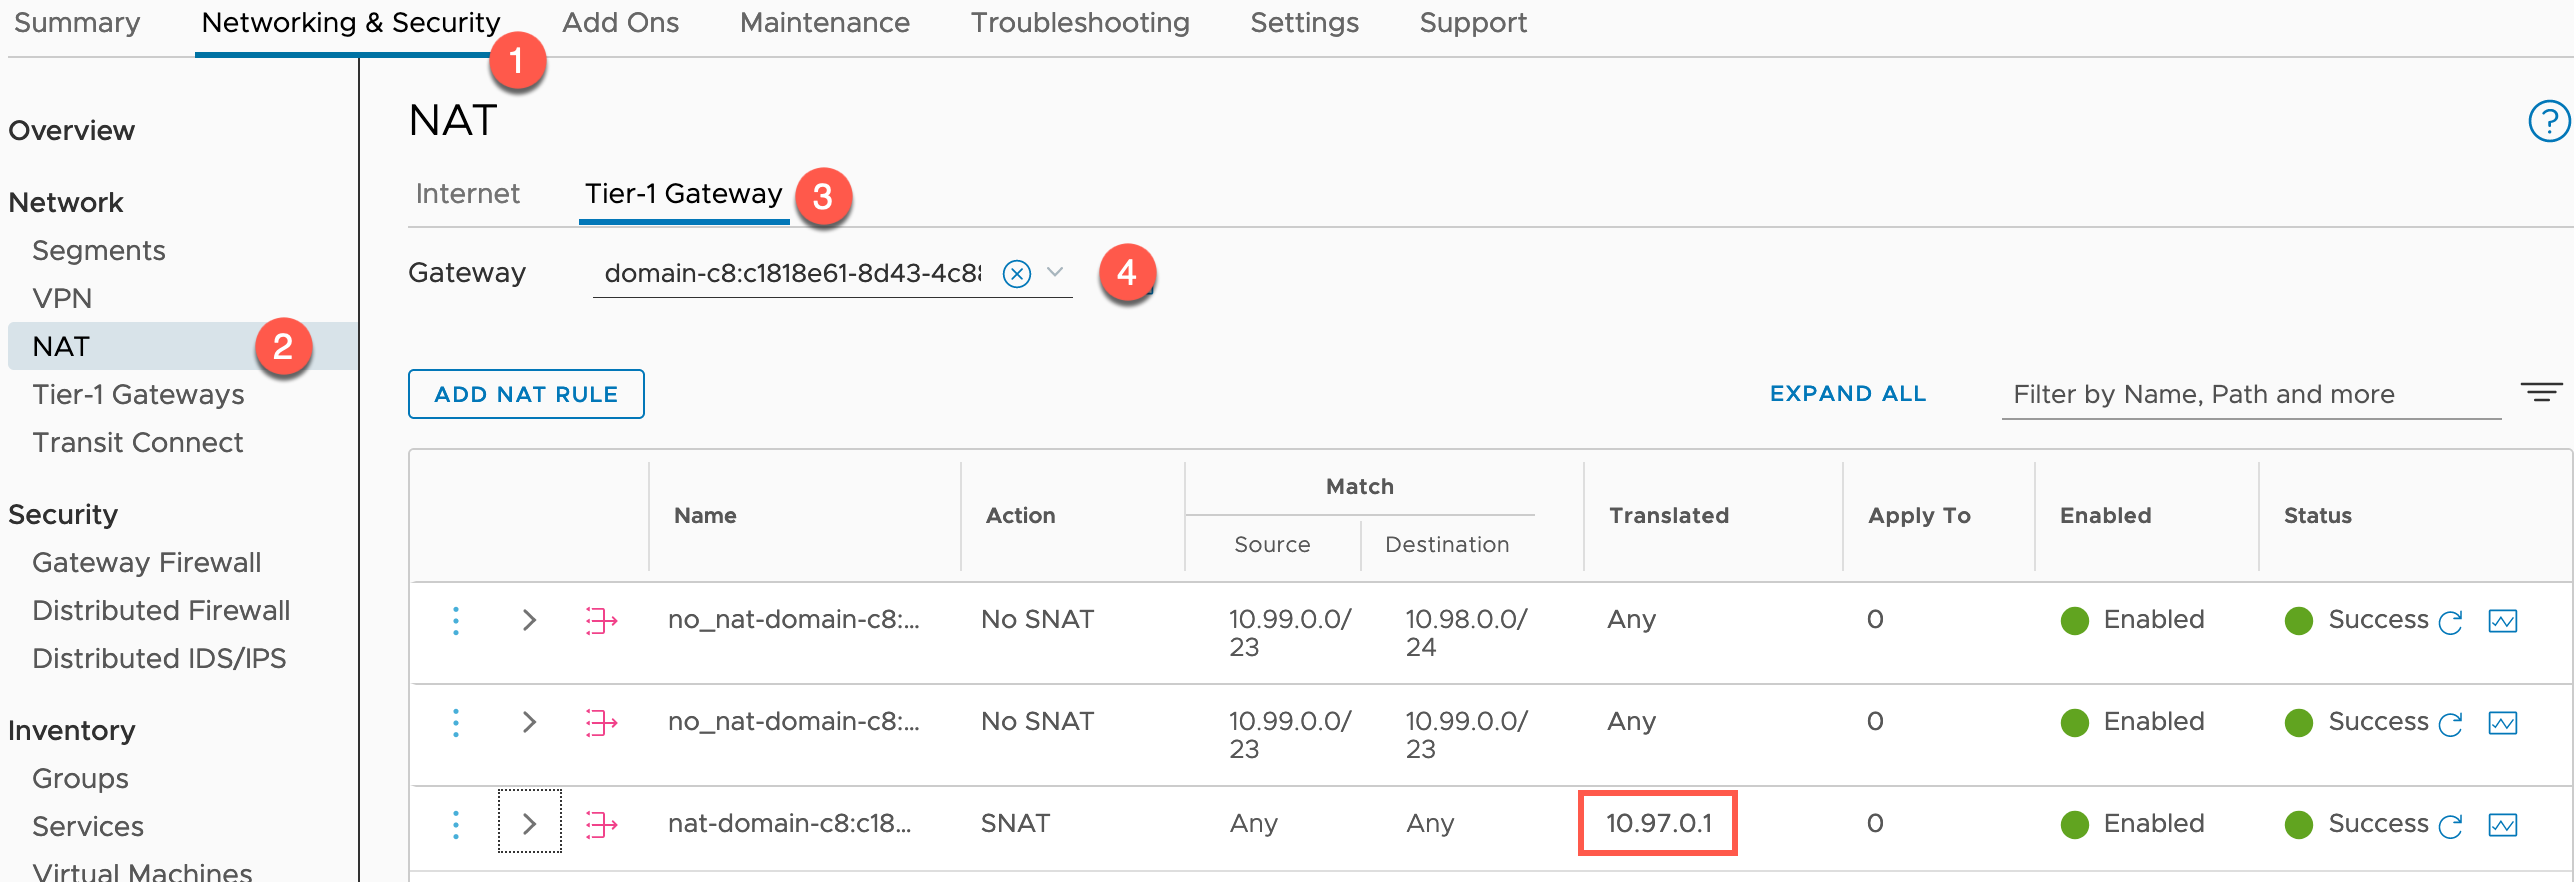
To view the default NAT configuration:
- Click NAT under Network heading in the left-hand navigation
- Click Tier-1 Gateways tab
- Set the Gateway to the correct gateway
You can see here; a rule has been added for the Supervisor Cluster API Address by default.
Official Documentation – Allow Internal Access to a Tanzu Kubernetes Grid Namespace
Create a vSphere Namespace
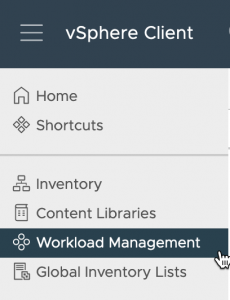
Navigate to the Workload Management view within the SDDC vCenter interface.
- Click the three lines next to “vSphere Client”
- Select Workload Management
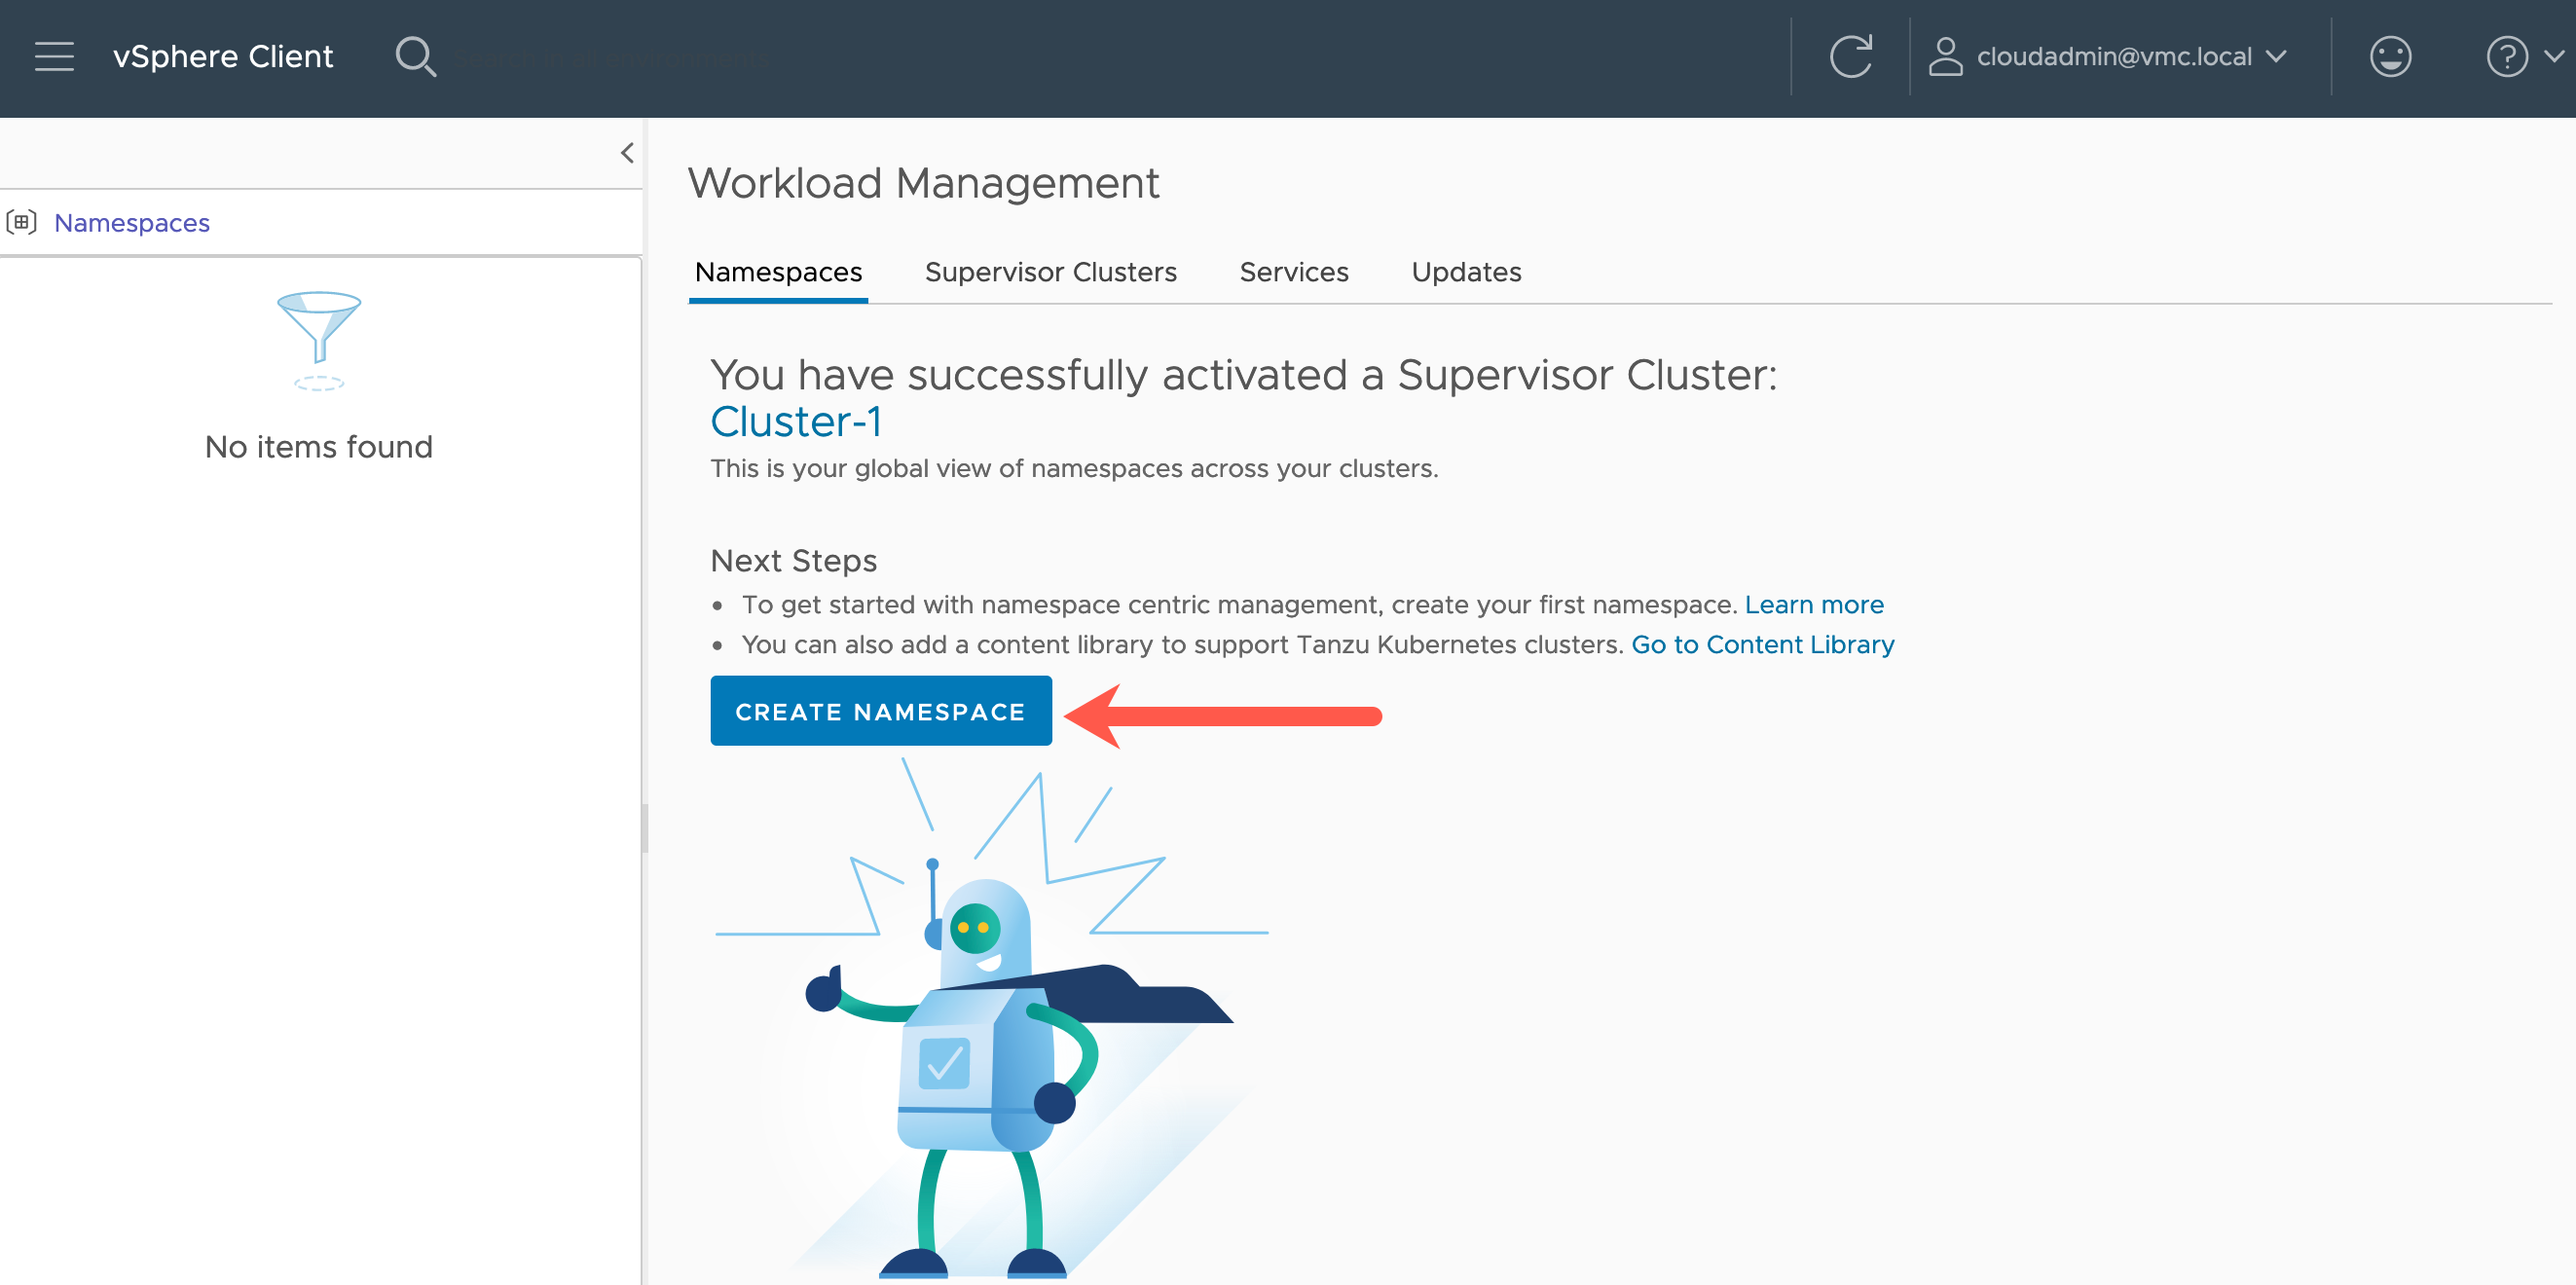
You will be taken to the Workload Management view, and on the Namespaces tab by default.
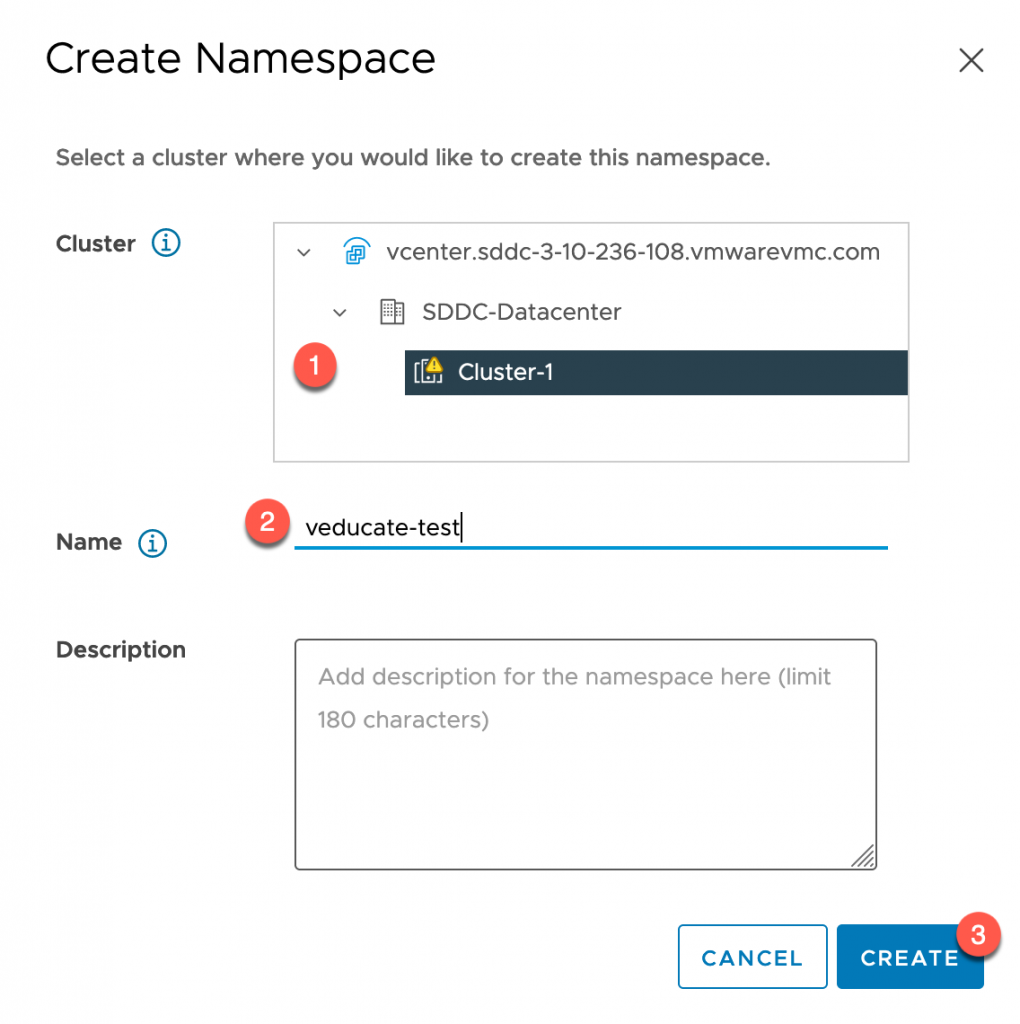
- Click to create a new namespace
- Select the cluster with the datacenter (remember you can have multiple clusters with the same VMC SDDC!)
- Provide a DNS conformant name
- Add a description as necessary
- Click to create
Configuring the CLI Tools
Now our Namespace is created, we’ll start to configure the various policies. As mentioned earlier, I am going to access this the TKG Service and namespaces/clusters from a Ubuntu Jump-Box I deployed within the same SDDC vSphere Cluster.
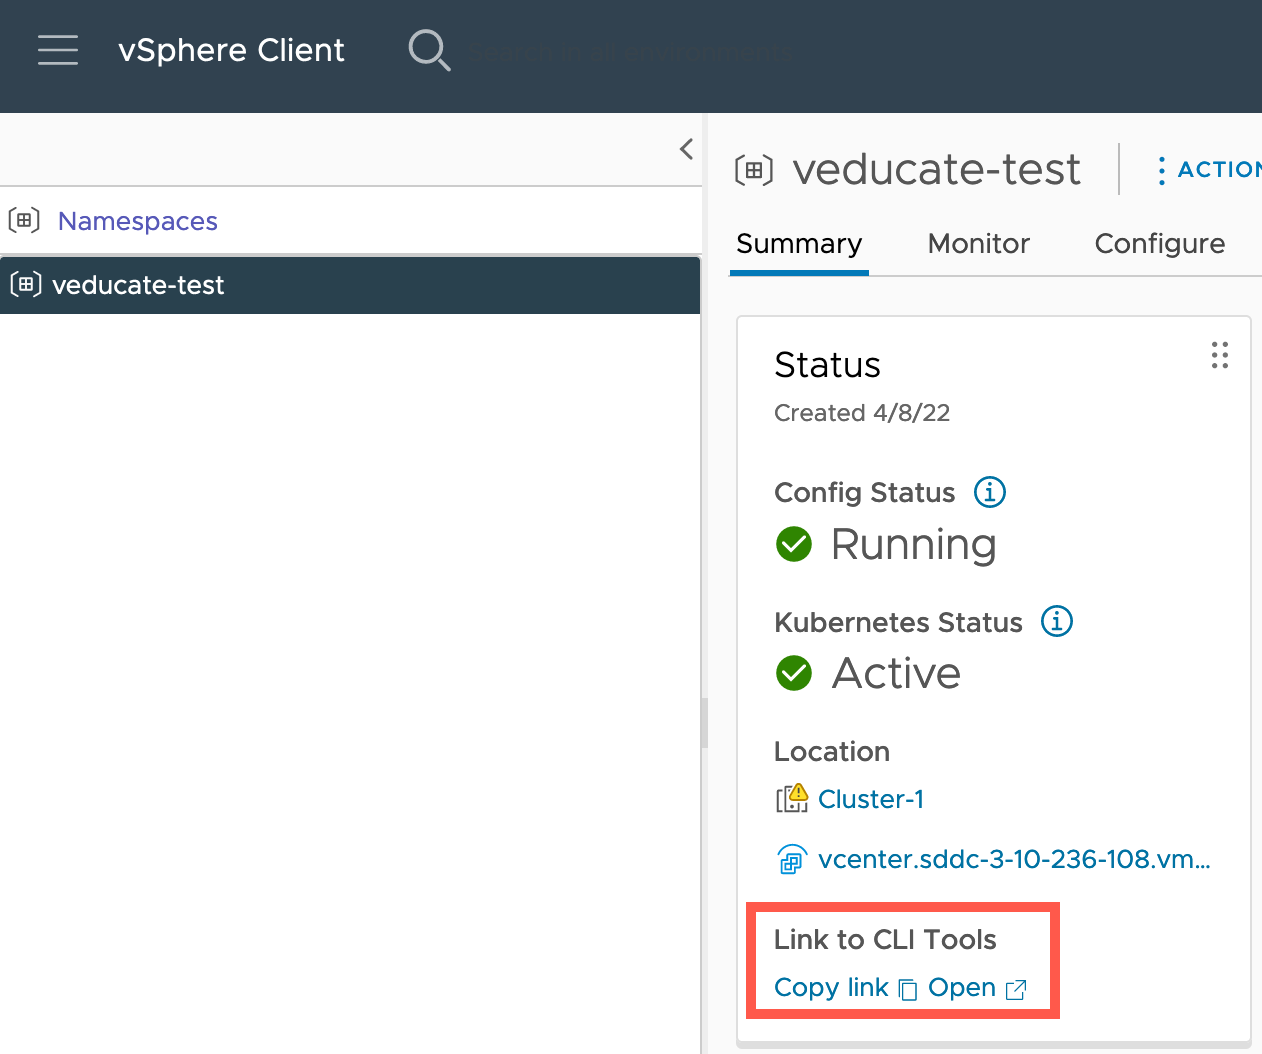
So, let’s configure the CLI tooling on this Jump host so I can interact with the TKG Service. On the namespace you will be given the web browser links where you can download the tools.
The links will take you to an address that follows the format:
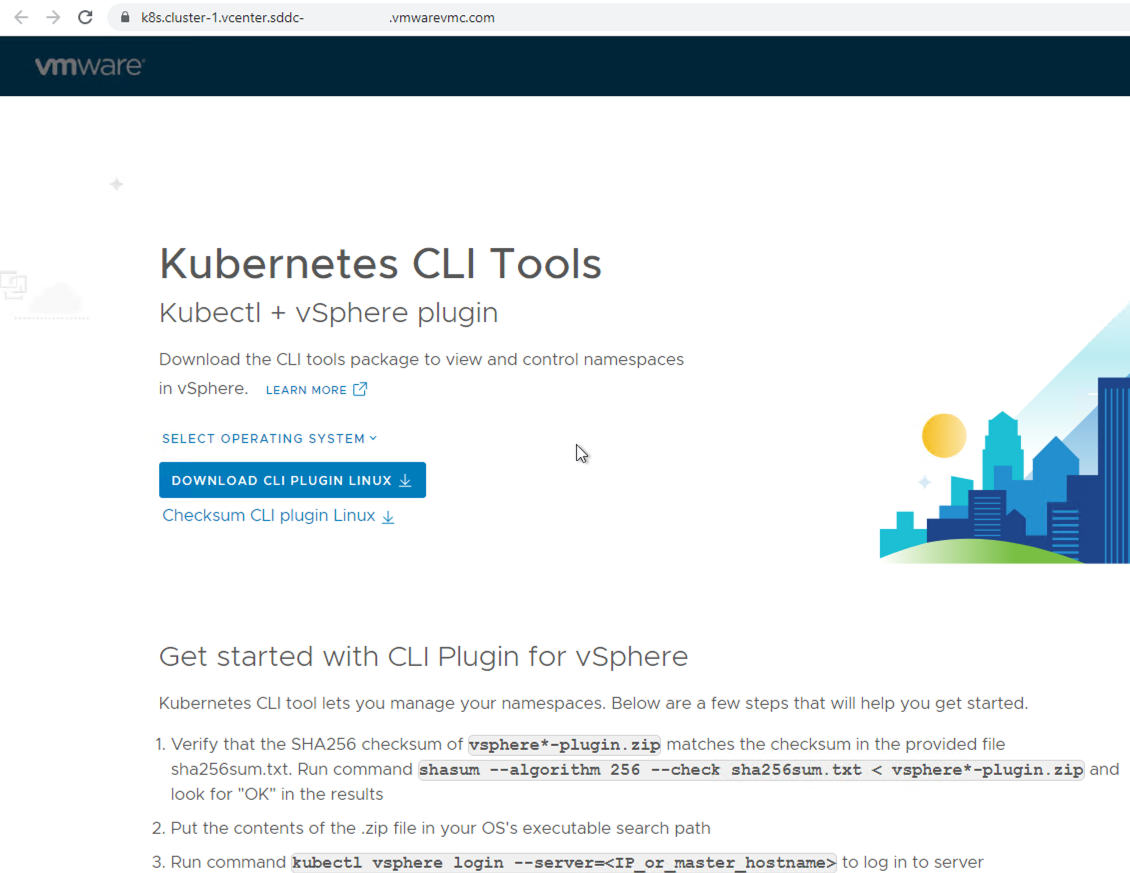
k8s.cluster-1.vcenter.sddc-{unique_url}.vmwarevmc.com
This will resolve back to the internal Ingress IP range you configured. In my case 10.98.0.2, which is then used by the Supervisor Cluster to host the CLI Tools webpage and other services for authentication.
Below is the webpage open in a browser (exciting I know 😀 ), you can download the tools from here, or below I provide the CLI option, as my Ubuntu Jump-box is CLI only.
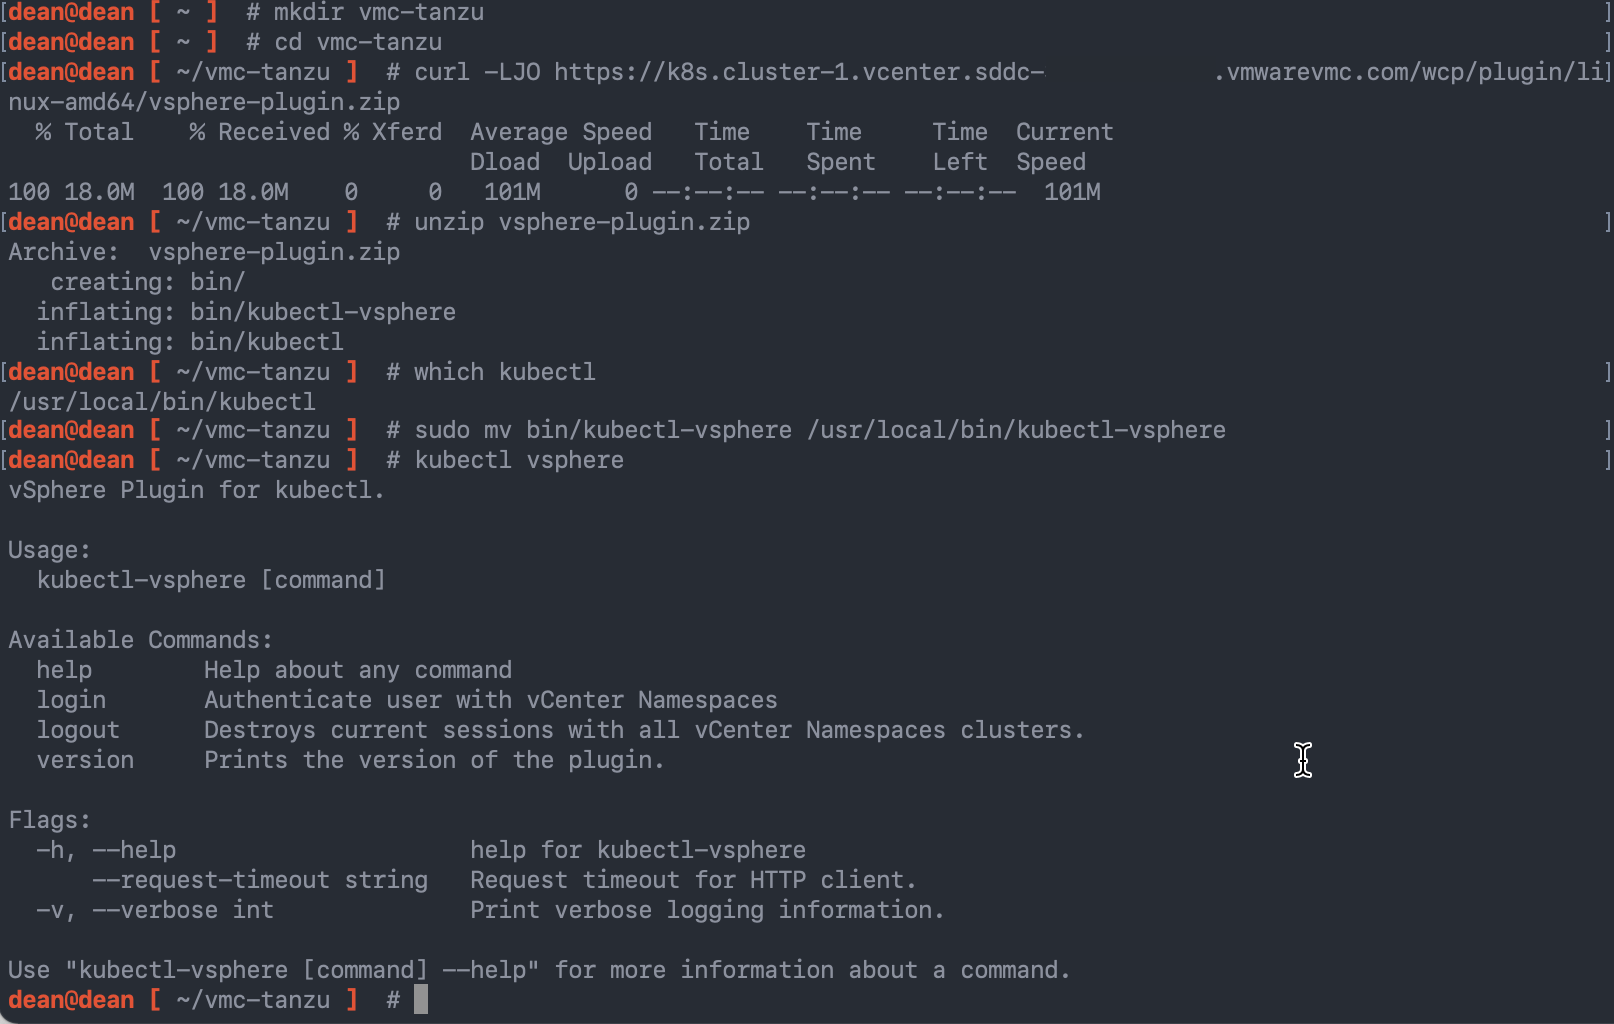
Below I’ve provided the command lines to download the Linux based plugin and install this on the Jump-Box. We’ll use this plugin later in the blog post to authenticate to the namespace to create a Tanzu Cluster.
# Download the plugin zip file

curl -LJO https://k8s.cluster-1.vcenter.{unique url}.vmwarevmc.com/wcp/plugin/linux-amd/vsphere-plugin.zip

# Unzip the plugin zip file
unzip vsphere-plugin.zip

# Locate the directory of your kubectl CLI Tool
which kubectl

# Move the Kubctl vSphere plugin
sudo mv bin/kubectl-vsphere /usr/local/bin/kubectl-vsphere

## Note: if you don't have kubectl already, the zip package contains a copy for you to move as well
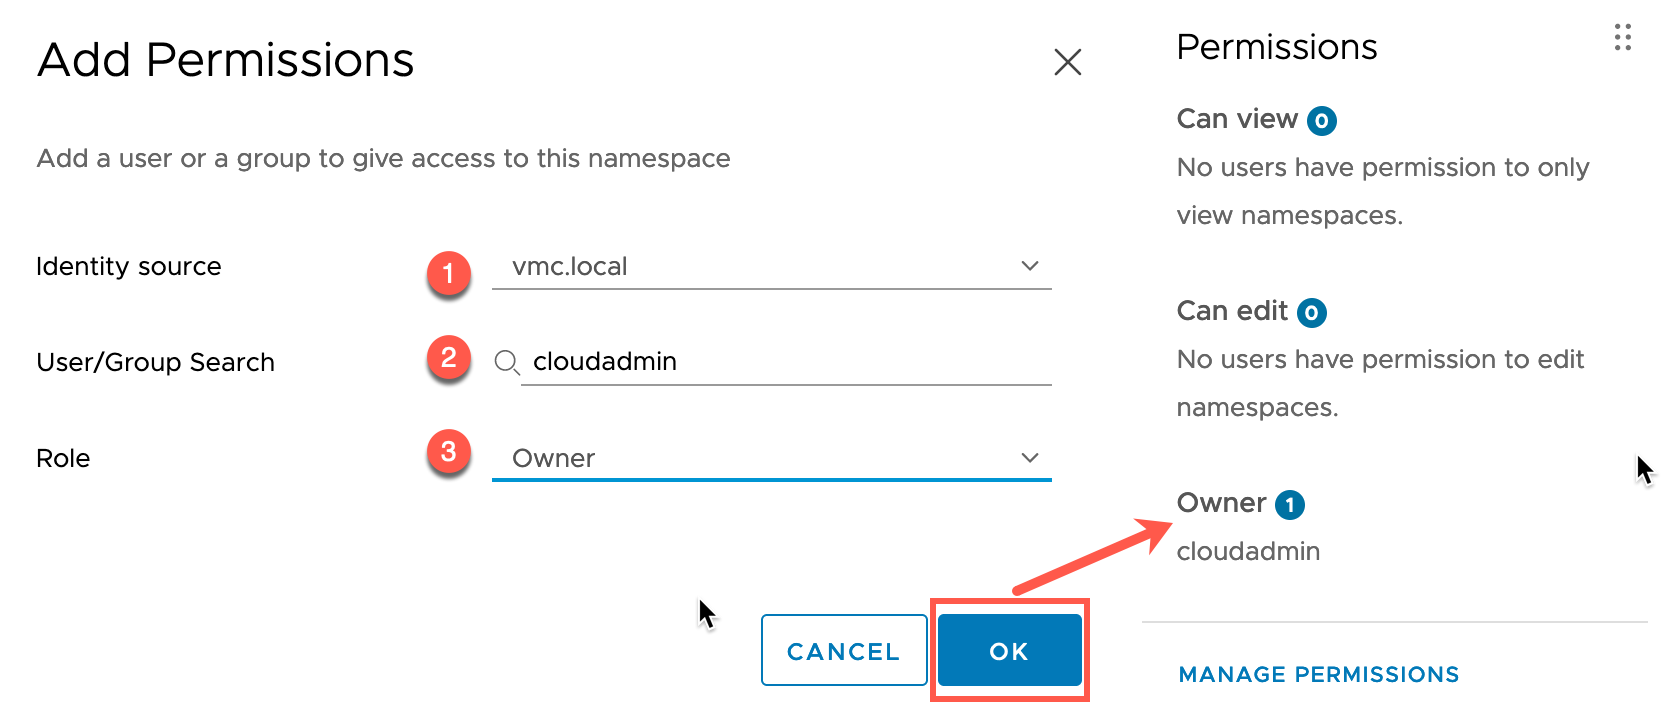
Add Permissions to your Namespace
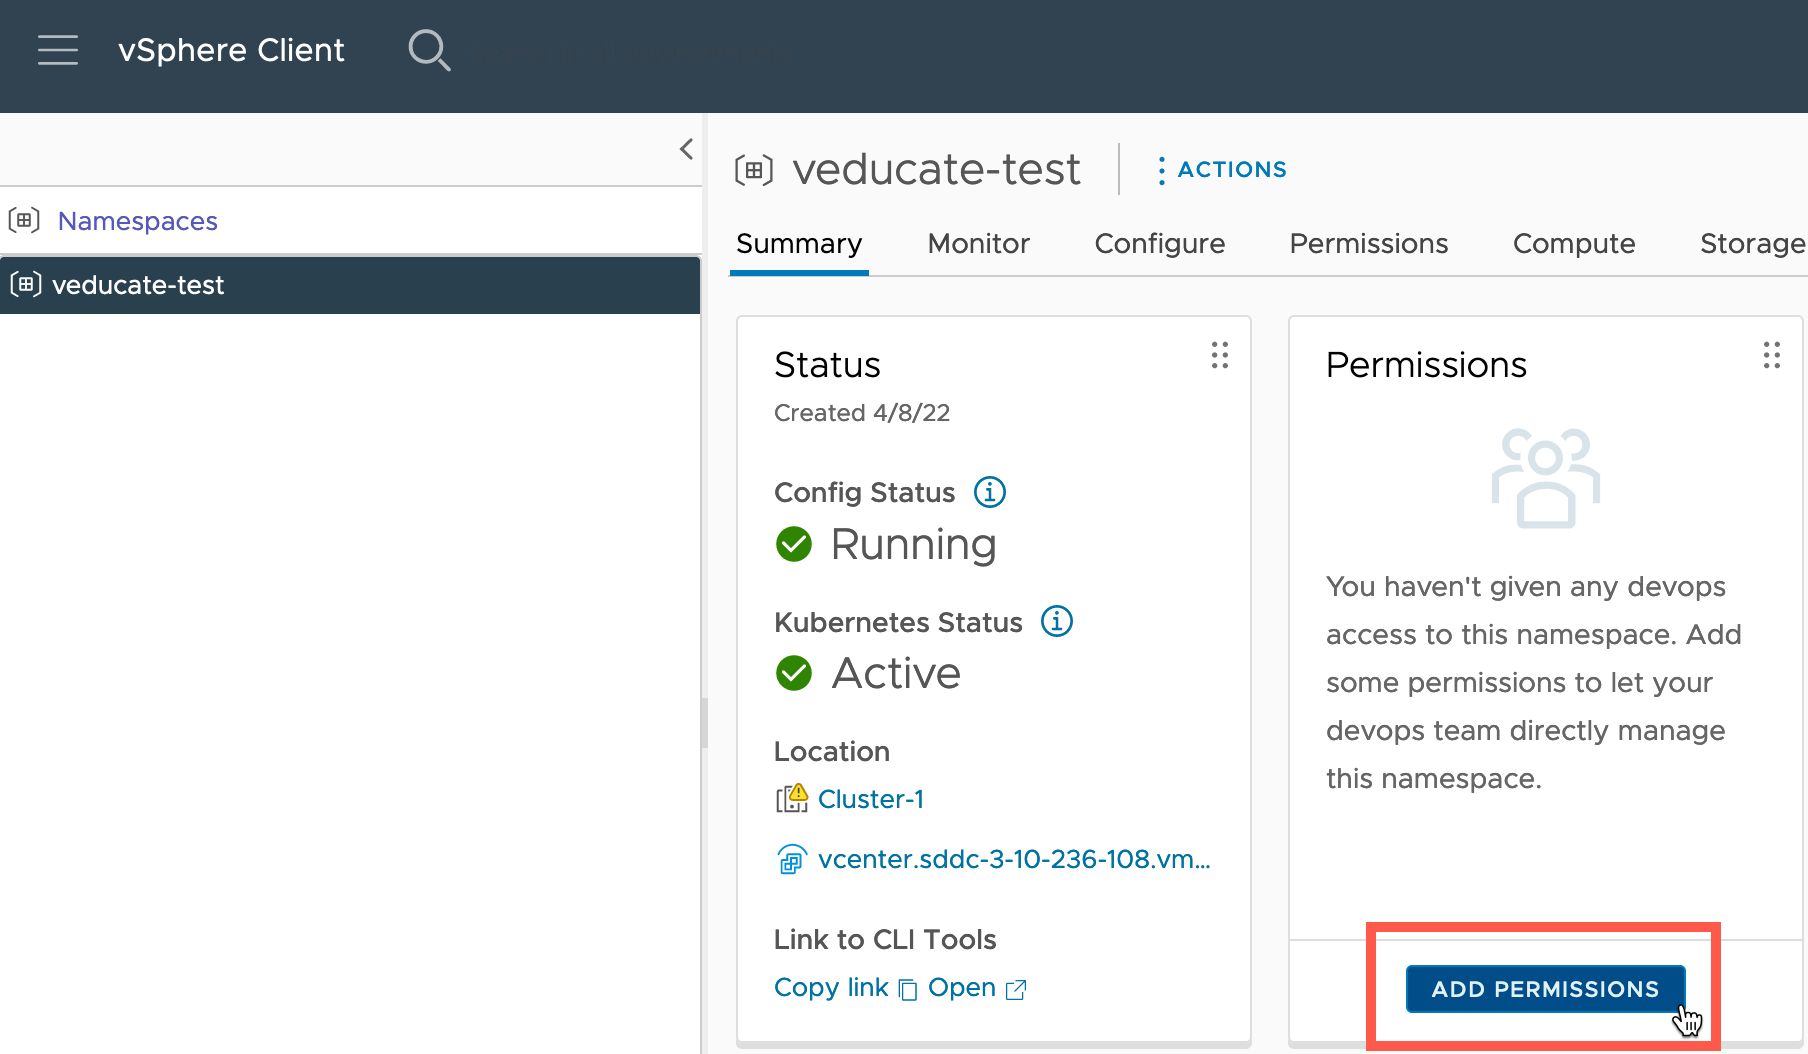
Next, we need to add permissions to our Namespace for user access. This will use the vSphere SSO, so if you’ve created a connection to your Active Directory for example, then those users/groups will be available for selection.
- Click to Add permissions
- Select your Identity Source
- Select the Users/Group
- Select the role you want to link the User/Group too
- Select OK
Now you will see the Permissions Tile is updated.
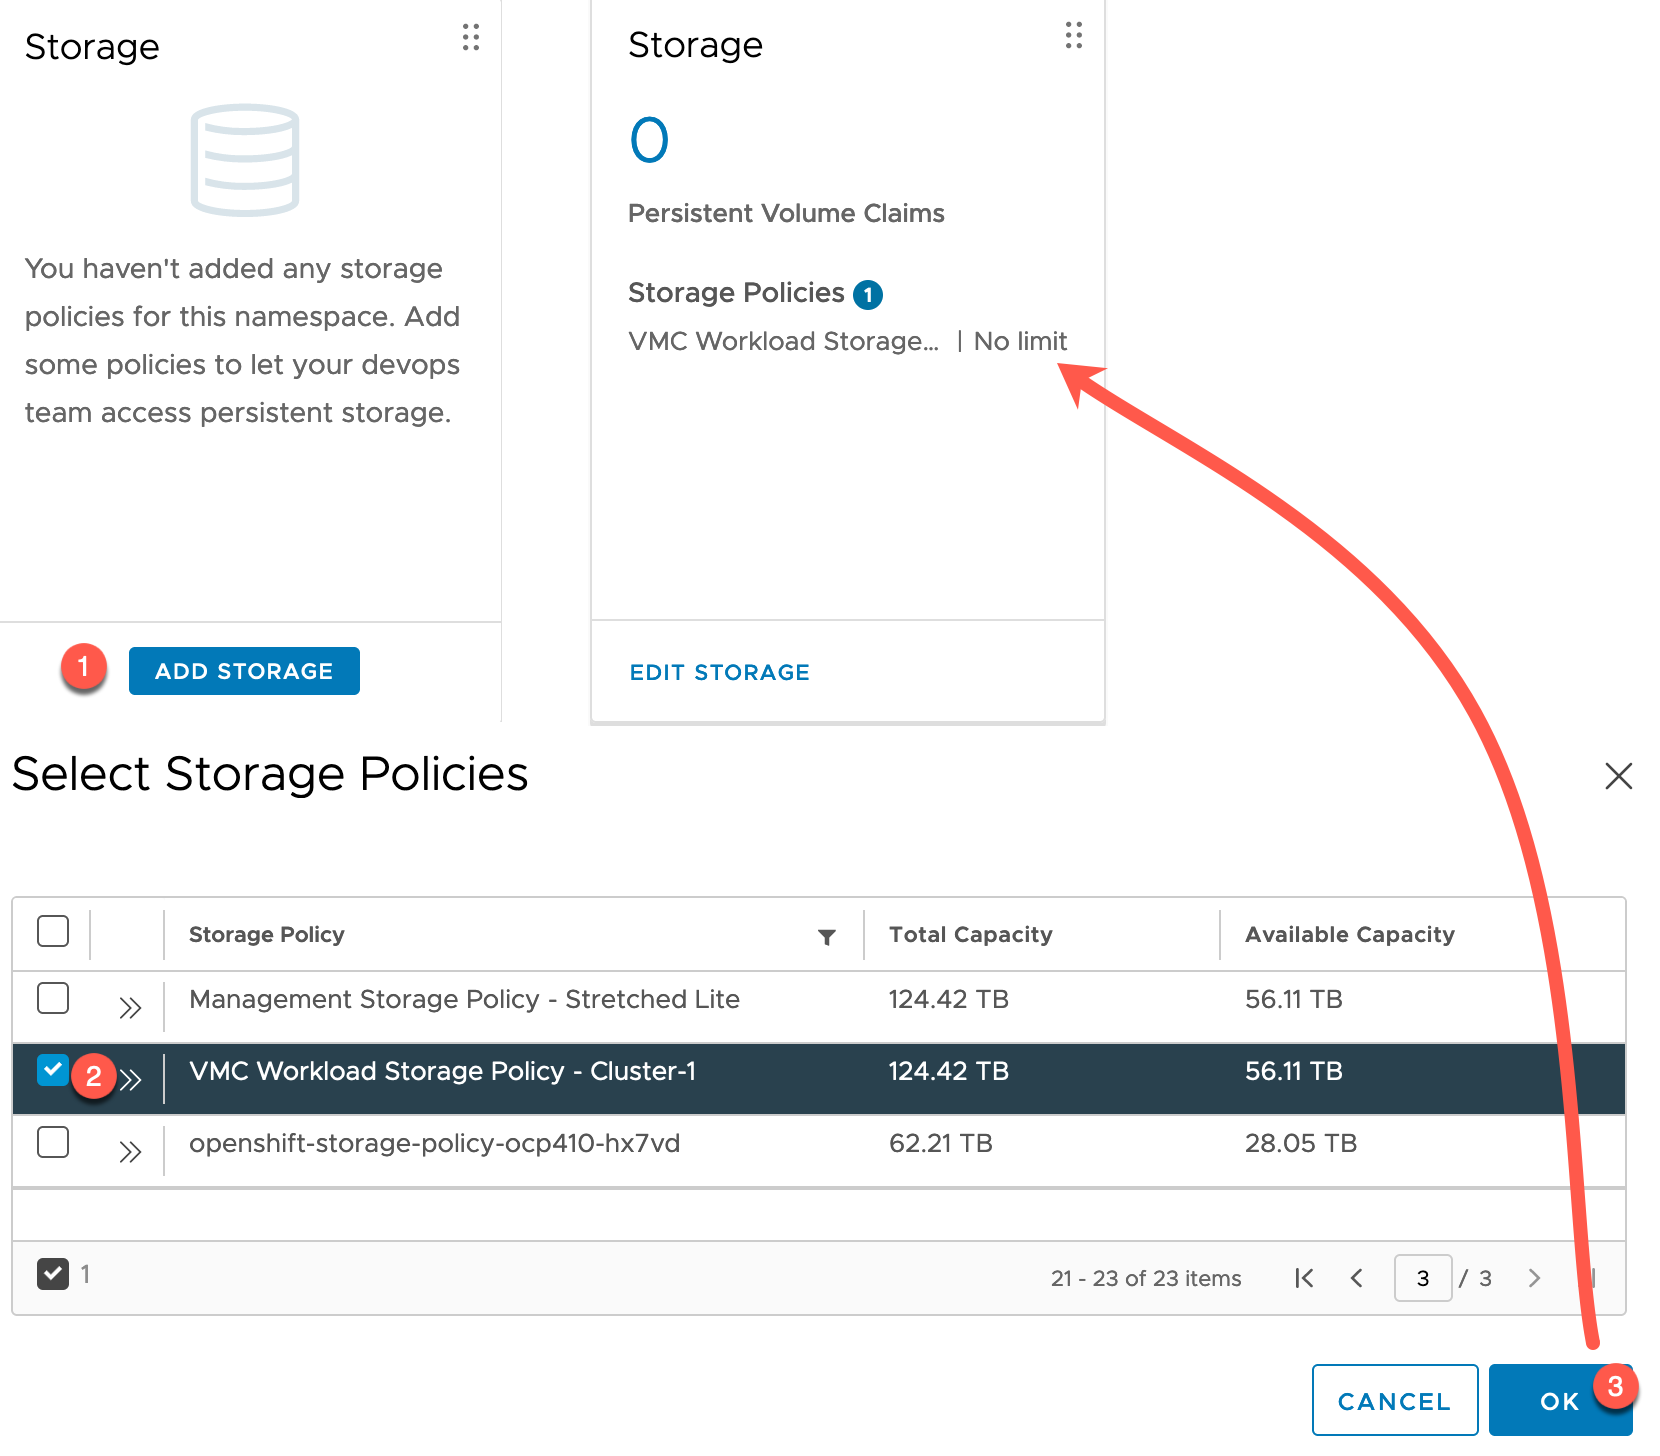
Add Storage to your Namespace
Now we need to add Storage Policies to our Namespace.
Below I combined the steps into a single screenshot.
- Click Add Storage on the Storage Tile
- Search for your Storage Policy that you want to link
- Multiple policies can be selected
The Storage Tile will update with the policies added.
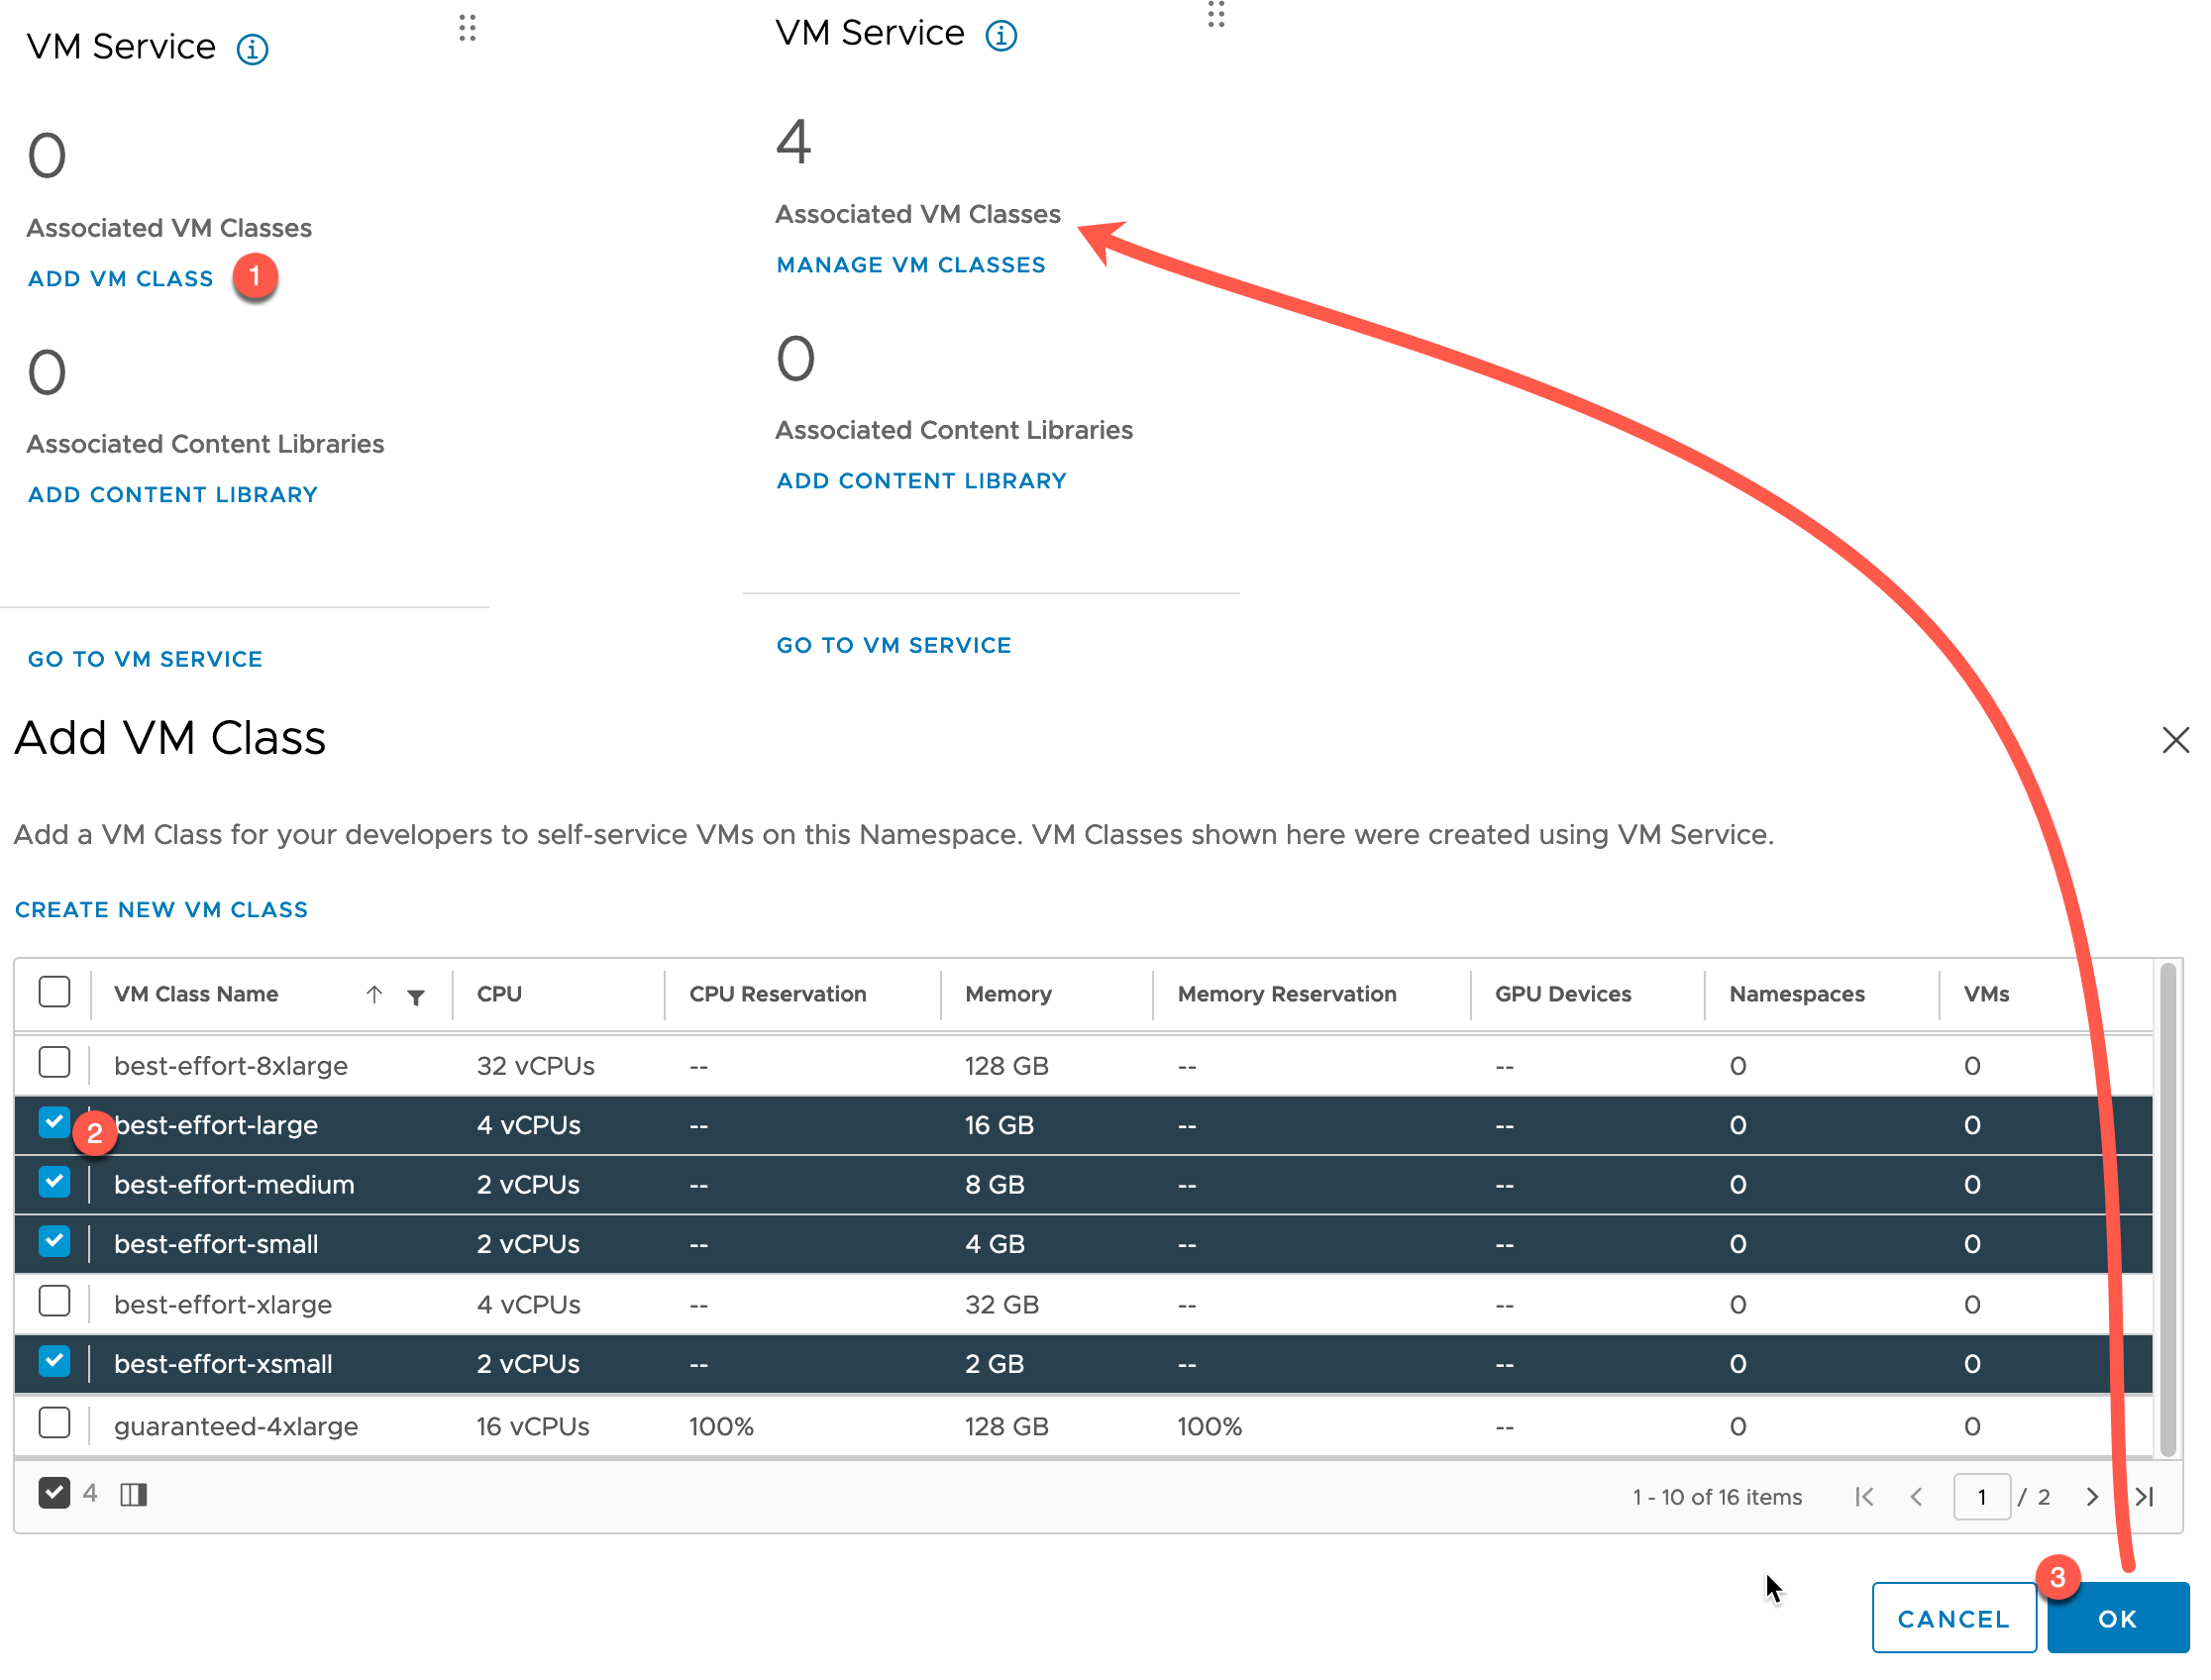
Add VM Class to your Namespace
The last mandatory step is to configure the VM Class, which will be used to govern the sizes of our Tanzu Cluster VMs.
Below I combined the steps into a single screenshot.
- Click Add VM Class on the VM Service Tile
- Select from the existing VM Class options, or create a new VM Class
- Click OK
The VM Service Tile will update to show there are associated VM Classes.
Deploying a Cluster and an Application
We are now ready to create a Guest Tanzu Cluster within our vSphere Namespace, which will then host our application workloads.
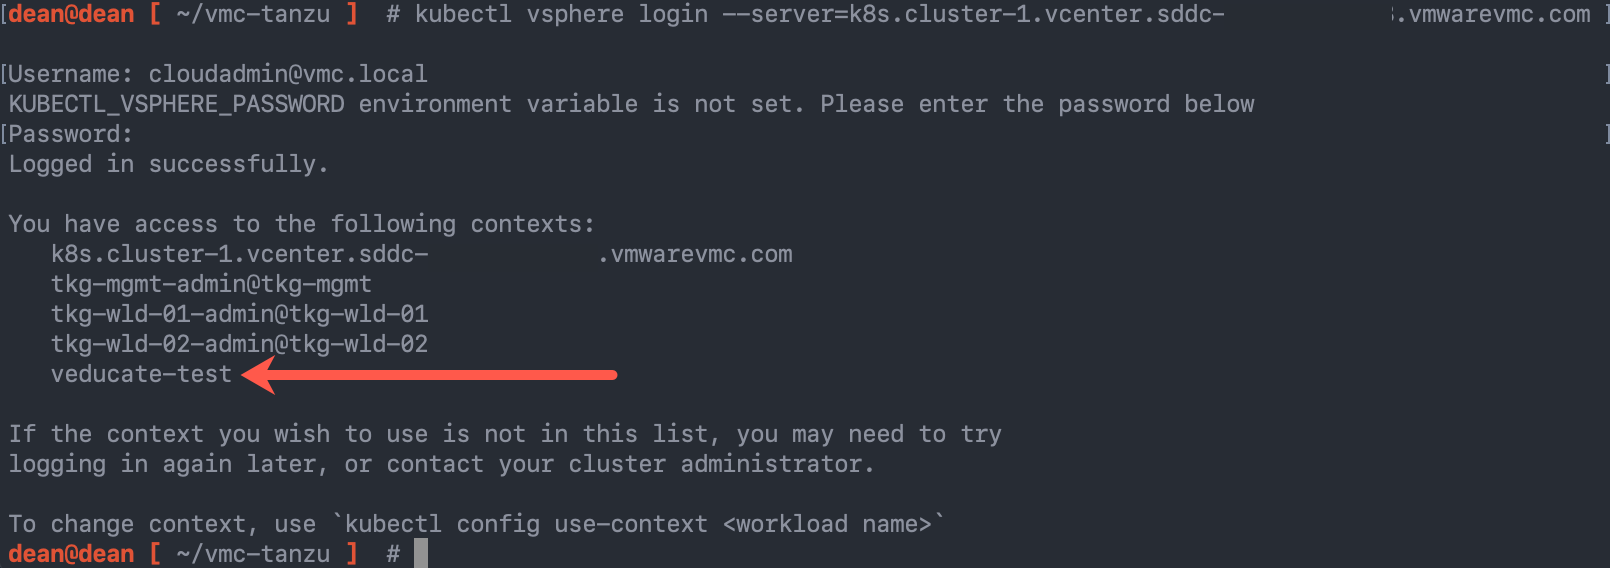
Login to your vSphere Namespace
From your jump-host, run the following command, which is going to use the kubectl vsphere plugin for authentication.
This will then add the Supervisor Cluster and the vSphere Namespace to your kubectl contexts alongside any existing contexts you already have configured.
kubectl vsphere login --server=k8s.cluster-1.vcenter.{unique_url}.vmwarevmc.com --tanzu-kubernetes-cluster-namespace {namespace_name}

# Example
kubectl vsphere login --server=k8s.cluster-1.vcenter.{unique_url}.vmwarevmc.com --tanzu-kubernetes-cluster-namespace veducate-test
Create a Tanzu Kubernetes Grid Cluster in your Namespace
Now to create our Tanzu cluster within the Namespace.
To do this we will specify a YAML file against the vSphere Namespace, which the Supervisor Cluster will receive and use to build the cluster.
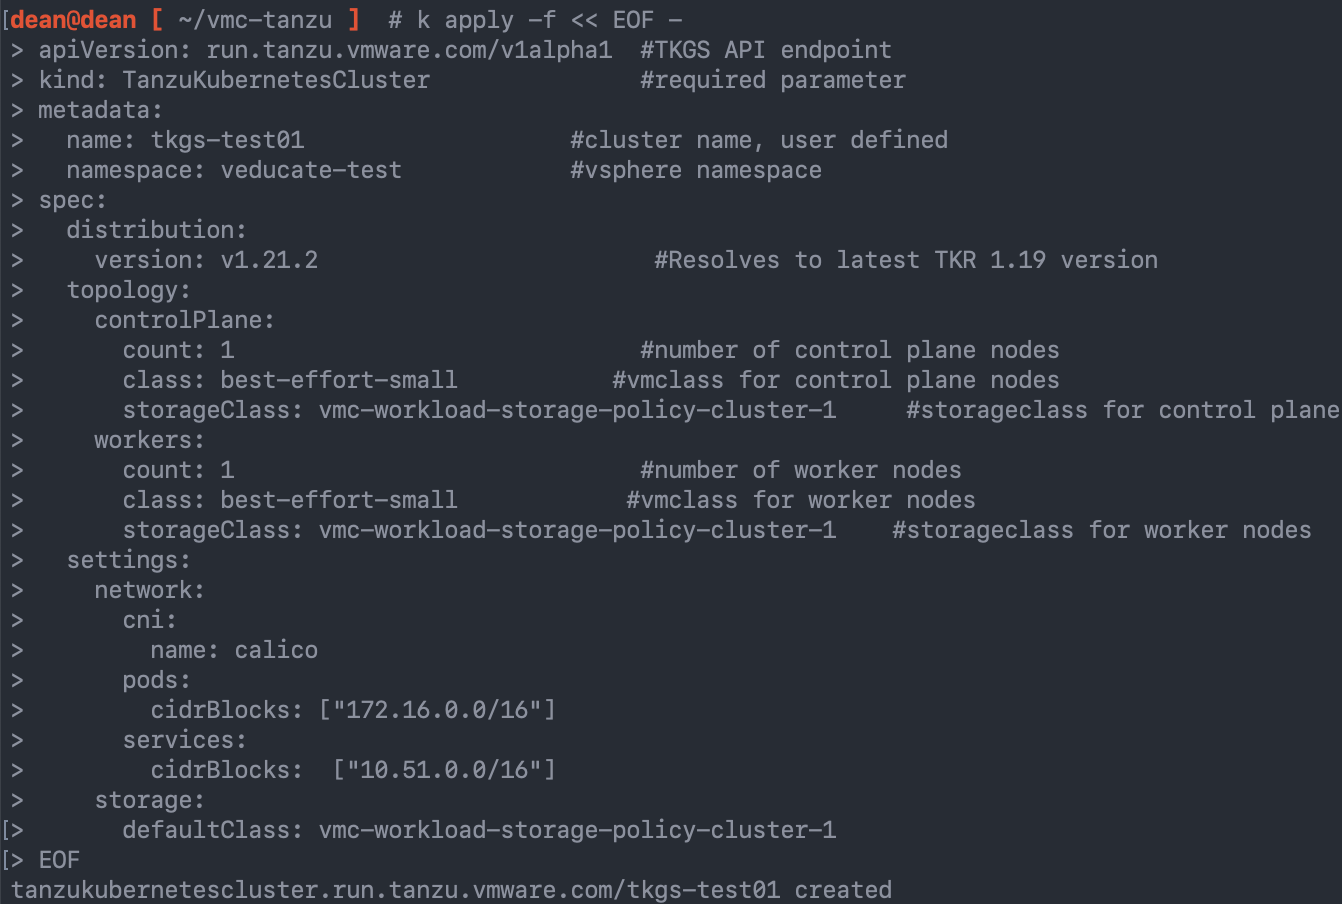
Below is an example of the YAML file I used to create my cluster, with some annotations.
A few things I’d like to point out:
- Version – matches the OVAs located in the vSphere Content Library called “Kubernetes”
- Class – needs to be one of the configured options on the vSphere Namespace from the earlier steps
- StorageClass – If your storage policy name has spaces, replace those with “-” (hyphens) unless a hyphen exists, then delete the spaces. The name needs to be lowercase.
- For example:
- VMC Workload Storage Policy – Cluster-1
- Becomes
- vmc-workload-storage-policy-cluster-1
- VMC Workload Storage Policy – Cluster-1
- For example:
- Storage Class – Default – Specify this to have a Kubernetes “storageclass” marked as the default in the cluster. If you do not do this, you will need to ensure all PersistentVolumeClaims, etc, created on the cluster reference the name of the Storage Class.
- Cluster Network – by default the cluster services network will always be 10.96.0.0/24 unless specified otherwise, for your Tanzu Cluster.
- As mentioned earlier in the blog, this will cause issues if you used this range for the Supervisor services already and you will hit issues similar to this.
- Below I’ve provided an example of changing the Pod Networking and the Cluster Services networking.
- These can overlap or replicate between Guest Tanzu Clusters.
apiVersion: run.tanzu.vmware.com/v1alpha1  #TKGS API endpoint
kind: TanzuKubernetesCluster               #required parameter
metadata:
  name: tkgs-test01                   #cluster name, user defined
  namespace: veducate-test            #vsphere namespace
spec:
  distribution:
    version: v1.21.2                        #Resolves to latest TKR 1.19 version
  topology:
    controlPlane:
      count: 1                             #number of control plane nodes
      class: best-effort-small           #vmclass for control plane nodes
      storageClass: vmc-workload-storage-policy-cluster-1     #storageclass for control plane
    workers:
      count: 1                             #number of worker nodes
      class: best-effort-small            #vmclass for worker nodes
      storageClass: vmc-workload-storage-policy-cluster-1    #storageclass for worker nodes
  settings:
    network:
      cni:
        name: calico
      pods:
        cidrBlocks: ["172.16.0.0/16"]
      services:
        cidrBlocks:  ["10.51.0.0/16"]
    storage:
      defaultClass: vmc-workload-storage-policy-cluster-1
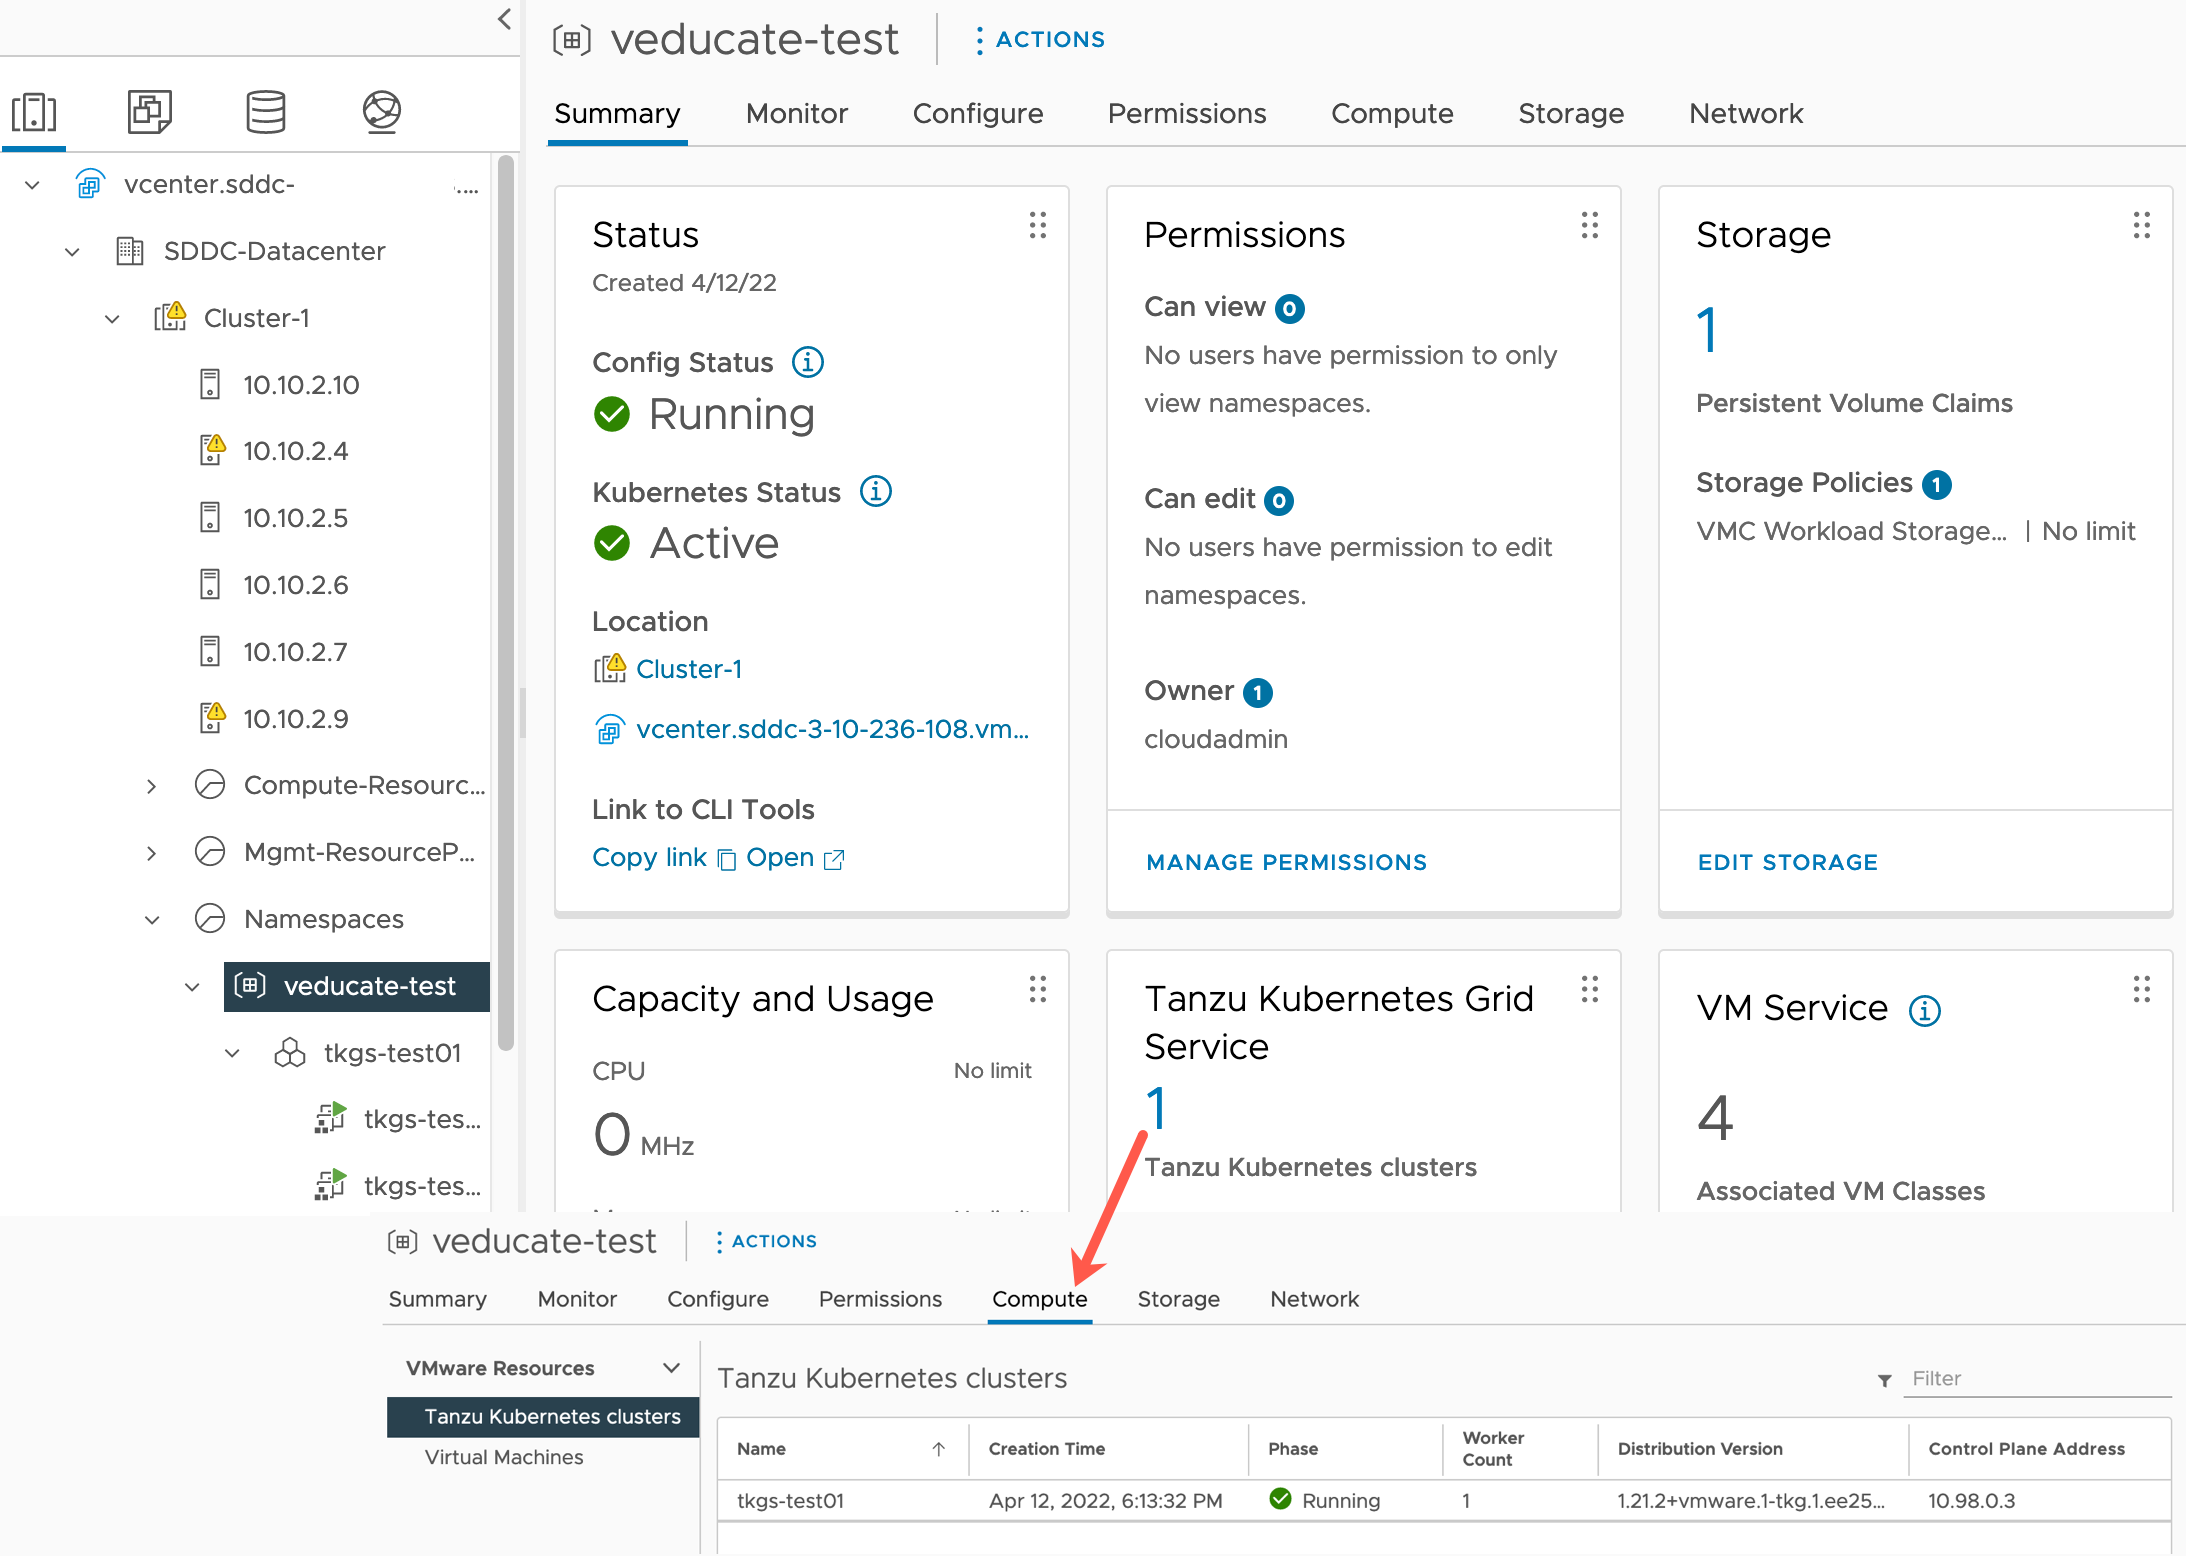
Once created, you’ll see the cluster count increase under the vSphere Namespace – Tanzu Kubernetes Grid Service tile.
Clicking on this figure will take you to the vSphere Namespace – Compute Tab.
Log into your Tanzu Cluster
Now that our Tanzu Cluster is built, we need to retrieve the kubeconfig for this cluster. We run the “kubectl vsphere login” command again, but this time we need to specify an additional argument for our cluster name.
kubectl vsphere login --server=k8s.cluster-1.vcenter.{unique_url}.vmwarevmc.com --tanzu-kubernetes-cluster-namespace veducate-test --tanzu-kubernetes-cluster-name tkgs-test01

# Change your Kubernetes CLI context
kubectl config use-context {Tanzu_Cluster_Name}
Allowing externally connectivity from your TKG Cluster
One of the things I will need to do for my demo application, is to pull containers from an external public registry, Docker.
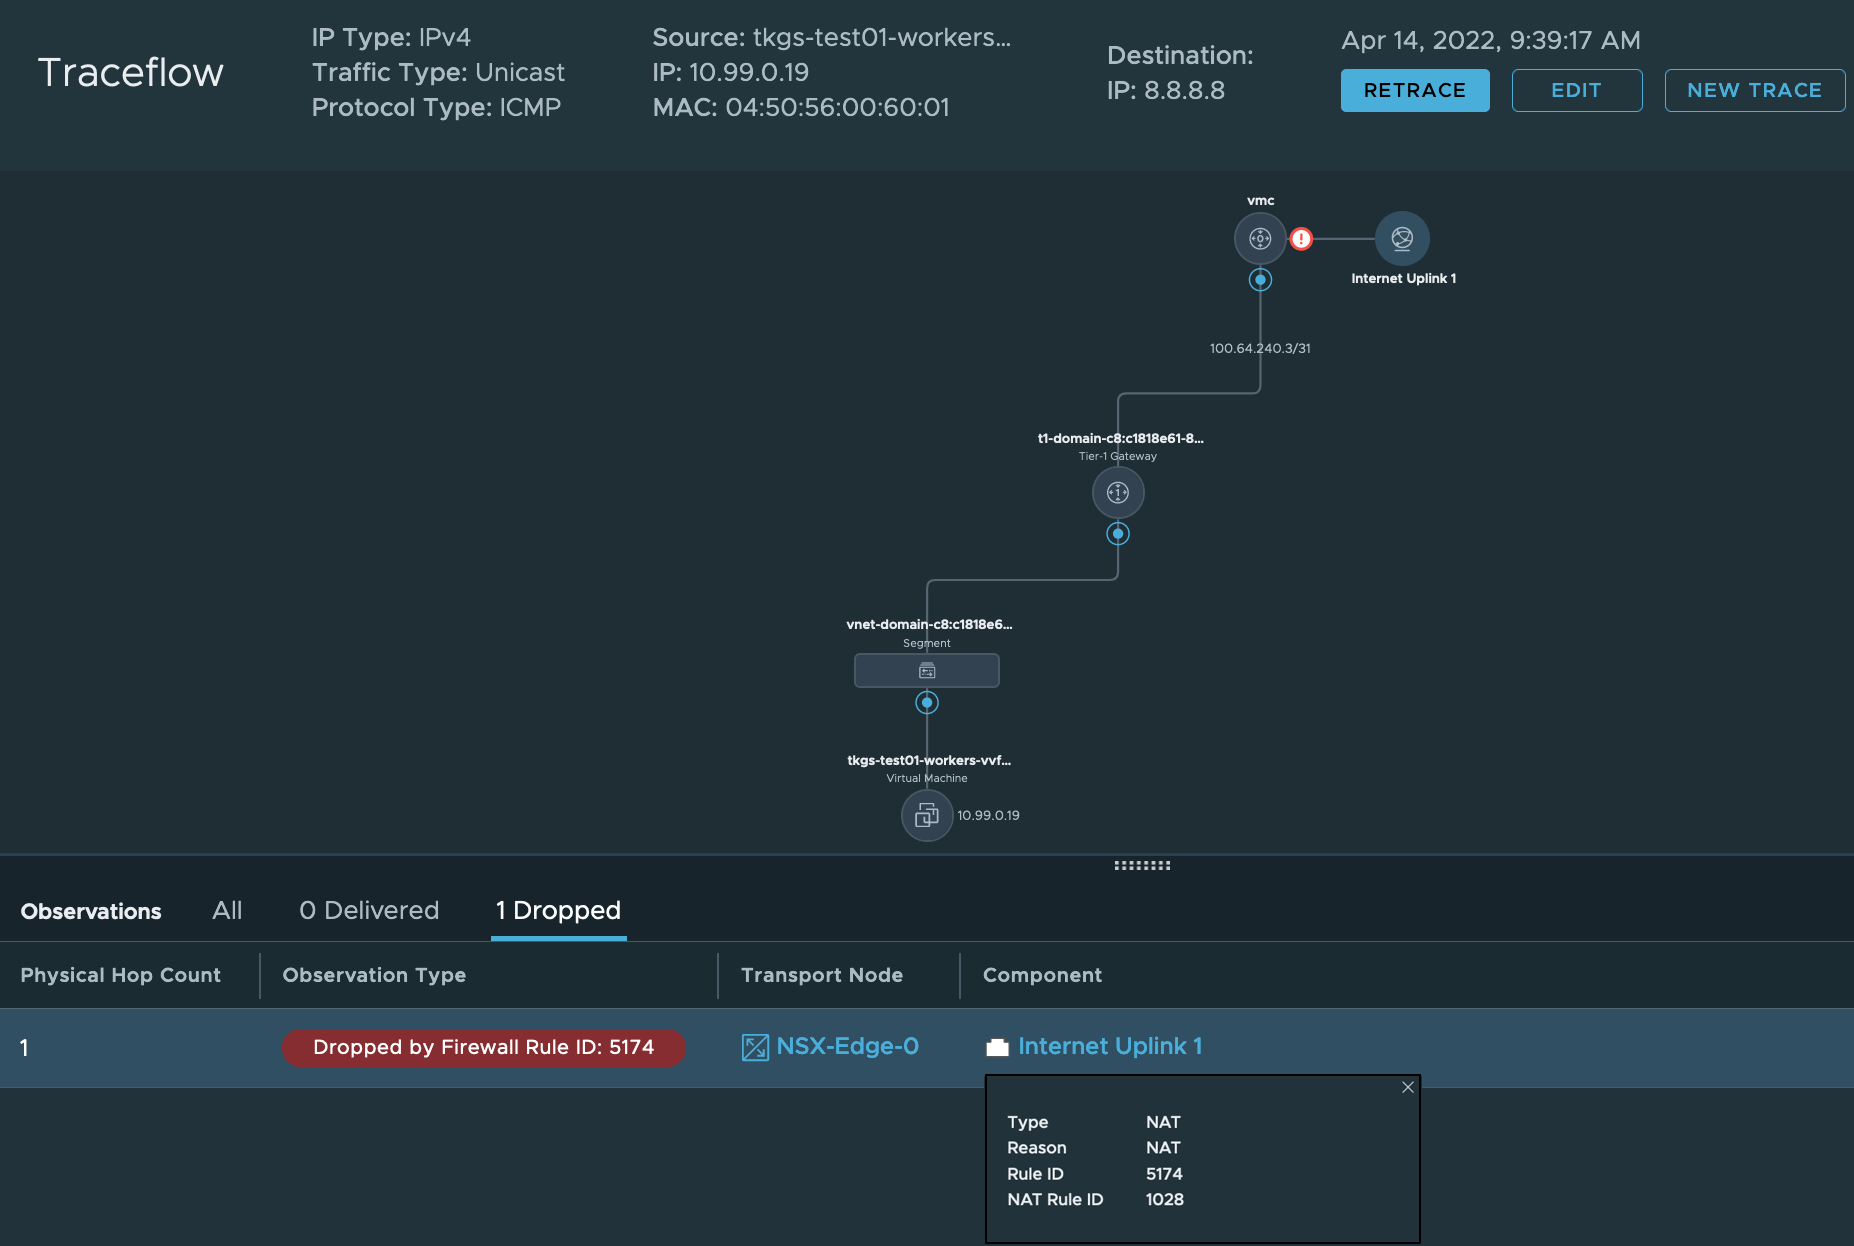
By default, my cluster will not have external networking access outside of the SDDC, as confirmed by the below NSX Manager Traceflow.
We need to allow the Egress Network address external connectivity through the compute gateway firewall rule.
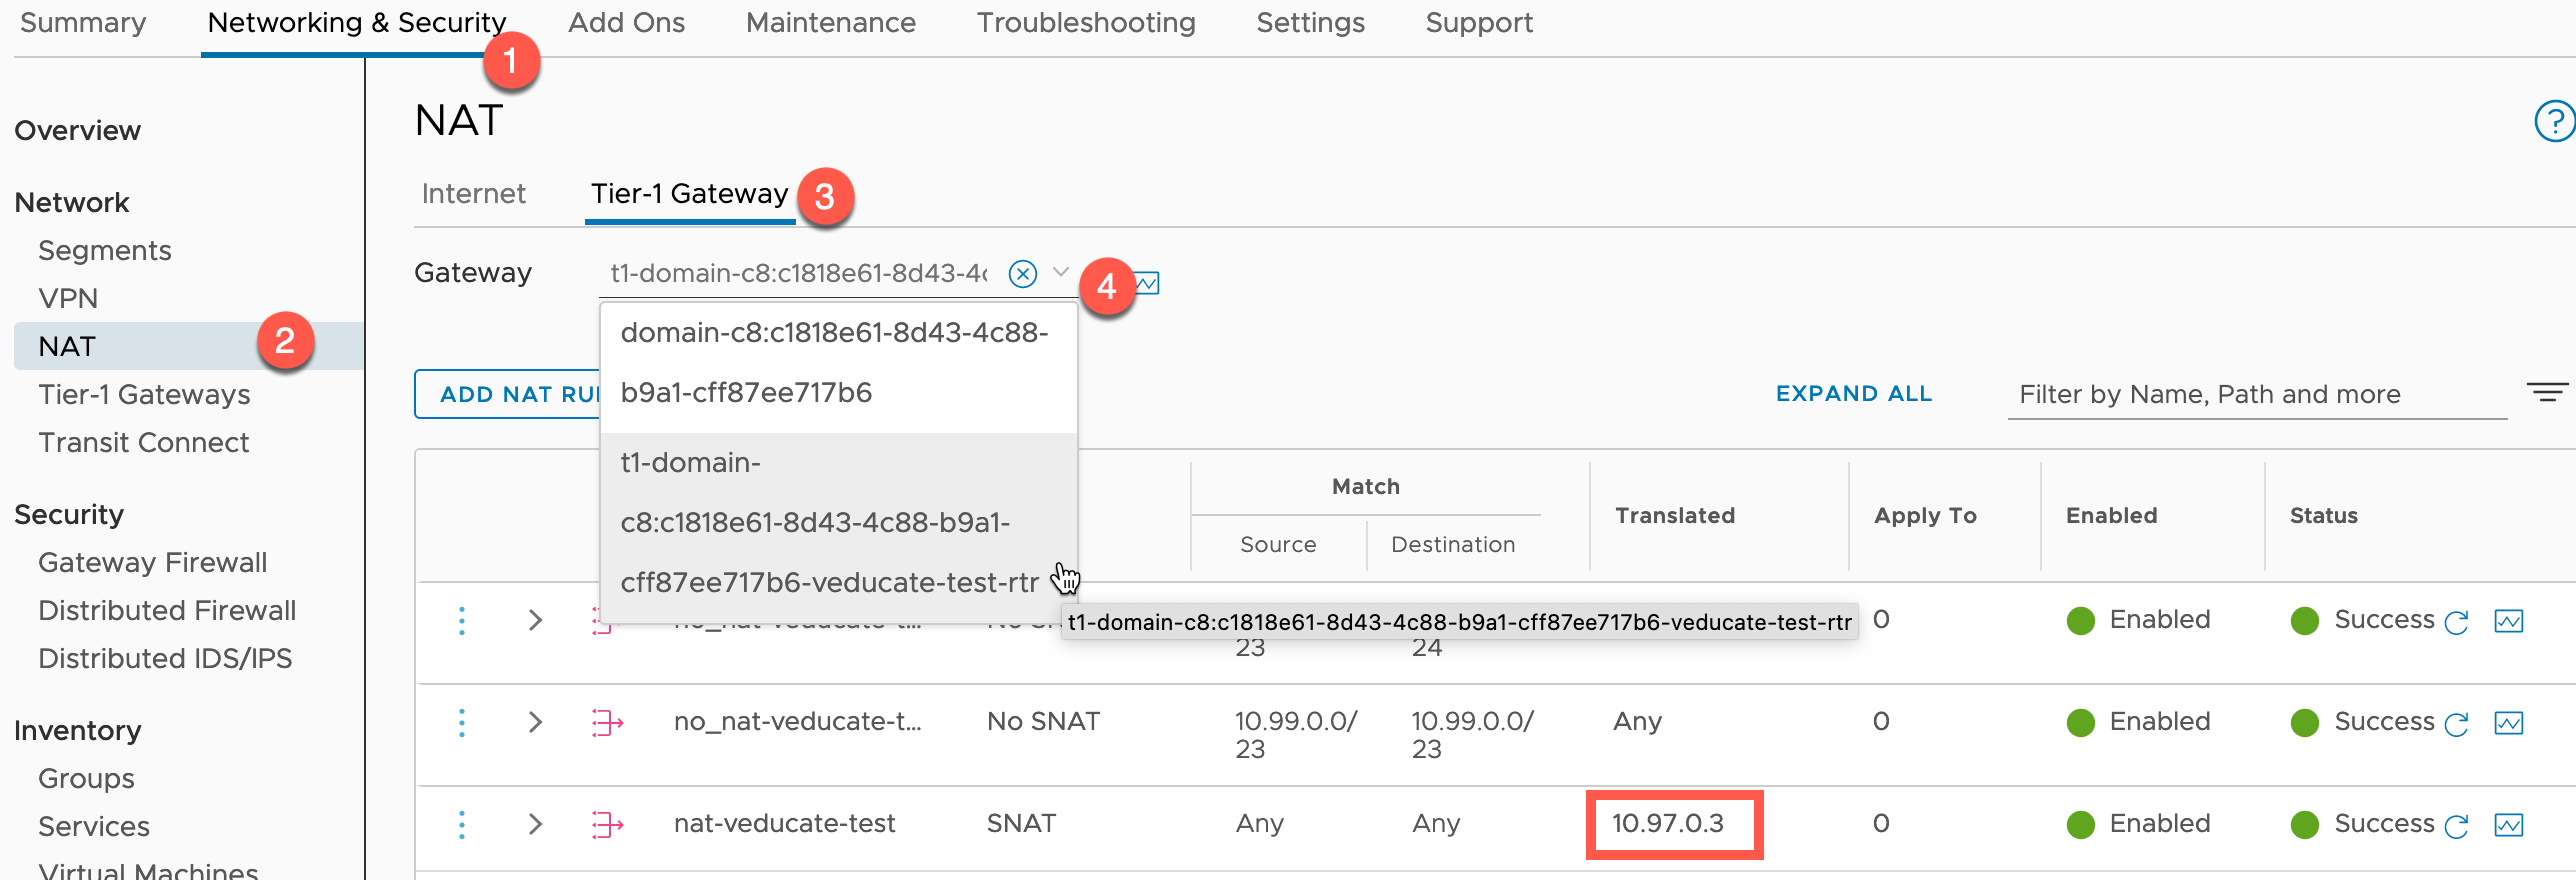
You can get the Egress address assigned to your cluster by going to:
- NAT > Tier-1 Gateways > Change the Gateway to the one identifying your cluster
Create your firewall rule as necessary.
Deploying the Pac-Man Demo Application
This is the easier part now, and I’ve covered deploying Pac-Man across many blog posts.
You can find all the details in my GitHub Repo:
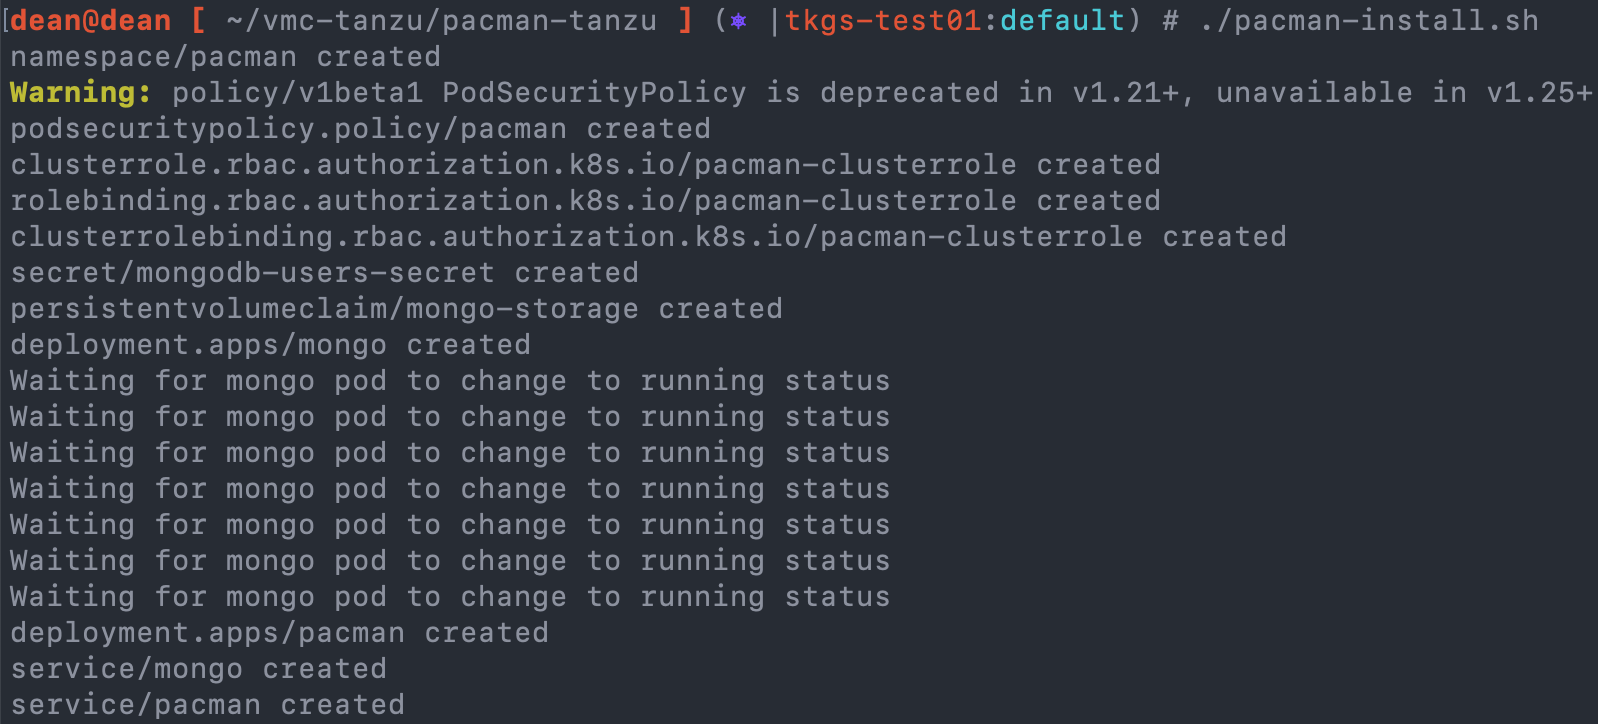
I’ve deployed for this example just using the shell script from the repo.
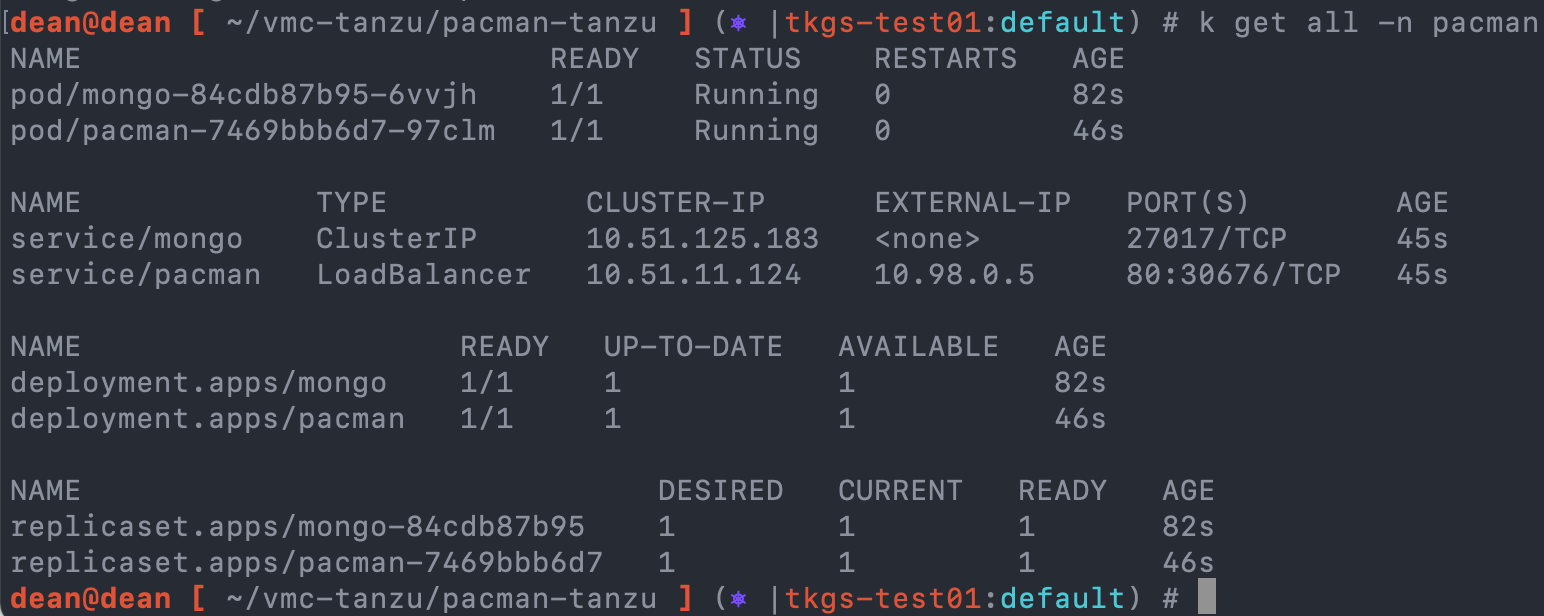
To check everything is up and running I can do this running the command:
kubectl get all -n pacman
Finally, to check the persistent storage volume is created, I can use the below command. My YAML files do not specify which storage class to use to create the PVC. However, in the cluster creation YAML I specified the default storage class. Meaning it will be used to provision all storage unless another storageclass is configured and specified:
kubectl get pvc -n pacman
Let’s look at that storage configuration in more detail, and what we see from the vCenter interface. If you’ve used TKGS for your on-premises vSphere environment, or the vSphere CSI Driver for your Kubernetes environments on vSphere, you are going to realise it’s the same!
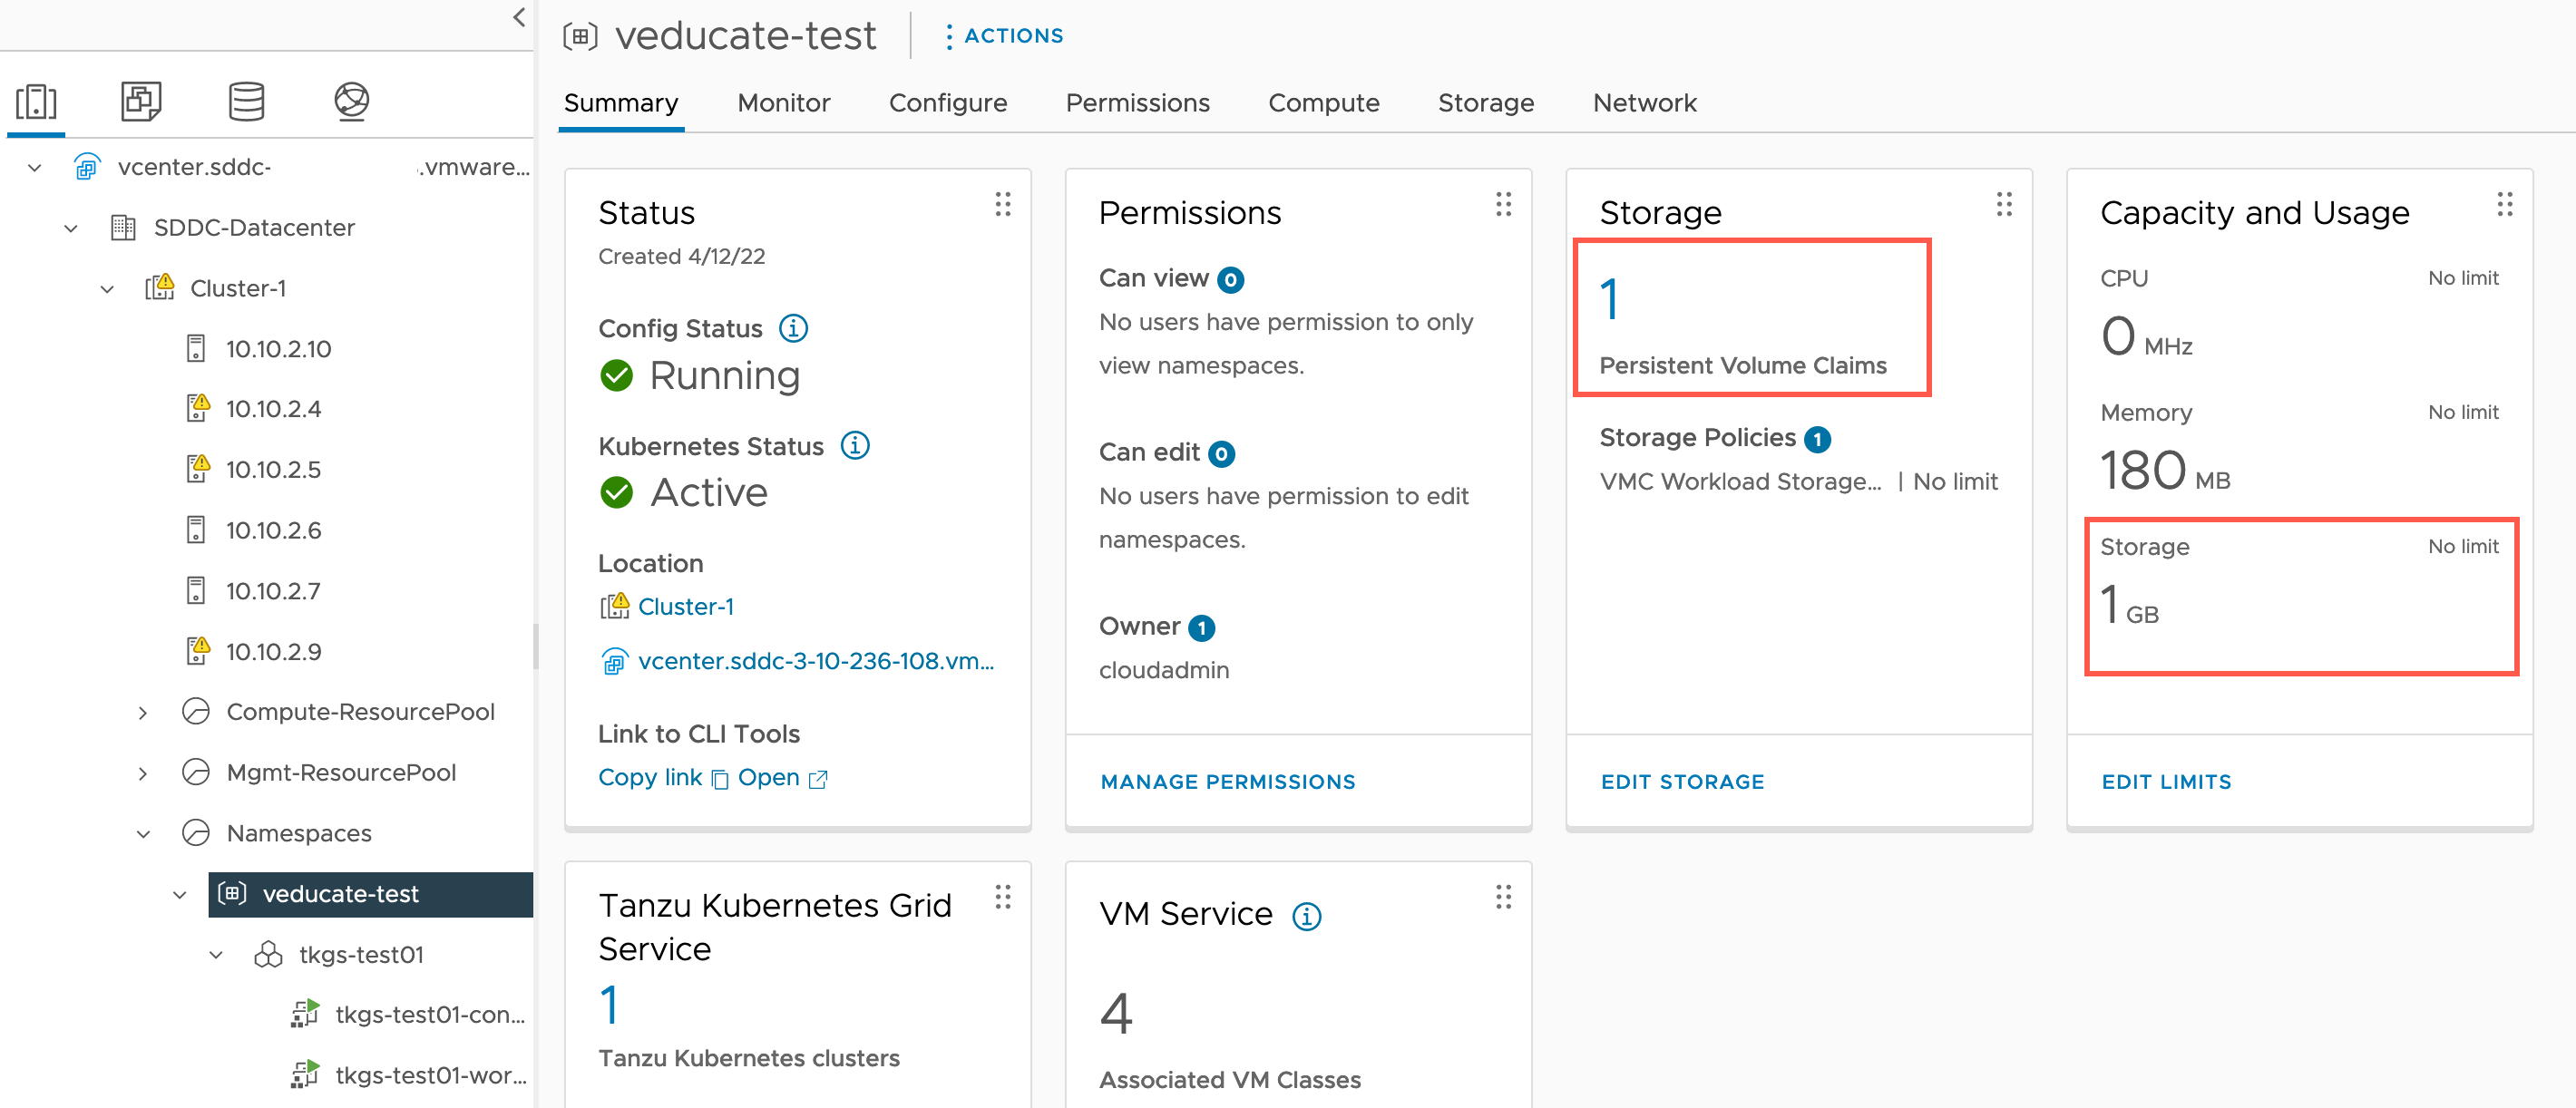
Against our vSphere Namespace object in vCenter, we can see that it registers the new PVC and size.
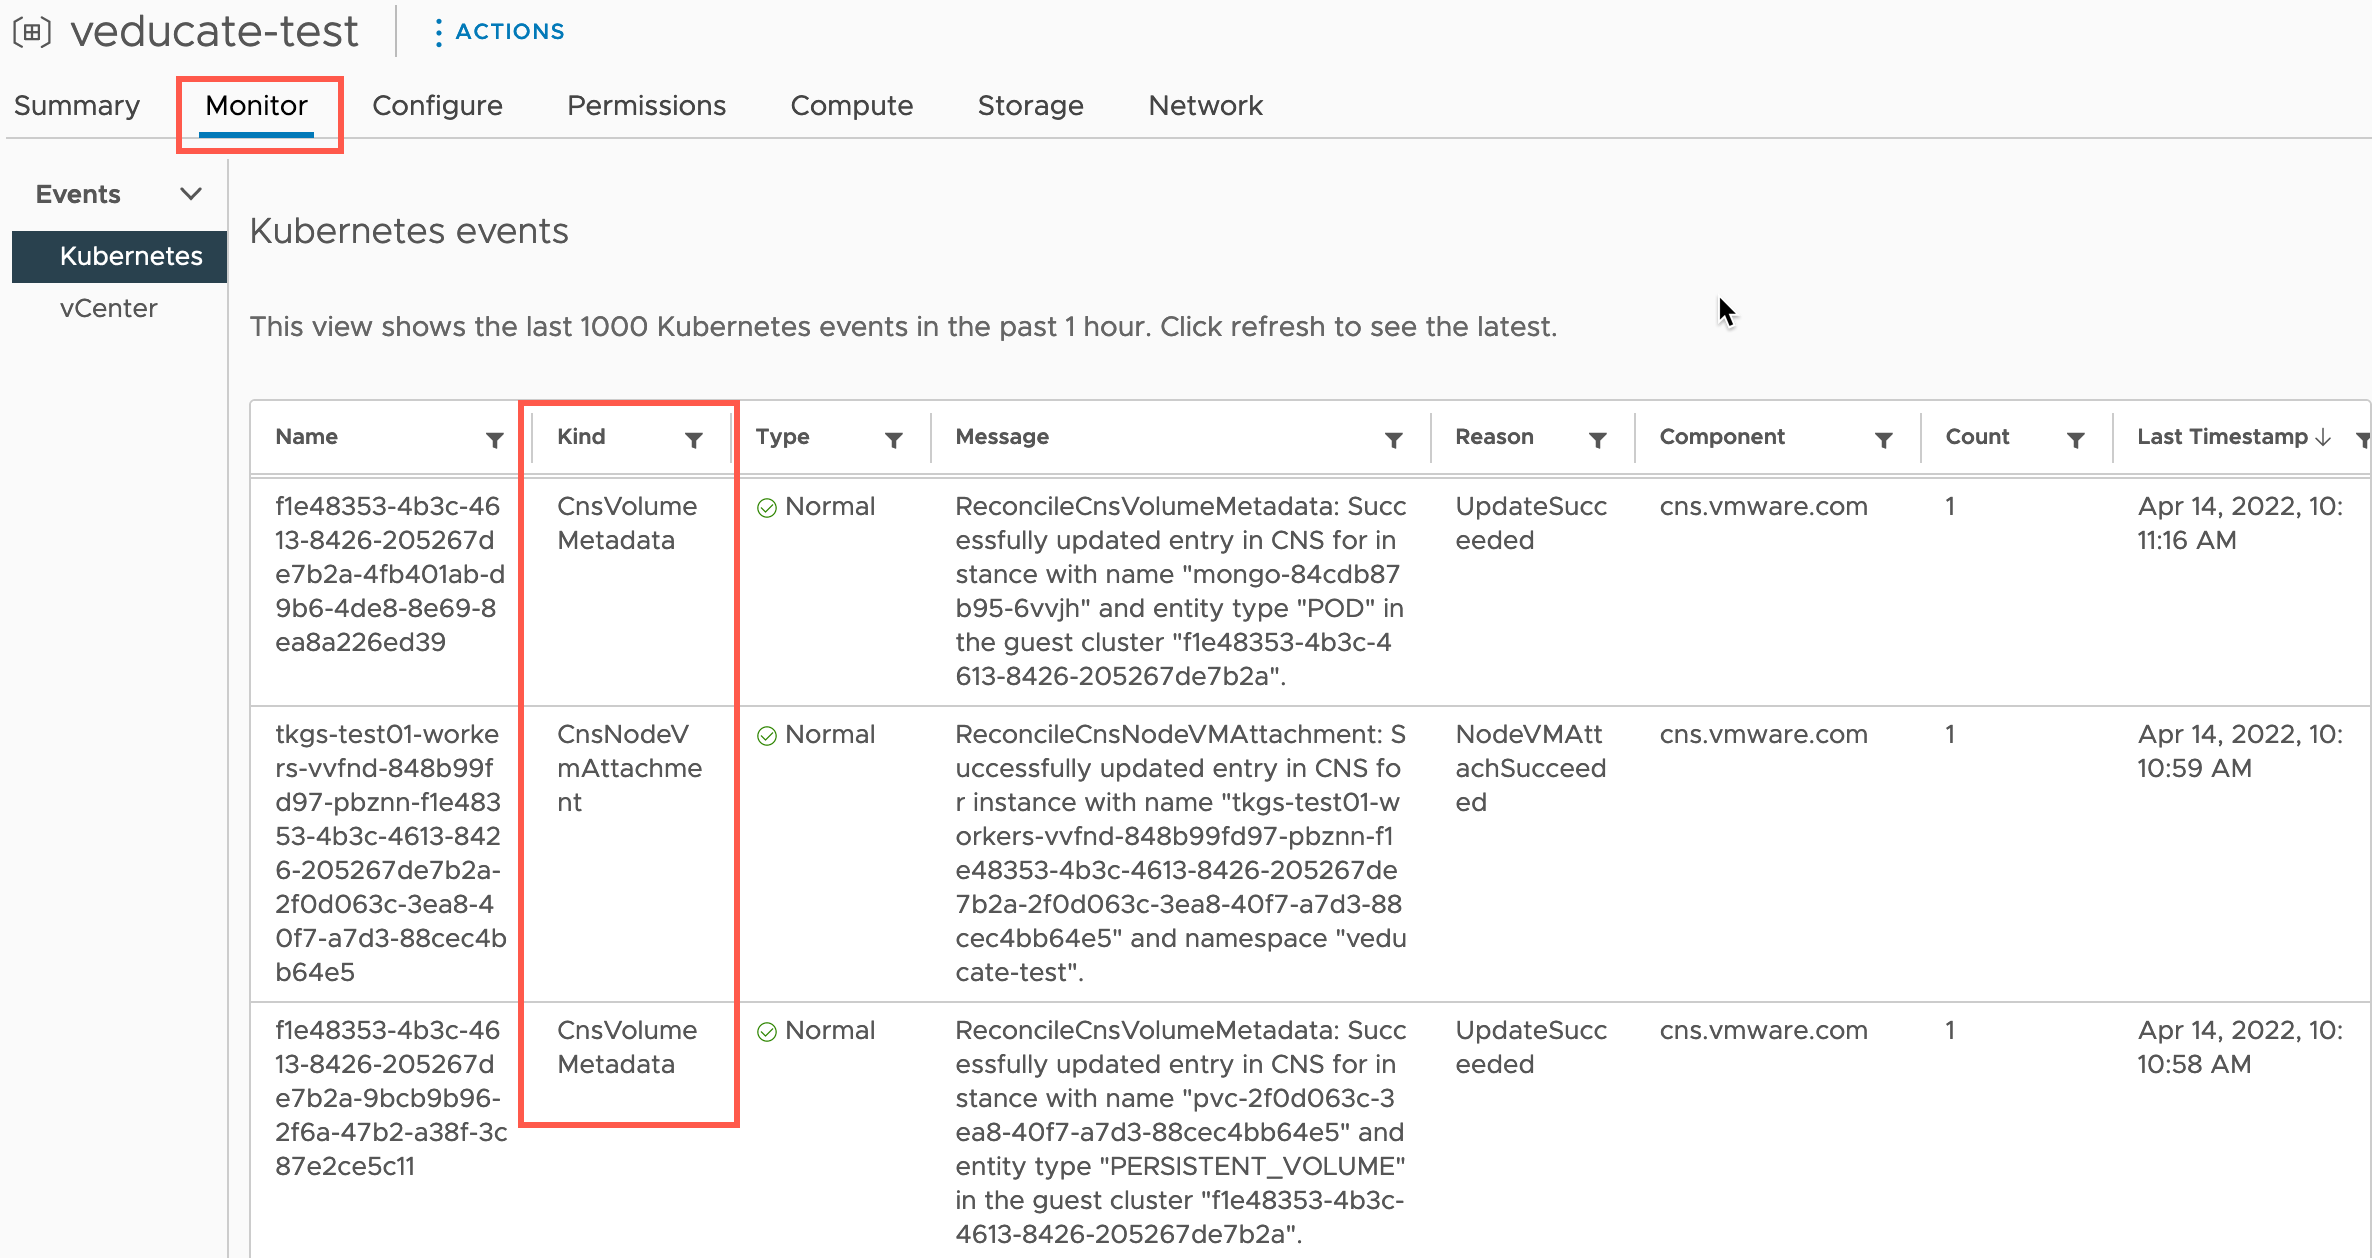
A quick side note, if you click the Monitor Tab on the namespace, then under Event, Kubernetes, you’ll also see CNS Storage Events from when you provision your applications, as well as any other cluster level events.
Clicking into the PVC number under the Storage tile. This will take us to the Storage tab on the Namspace object view.
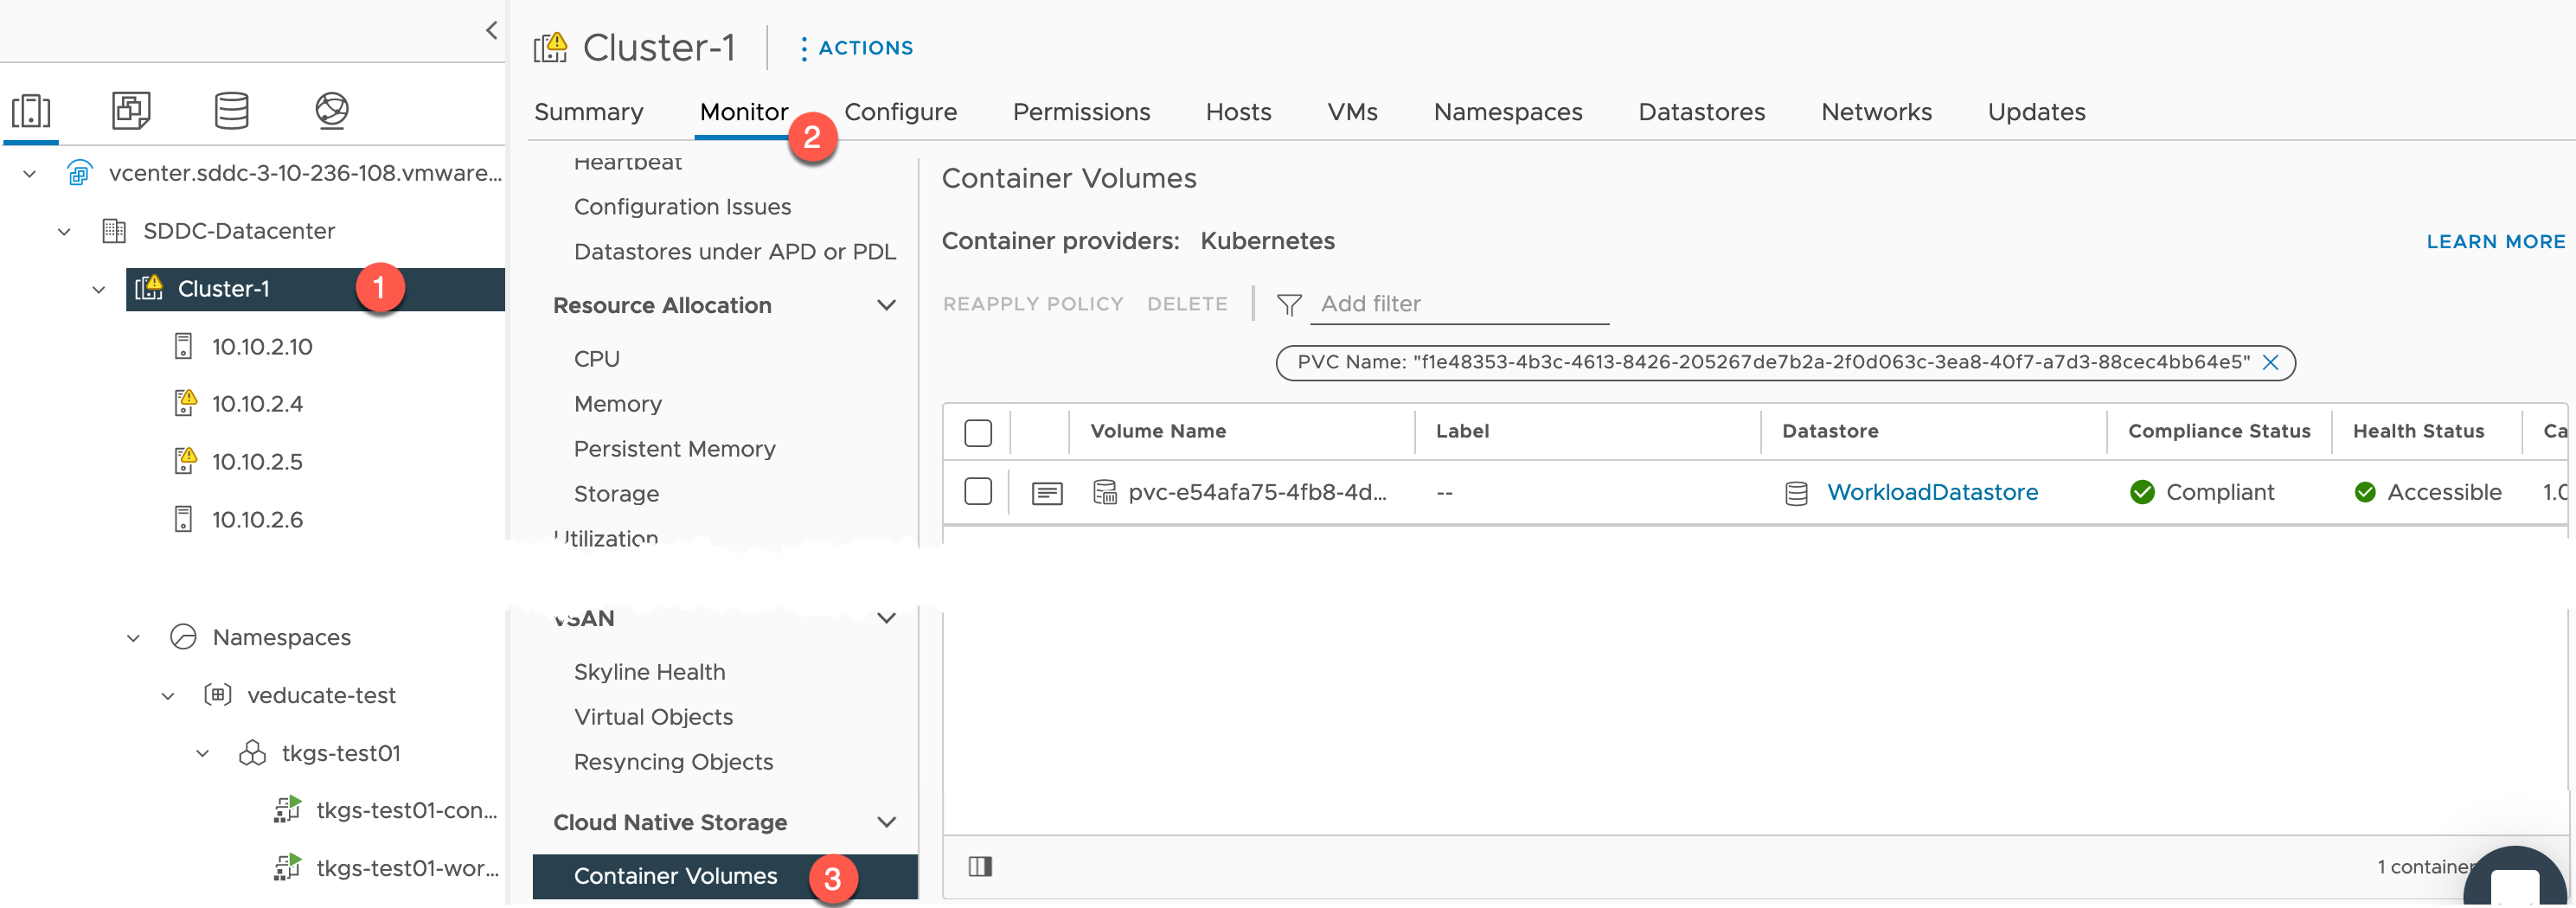
And clicking the PVC name, will move us into the Cluster Object – Container Volumes view. Alternatively you can manually browse there by clicking:
- vSphere Cluster name > Monitor > Cloud Native Storage > Container Volumes
If I click the little “document” icon next to my PVC Name (if you click here from the namespace object storage screen, it will filter for that PVC for you).
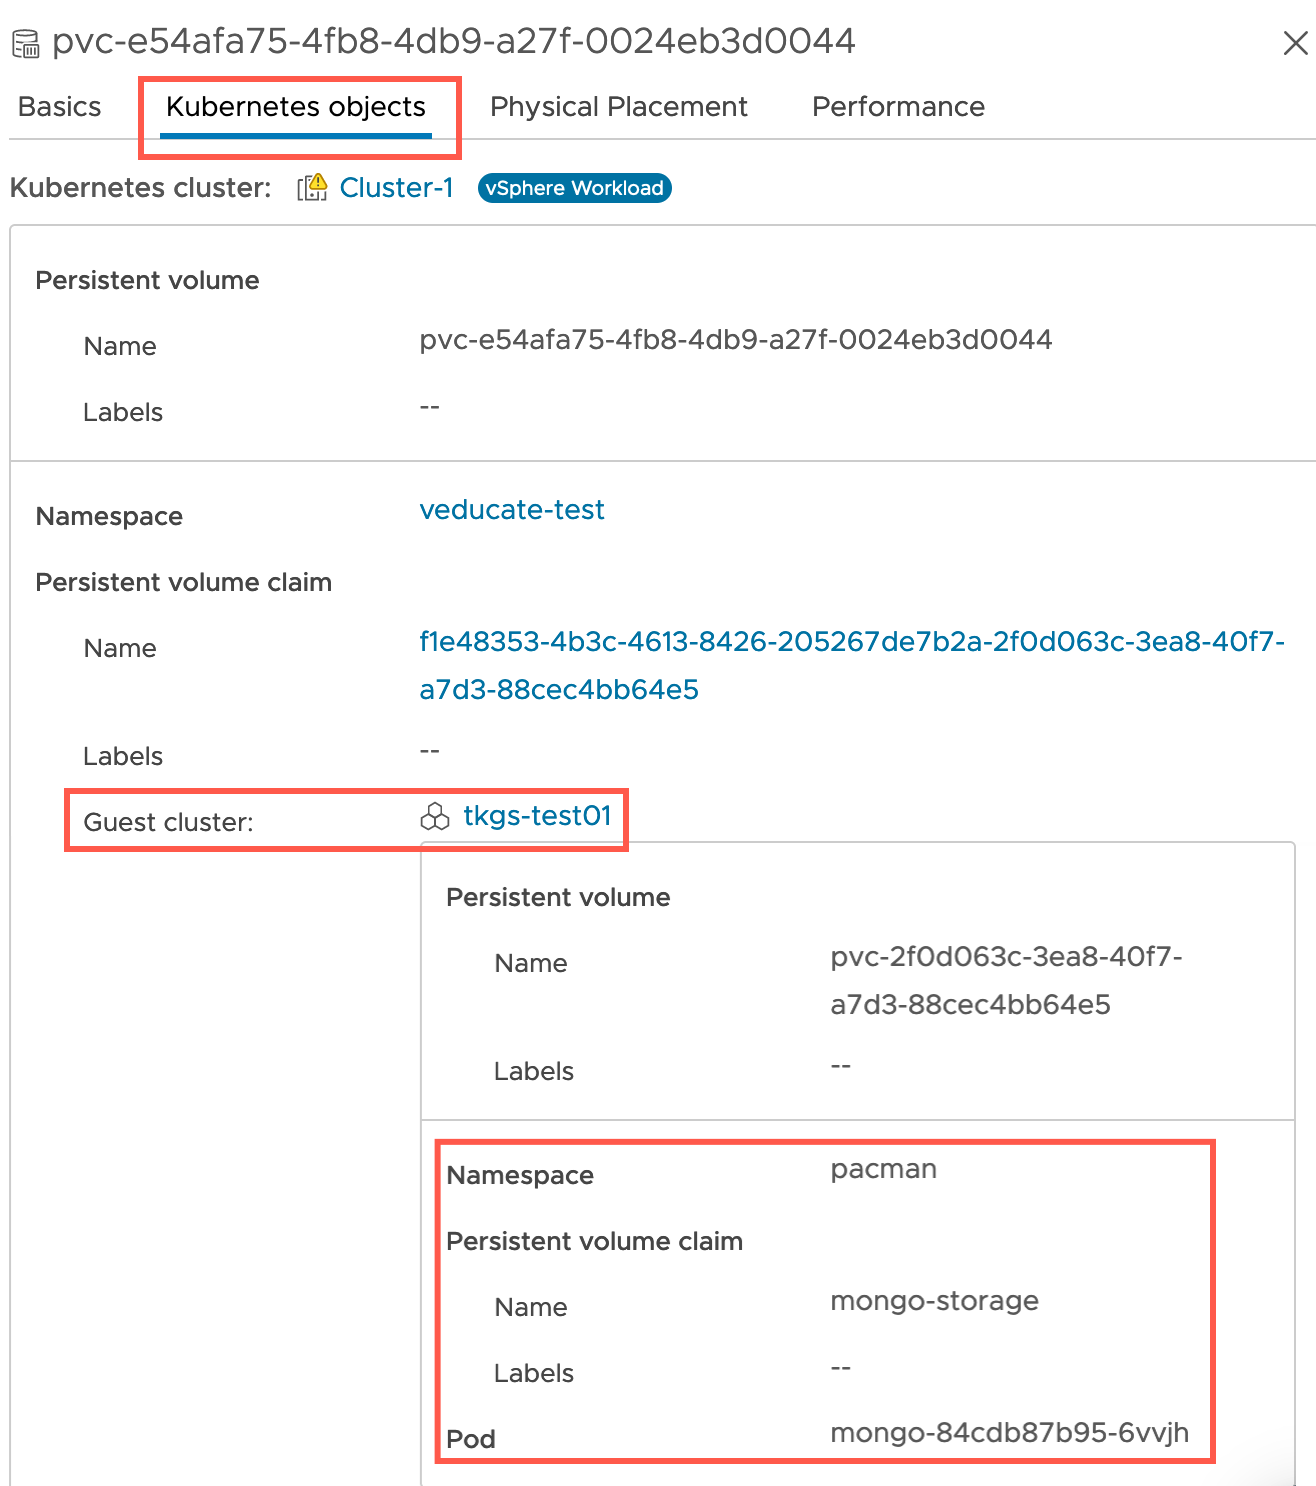
We can now see more in-depth information about the PVC, and under the Kubernetes objects tab, I can see which Guest Cluster it is attached too, which namespace within that cluster, and which pods are attached.
Creating a public access (internet) rule to your Application
Let’s tackle the next important step, I’ve created an application running inside the Guest TKG cluster, but I want it to be accessible to the world!
- Official Documentation – Enable Internet Access to a Kubernetes Service
At a high level the steps are as follows:
- In the VMC console:
- Create a public IP address (as needed)
- Create a NAT rule for the Kubernetes Service IP address to this public IP address
- Configure the Compute Gateway firewall to allow external access to the internal Kubernetes Service IP address
First to get our Kubernetes LoadBalancer IP address that has been assigned, you can run the following:
> kubectl get svc -n pacman
NAME     TYPE           CLUSTER-IP      EXTERNAL-IP   PORT(S)        AGE
mongo    ClusterIP      10.51.125.183           27017/TCP      67m
pacman   LoadBalancer   10.51.11.124    10.98.0.5     80:30676/TCP   67m
As you can see the external IP is from the Ingress range we created during the activation of the Tanzu Services on the VMC SDDC.
In the VMC Console:
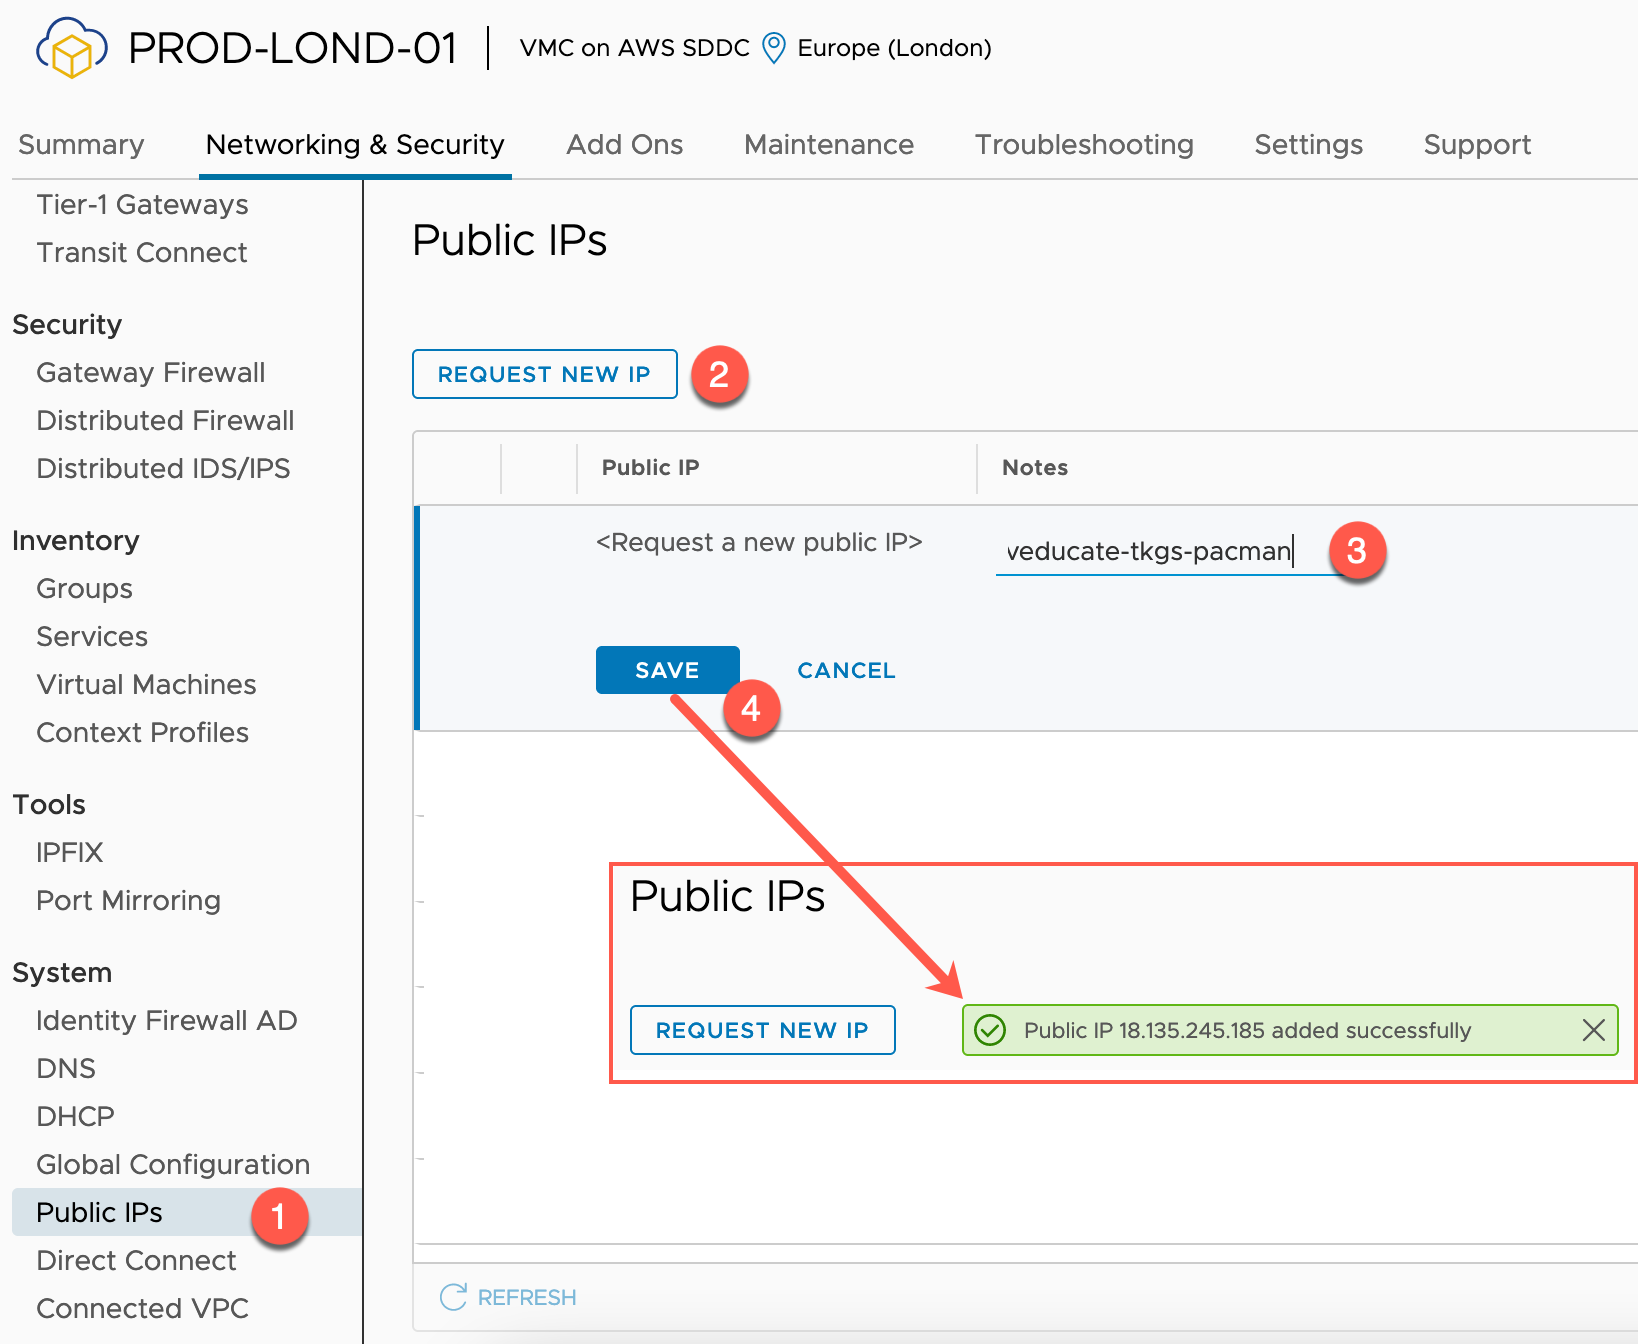
- Find your SDDC in the Inventory
- Click into the SDDC
- Select the Networking & Security tab
- Select Public IPs from the System heading on the left-hand navigation
- Click to Request a New IP
- Provide any notes as necessary (I describe what it is used for to make identification easier)
- You will see a dialog box appear showing you the new IP address range once you click Save.
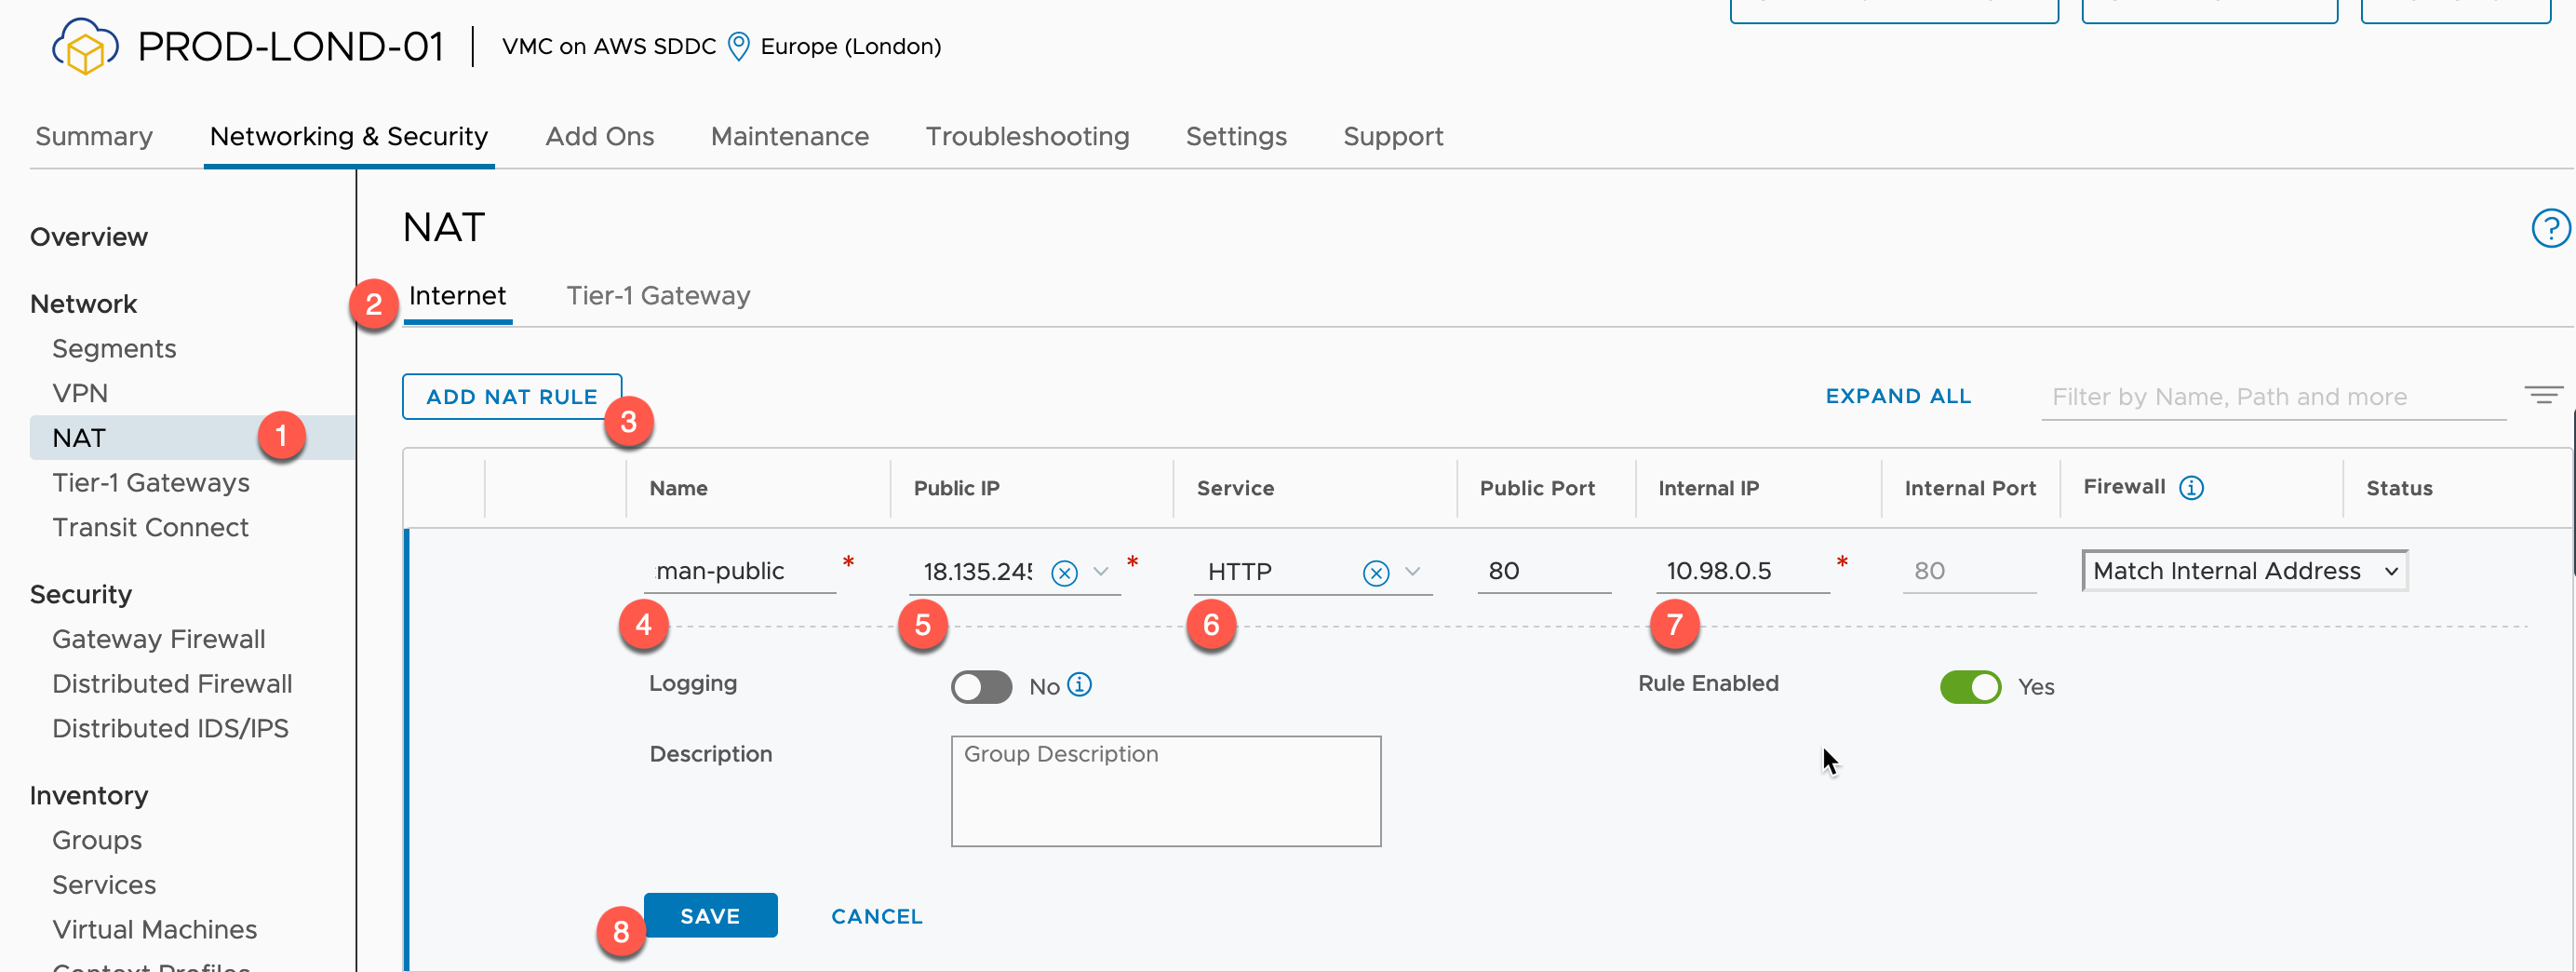
Now we need to create the Internet facing NAT rule.
- Click NAT under the Networking heading from the left-hand navigation pane.
- Select the Internet Tab (if necessary)
- Click to add a NAT Rule
- Provide a Name
- Select the Public IP you want to use
- Select the Service you want to NAT
- Specify the Internal IP
- This will be the Kubernetes Service External IP, as shown above.
Now we need to create a Gateway Firewall rule to allow external access inbound to the service.
- Click Gateway Firewall under the Security heading from the left-hand navigation pane.
- Select the Compute Gateway tab
- Click to add a Rule
- Provide a Name
- Select the source of the traffic
- In my example it’s a public website, so I allow Any source
- Select the Destination of the Traffic
- Specify the Internal IP
- This will be the Kubernetes Service External IP, as shown in the above example
- You may need to create a Group if you have not already done so for this step, see below the screenshot for those steps.
- Specify the Internal IP
- Select the Services to allow through the firewall
- Publish the Rule changes.
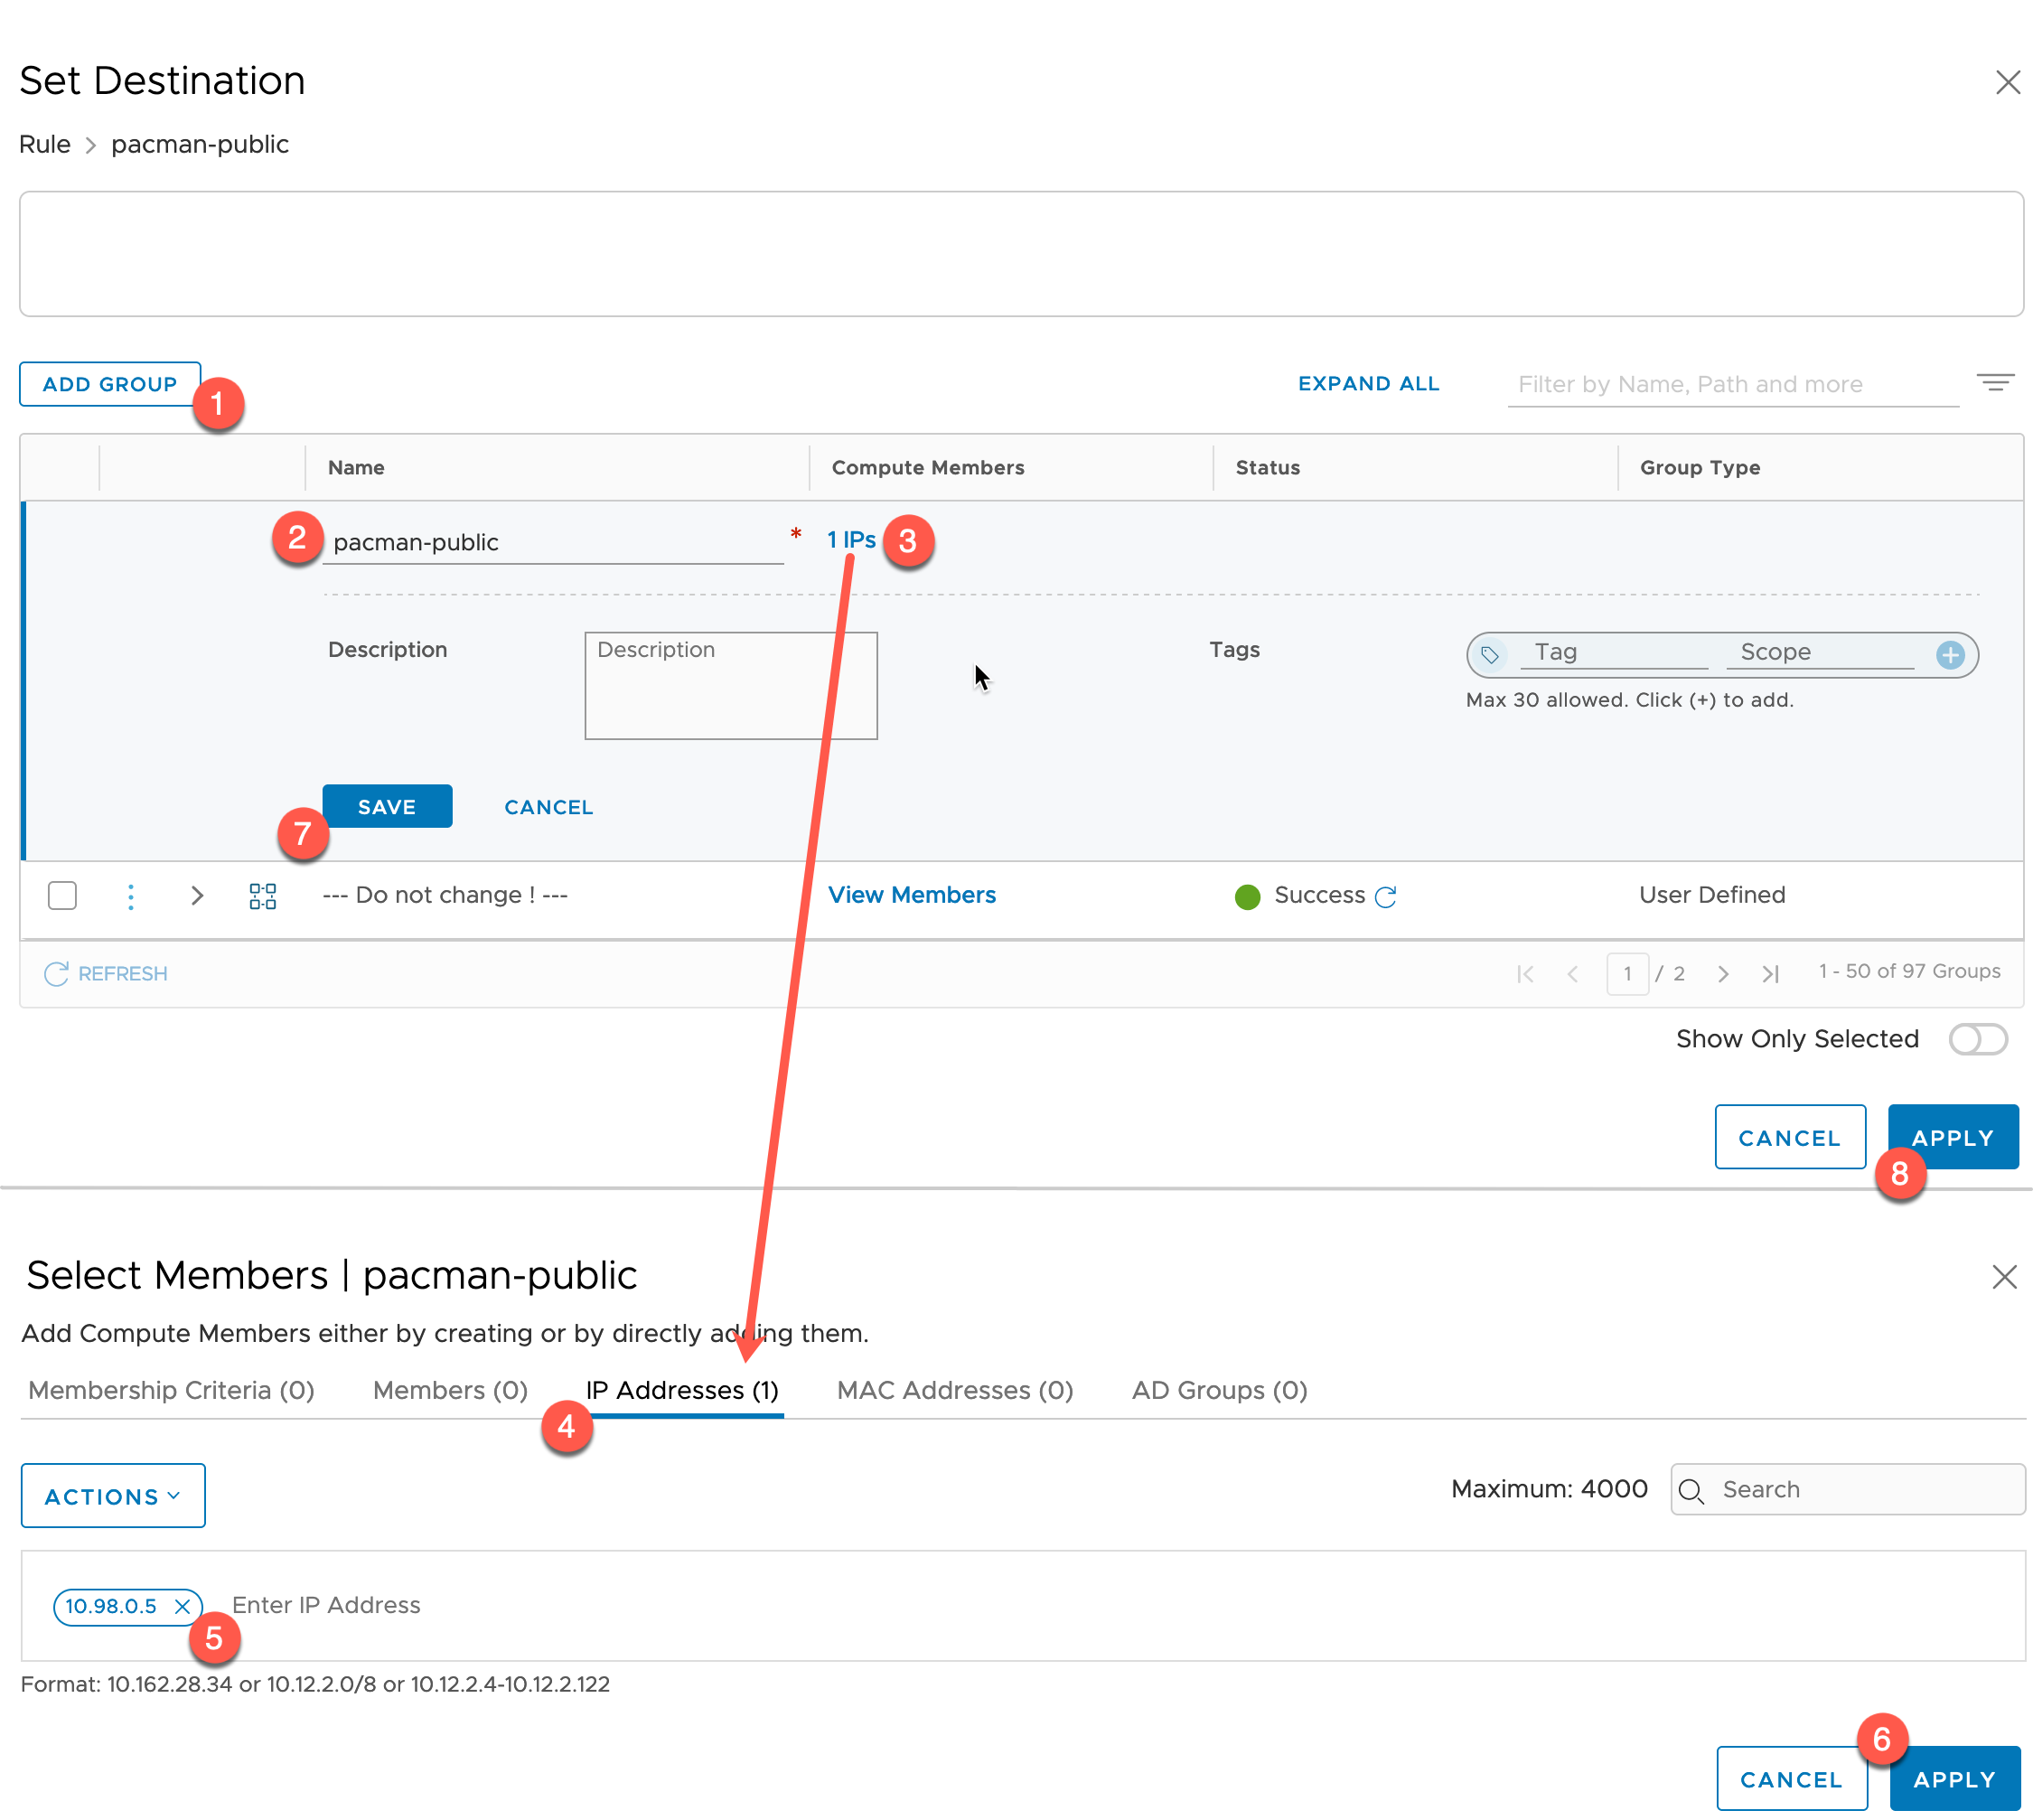
You will need to create a group to hold the IP address of your Ingress, as today VMC doesn’t dynamically create a network object for you.
Below are the steps to do that click on the destination section.
- Click Add Group
- Provide a name
- Select the Members input
- Set to IP Addresses Tab
- Enter the IP address of your Ingress, press enter so it shows as an object box
- Click Apply
- Click Save on the Group
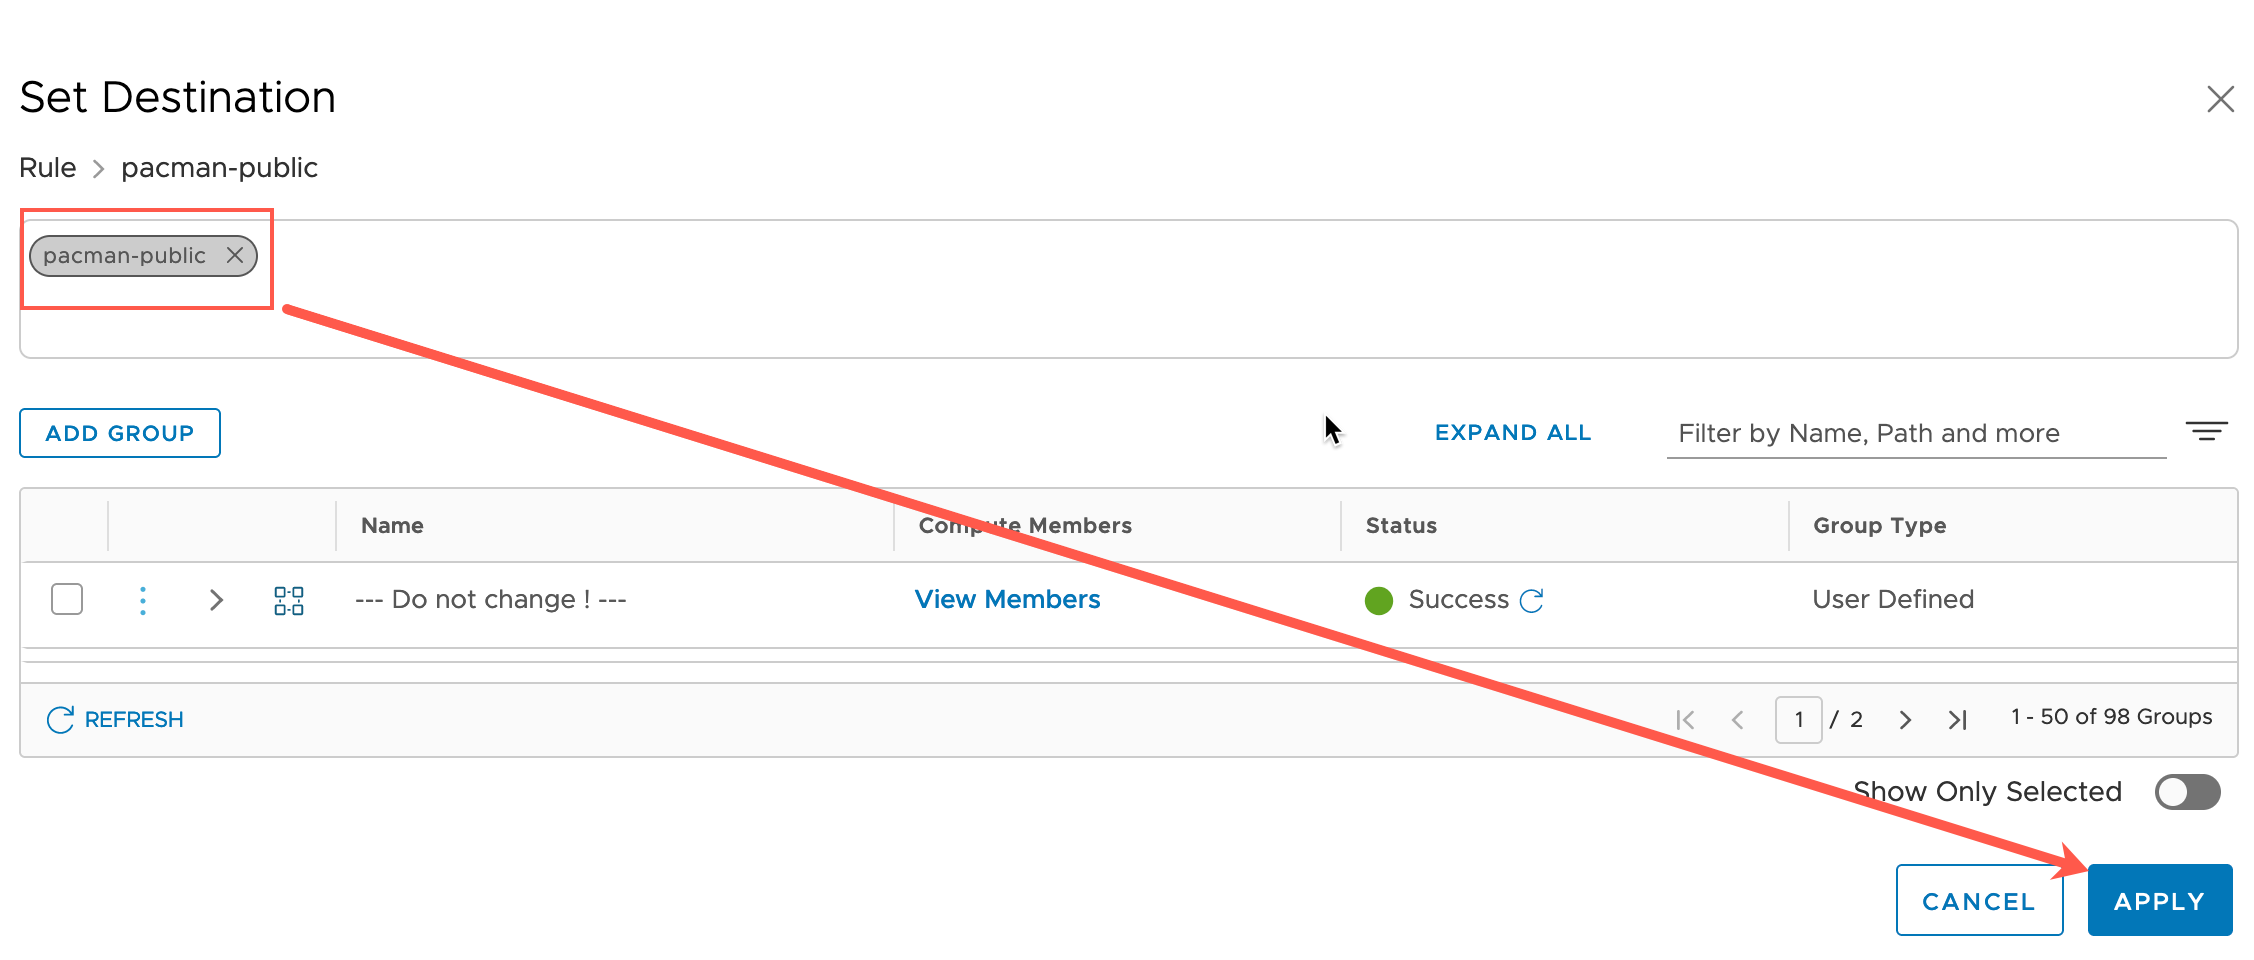
- Click Apply to use the group in the Firewall Rule.
Below you can see the group is created, selected, and ready to be applied as a destination.
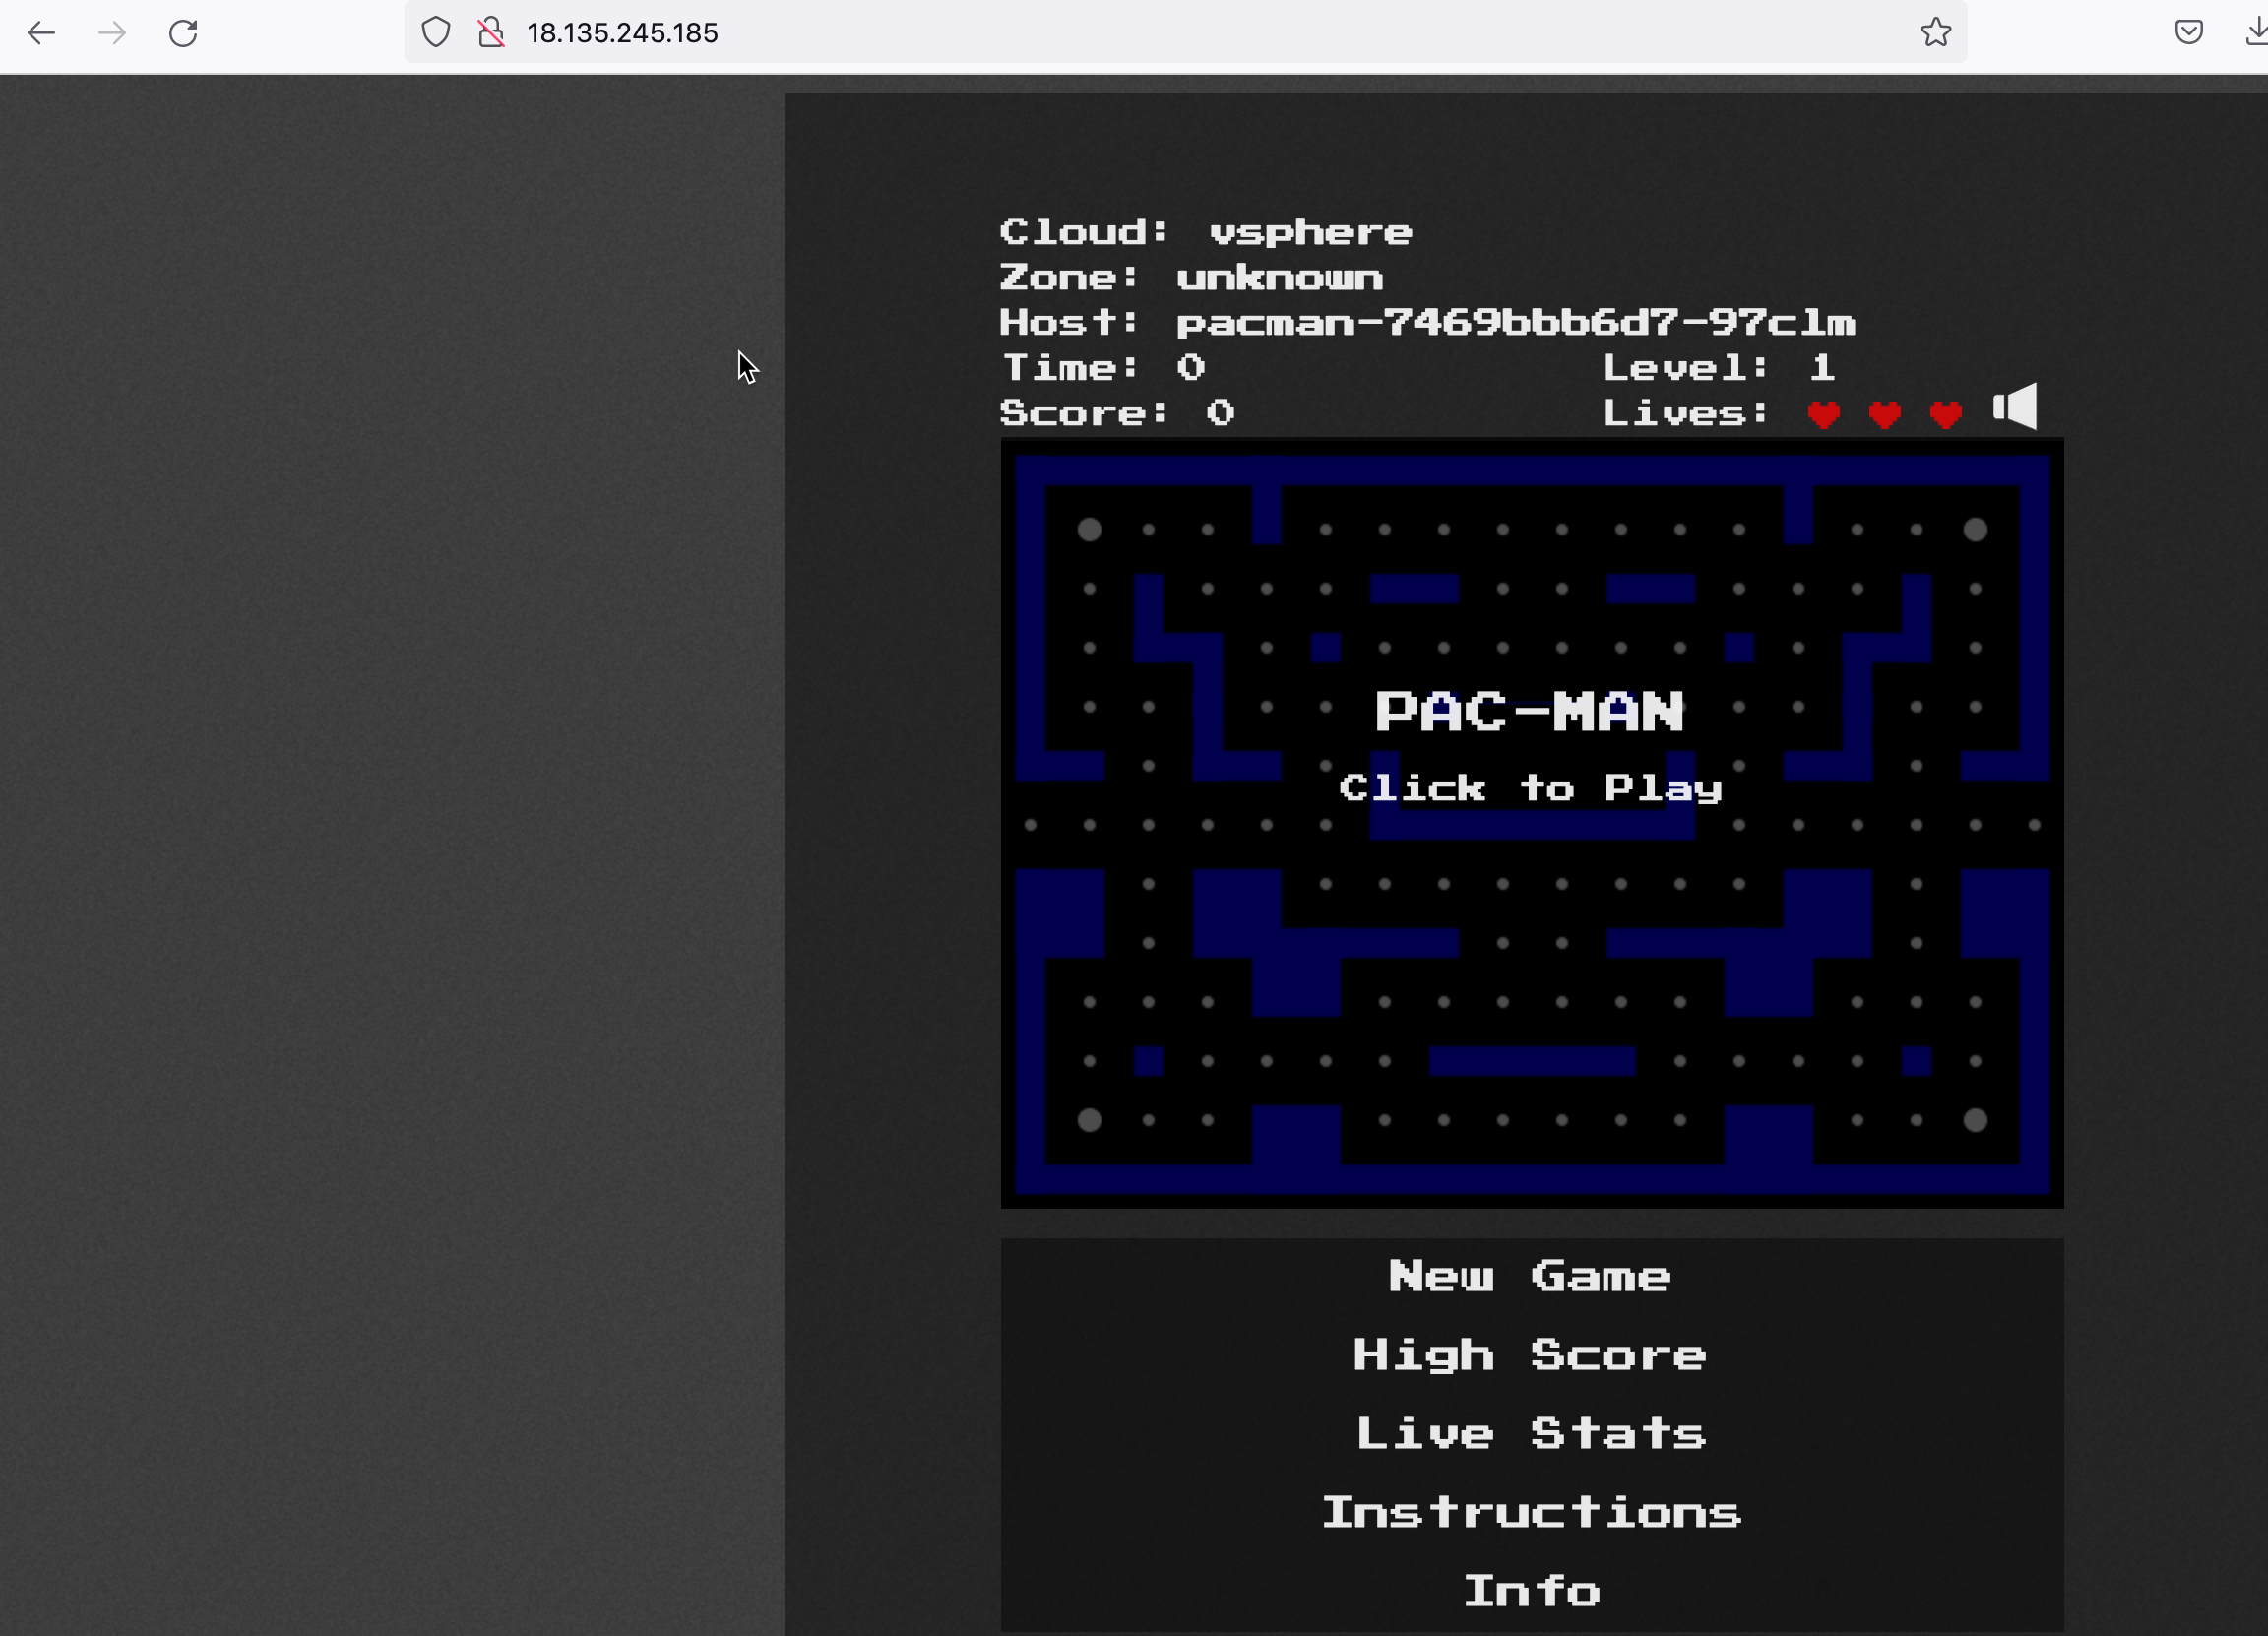
Now let’s go to my public IP address, and we can see I can access the Pac-Man application running inside the TKG Guest Cluster.
Summary and wrap-up
This was a bit of a long guide as we covered the end-to-end setup of managed Tanzu Services on VMware Cloud on AWS.
We activated the service, which was as simple as having our SDDC enabled by VMware support for this option. Then to actually activate the service itself, we provided four network address ranges and let the backend managed service do the rest for us! A fully integrated native Kubernetes offering at the vSphere layer of our SDDC in three clicks.
Then we configured a vSphere namespace and deployed a Guest Tanzu Cluster. Within that cluster we deployed out example application and provided external public connectivity.
Overall, there are some pieces around the networking configuration with the Tier-1 gateways, and the integrations with the NSX Component of the SDDC to get your head around, but the configuration was quick and simple to achieve.
Most of the vSphere with Tanzu documentation crosses over to work with the VMC managed Tanzu Services offering, however there are some key differences, which I pointed out at the start of the article. You can check out the official documentation section “Tanzu Services in the Cloud” which explains which documents do not cross-over correctly, or changes to be noted.
Regards
