Today was the second time I’ve done this in around a year, it’s a little uncommon to be honest, which means googling advice on how to do it, is a bit thin.
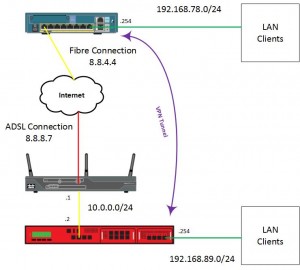
Todays walk through is also made even more different by the fact that at the branch site containing the Watchguard, its connected to a Cisco 857w router, with a Public IP address NAT’d to it due to the site having an ASDL connection.
See the below diagram I’ve sketched up in visio;
It’s actually easy enough to setup, the official documentation on the Watchguard is here, but doesnt cover it all.
The Watchguard Side
Log onto the Watchguard and load up policy manager.
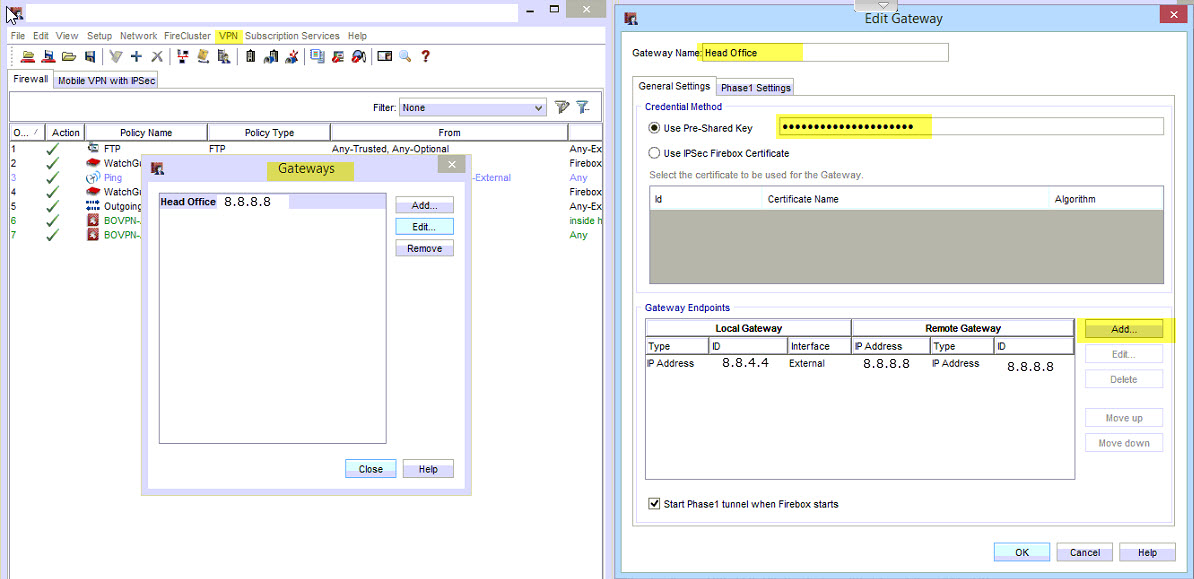
1. Click on VPN Tab, and then “Branch Office Gateways”. Click to add a new gateway;
- Set a Name for the Gateway
- The pre-shared key
- Add the Public IP address of the Watchguard, in the example it is 8.8.4.4
- Add the Public IP address of the Cisco ASA, in the example it is 8.8.8.8
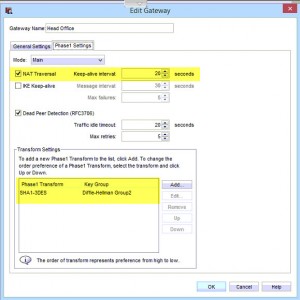
2. Click on the tab “Phase 1 Settings”
- As my Watchguard is behind a NAT, the NAT Transversal box needs to be ticked (and inputted on the Cisco side too!!!)
- Ensure here that your transform settings match those on the Cisco ASA, of which in the example I’ve used the defaults.
Click ok to finish this.
3. Click on VPN again, and then “Branch Office Tunnels”. And then Click Add;
- Name your Tunnel
- Select the Gateway you have created
- Add your Local LAN Subnet
- Add your Remote LAN Subnet
4. Click on “Phase2 settings”
- Untick the box for Perfect Forward secrecy
- Ensure your Encryption selection under IPSec Proposals match those on the Cisco ASA.
The Cisco ASA Side
So the Cisco side is basically the same as any other site to site VPN. However here are the commands to make the above scenario work;
Create an Access-List to allow the HQ Site traffic through to the Remote Site
access-list vpn-HQ-BRANCH extended permit ip 192.168.78.0 255.255.255.0 192.168.89.0 255.255.255.0
Create your Crypto transform set, if different to the default, which is below;
crypto ipsec transform-set ESP-3DES-SHA esp-3des esp-sha-hmac
Set your Crypto map to connect to the Remote site;
crypto map VPN-Tunnel 6 set peer 8.8.8.8
crypto map VPN-Tunnel 6 set transform-set ESP-3DES-SHA
crypto map VPN-Tunnel 6 set pfs
crypto map VPN-Tunnel 6 set security-association lifetime seconds 43200
crypto map VPN-Tunnel 6 set security-association lifetime kilobytes 4608000
crypto map VPN-Tunnel 6 match address vpn-HQ-BRANCH
Ensure that NAT transversal is enabled, there is a command to disable it which if present for this example, needs to be removed using;
no crypto map VPN-Tunnel 6 set nat-t-disable
Create your Crypto Policy, ensure your Diffe-Hellman group matches your Watchguard config;
crypto isakmp policy 1
 authentication pre-share
 encryption 3des
 hash sha
 group 2
 lifetime 28800
And finally the tunnel-group settings;
tunnel-group 8.8.8.8 type ipsec-l2l
tunnel-group 8.8.8.8 ipsec-attributes
 pre-shared-key securepassword
 peer-id-validate nocheck
 isakmp keepalive disable
And your tunnel should be up.
If your Watchguard is not behind a NAT and has a direct Public IP address, then you can disable NAT-Transversal on both the Cisco ASA and the Watchguard.
![]()


