Category Archives: Kubernetes

Kubernetes

Quick Tip: Supercharge Kubernetes Resource Retrieval with ‘kubectl get -f’

Did you know you can use the -f argument with kubectl get? Yep me either.

It’s pretty handy actually, as it will provide the status for all your Kubernetes resources deployed using that file or even file from hyperlink!

Below is a screenshot example using a file.

kubectl get -f

You can also specify multiple files by adding -f {file}for each file you want to check (this also works when deploying resources too!).

kubect get -f multiple files

And another example, using a hyperlink as the file location.

kubectl get -f from url

Hope this little tip helps someone!

Just for fun, here’s the ChatGPT write-up!

The command “kubectl get -f” is used in Kubernetes to retrieve information about Kubernetes resources defined in a file or multiple files. Let’s break down the command and its components:

  • “kubectl”: It is the command-line interface (CLI) tool for interacting with Kubernetes clusters. It allows you to manage and control Kubernetes resources.
  • “get”: It is the action or subcommand used to retrieve information about Kubernetes resources.
  • “-f”: It is a flag that specifies that the input will be provided from a file or multiple files rather than directly on the command line. It is followed by the path to the file(s) containing the Kubernetes resource definitions.

When you use “kubectl get -f <file>”, Kubernetes reads the file(s) provided and retrieves the information about the resources defined within those files. The information can include the names, statuses, and other details of the resources.

For example, if you have a file named “deployment.yaml” that defines a Kubernetes Deployment resource, you can use the command “kubectl get -f deployment.yaml” to retrieve information about that specific Deployment resource.

You can also provide multiple files by separating them with commas or specifying a directory containing multiple resource files. For instance, “kubectl get -f file1.yaml,file2.yaml” or “kubectl get -f /path/to/files” (where /path/to/files is the directory path).

By using this command, you can quickly retrieve information about Kubernetes resources defined in files without needing to manually create or modify resources using the command line.

Regards
Dean Lewis

Red Hat OpenShift Header

Red Hat OpenShift – Sorry, your reply was invalid: IP expected to be in one of the machine networks

The Issue

When running the command:

openshift-install create cluster

And you provide an API IP address which is not in the CIDR range 10.0.0.0/16, you recieve the below error.

INFO Defaulting to only available network: VM Network 
X Sorry, your reply was invalid: IP expected to be in one of the machine networks: 10.0.0.0/16
? The VIP to be used for the OpenShift API.
OpenShift-Install create cluster - Sorry, your reply was invalid- IP expected to be in one of the machine networks- 10.0.0.0-16
The Cause

This is a known bug in the openshift-install tool (GitHub PR,Red Hat Article), where by the software installer is hardcoded to only accept addresses in the 10.0.0.0/16 range.

The Fix

The current work around for this is to run openshift-install create install-config provide ip addresses in the 10.0.0.0/16 range, and then alter the install-config.yaml file manually before running openshift-install create cluster, which will read the available install-config.yaml file and create the cluster (rather than presenting you another wizard).

In the wizard (below screenshot), I’ve provided IP’s on the range from above, and set my base domain and cluster name as well. The final piece is to paste in my Pull Secret from the Red Hat Cloud console.

OpenShift-install create install-config

Now if I run ls on my current directory I’ll see the install-config.yaml file. It is recommended to save this file now before you run the create cluster command, as this file will be removed after this, as it contains plain text passwords.

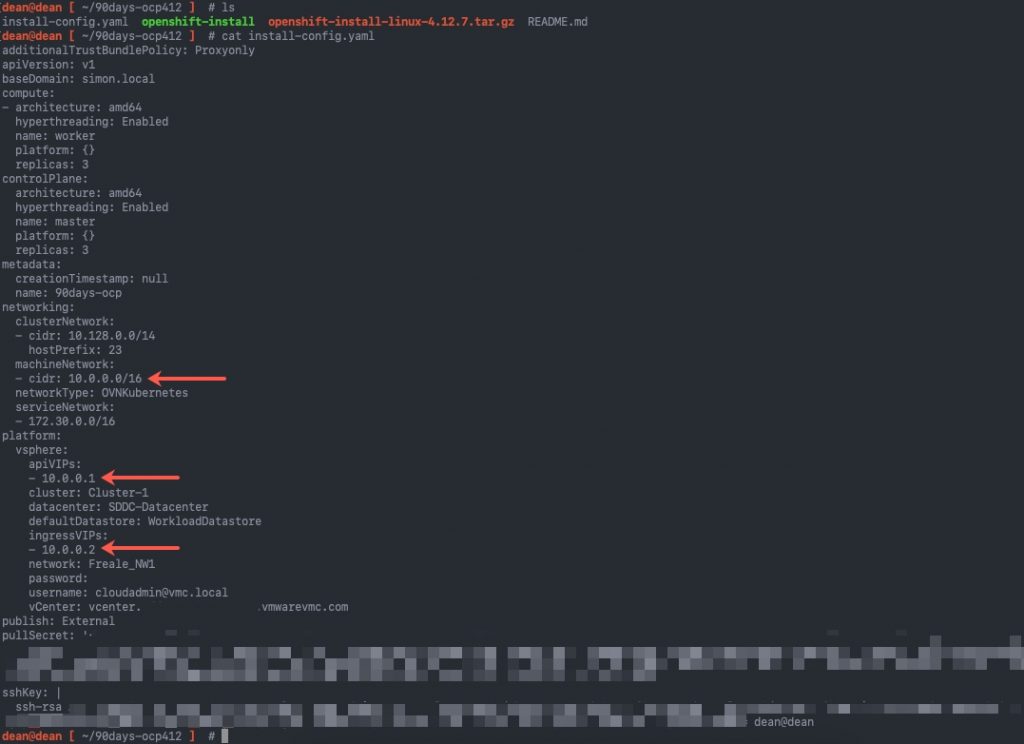
I’ve highlighted in the below image the lines we need to alter.

OpenShift install install config.yaml file

For the section:

machineNetwork: - cidr: 10.0.0.0/16

This needs to be changed to the network subnet the nodes will run on. And for the platform section, you need to map the right IP addresses from your DNS records.

platform:
  vsphere:
    apiVIP: 192.168.200.192 <<<<<<< This is your api.{cluster_name}.{base_domain} DNS record
    cluster: Cluster-1
    folder: /vEducate-DC/vm/OpenShift/
    datacenter: vEducate-DC
    defaultDatastore: Datastore01
    ingressVIP: 192.168.200.193 <<<<<<< This is your *.apps.{cluster_name}.{base_domain} DNS record

Now that we have our correctly configured install-config.yaml file, we can proceed with the installation of the cluster, which after running the openshift-install create cluster command, is hands off from this point forward. The system will output logging to the console for you, which you can modify using the --log-level= argument at the end of the command.

Regards

Dean Lewis

Kubernetes

How to delete Kubernetes namespaces or pods with a specific pattern or name

I had a need to delete a number of Namespaces all at once that were created as part of some automated platform testing.

Each namespace had a common naming convention starting with “e2e”, the below command will get all namespaces without the initial returned header line from Kubectl, look for anything with the pattern “e2e” using the awk command, and print them to a variable $1, xargs then uses each object in the variable array into the “kubectl delete ns”

kubectl get ns --no-headers=true | awk '/e2e/{print $1}'| xargs  kubectl delete ns

You can also do the same for deleting pods. The below command, would delete any pods with “veducate” in their name, you would need to input the necessary namespace.

kubectl get pods -n {namespace} --no-headers=true | awk '/veducate/{print $1}'| xargs  kubectl delete -n {namespace} pod

Quick link to this Stackoverflow post which pointed me in the right direction, I just had to modify it from pods to namespaces as the use case.

Regards

Dean Lewis

Tanzu Blog Logo Header

Tanzu Kubernetes Grid 1.6 – Management Cluster deployment failure – unable to patch the cluster object

The Issue

When deploying a brand new Tanzu Kubernete Grid Management Cluster to a vSphere environment we kept hitting failures like the below. The deployment was very vanilla with the default settings, no extra metadata inputted into the build.

!! [1223 15:26:17.84239]: init.go:732] Failure while deploying management cluster, Here are some steps to investigate the cause:
!! [1223 15:26:17.84256]: init.go:733] Debug:
!! [1223 15:26:17.84262]: init.go:734] kubectl get po,deploy,cluster,kubeadmcontrolplane,machine,machinedeployment -A --kubeconfig /home/michael/.kube-tkg/tmp/config_Qd01VhPd
!! [1223 15:26:17.84272]: init.go:735] kubectl logs deployment.apps/ -n  manager --kubeconfig /home/michael/.kube-tkg/tmp/config_Qd01VhPd
!! [1223 15:26:17.84278]: init.go:738] To clean up the resources created by the management cluster:
!! [1223 15:26:17.84283]: init.go:739] tanzu management-cluster delete
✘ [1223 15:26:17.84291]: init.go:91] unable to set up management cluster, : unable to patch cluster object: unable to patch optional metadata under labels: unable to patch the management cluster object with optional metadata: unable to patch the cluster object: error while applying patch for "&TypeMeta{Kind:,APIVersion:,}" tkg-system/tkg-mgmt-vsphere-20221223151757: Cluster.cluster.x-k8s.io "tkg-mgmt-vsphere-20221223151757" is invalid: [metadata.labels: Invalid value: "": name part must be non-empty, metadata.labels: Invalid value: "": name part must consist of alphanumeric characters, '-', '_' or '.', and must start and end with an alphanumeric character (e.g. 'MyName', or 'my.name', or '123-abc', regex used for validation is '([A-Za-z0-9][-A-Za-z0-9_.]*)?[A-Za-z0-9]')]

The Cause

The tooling creates an erronous value in the cluster config file, which causes the build error.

The Fix

Search for the latest yaml file created in:

~/.config/tanzu/tkg/clusterconfigs/

and comment out the following line:

CLUSTER_LABELS: :,

# The line will now look like this:

#CLUSTER_LABELS: :,

Now re-run the creation of your cluster using the CLI

tanzu mc create --file {file_name.yaml}

Regards

Dean Lewis

Tanzu Kubernetes Grid Cilium Header

How to Deploy a Tanzu Kubernetes Grid cluster using the Cilium CNI

In this blog post I’m going to dive into how you can create a Tanzu Kubernetes Grid cluster and specify your own container network interface, for example, Cilium. Expanding on the installation, I’ll also cover installing a load balancer service, deploying a demo app, and showing some of the observability feature as well.

What is Cilium?
Cilium is an open source software for providing, securing and observing network connectivity between container workloads - cloud native, and fueled by the revolutionary Kernel technology eBPF

Let’s unpack that from the official website marketing tag line.

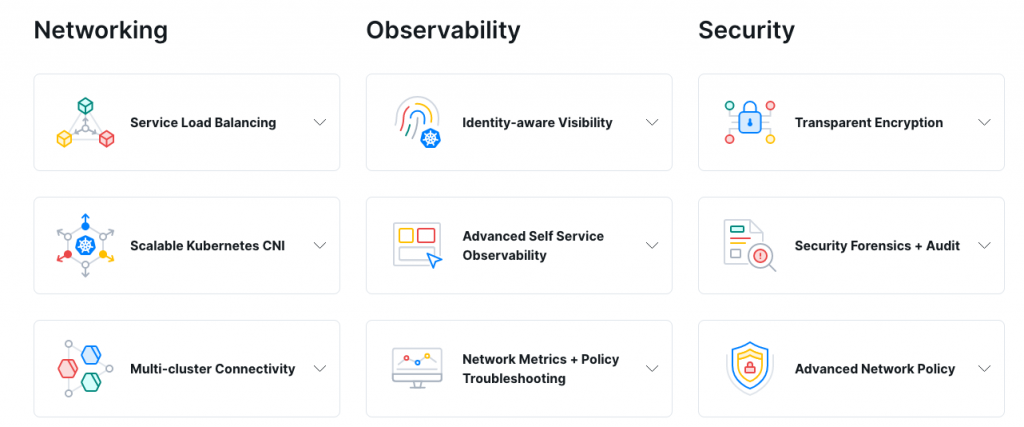
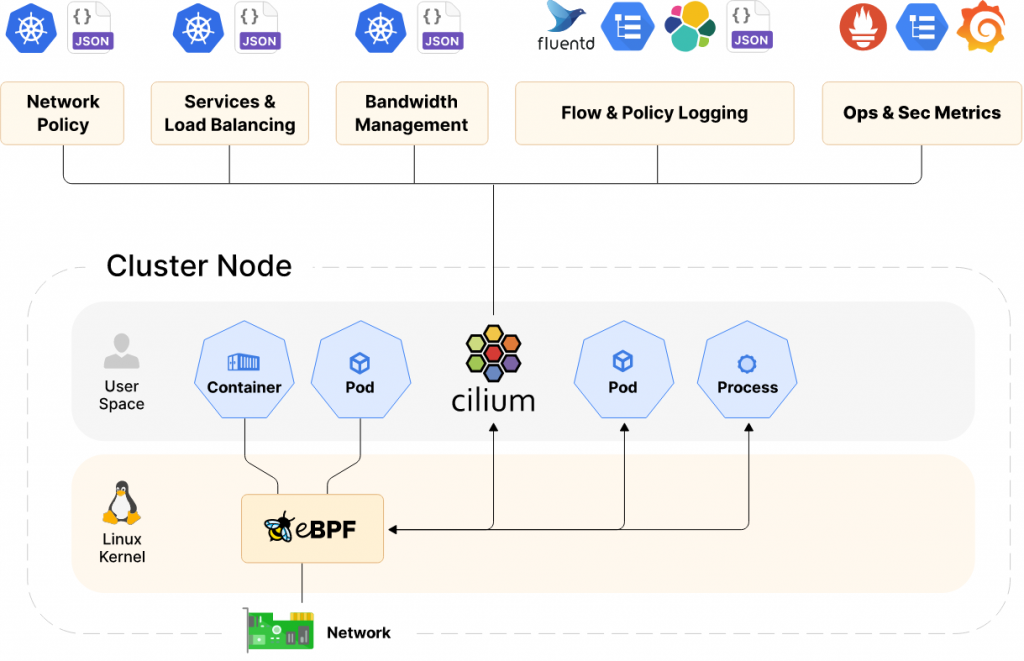
Cilium is a container network interface for Kubernetes and other container platforms (apparently there are others still out there!), which provides the cluster networking functionality. It goes one step further than other CNIs commonly used, by using a Linux Kernel software technology called eBPF, and allows for the insertion of security, visibility, and networking control logic into the Linux kernel of your container nodes.

Below is a high-level overview of the features.

TKG Cilium - Features

And a high-level architecture overview.

Cilium Architecture

Is it supported to run Cilium in Tanzu Kubernetes cluster?

Tanzu Kubernetes Grid allows you to bring your own Kubernetes CNI to the cluster as part of the Cluster bring-up. You will be required to take extra steps to build a cluster during this type of deployment, as described below in this blog post.

As for support for a CNI outside of Calico and Antrea, you as the customer/consumer must provide that. If you are using Cilium for example, then you can gain enterprise level support for the CNI, from the likes of Isovalent.

Recording

How to deploy a Tanzu Kubernete Cluster with Cilium

Before we get started, we need to download the Cilium CLI tool, which is used to install Cilium into our cluster.

The below command downloads and installs the latest stable version to your /usr/local/bin location. You can find more options here. Continue reading How to Deploy a Tanzu Kubernetes Grid cluster using the Cilium CNI