When deploying Red Hat OpenShift to VMware vSphere platform, there are two methods:
- User Provisioned Infrastructure (UPI)
- Installer Provisioned Infrastructure (IPI)
There are several great blogs covering both options and deployment methods.
In this blog, we are going to use the IPI method but customize the settings of our Virtual Machines that are deployed setting CPU and Memory that is different from the default settings.
Getting Started
Setting up your Jump host Machine
I’ll be using an Ubuntu Machine as my jumphost for the deployment.
Download the OpenShift-Install tool and OC command line tool. (I’ve used version 4.6.4 in my install)
Extract the files and copy to your /usr/bin/local directory
tar -zxvf openshift-client-linux.tar.gz
tar -zxvf openshift-install-linux.tar.gz
Have an available SSH key from your jump box, so that you can connect to your CoreOS VMs one they are deployed for troubleshooting purposes.
You need to download the vCenter trusted root certificates from your instance and import them to your Jump Host.
curl -O https://{vCenter_FQDN}/certs/download.zip
Then the following to import (ubuntu uses the .crt files, hence importing the win folder);
unzip download.zip
cp certs/win/* /usr/local/share/ca-certificates
update-ca-certificates
You will need an account to connect to vCenter with the correct permissions for the OpenShift-Install to deploy the cluster. If you do not want to use an existing account and permissions, you can use this PowerCLI script to create the roles with the correct privileges based on the Red Hat documentation.
If you are installing into VMware Cloud on AWS, like myself, you will also need to allow connectivity from your segments as follows:
- Compute gateway
- OCP Cluster network to the internet
- OCP Cluster network to your SDDC Management Network
- Management gateway
- OCP Cluster network to ESXi – HTTPs traffic
DNS Records – You will need the two following records to be available on your OCP Cluster network in the same IP address space that your nodes will be deployed to.
- {clusterID}.{domain_name}
- example: ocp46.veducate.local
- *.apps.{clusterID}.{domain_name}
- example: *.apps.ocp46.veducate.local
If your DNS is a Windows server, you can use this script here.
Minimum Resources
You need to be aware of the minimum deployment options to successfully bring up a cluster.
- 1 Bootstrap
- This machine is created automatically and deleted after the cluster build.
- 3 Control Plane
- 2 Compute Plane
Deploying OpenShift to your vSphere environment
Rather than building the install-config.yaml file by using the Install Wizard, which holds the settings for the deployment. We are instead going to manually create this by first specifying our configuration in variables and writing to a file.
You can use the install wizard to generate the install-config.yaml file, and then edit it with the additional parameters needed before you run the create cluster command.
export Domain={Your base domain name}
export Cluster_Name={Your OCP cluster name}
export Control_Plane_Count={Set number of Control Nodes}
export Control_Plane_CPU={Set CPU Sockets for Control Node}
export Control_Plane_Cores={Set CPU Cores per Socket for Control Node}
export Control_Plane_MemoryMB={Set Memory (in MB) for Control Node}
export Control_Plane_OSDiskGB={Set OS Disk Size (inGB) for Control Node}
export Compute_Plane_Count={Set number of Compute Nodes}
export Compute_Plane_CPU={Set CPU Sockets for Compute Node}
export Compute_Plane_Cores={Set CPU Cores per Socket for Compute Node}
export Compute_Plane_Memory={Set Memory (in MB) for Compute Node}
export Compute_Plane_OSDisk={Set OS Disk Size (inGB) for Compute Node}
export vCenter={Set vCenter FQDN/IP}
export vCenter_User={Set vCenter User}
export vCenter_Pass={Set vCenter Password}
export vCenter=Datacenter={Set vCenter Datacenter}
export vCenter_Cluster={Set vCenter Cluster name}
export vCenter_Datastore={Set datastore to deploy OCP VMs to}
export VM_Network={Set network for OCP VMs}
export apiVIP={Set api IP address}
export ingressVIP={Set ingress IP address}
export pullsecret= $(< ~/{location}/pull-secret.json)
export SSH_KEY= $(< ~/.ssh/id_rsa.pub)
Replace the values as needed and run on your Ubuntu jump host to create the variables.
Then run the following command to generate the install-config.yaml file.
cat << EOF > install-config.yaml
apiVersion: v1
baseDomain: $Domain
compute:
- hyperthreading: Enabled
  name: worker
  replicas: $Compute_Plane_Count
  platform:
    vsphere:
      cpus: $Compute_Plane_CPU
      coresPerSocket: $Compute_Plane_Cores
      memoryMB: $Compute_Plane_Memory
      osDisk:
        diskSizeGB: $Compute_Plane_OSDisk
controlPlane:
  hyperthreading: Enabled
  name: master
  replicas: $Control_Plane_Count
  platform:
    vsphere:
      cpus: $Control_Plane_CPU
      coresPerSocket: $Control_Plane_Cores
      memoryMB: $Control_Plane_Memory
      osDisk:
        diskSizeGB: $Control_Plane_OSDisk
metadata:
  name: $CLuster_Name
networking:
  clusterNetwork:
  - cidr: 10.128.0.0/14
    hostPrefix: 23
  machineNetwork:
  - cidr: 10.0.0.0/16
  networkType: OpenShiftSDN
  serviceNetwork:
  - 172.30.0.0/16
platform:
  vsphere:
    apiVIP: $apiVIP
    cluster: $vCenter_Cluster
    datacenter: $vCenter_datacenter
    defaultDatastore: $vCenter_Datastore
    ingressVIP: $ingressVIP
    network: $VM_Network
    password: $vCenter_Pass
    username: $vCenter_User
    vCenter: $vCenter
publish: External
pullSecret: $pullsecret
sshKey: $SSH_Key
EOF
Below is a completed example when you view the install-config.yaml file.
apiVersion: v1
baseDomain: veducate.local
compute:
- hyperthreading: Enabled
  name: worker
  replicas: 1
  platform:
    vsphere:
      cpus: 8
      coresPerSocket: 4
      memoryMB: 16384
      osDisk:
        diskSizeGB: 120
controlPlane:
  hyperthreading: Enabled
  name: master
  replicas: 3
  platform:
    vsphere:
      cpus: 8
      coresPerSocket: 4
      memoryMB: 16384
      osDisk:
        diskSizeGB: 120
metadata:
  creationTimestamp: null
  name: ocp48
networking:
  clusterNetwork:
  - cidr: 10.128.0.0/14
    hostPrefix: 23
  machineNetwork:
  - cidr: 10.0.0.0/16
  networkType: OpenShiftSDN
  serviceNetwork:
  - 172.30.0.0/16
platform:
  vsphere:
    apiVIP: 192.168.200.192
    cluster: Cluster-1
    folder: /vEducate-DC/vm/OpenShift/
    datacenter: vEducate-DC
    defaultDatastore: Datastore01
    ingressVIP: 192.168.200.193
    network: "network_NW1"
    password: Password@!
    username: [email protected]
    vCenter: vcenter.veducate.local
publish: External
pullSecret: '{"auths":{"cloud.openshift.com":{"auth":"bxxxxxx==","email":"[email protected]"},"registry.redhat.io":{"auth":"Nxxx=","email":"[email protected]"}}}'
sshKey: |
  ssh-rsa AAAABxxxxxx dean@veducate
After this it’s as simple as running the below command and waiting.
openshift-install create cluster
This will read your file and create the cluster as designed, if you need to scale up or change the resource settings for your virtual machines in your cluster once it is deployed, please see this blog post;
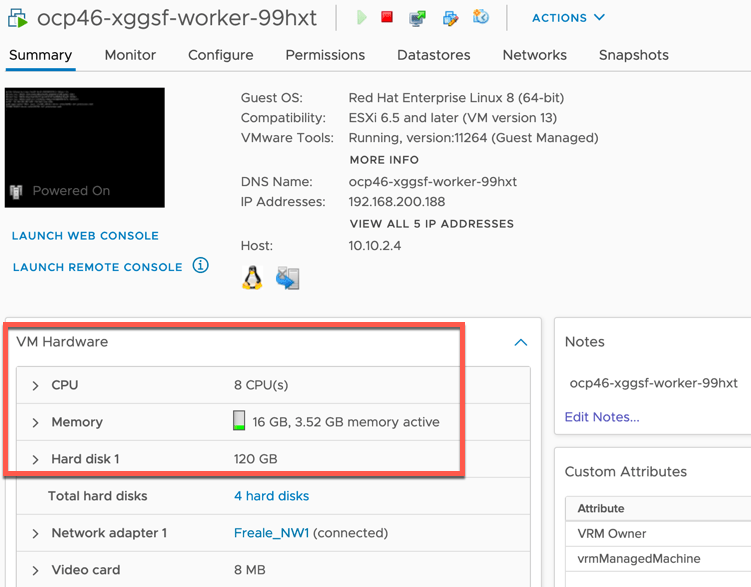
Below you can see my deployment cluster with changed settings from OOTB for the worker nodes.


If you are planning on using the vSphere CSI Driver with your OpenShift platform, you will now need to power off your cluster to increase the VM Hardware compatibility to vSphere 6.7 u2 or higher (VMX-15) for support.
Regards
