On to-day 3, most of you have probably noticed that I am posting these online a day behind when I actually take the class, which is helpful, as I spend the evening typing up my notes and building the topologies etc in Visio. It's a good way to re-cap stuff.
So I cheated a bit on the last post as I stopped before OSPF, so we hit all the main points in one big go.
So heres a quick summary of what will be covered in this post;
- OSPF
- OSPF Timers
- Packet Types
- Hello Packet
- OSPF Convergence
- OSPF Convergence Troubleshooting
- Router ID
- OSPF Virtual-Link
- OSPF Authentication
- DR/BDR Concept
- Point-to-Point Links
- Broadcast Multi-Access Network
- Non-Broadcast Multi-Access Network
- Point-to-Multipoint
- Point-to-Point Subinterface
OSPF
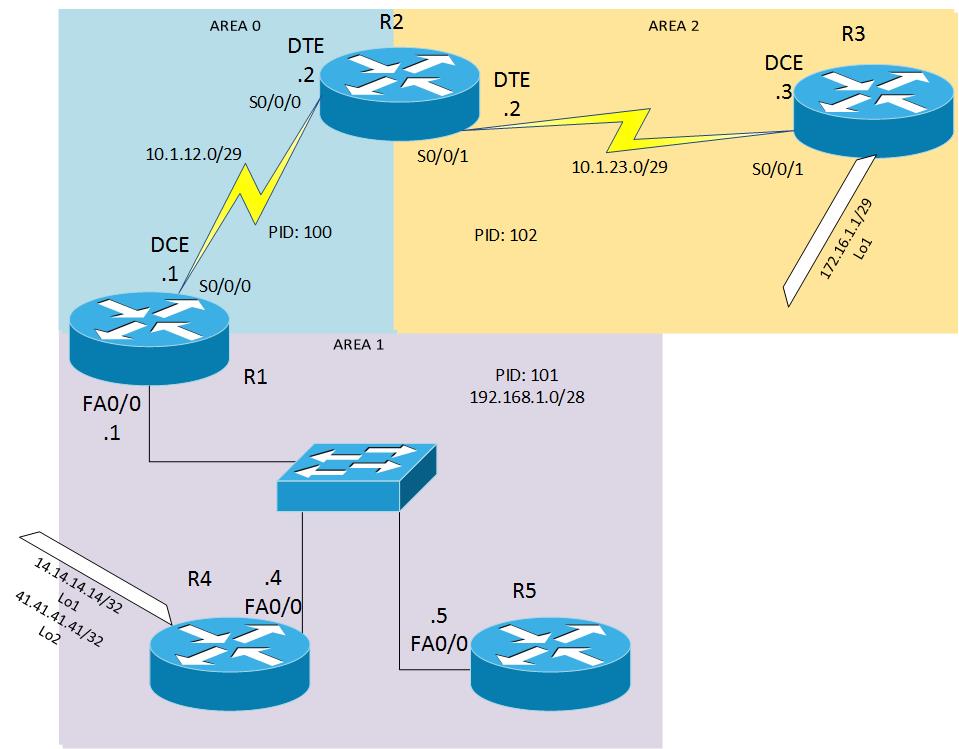
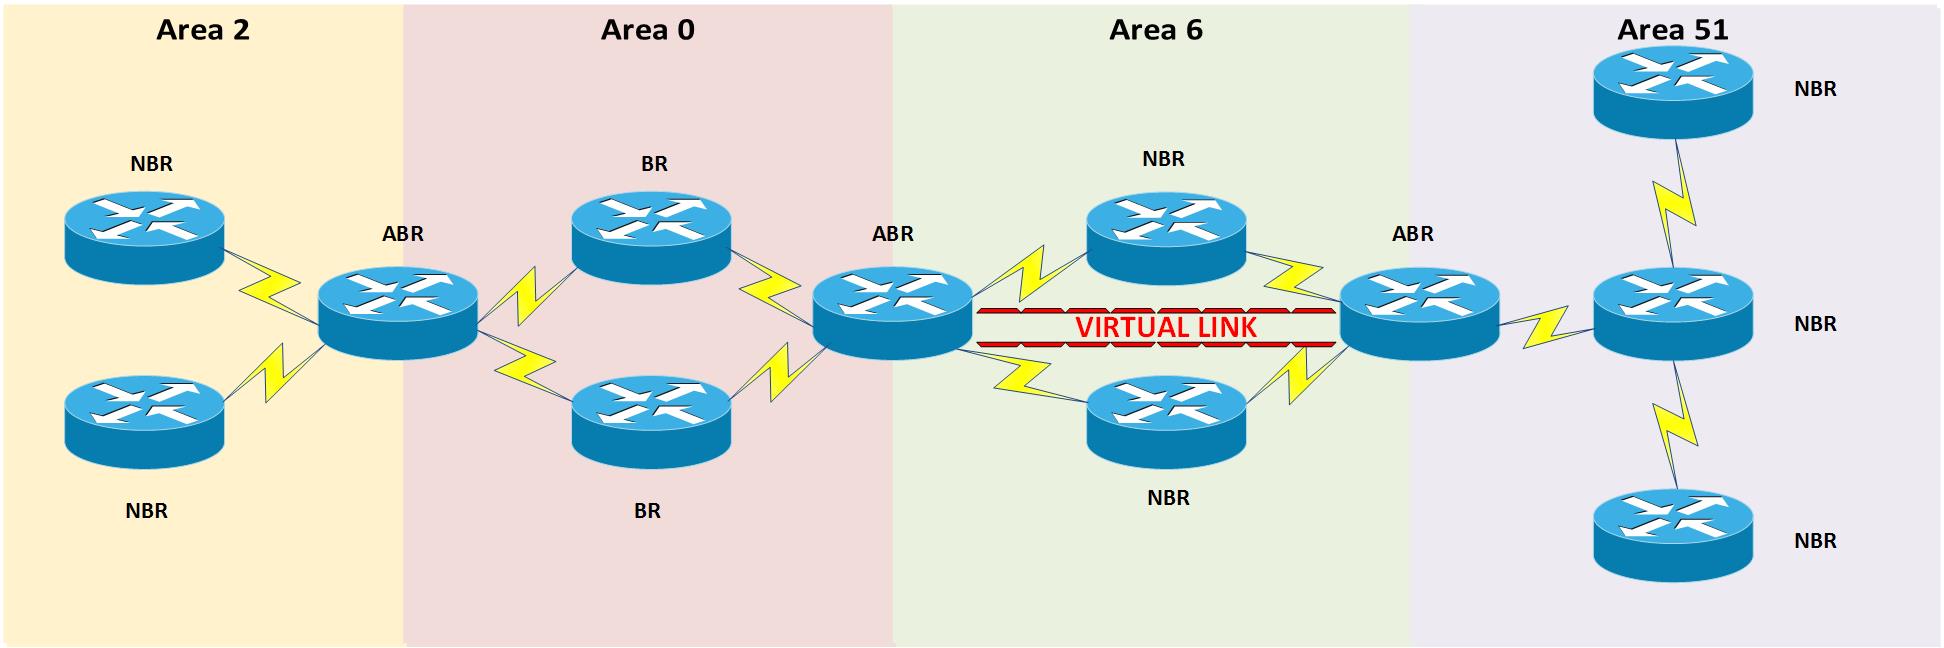
Here is the first topology we worked off.
- Link State Protocol
- Open Source
- uses SPF algorithm created by Mr Djkstra
- Routes determined on COST = 10 power 8 / bandwidth
- Uses multicast - 224.0.0.5 + 224.0.0.6
- Classless variable lengths
- Equal load balancing
- True loop free routing
Some of the downsides are
- It can become complex
- Memory and CPU intensive
- Fast convergence
- Manual Summary
- No unequal load balancing
Maybe the above points crop up due to the fact they aren't an issue in EIGRP, which is "owned" by Cisco, and this is a Cisco Exam, but make your own judgement on which is the superior routing protocol.
OSPF must always have an Area 0, which is central to the network. This is called the Backbone, all other Area's have to "Touch" Area 0, and these are called Non-Backbone.
- BR = Backbone Router
- NBR = Non-Backbone Router
- ABR = Area Backbone Router
- ASBR = Autonomous System Board Router - Used to isolate from flapping links and causing re-convergence, helps to reduce size of routing tables as this is where Summarisation is performed.
OSPFv3 = used for IPv6.
OSPF uses the Routing table, Neighbor Table and Database (AKA Link State Database) to operate.
An ASBR is used to redistribute routes from EIGRP into OSPF and vice versa. When going from OSPF to EIGRP you need to set the K Metric Values for EIGRP (bandwidth, Delay, Reliability, Load and MTU)

BMA = Broadcast Multi-Access
NBMA = Non-Broadcast Multi-Access
I found this create post which explains the differences as well, I wont copy and paste, but click here for the link.
OSPF Timers
Packet Types
- Link State Advertisements/Updates (Triggered/Incremental - Every 30 mins Full DB sent).
- Hello Packets (Discover and maintain neighbor relationships).
- LSR (Link State Requests - Database Download).
- DBD (Database Descriptor).
- LS ACK (for DBD, LSA, LSU, LSR [Flooding Acknowledgement])
Hello Packet
Sent on 224.0.0.5 and 224.0.0.6
Contains the following in the packet;
- RID of interface
- Authentication
- Hello Dead Timers
- Area ID
- Nieghbor List (If not a nieghbor, sends more info)
- Designated Router IP
- Backup DR IP
- Priority of Interfaces
OSPF Convergance
- Down
- A. Attempt (NBMA Only)
- Initialization (Send Hello's using 224.0.0.5 224.0.0.6)
- Two-Way
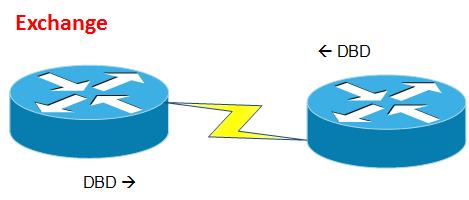
- Exchange Starts (election of DR)
- Exchange of DBDs
- Loading - updates requested/required
- Full - OSPF Converged
If the router is a BDR it will stay in this two-way state.
- Exchange Start State - Routers now place a part in the electiOSPFon process, the winner (DR) takes control of the DBD messages.
- Exchange of DBDs - Winner of exchange floods the looser with LSA Summary (DBD Packets)
- Loading - Any updates are requested or required

- Full - OSPF has converged and routing tables are complete
Troubleshooting - Two way;
- Area ID must match
- Authentication must match
- Timers must match
- Common subnet advertised on both sides
- No passive interface set
- All routers in stub area must be configured in stub (along the links)
Router ID (RID)
Chosen based on the following, in priority order;
- Manual Router ID
- Highest loopback interface
- Highest interface
OSPF Virtual Link
A Virtual Link is created to extend Area 0 when joining a new area that does not touch Area 0. See Below;
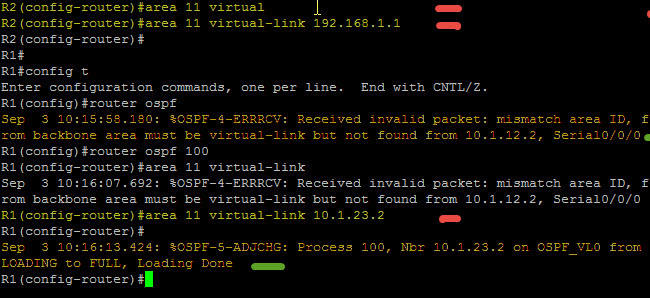
The commands to create a virtual link are as follows;
router ospf [ASN]
area [ID] virtual-link [RID for other router]
To try this yourself;
- From the topology at the top of this post;
- Change existing Area 0 to Area 11
- Change existing Area 1 to 0
- Change existing Area 2 to 54
Below are screenshots from my own deployment, in yellow is the config to create the virtual link, and in orange is the logging from the virtual link.
Notice that it states a virtual link was needed before it was created, and then acknowledging that it has being created and changed into the FULL OSPF state.
OSPF Authentication
Clear Text
interface s0/0/0
ip ospf authentication-key [Value]
ip ospf authentication
Message Digest
interface s0/0/0
ip ospf authentication-key [Value]
ip ospf authentication message-digest
ip ospf message-digest key [Key Number] MD5 [Value]
DR/BDR Concept
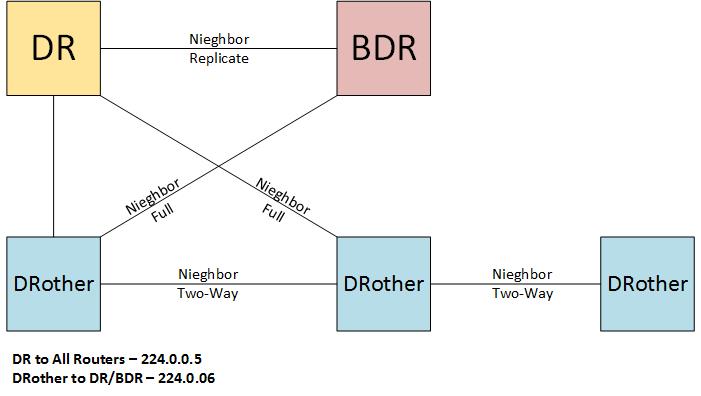
DR = is the elected router which has the highest priority. If duplicate is found, then highest RID is used for tie break.
BDR = is the elected router which has the second highest priority. If duplicate is found, then second highest RID is used for the tie break.
DRother = These are the routers with the lower priorities than DR + BDR. Or the priority has manually been set to 0.
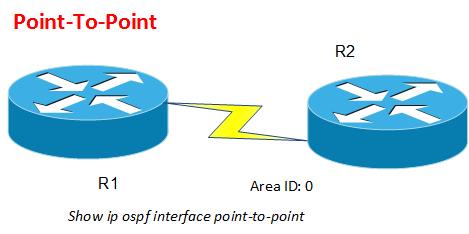
Point-to-Point
This is as simple as it states, a point to point network that is very simple.
- No DR/BDR concept.
- Has a Master and Slave concept instead, with highest interface chosing the Master, but can be manually set.
- Default Priority = 0
- Multicast = 224.0.0.5
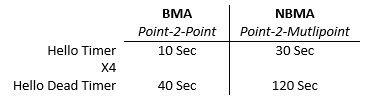
- Hello Timer = 10
- Hello Dead Timer = 40
- 1 Common Subnet
sh ip ospf interface point-to-point
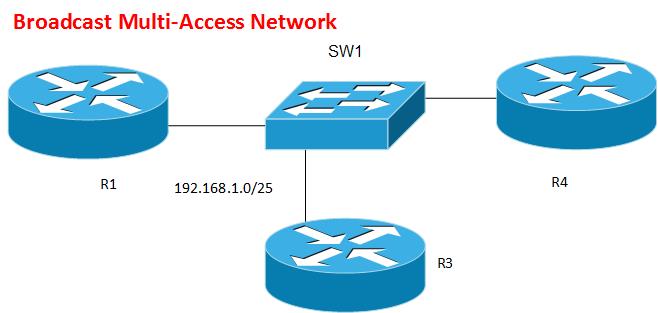
Broadcast Multi-Access Network
- Hellos sent on 224.0.0.5
- Priority = 1
- Hello Timer = 10
- Hello Dead Timer = 40
- 1 Common Subnet
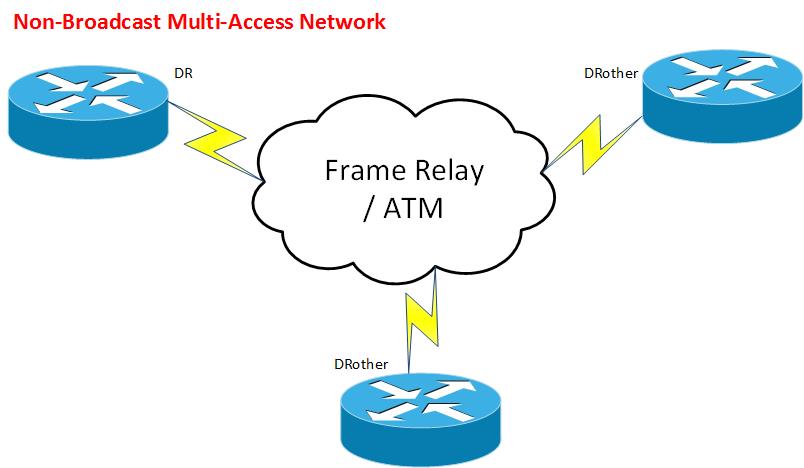
Non-Broadcast Multi-Access Network
- No Mutlicast of Hello Packets
- No auto-discovery of nieghbors (Relies on manual neighbor setup)
- Uses DR/BDR concept
- Hello Timer = 30 Seconds
- Hello Dead Timer = 120 Seconds
- 1 Common Subnet
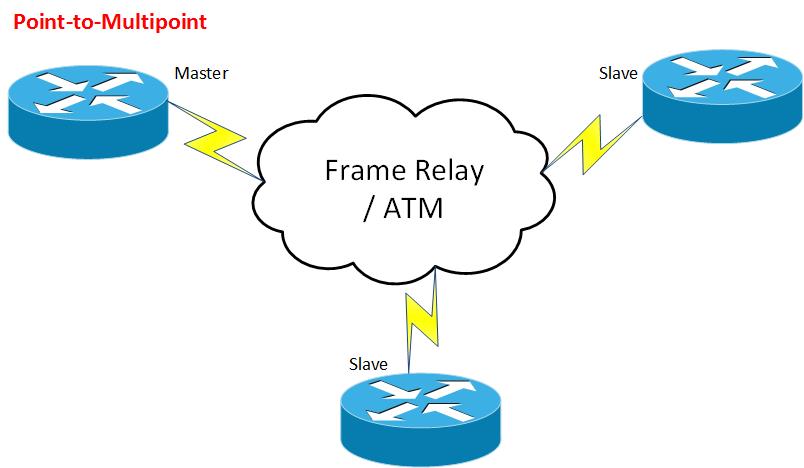
Point-to-Multipoint
- Master/Slave concept is used (not DR/BDR)
- Hellos are sent on 224.0.0.5
- Hello Timer = 30 Seconds
- Hello Dead Timer = 120 Seconds
- 1 Common Subnet
- There are known issues with split horizon (the use of same/similar subnets at two different "sites")
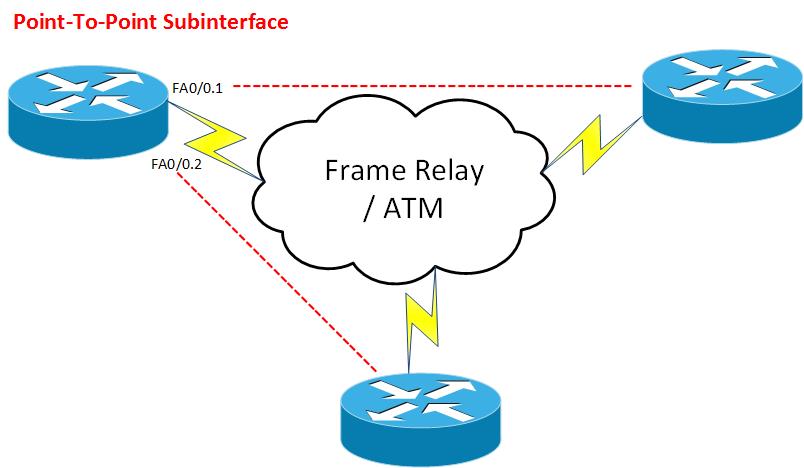
Point-to-Point Subinterface
- Hellos are mutlicast
- Master/Slave Concept (Not DR/BDR concept)
- 1 virtual-circuit per subnet
- No split horizon issues (oppose to Point-to-Multipoint)
- Hello Timer = 10 Seconds
- Hello Dead Timer = 40 Seconds
So that's it for Day 3, next up we have OSPF Summerization, LSA types and more!!
Cheers