In this blog post, we will cover the technical configuration to import the packages that myself and Katherine Skilling (Twitter, LinkedIn, Blog) have created.
This work is to show the possibility of creating custom workflows to integrate other products that are not natively supported within vRA, by exploiting Dynamic Types. A further write-up will detail the technical configurations of how this integration was created.
You can read this blog post on how to create Dynamic Types in vRealize Orchestrator to be used as custom resources in vRealize Automation:
Updated Feb 2022 - Includes edits needed to enable compatability with Data Management for VMware Tanzu v1.1
High-Level Overview
This blog post focuses on integrating “Data Management for VMware Tanzu”, you can read more here about this product:
- Data Management for VMware Tanzu – Getting Started
- Data Management for VMware Tanzu – Self-Service Database-as-a-Service
- Data Management for VMware Tanzu- Postman API Collection
These packages offer the following capabilities:
- vRA Cloud Assembly Custom Resource for Data Management with VMware Tanzu
- Create a database instance
- Delete a database instance (clean up when a deployment is deleted)
- Day 2 actions for database instance
- Scale database instance resources
- Point in Time Backup of database instance
- Power-On database instance
- Power-Off database instance
Pre-Requisites
- Data Management for VMware Tanzu platform deployed and configured
- Agent appliance deployed and environment configured.
- Organisation configured with Org Admin user account.
- vRealize Automation deployed and configured
- Using embedded vRO will be fine
- vRA needs to be able to connect to the DMS system over HTTPs, so appropriate routes and firewalls configured.
- Grab the files from this location
Recording
Below is a 25 minute recording showing you how to implement the documented steps that follow in this blog post.
Importing & Configuring the vRealize Orchestrator packages
From the downloaded files under the folder “vRealize Orchestrator” there is two files:
- com.vmware.dms.backup.package
- dms-dynamictypes-config.package
Open the vRealize Orchestrator UI (https://{vro-url}/orchestration-ui)
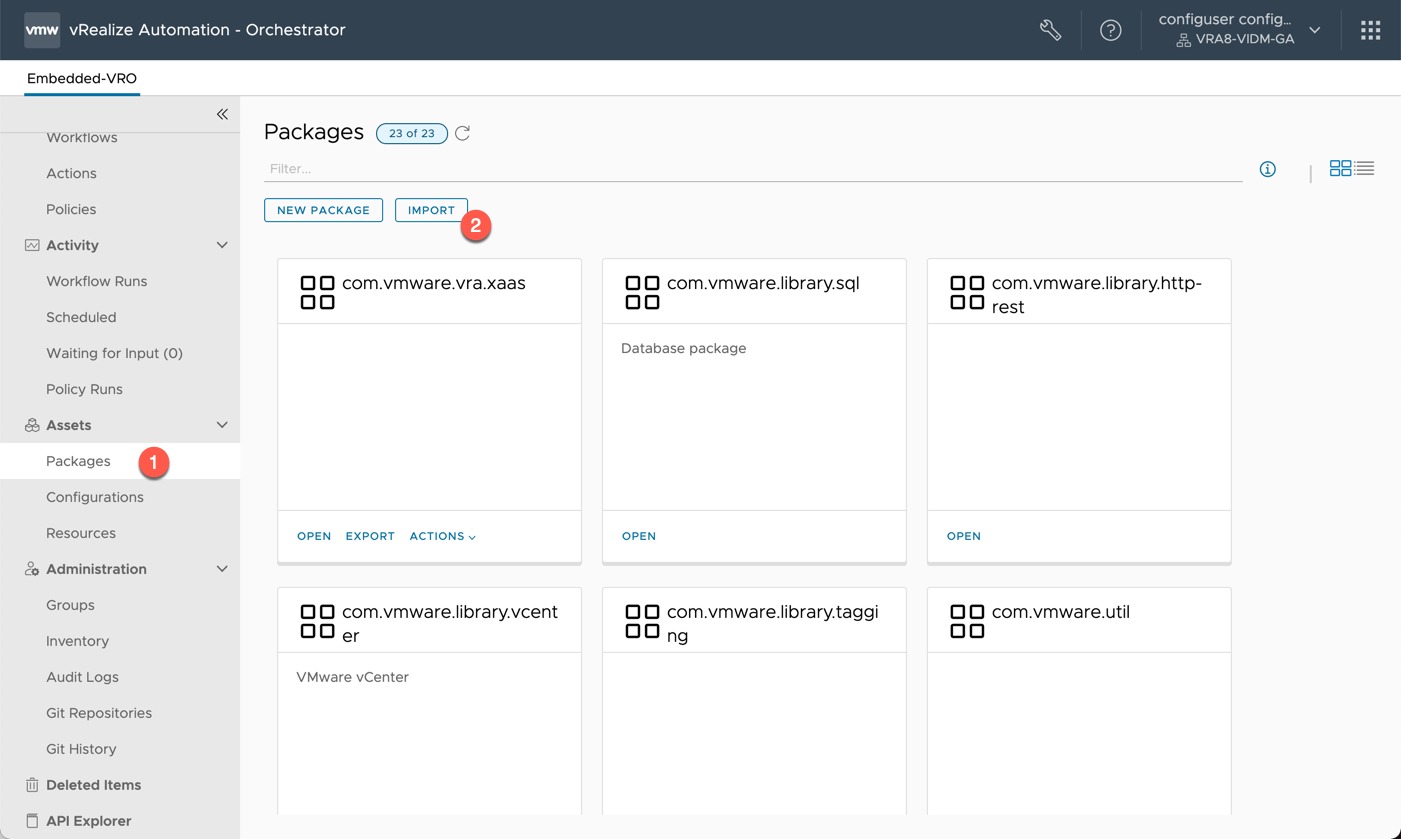
- Left-hand navigation pane > Assets > Packages > Import
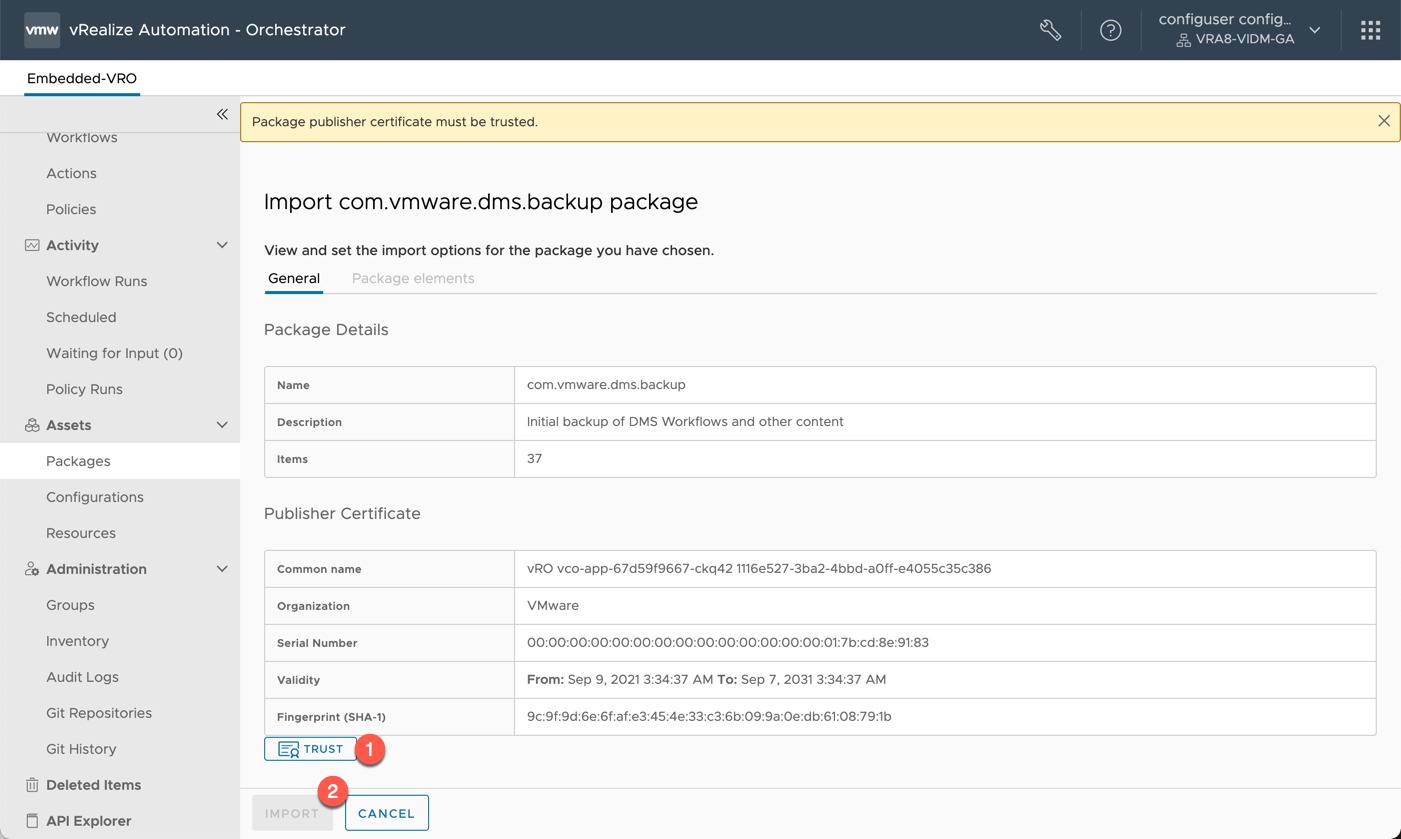
- Select the file name “com.vmware.dms.backup.package”
- Select to trust the package and click import
Now we need to configure some of the assets before we import the next configuration.
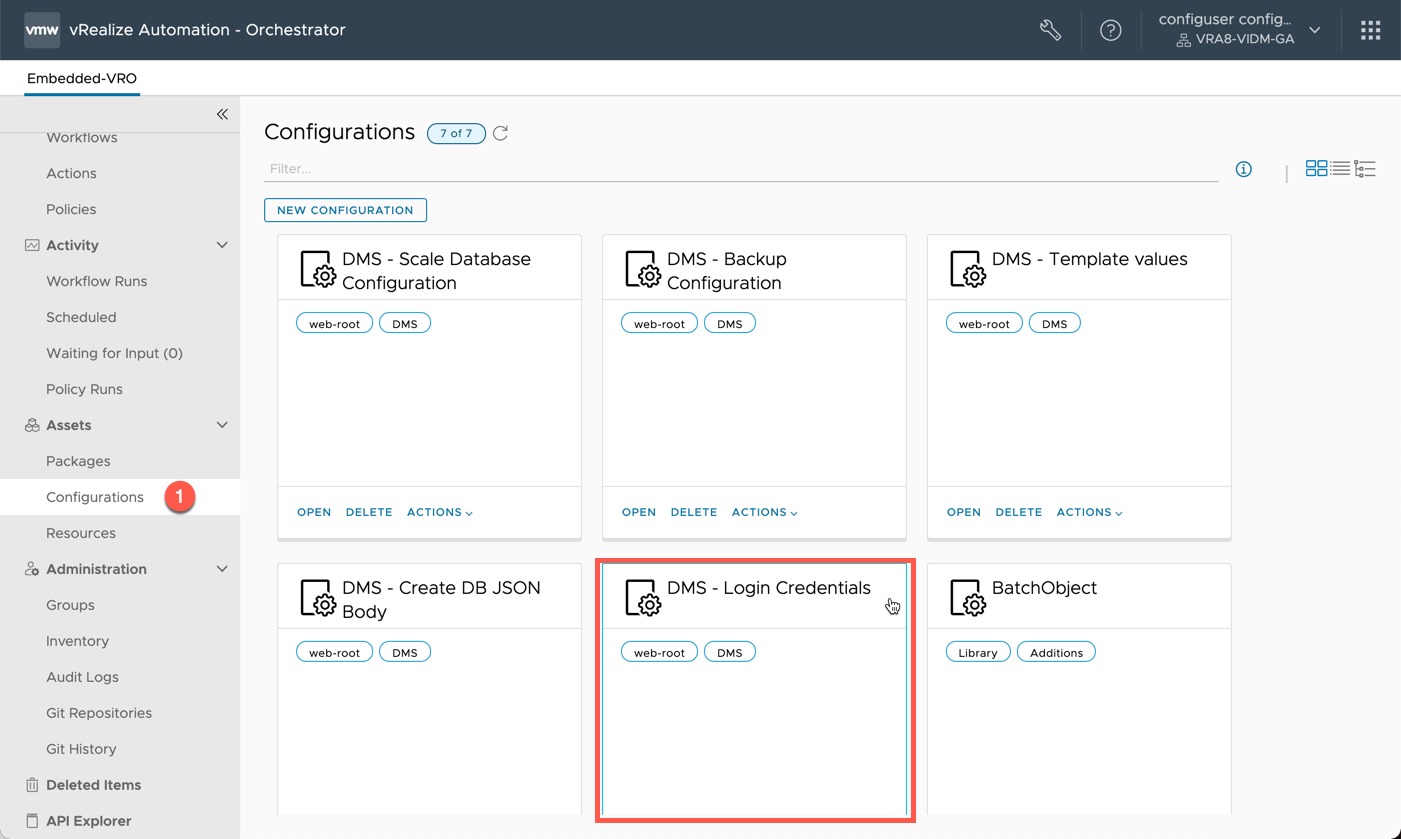
- Left-hand navigation pane > Assets > Configurations
- Click on the item “DMS – Login Credentials”
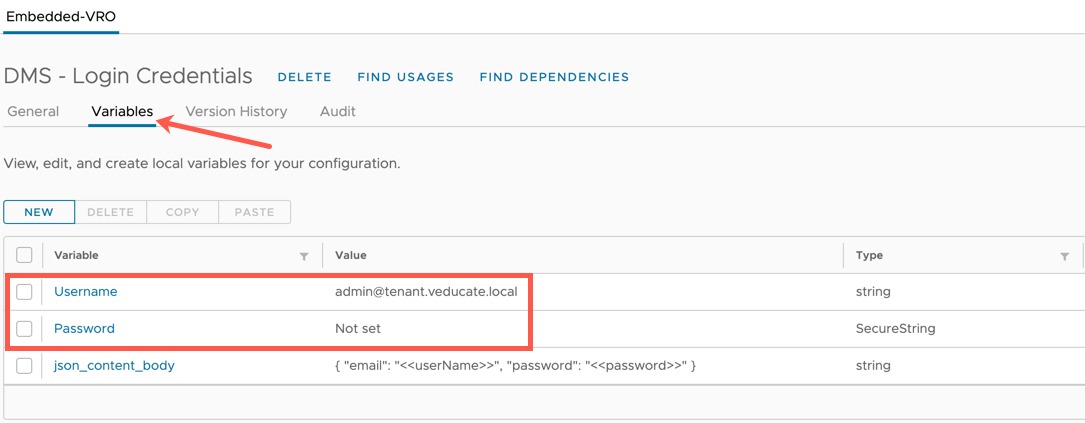
- Select the Variables tab
- Edit the Username and Password as appropriate
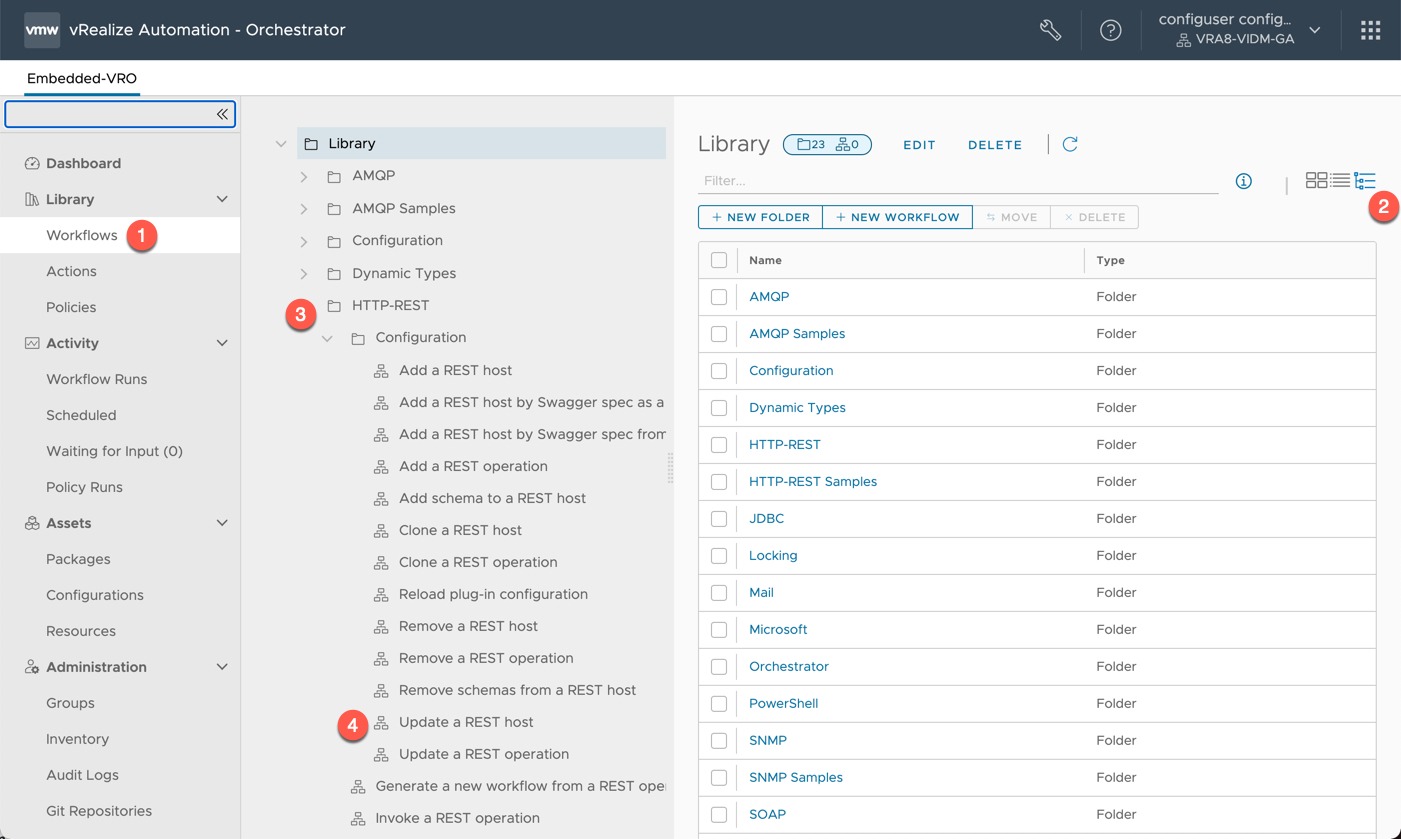
- Left-hand navigation pane > Library > Workflows
- Select the Tree navigation view on the right-hand side
- Open the folder structure > Library > HTTP-REST > Configuration
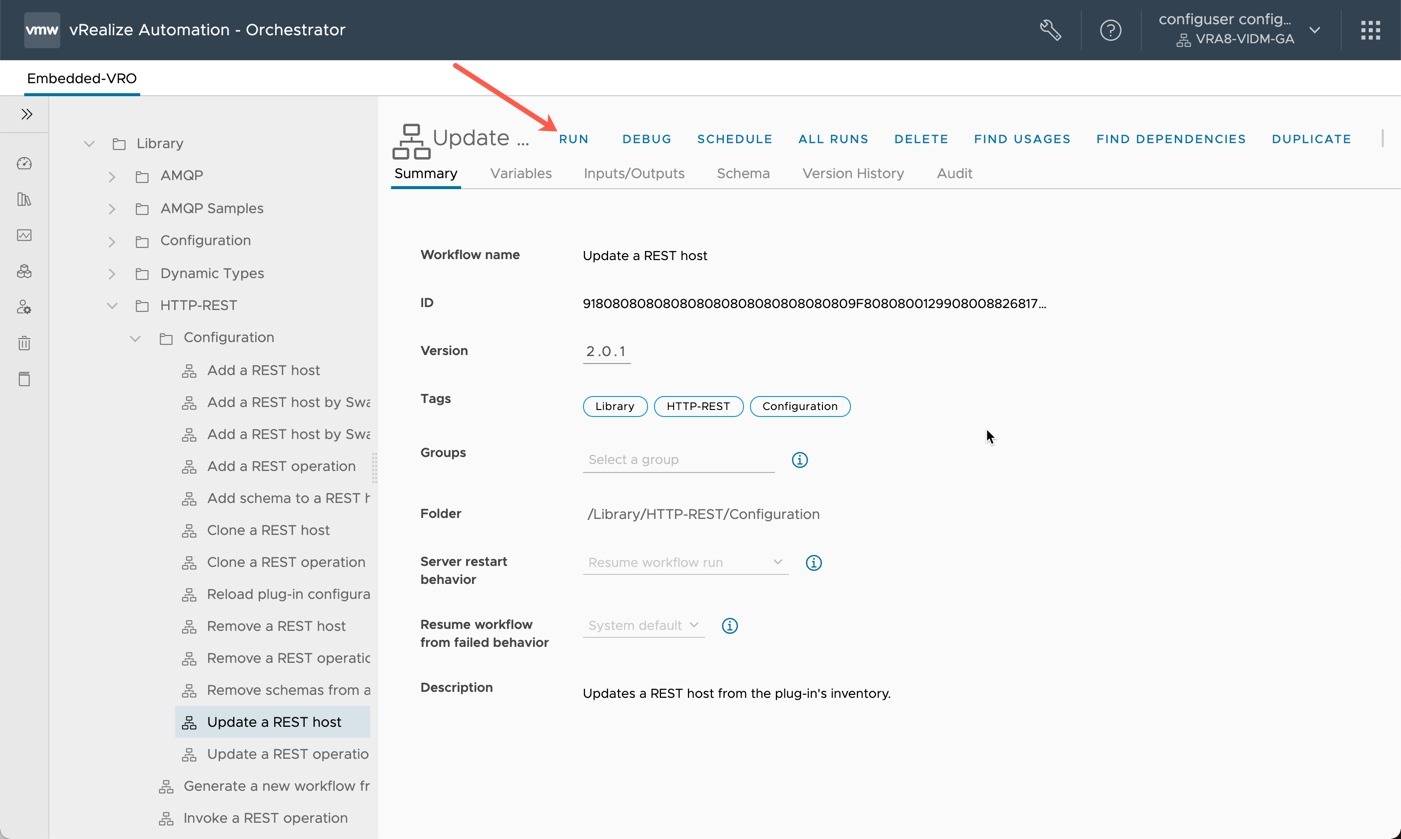
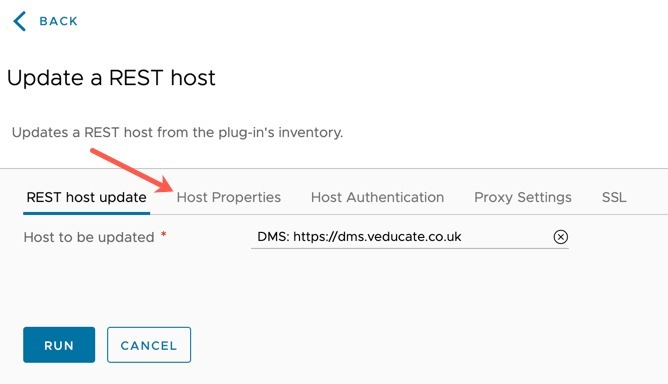
- Select the “Update a REST HOST” Workflow
- Run the workflow
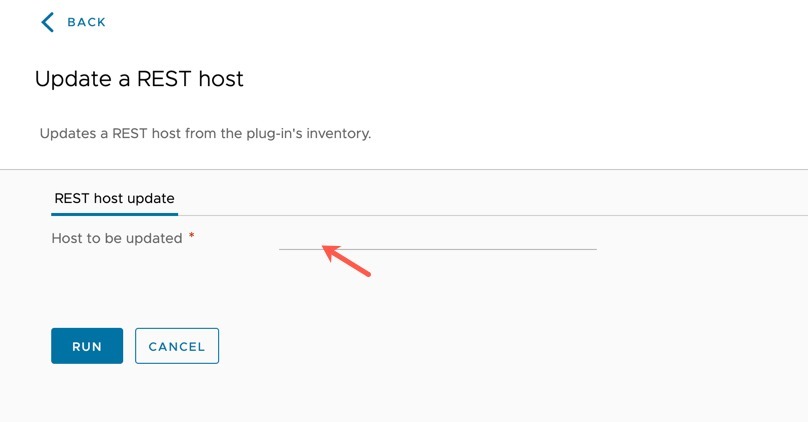
- Select the blank space next to “Host to be updated”, this will open another dialog window
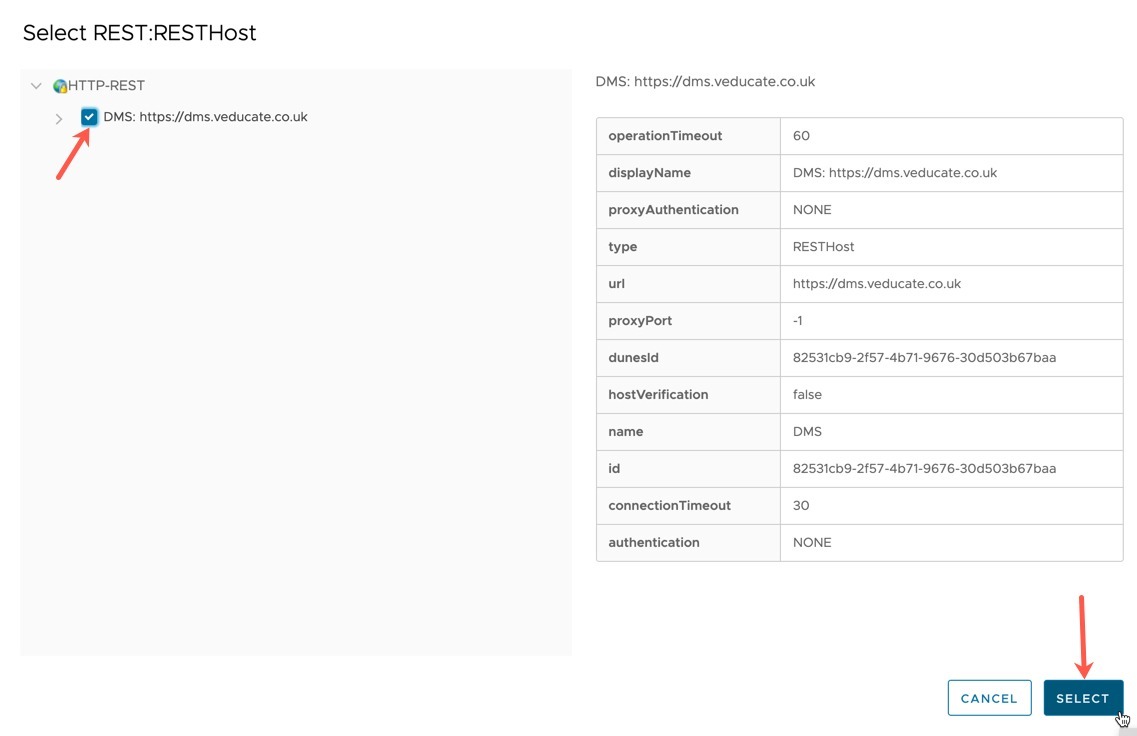
- Select the DMS Rest Host
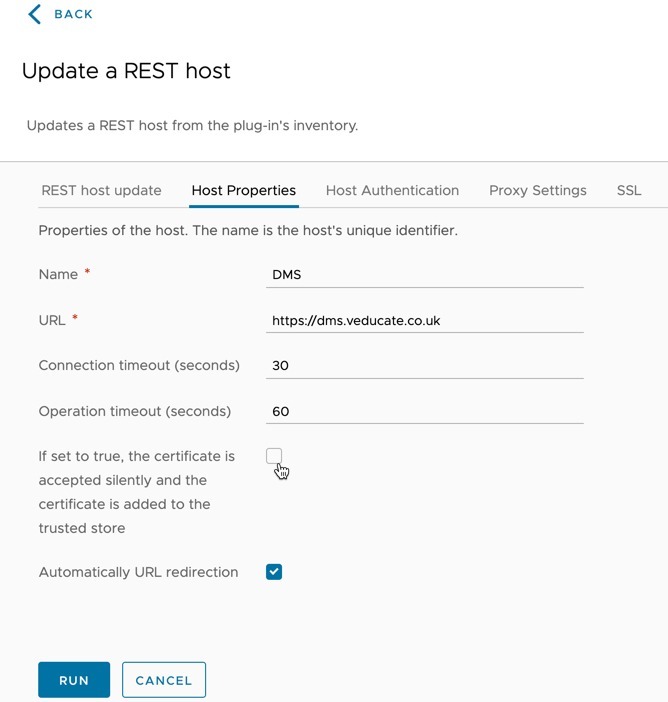
- Now you will see additional tabs, select “Host Properties”
- Edit the REST Host details to match your environment, if using internal or self-signed certificates select the appropriate option for trusting the certificate.
- Click Run
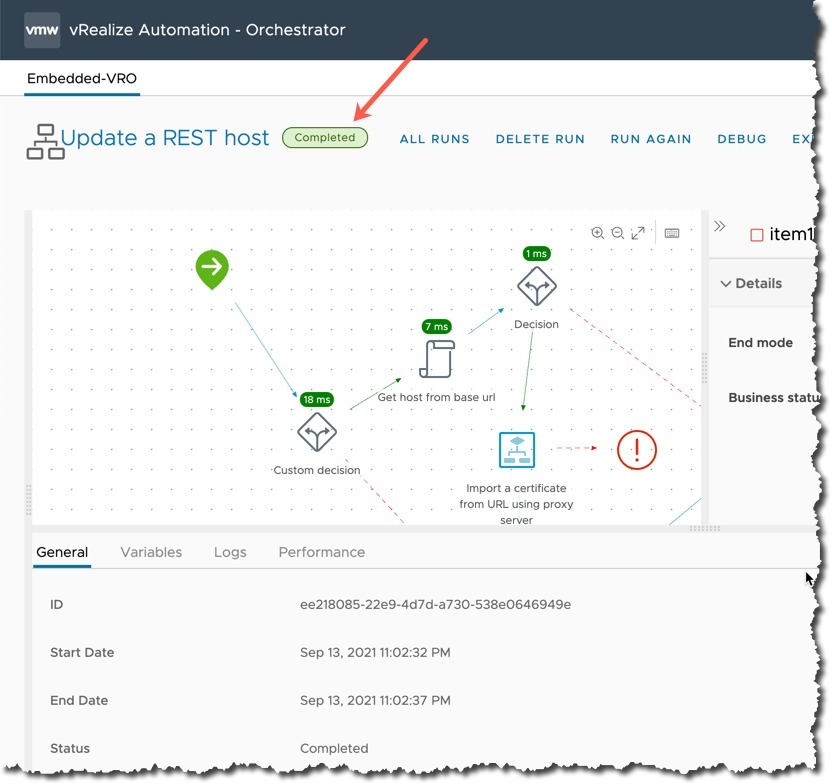
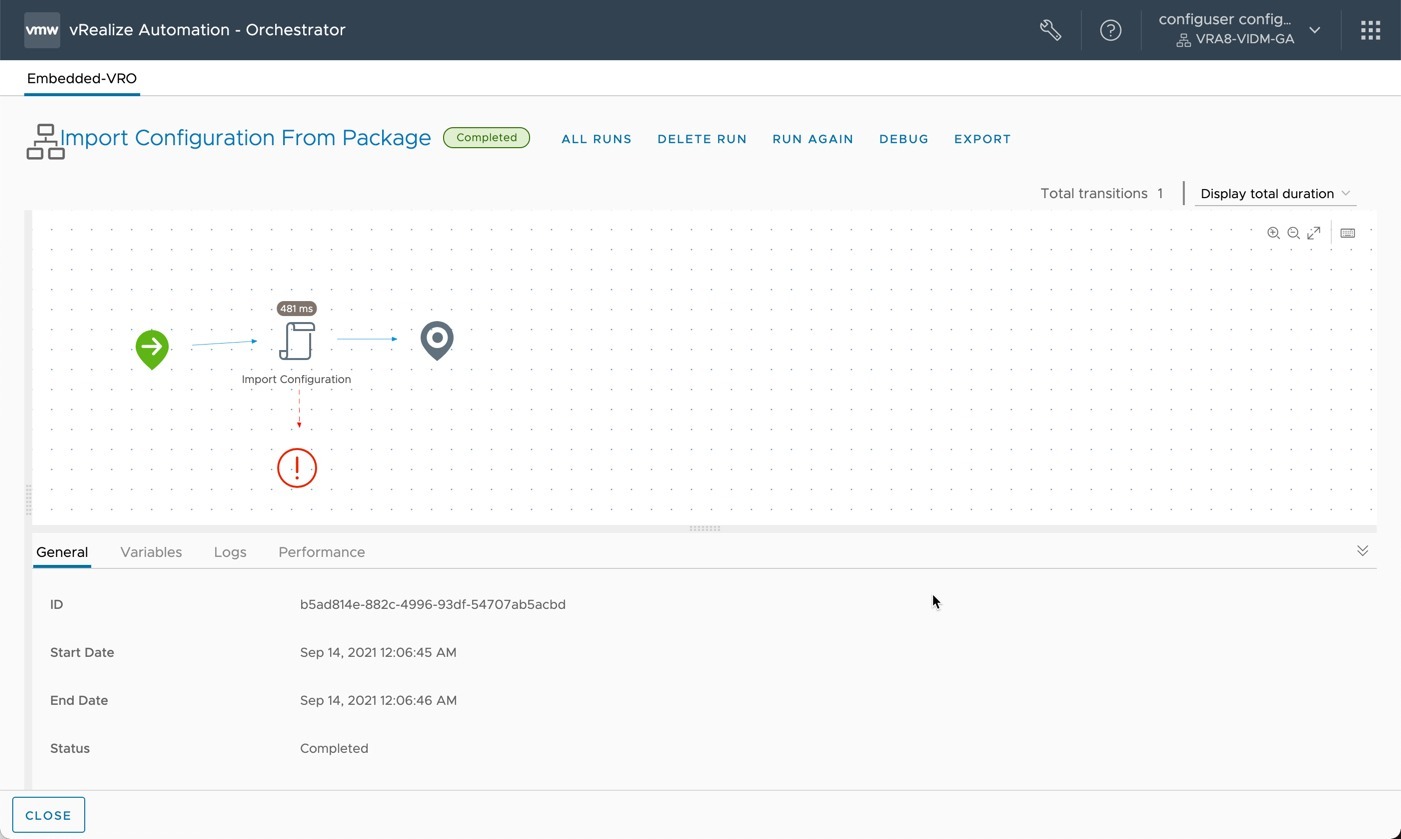
You should be seeing a completed message once the run completes.
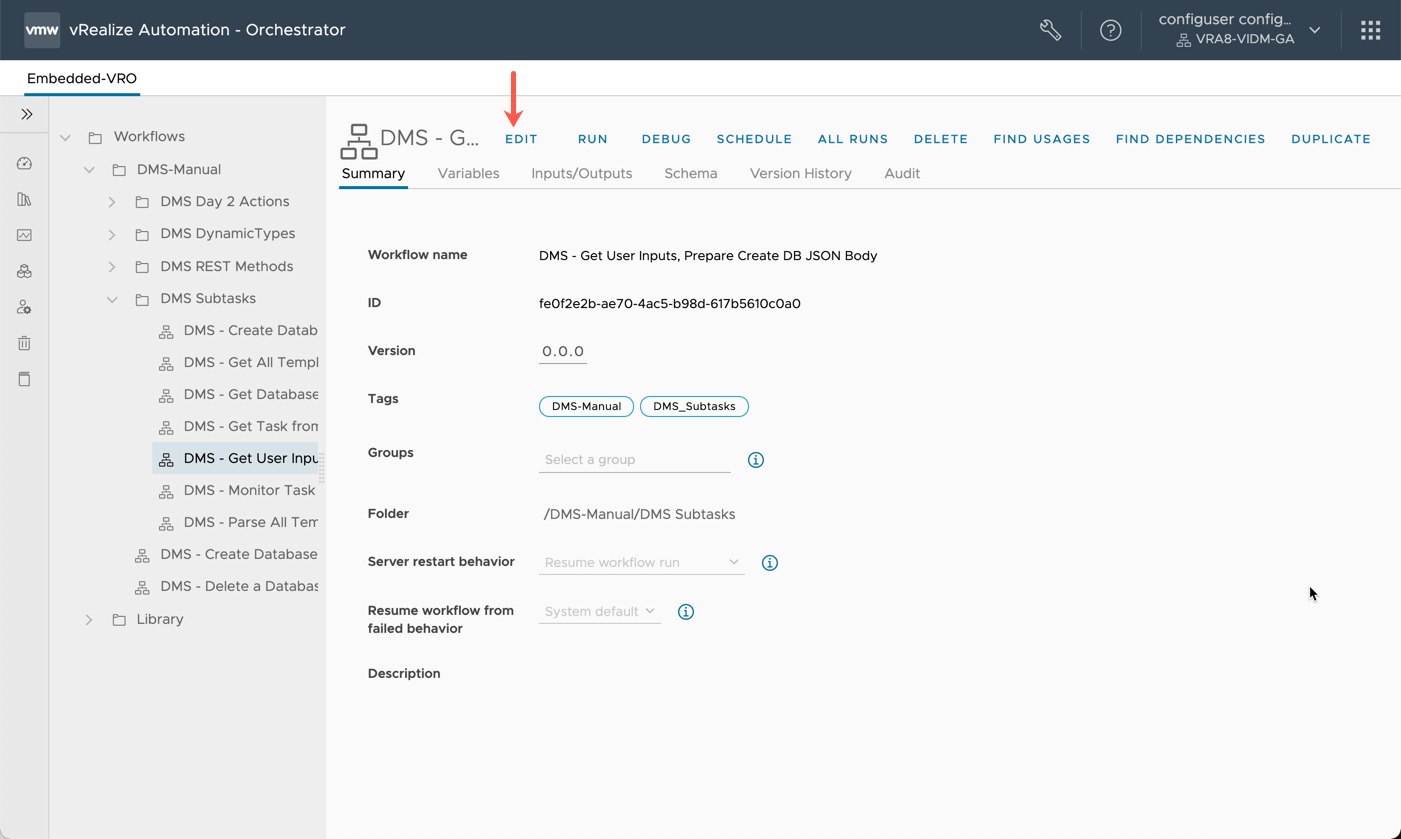
- Left-hand navigation pane > Library > Workflows
- Navigate to the following via the folders in the tree view > Workflows > DMS-Manual > DMS Subtasks
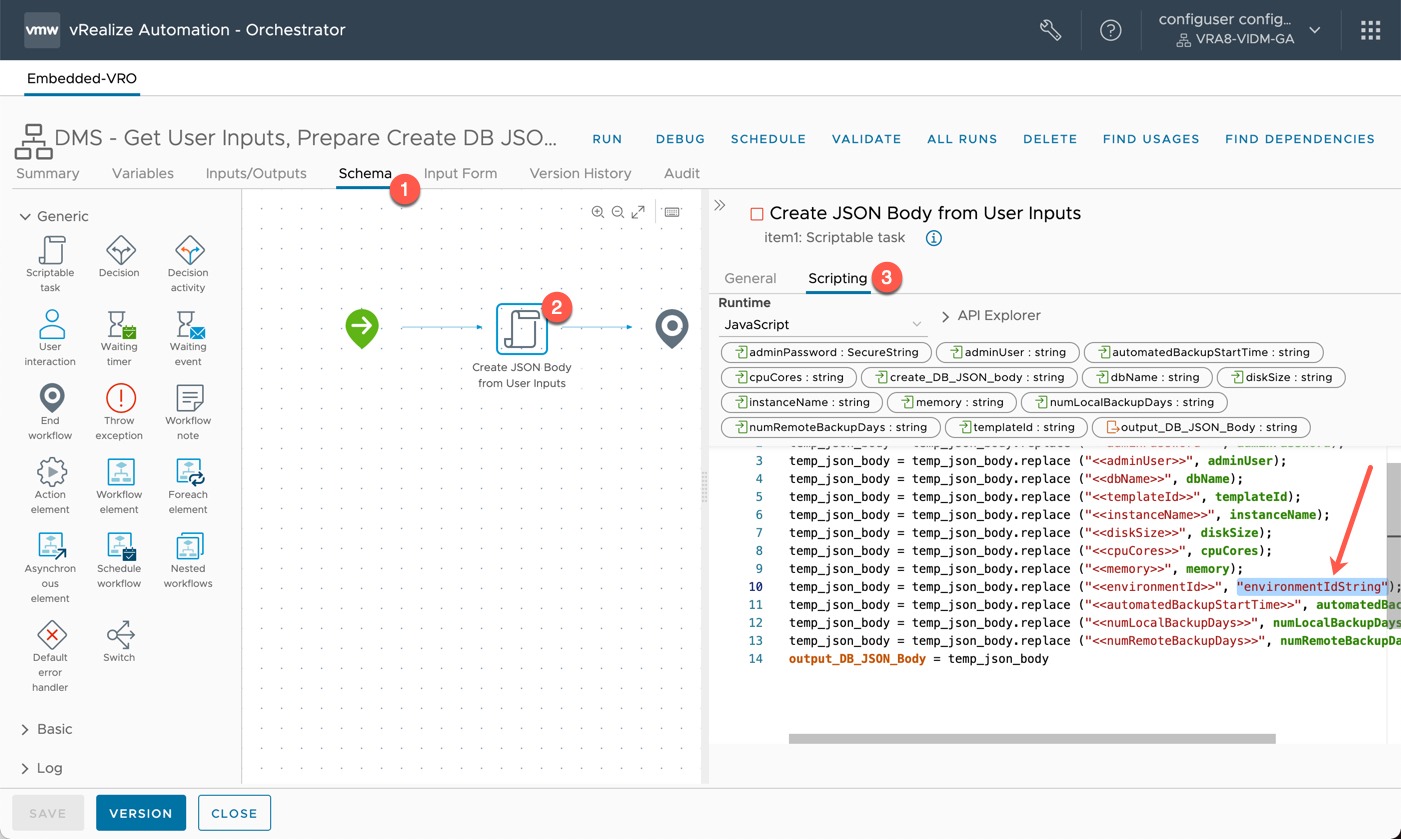
- Select & edit the workflow “DMS – Get User Inputs, Prepare Create DB JSON Body”
- Select the “Schema” tab
- Select the Scriptable Task “Create JSON Body from User Inputs”
- Select the Scripting tab for the task
- Input the EnvironmentId from your DMS installation.
- You can find this using the API call:
- GET https://{{baseUrl}}/provider/environments/search/withOrgId?tenantId={{OrgId}}
- You can find this using the API call:
- Save the workflow
- You can also get the EnvironmentId from the Browser URL string when browsing to see the vCenter environment in DMS as the provider admin user.
Now we will proceed to import the DynamicTypes configuration.
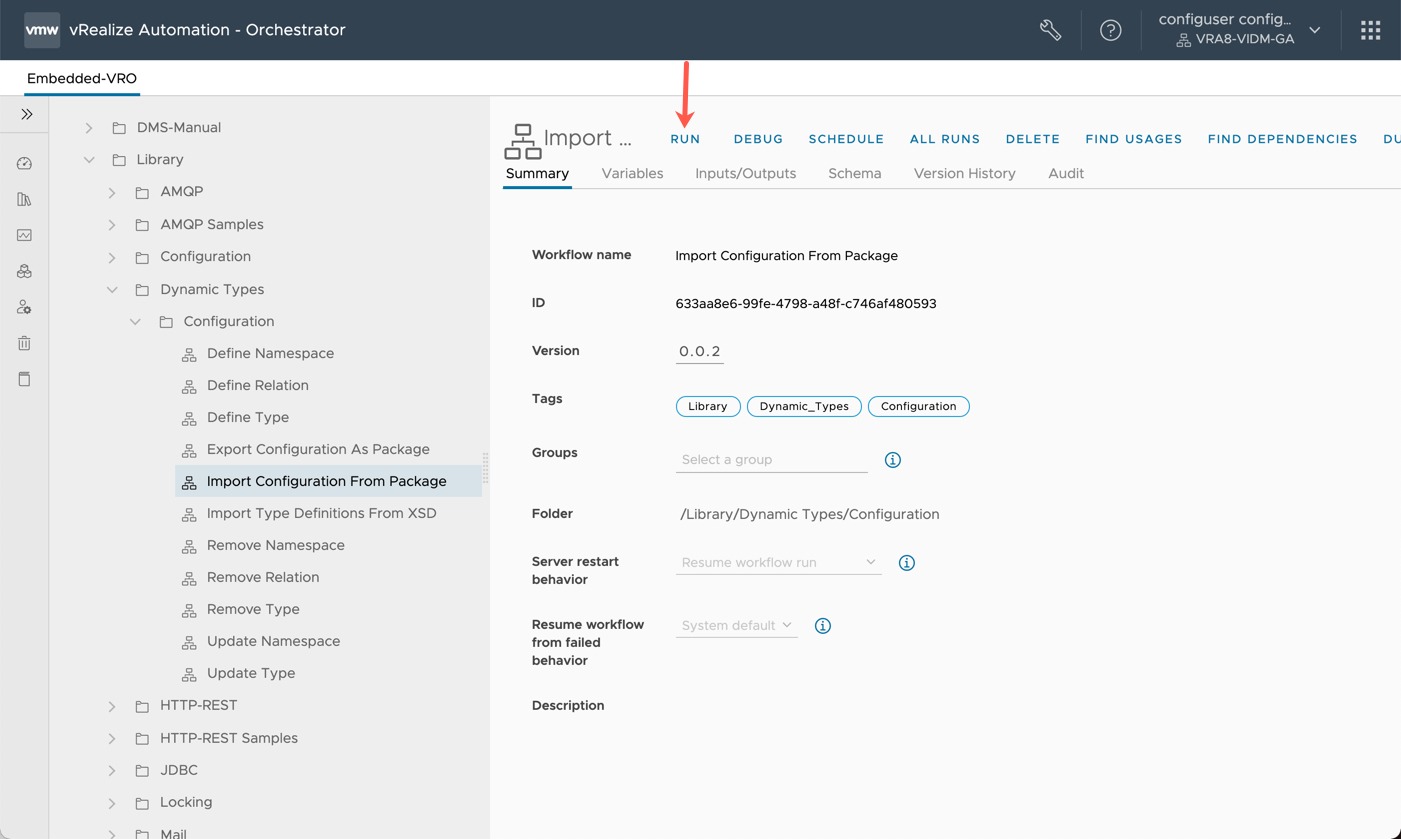
- Browse through the workflow folder tree > Library > Dynamic Types > Configuration
- Run the workflow “Import Configuration From Package”
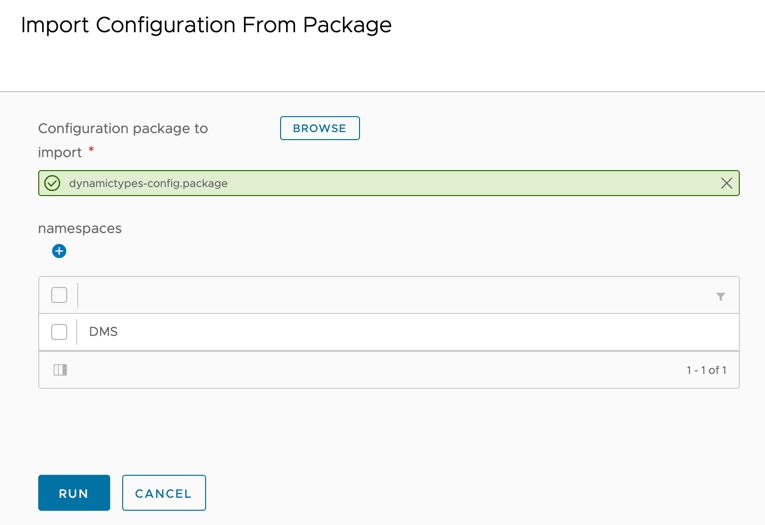
- Browse and select the file “dms-dynamictypes-config.package” from the download location
- You should see the Namespace “DMS”
- Select Run
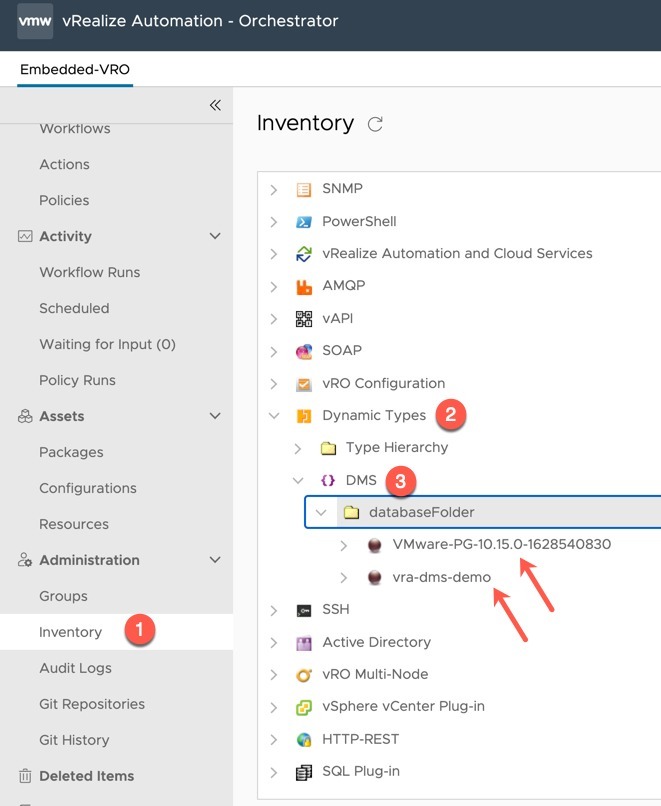
You can test the DynamicTypes import and setup by browsing the Inventory for the DynamicTypes plugin and fully expanding the DMS namespace. So long as you have existing database instances deployed with DMS, you will see them appear in the inventory list.
Create DB Payload update for Data Management for VMware Tanzu version 1.1
In v1.1 of the product, the API had some small updates, including for the POST Method to create a DB instance.
If you follow all of the steps above, you need to make a small change to the Configuration object which holds the Create DB JSON body input used in the API request.
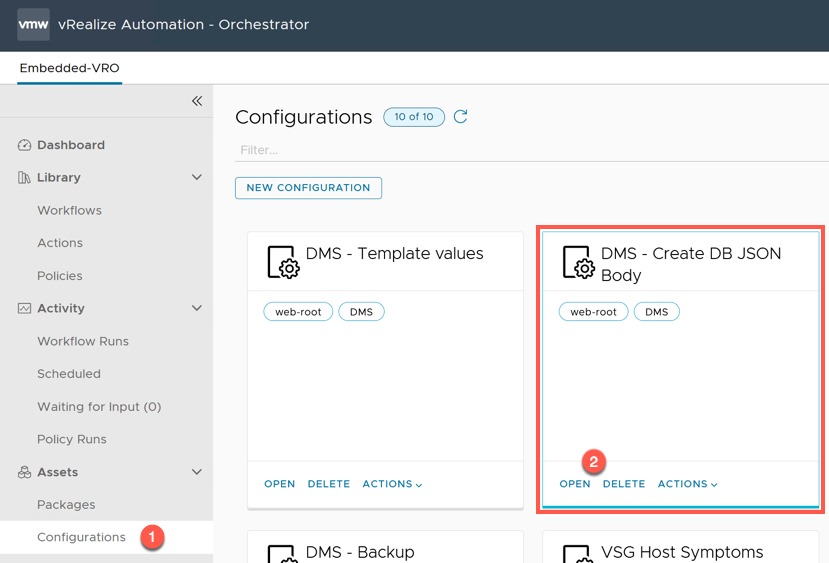
- Select Configurations under Assets under the left-hand navigation
- Find “DMS – Create DB JSON Body” and open it
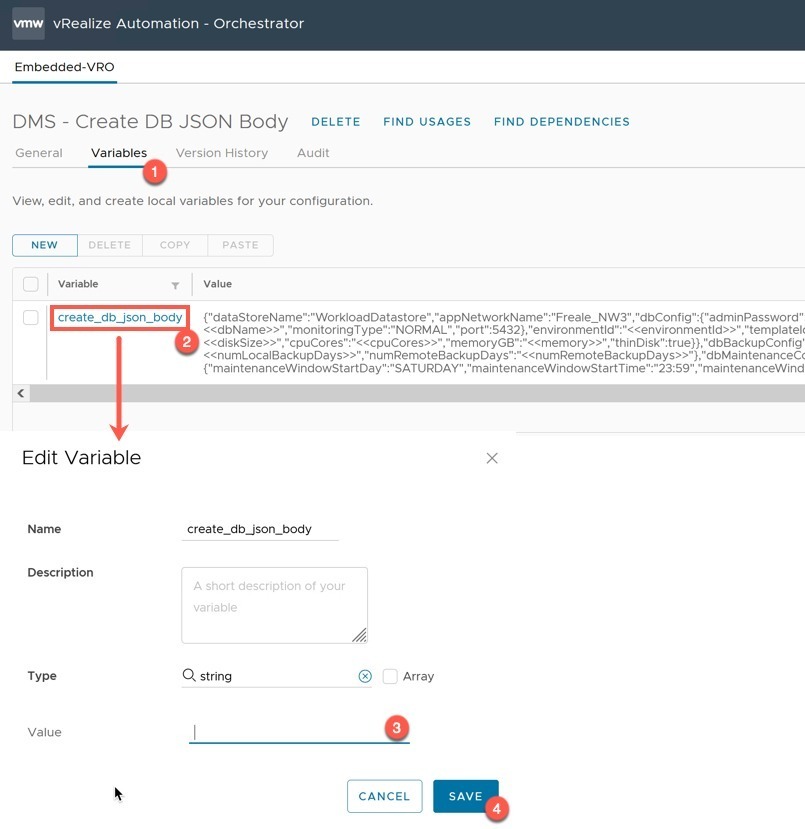
- Select the variables tab
- click on the variable “create_db_json_body” to open the Edit Variable dialog box
- Replace the value with the text provided below
- Edit the hard coded values such as:
- dataStoreName
- appNetworkName
- Edit the hard coded “dbMaintenanceConfig” values:
- maintenanceWindowStartDay
- maintenanceWindowStartTime
- maintenanceWindowDuration
- minorVersionUpgradeEnabled
- maintenanceWindowSelected
- Edit the hard coded values such as:
- Click Save
{"dataStoreName":"WorkloadDatastore","appNetworkName":"Freale_NW3","dbConfig":{"adminPassword":"<<adminPassword>>","adminUser":"<<adminUser>>","dbName":"<<dbName>>","monitoringType":"NORMAL","port":5432},"environmentId":"<<environmentId>>","templateId":"<<templateId>>","instanceName":"<<instanceName>>","provisioningConfig":{"type":"SingleNode","hwConfig":{"hdDiskSizeGB":"<<diskSize>>","cpuCores":"<<cpuCores>>","memoryGB":"<<memory>>","thinDisk":true}},"dbBackupConfig":{"automatedBackupStartTime":"<<automatedBackupStartTime>>","numLocalBackupDays":"<<numLocalBackupDays>>","numRemoteBackupDays":"<<numRemoteBackupDays>>"},"dbMaintenanceConfig":{"maintenanceWindowStartDay":"SATURDAY","maintenanceWindowStartTime":"23:59","maintenanceWindowDuration":"360","minorVersionUpgradeEnabled":true,"maintenanceWindowSelected":true},"enableProtection":true,"requireClientSsl":true}
Configure Custom Resources in vRealize Automation
Change your browser to the Cloud Assembly UI.
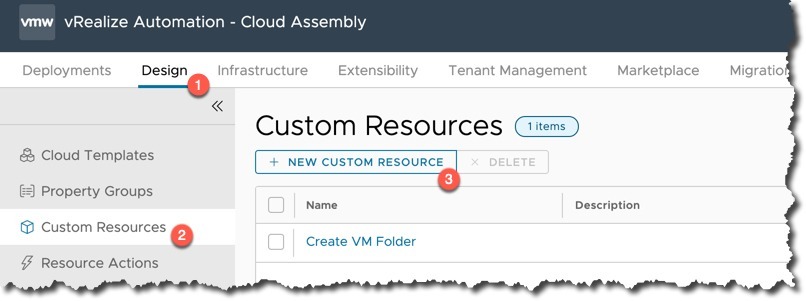
- Select the Design Tab > Select Custom Resources from the navigation list.
- Click Create “New Custom Resource”
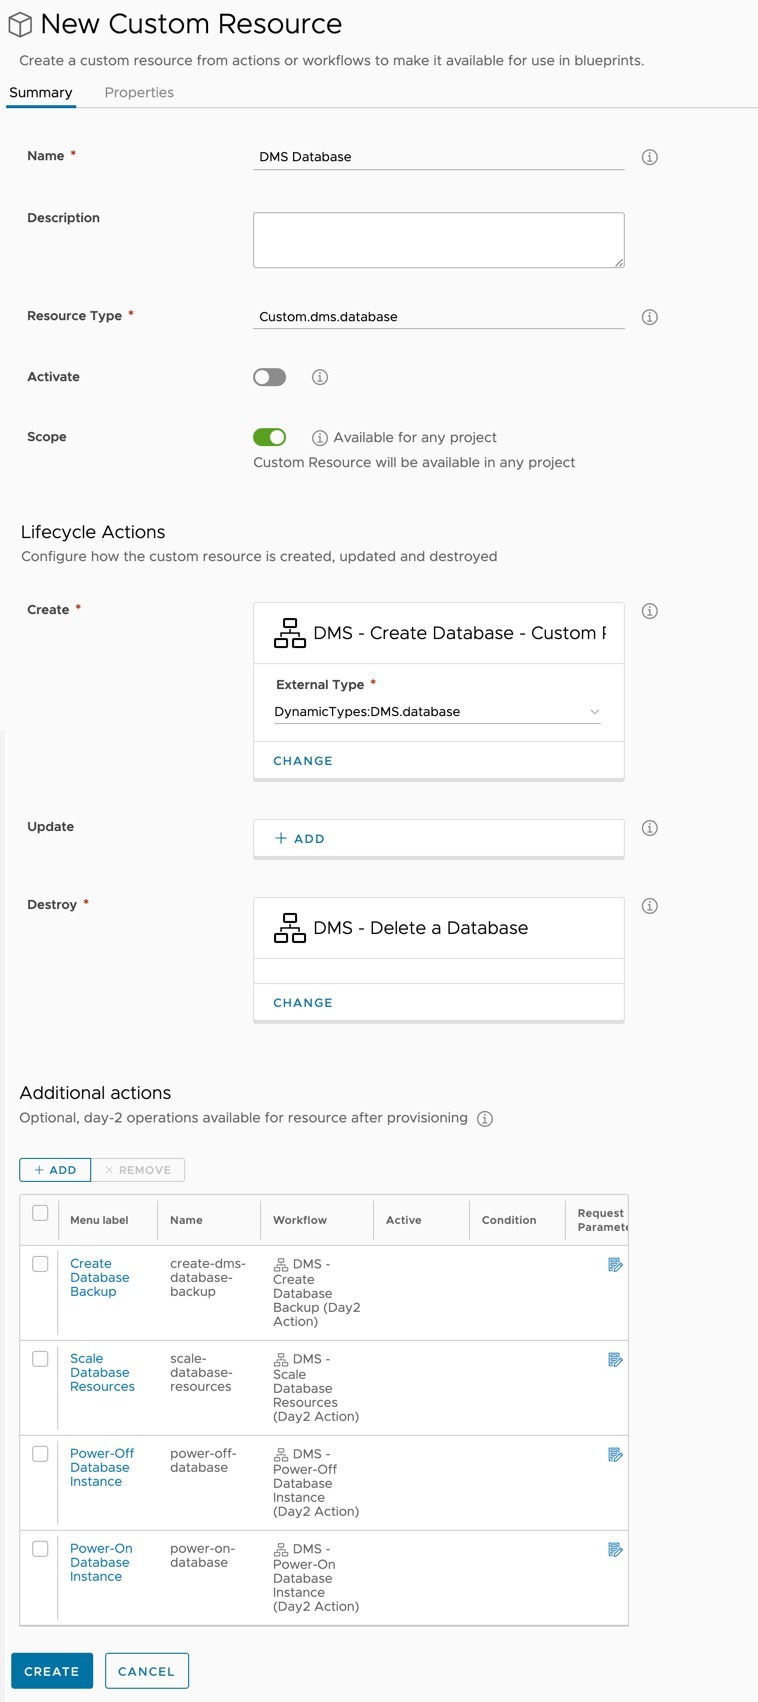
- Set a name for the custom resource
- Set a resource type name
- Activate the custom resource (or do this later)
- Set the scope
- Lifecycle Actions
- Create – Select workflow named “DMS – Create Database – Custom Resource Version”
- Delete – Select workflow named “DMS – Delete a Database”
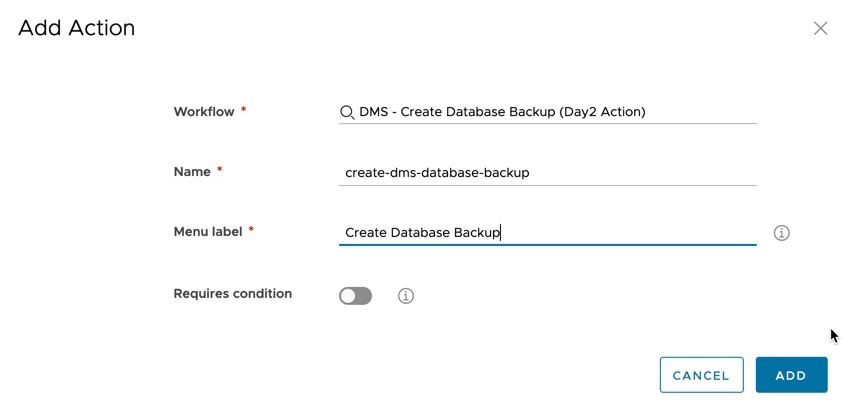
- Additional Actions – Select the Day 2 workflows and provide the necessary details:
- DMS – Create Database Backup (Day2 Action)
- DMS – Scale Database Resources (Day2 Action)
- DMS – Power-Off Database Instance (Day2 Action)
- DMS – Power-On Database Instance (Day2 Action)
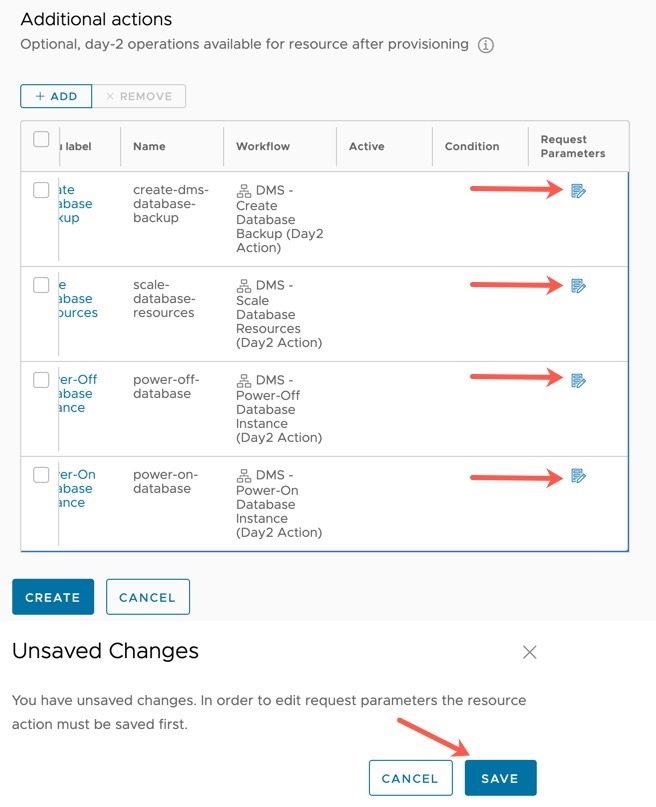
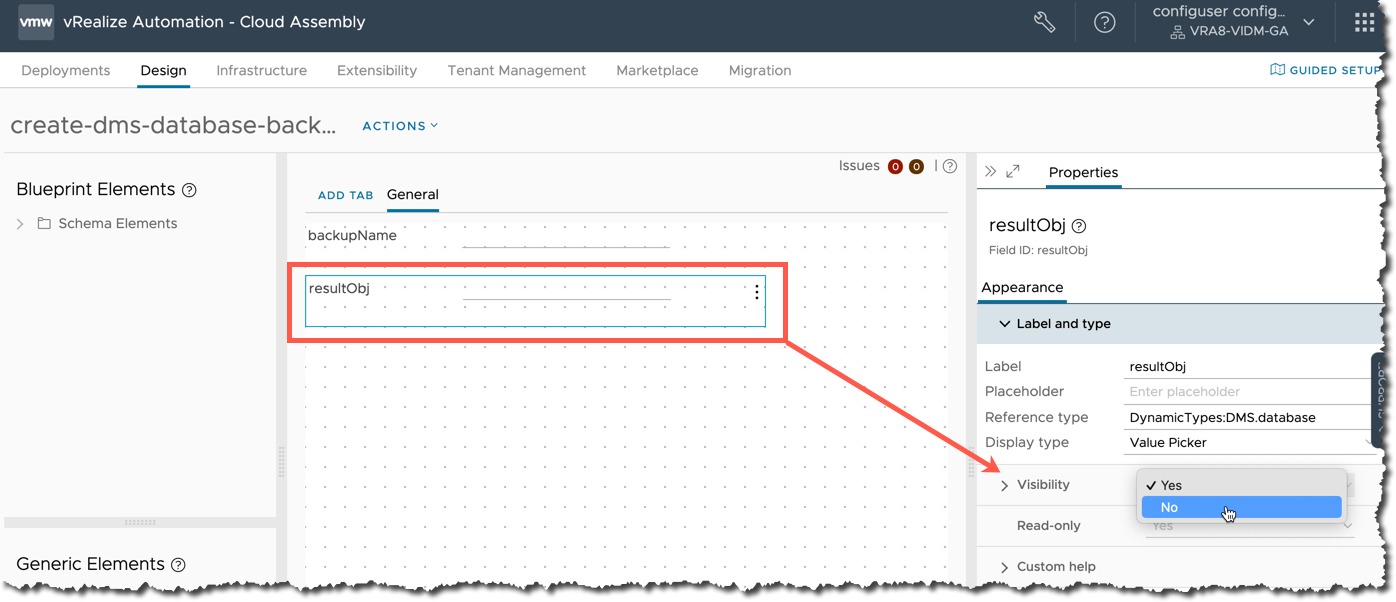
Click on the request parameters next to each day 2 action, save the configuration, and set the visibility for input “resultObj” to hidden.
- This input is the DynamicType information for the Custom Resource to be passed from vRA back to vRO, to link the Day 2 action to the appropriate resource.
Creating a Cloud Template to use the DMS Custom Resource
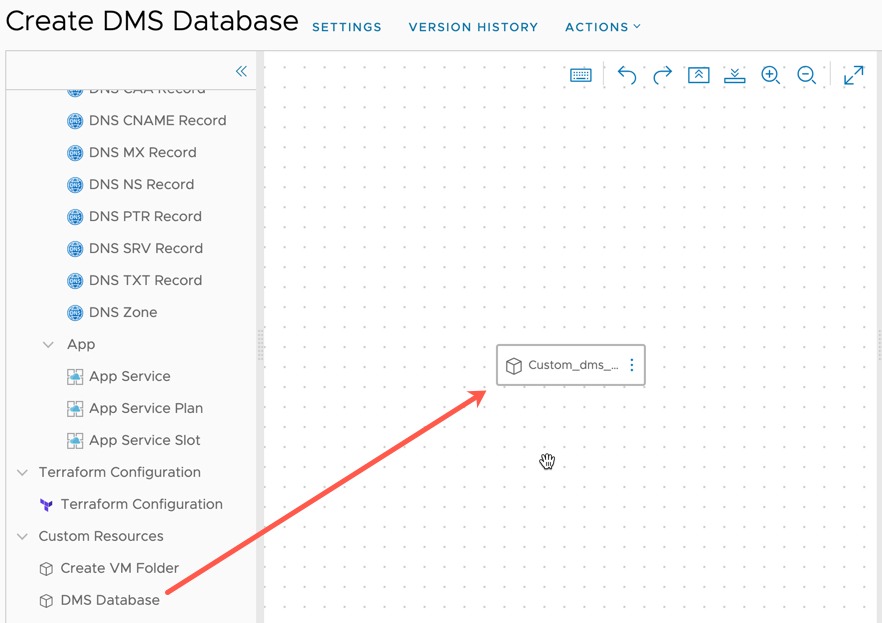
Create a new cloud template in Cloud Assembly. Drag and drop the custom resource onto the canvas.
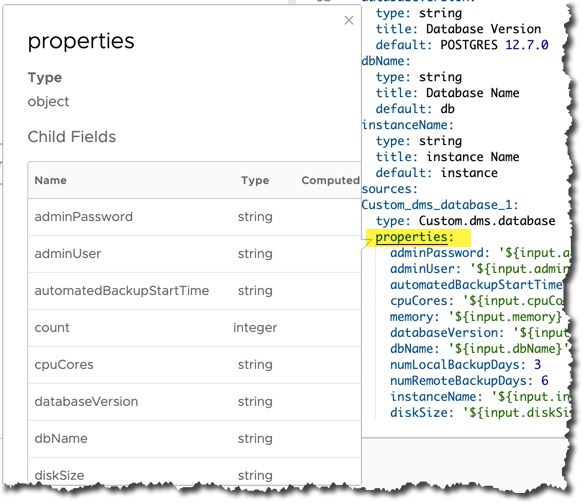
On the code window on the right-hand side, you can click the properties heading and it will show you all of the expected inputs from the create workflow.
A quick note about the inputs:
    cpuCores
        Integer
    diskSize
        Set in Gb
    memory
        Set in Gb
    instanceName
        String
    dbName
        String
    databaseVersion
        String
        Has to be a value from the vRO Configuration "DMS - Template values"
            There is a workflow called "DMS - Get All Templates" that populates this configuration.
        This value is mapped by the workflow to the correct template Id for the API call.
    automatedBackupStartTime
        Has to be provided as "HH:MM"
    numLocalBackupDays
        Integer
    numRemoteBackupDays
        Integer
        has to be a 2x multiplier of "numLocalBackupDays"
    adminUser
        String
    adminPassword
        String
I’ve uploaded an example cloud template here:
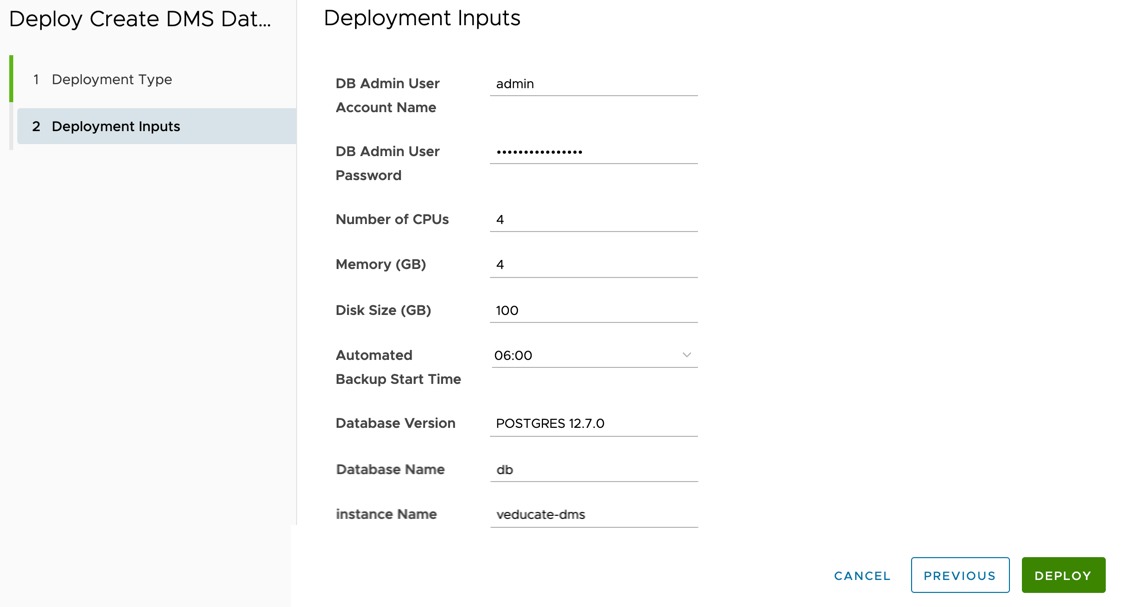
Next, we can test a deployment.
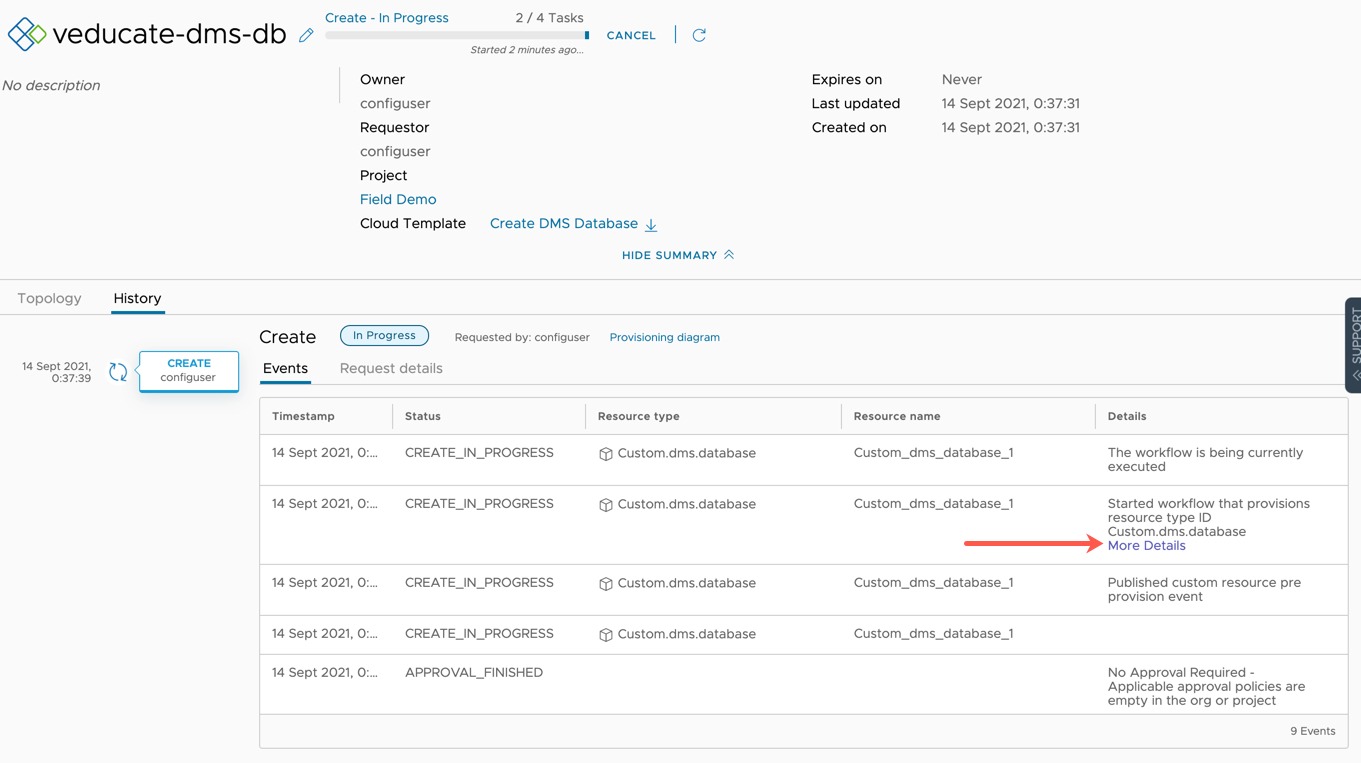
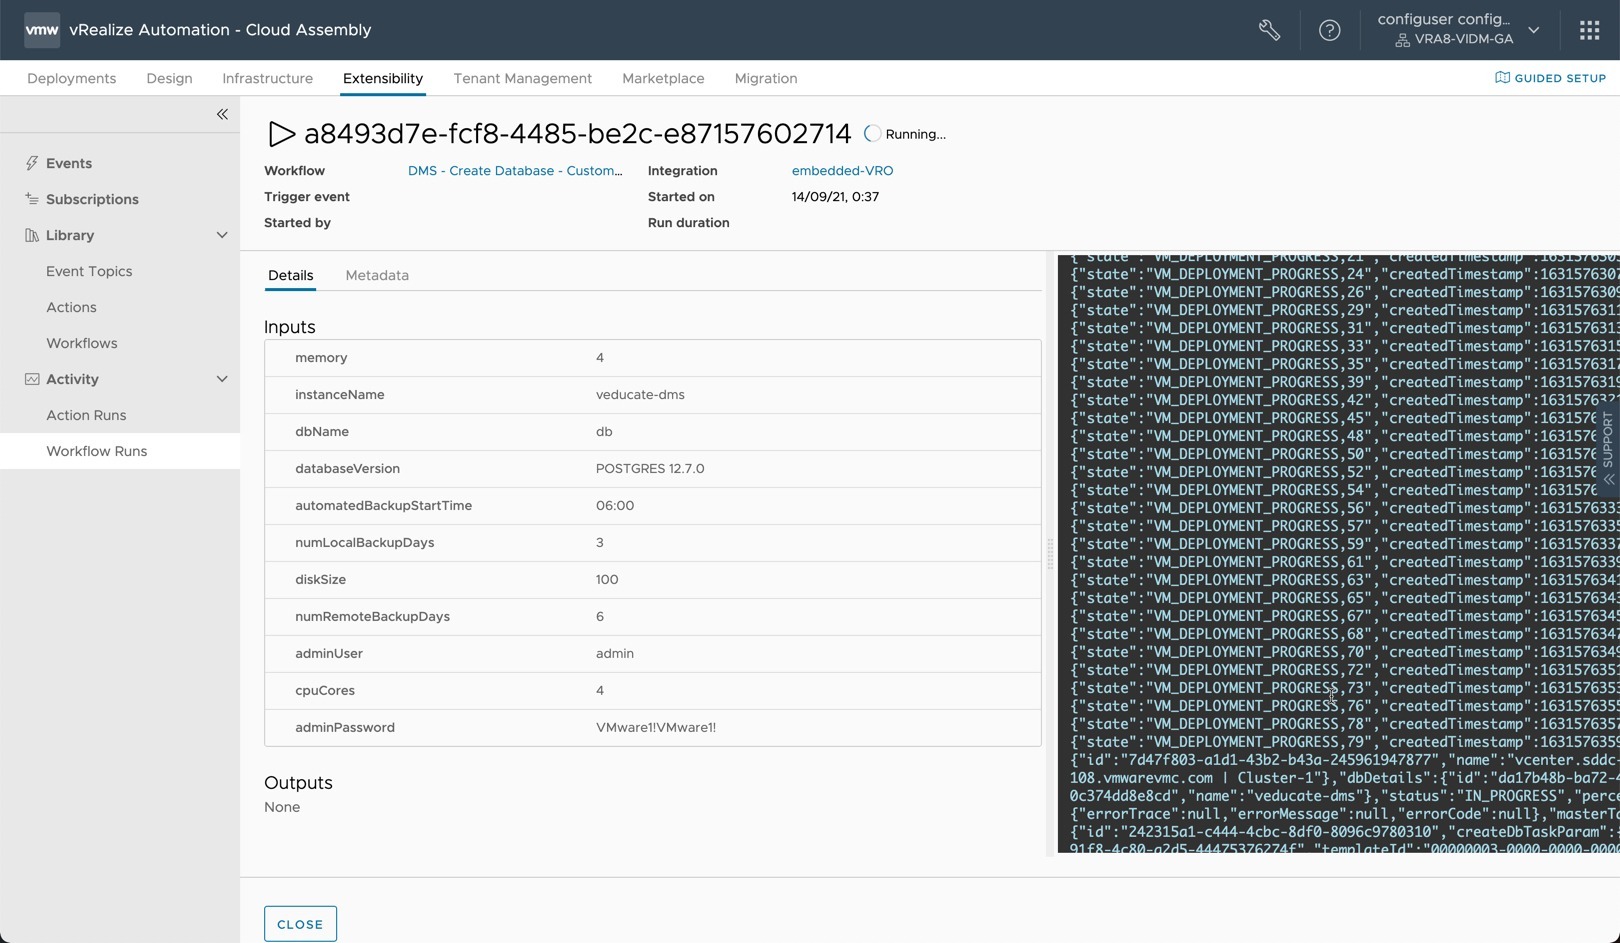
You can watch the progress on the Deployment history tab. In vRA 8.5 and above, you have the ability to watch the vRO workflow progress from within the UI as well (see the red arrow below for more details of the workflow) or you can see this directly in vRO.
Within DMS we can see the Create DB operation is under way.
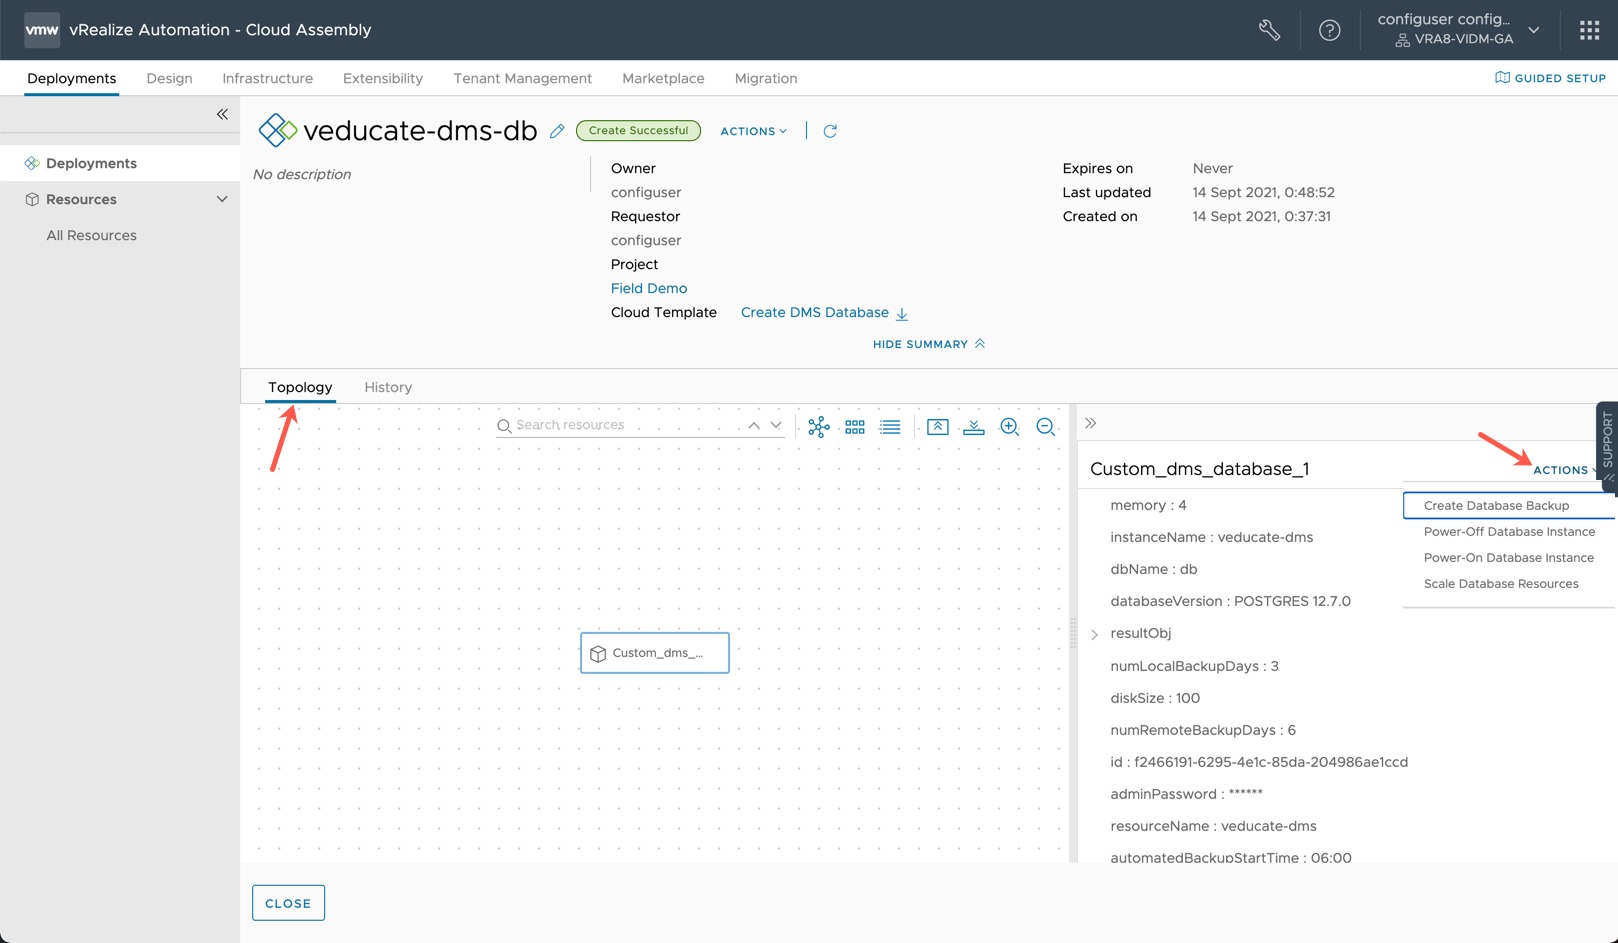
Finally, you should see a successful deployment, with the Custom Resource Object showing in the topology view.
Clicking the Object then Actions on the far right, you can select & run the Day 2 actions.
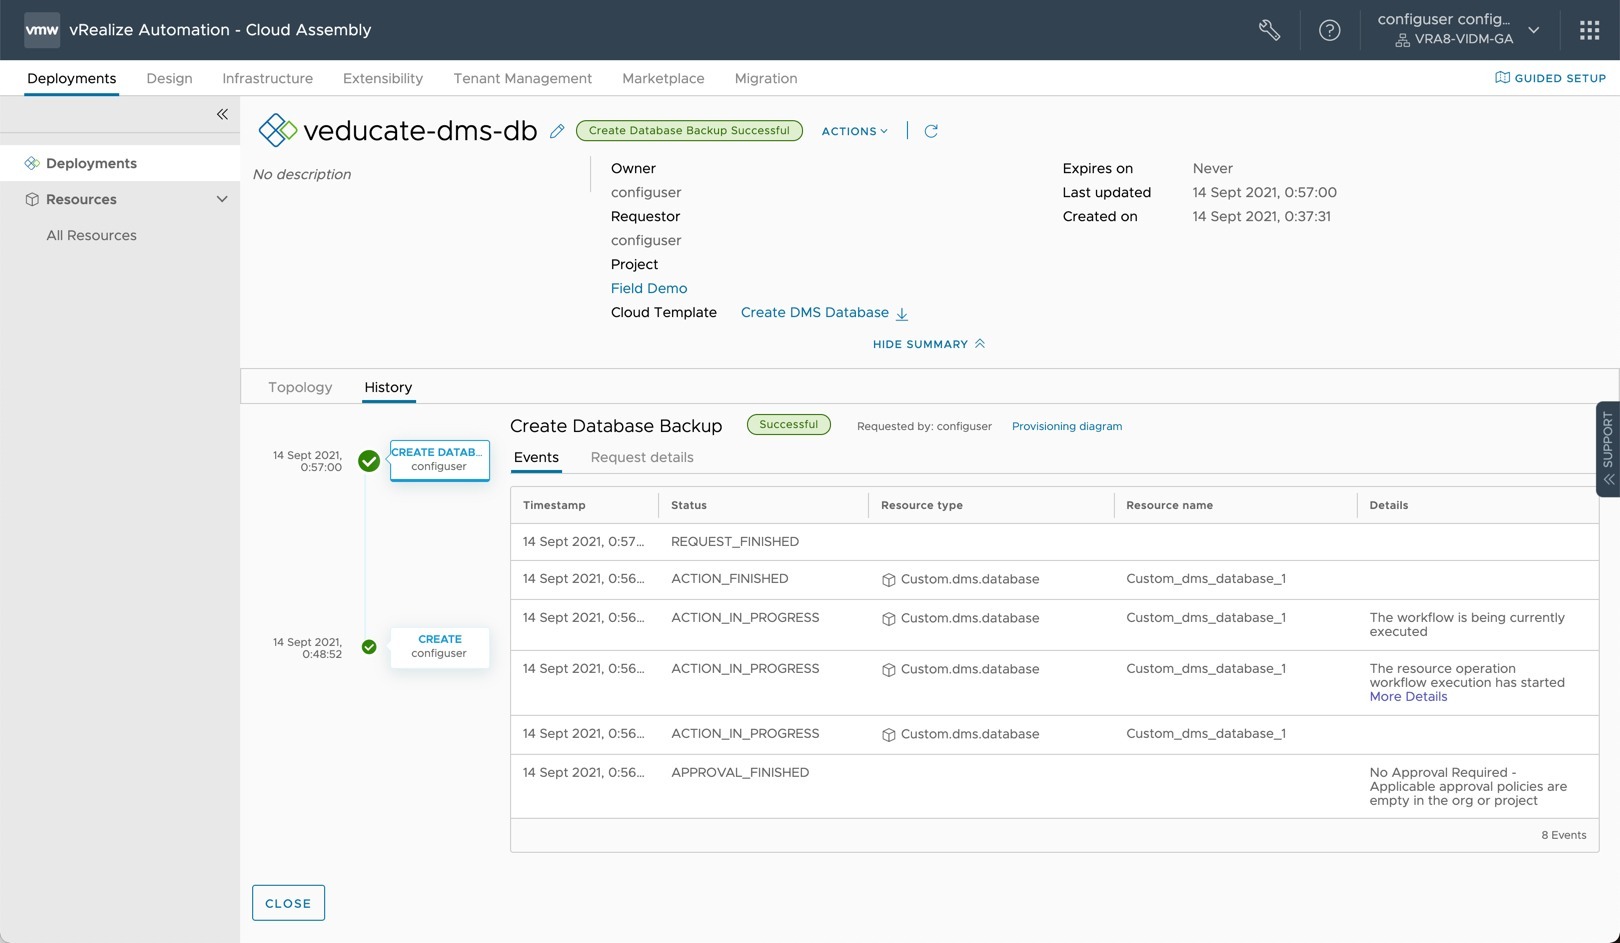
Below I’ve taken some screenshots for showing the creation of a backup.
Pulling Template Versions dynamically to the Catalog Item in Service Broker
The last configuration is setting a vRO action, which pulls the available Templates in DMS and shows them as a selectable list to the end-user consuming a catalog item in service broker.
- Release a cloud template version to the service catalog
- Configure the cloud template to be enabled as a catalog item in the Service Broker content settings.
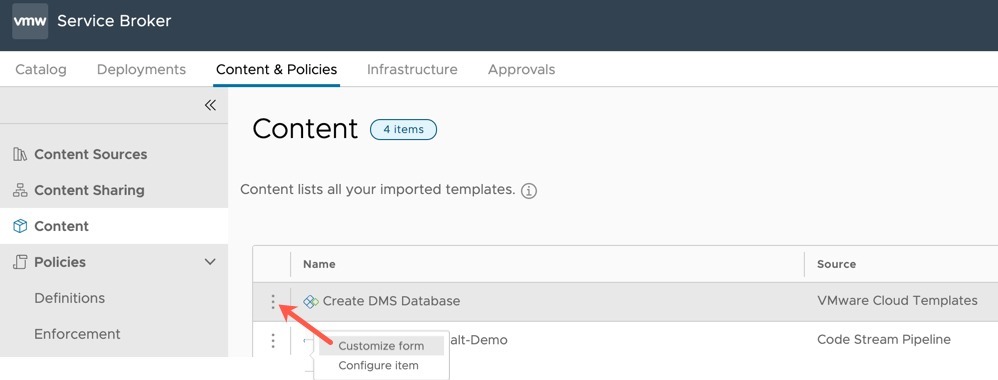
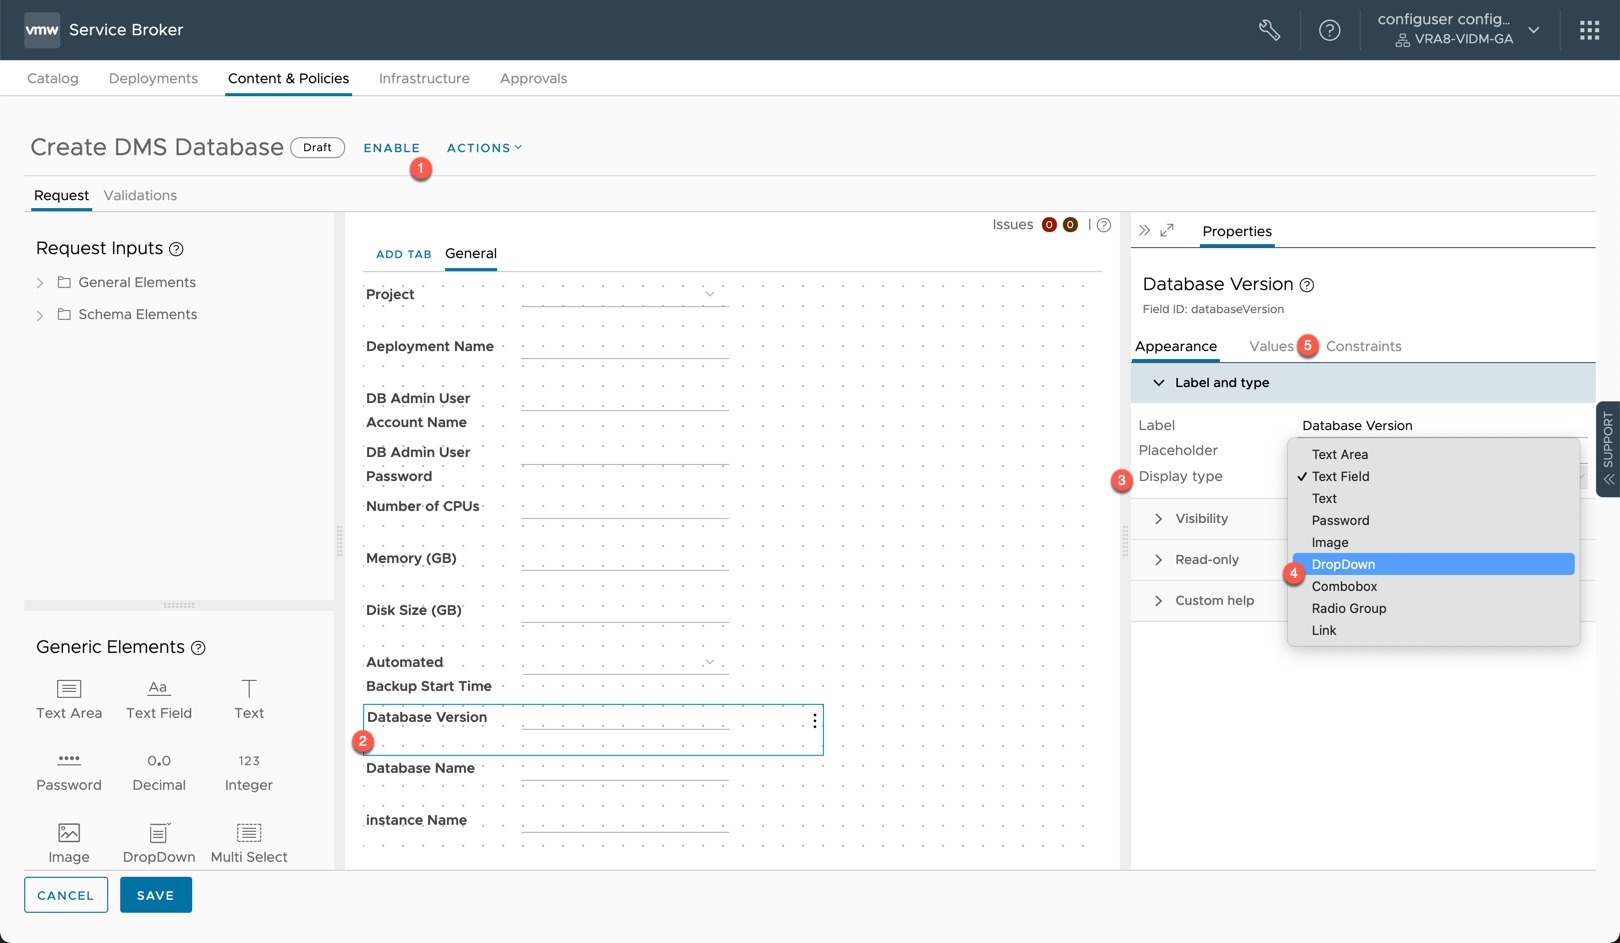
Within Service Broker, go to the Content & Policies tab > Content > Click the 3 dots next to the template name and select “Customize form”. For the below configurations, I’ve included a Custom Form YAML file which can be imported here:
- Service Broker Custom Form – Create DMS Database.yml
- Enable the custom form
- Select the element “Database Version”
- Select the Display type as “DropDown”
- Select the values tab
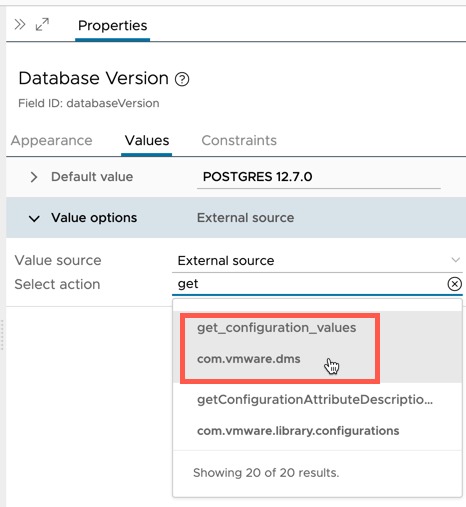
- Under Value Options, set the source as “External Source”
- Set typing in “get” select the vRO action “get_configurations_values” (denoted as correct by the module folder as “com.vmware.dms”)
- Save the custom form
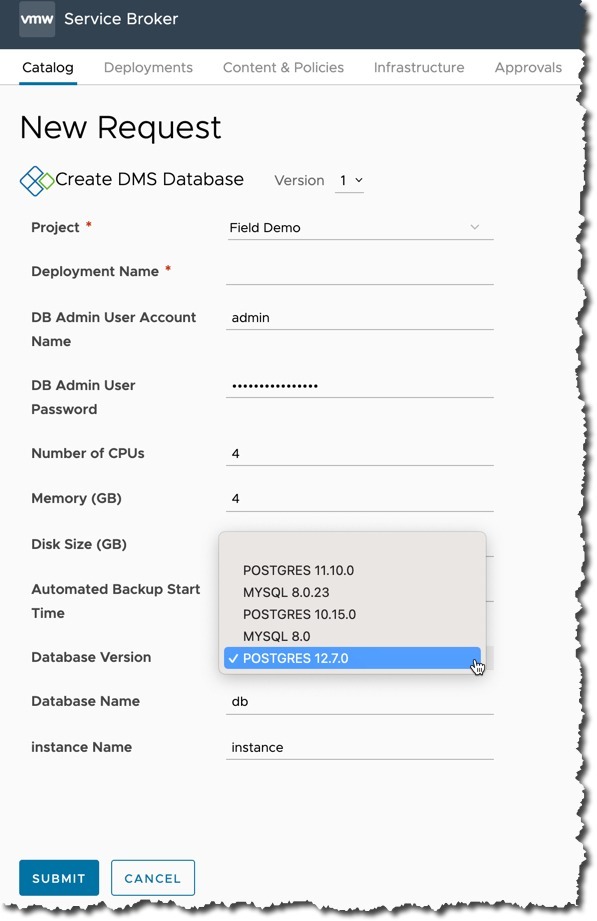
Now when you open the catalog item in Service Broker, you’ll see a drop-down list for the Template version to be deployed.
Wrap Up and Resources
In this blog post, we have covered the configurations needed to import the settings and files so you can connect vRO workflows to an existing Data Management for VMware Tanzu System and create Database Instance through the self-service governance and approvals of vRealize Automation.
You can also read up how we created the Dynamic Types which are the fundamental piece of how all this works so that we can consume DMS Databases as a custom resource in vRA.
As a quick reminder of my other DMS resources:
- Data Management for VMware Tanzu – Getting Started
- Data Management for VMware Tanzu – Self-Service Database-as-a-Service
- Data Management for VMware Tanzu- Postman API Collection
Regards
