
What is Git?
Git is distributed version control software.
Version Control is the ability to save and track changes over time, without interfering with previous versions. As the software is distributed, it means all users can have a copy of an entire repository, containing all commits, branches, and files.
There are a few things you should know before we dive in:
- Branches are lightweight and cheap, so it's OK to have many of them
- Git stores changes in SHA hashes, which work by compressing text files. That makes Git a very good version control system (VCS) for software programming, but not so good for binary files like images or videos.
- Git repositories can be connected, so you can work on one locally on your own machine and connect it to a shared repository. This way, you can push and pull changes to a repository and easily collaborate with others.
Why Use Git?
Version Control is important in development, whether for software, or simply for developing your automation scripts. Without it, you can risk losing your work. By using Git, you can make a "commit", which is a snapshot of your point in time work. This provides you the capability to rollback to previous commits if needed.
Install the command line tool
# Executable Installers (all OSes)
https://git-scm.com/downloads

# Command Line Installer
# Mac OS X
brew install git
# Linux
sudo apt-get install git-all

# Validate installation
git version
Authenticating to GitHub and creating a repository
To make life easier, I am going to use GitHub as my main source control platform.
I am going to start off creating a repository on the GitHub website. This is simple to complete, so I will not document the steps, but you can view this page for more information.
I would also recommend at this point setting up the authentication with GitHub as well to your local CLI.
Cloning a Repository locally
Once our repository is created, we start off by cloning the repository locally.
git clone {url}

#Example
git clone https://github.com/saintdle/veducate-git-example.git
![]()
Create and commit our first file
As we can see, this is a completely empty repository. So, we are going to run through the first steps to create a file and upload it (push) to our repository.
- Create a file, it can be anything you want, I've simply ran echo to place some text into a file.
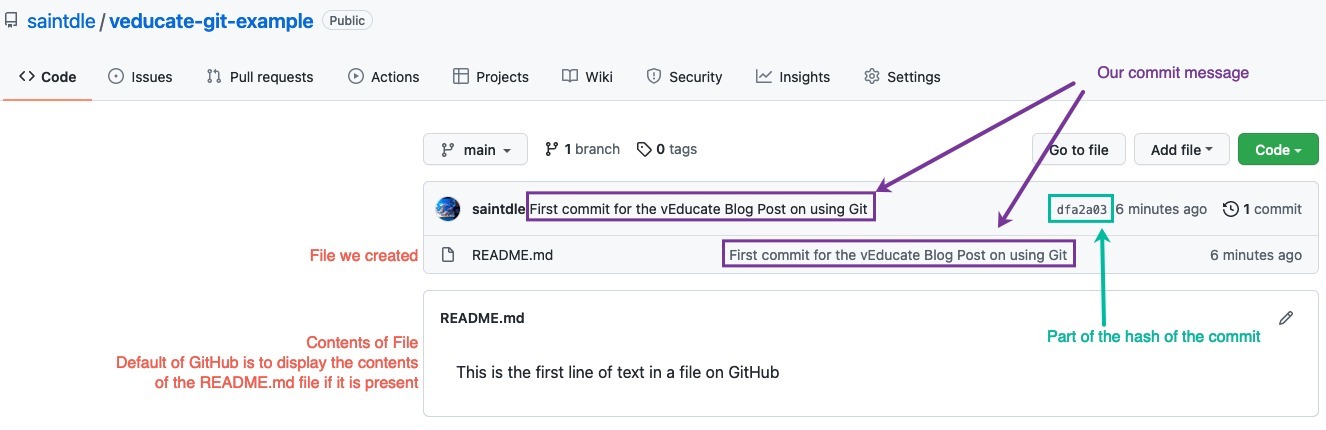
In my below example, I've created the README.md file. This is a typical standard file found in git repositories used to display information about the repository itself when using source control. This may be a summary page or full documentation, typically for larger projects, full documentation will be nested inside of another folder, with the root of the folder containing a README file with the relevant links to the other files.
The .md extension is for the type "Markdown". You can learn more about Markdown with this guide.
echo "This is the first line of text in a file on GitHub" >> README.md
Now we need to add the file so that it is tracked to be synchronised with the repository
git add README.md
We now need to add a message for our commit before we send the updates to the repository.
git commit -m "First commit for the vEducate Blog Post on using Git"

Pushing our changes to a repository
Now we have some files ready to push to our repository it's a simple command to synchronise, or push, those files, and comments to our repository.
git push
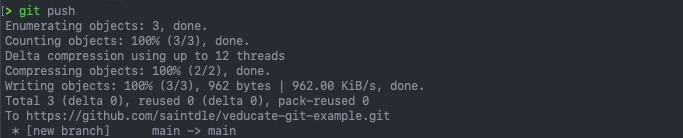
Now if we check the GitHub website to view the repository, we can see the updates.
If you receive errors such as the below, this is typically because you have not provided a commit message after adding your files.
error: src refspec refs/heads/main does not match any
error: failed to push some refs to 'https://github.com/saintdle/veducate-git-example.git'
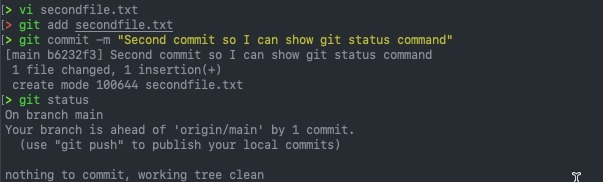
Checking the status of your commits
One of the easy ways to avoid the issue above is to use the status command to check if you have an active commit ready to push to your repository
git status
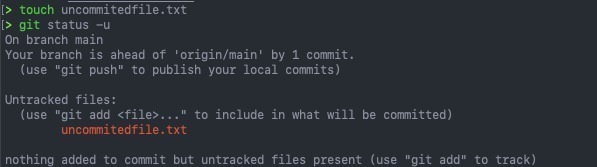
We can also see if there are any uncommitted files in our repository as well.
git status -u
git status --untracked-files[=<mode>]
show untracked files, optional modes: all, normal, no. (Default: all)
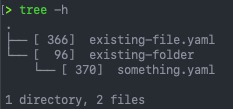
What if we want to push an existing folder and files to a new repository?
So, the first examples we created everything from scratch.
In this example, I'm covering how to upload an existing folder with files to a new repository.
For my example, I've created a new folder and some example folders/files.
Now we need to initialise our folder, add the remote location information to our local repository, then add our files so they will be part of a commit, and finally a commit message and push.
# This created an empty git repository with the necessary files, such as .git which tracks the information needed for source control

git init

# Add a remote named <name> for the repository at <url>
git add remote {remote_name} {url}

## Example of git add remote
git remote add origin https://github.com/saintdle/veducate-git-example.git

# using . instead of individual files or folders adds everything currently available in the root folder to the commit

git add -A

git commit -m {message}

git push
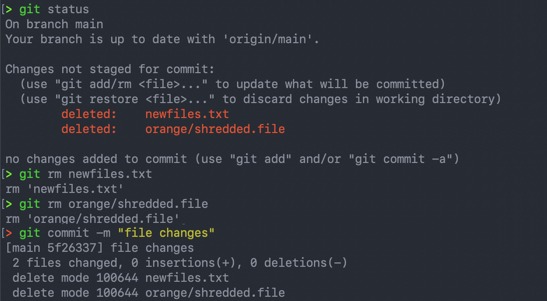
Removing files from a remote repository
If a repository has files added by another user, you can bring them locally by running:
git pull
If you want to remove them, you can delete the files locally, however you also need to tell git to remove them from the remote location too in the next push.
rm -rf {files/folders}
git rm {files/folders}
Version control using branches
One of the main reasons to use Git is the versioning features, beyond tracking each commit if code and therefore change, you also can create branches. A separate flow of the code, for versioning or testing reasons. You can then merge this back with your main line of code in the future. This allows you to work on the code without interfering with the main copy of your code.
For a full breakdown of branches, I recommend this page.
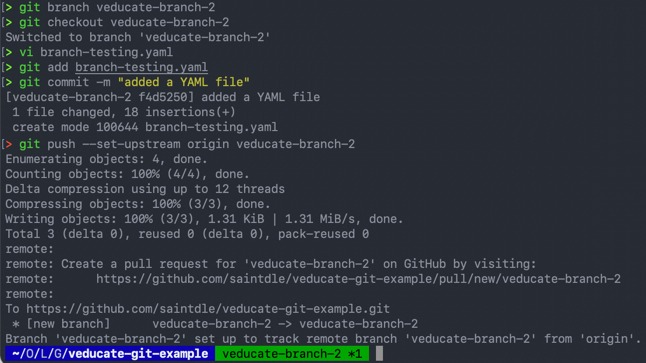
To create a branch:
git branch {name}
# Example
git branch veducate-branch-2
Now you need to change your branch:
git checkout {branch_name}
# Example
git checkout veducate-branch-2

# From git v2.23 you can use the argument "switch"
git switch {branch_name}

# To create and switch to a new branch straight away
git switch --create {new_branch_name}
From here you can continue to add new files, make changes, and commit as necessary then git push.
To push the new branch to your upstream repository you will need to run the following command, as this branch does not yet exist in the remote location:
git push --set-upstream origin {branch_name}

#Example
git push --set-upstream origin veducate-branch-2
To view all available branches:
# To show local branches
git branch
git branch -l

# To show local and remote branches
git branch -a
To remove a branch:
git branch -d {branch_name}
![]()
Tracking with Git Log
Each commit is a snapshot of your repository at the moment of time it is created(the commit), which is referenced as a SHA hash value.
You can view the tracking by using the "git log" command. This however will only show you the tracking information for the branch you are in or specified branch
git log

# Shortened output
git log --oneline --decorate

# To view a particular branch
git log {branch_name}
To see all branches, you can append "--all" to the command.
git log --all
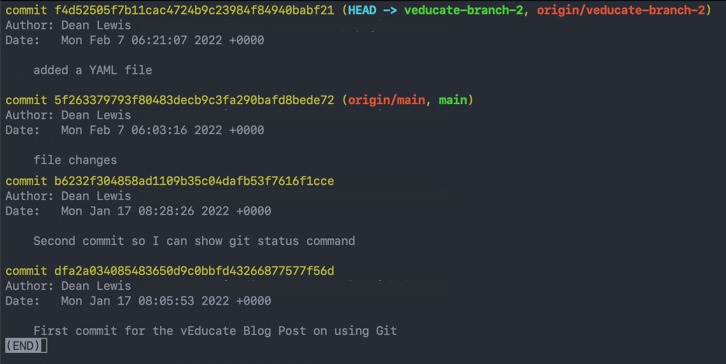
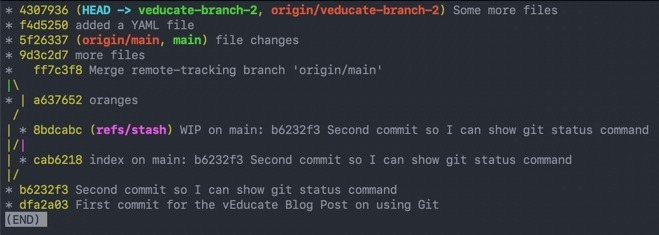
Above you can see the latest commit is against my branch.
Another point to note here is the use of the term "HEAD" this essentially means your active branch/commit of the repository you are working in.
You can track all your history with a view of how things have diverged by running:
git log --oneline --decorate --graph --all
Merging branches and fixing conflicts
If you have used GitHub previously (or GitLab or BitBucket), you may have come across the concept or Pull Requests. This is the ability to merge changes in one branch to another after a review, with the Pull request allowing for commit messages and differential viewing between versions. This feature is implemented by the source control software offering themselves, extending the capabilities of git. Typically, the vendor provided software will offer a CLI tool themselves which builds on git command line and exposes this features.
- Example - GitHub CLI - Create Pull Request
In just plain git command line tool, we have the merge feature which is a way to control combining code between two or more branches. Which we will cover below.
In the below example, I am going to create another new branch, so that I have three in total. Whilst working on my branch I created above. I noticed in my main branch there was some text missing from my Readme.md file, so I quick resolve this using another branch, because branch "veducate-branch-2" is not ready to be committed into the main branch yet.
# Branches
main
veducate-branch-2
veducate-patch-for-main

# Change readme file
# add a commit for all changed files
git commit -a -m "added text to readme file"

# Change branch back to main
# Merge changes from alternative branch into active branch
git checkout main / git switch main
git merge veducate-patch-for-main

# Changes are now merged into branch main, so the patch branch can now be deleted
git branch -d veducate-patch-for-main

# To delete a branch which has not been merged
git branch -D veducate-patch-for-main
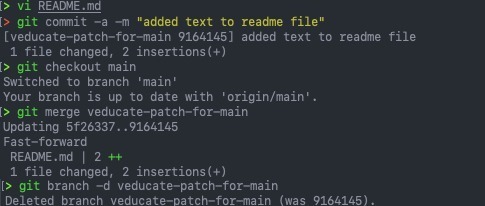
In the above output, you will see the "git merge" command output, shows the term "fast-forward". This is because the commits merged from branch "veducate-patch-for-main" where ahead of the commits in branch "veducate-branch-2".
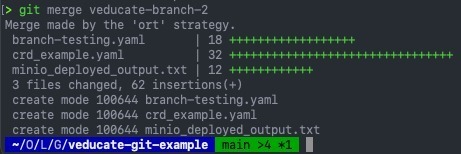
Now I want to merge the changes from "veducate-branch-2", which git will still compute, despite the current main commit being ahead.
Below, you will see the output comment is a bit different "Merge made by the 'ort' strategy". This specifies the strategy used by Git to merge the files between the two branches. You can read more here.
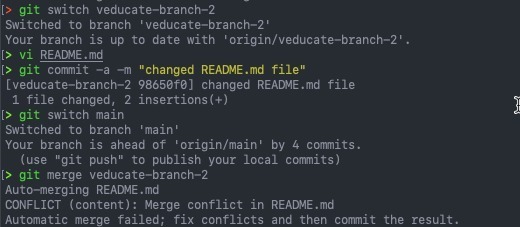
Now let's look at conflict handling. I've gone back to my branch "veducate-branch-2" and edited the file "README.md" adding some additional text. Which will now differ from the text found in the main branch.
When I run the merge, I get the conflict message, which helpfully points out the file that is at fault.
Git hasn’t automatically created a new merge commit. It has paused the process while you resolve the conflict
I can also see this detail by running "git status".
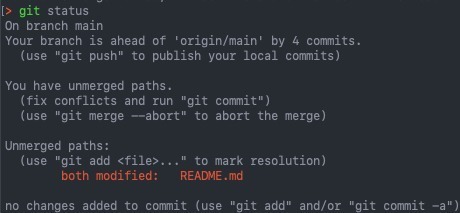
When there is a conflict, git will mark anything which has not been resolved is listed as unmerged. Git adds standard conflict-resolution markers to the files that have conflicts, so you can open them manually and resolve those conflicts. Your file will contain a section that looks something like the below, I opened my README.md file using vi:
This is the first line of text in a file on GitHub

<<<<<<< HEAD Added some text to show merge from branch "veducate-patch-for-main".
=======

This line is to cause a merge conflict.

>>>>>>> veducate-branch-2
The first line(s) are your original files content.
"<<<<<<< HEAD" is used to identify the active branch that you tried to merge to. With "=======" used to mark everything above this line as your active branch details. Everything below as the content from the file in your branch you are merging from. ">>>>>>>" identifies the branch the conflict content came from.
To resolve the conflict, you need to choose what should be in the file. And then remove the lines that start with "<<<<<<<", "=======" and ">>>>>>>". For my example, I end up saving the file with the following contents:
This is the first line of text in a file on GitHub

This line is to cause a merge conflict.
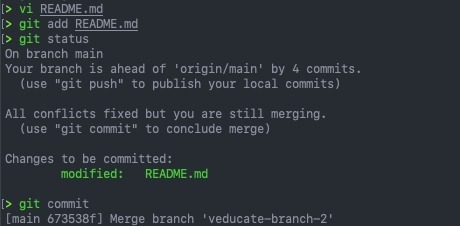
To mark the conflict as resolved, you simply need to run "git add", to stage the file as part of the commit.
You will see the file(s) marked as resolved by running "git status", then to finalize the merge run "git commit".
This was a simple example and overview of merging. At times you may hit more complex merges that need to be resolved. I recommend reading this advanced merging page on the Git documentation.
Rebase - Rewrite commits from one branch onto another branch
The rebase command takes a commit from one branch and places them into another branch.
When you rebase, you are abandoning the commits in your target branch, and replaying the commits from your source branch onto the target branch.
This operation works by going to the common ancestor of the two branches (the one you’re on and the one you’re rebasing onto), getting the diff introduced by each commit of the branch you’re on, saving those diffs to temporary files, resetting the current branch to the same commit as the branch you are rebasing onto, and finally applying each change in turn.
Source
I've created a new branch "veducate-branch-3", I've added a new file and created a commit. In my main branch, I removed a file and created a commit. In the "git log" command I can see the divergence of branches.
![]()
I ensure I am using my source branch that I want to rebase from (git switch veducate-branch-3), run the rebase command. Then I check to my target branch I want the rebase to apply to and run the merge command against my source branch.
git switch {source_branch}
git rebase {target_branch}
git switch {target_branch}
git merge {source_branch}

# Example
git switch veducate-branch-3
git rebase main
git switch main
git merge veducate-branch-3
Below you can see all the commands I ran (I did screw up the commit message on both branches by using the same message).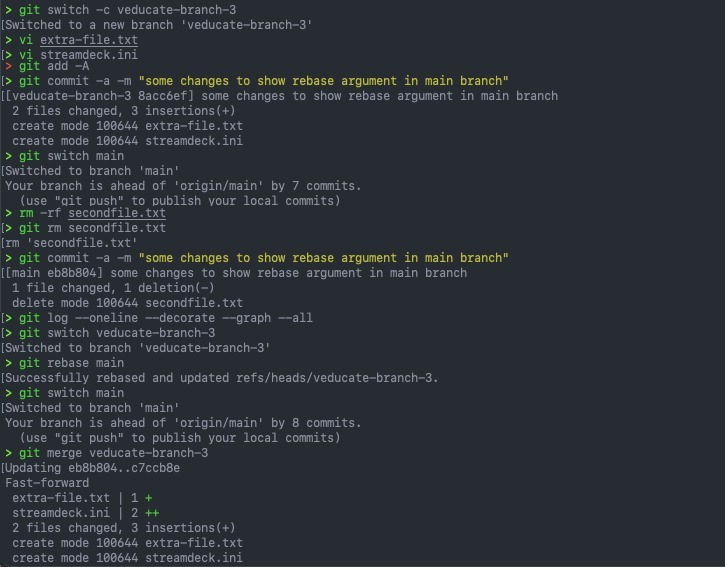
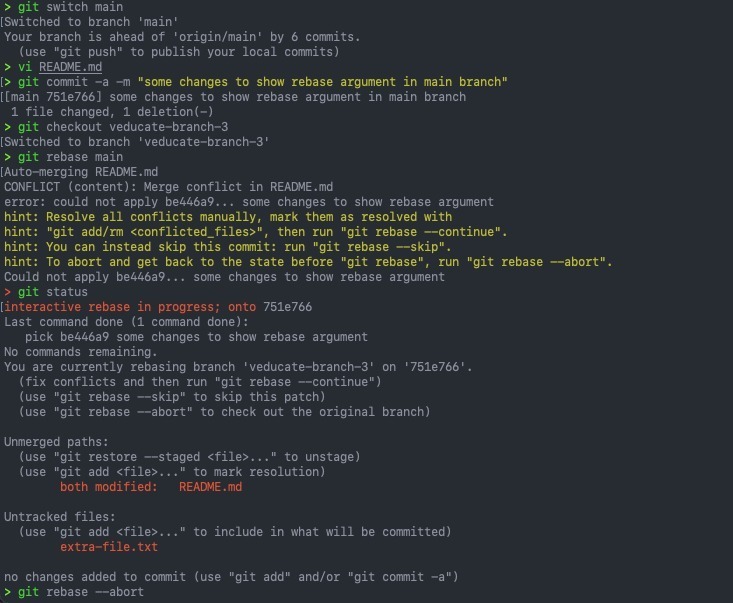
Now let's take a look at what happens when there is a conflict. I've editted the Readme file in my source branch.
The README file has the following content/lines between branches:
# main
This is the first line of text in a file on GitHub

# veducate-branch-3
This is the content of the veducate-branch-3
I create a commit in my branch "veducate-branch-3" then change to branch "main" and create a commit so it's ahead of the other branch. I've edited the same file in both commits, "README.md".
I run the rebase command from the active branch "veducate-branch-3" against branch "main" and run into the conflict message. I need to fix the conflict and use the "git add" command to mark as resolved.
In my example I just dropped the rebase operation this time running "git rebase --abort".
Merge vs Rebase
There are benefits and draw backs to either option. Rebase is cleaner from a history tracking point of view, but harder to resolve conflicts between branches. Merge has less risk but can cause a messier history graph. Typically, it's better to merge than rebase, especially if you are unsure.
GitKraken has a great write up on the differences and choosing the right option.
Resources
- GitHub
- Official Git Documentation
- GitImmersion
- BackLog - Git Tutorial
- Michael Cade - #90DaysOfDevOps
Regards