Product status notice (2024): VMware Tanzu Service Mesh (TSM) was discontinued by Broadcom following its acquisition of VMware. This article describes the product as it existed before discontinuation and is retained for historical reference. For service mesh today, consider Istio, Cilium Service Mesh, or Consul Connect.
I've finally found the time to dive into Tanzu Service Mesh (TSM), a product which has intrigued me greatly. In this blog post I cover setting up TSM, and configuring application connectivity between two clusters running in different public clouds.
What is a Service Mesh?
In software architecture, a service mesh is a dedicated infrastructure layer for facilitating service-to-service communications between services or micro-services, using a proxy. This then provides additional capability such as transit layer between platforms, observability, traffic management and more.
A service mesh provides the capability to secure and simplify your application communications between platforms/clusters/clouds without the need for introduction of lots of other software such as API Gateways.
A service mesh introduces a proxy component which sits side by side with any deployed service. And any inbound and outbound communication flows through the proxy to/from the service. This allows the proxy to provide all the functions needed to offer the capabilities discussed above and in the rest of this blog post.
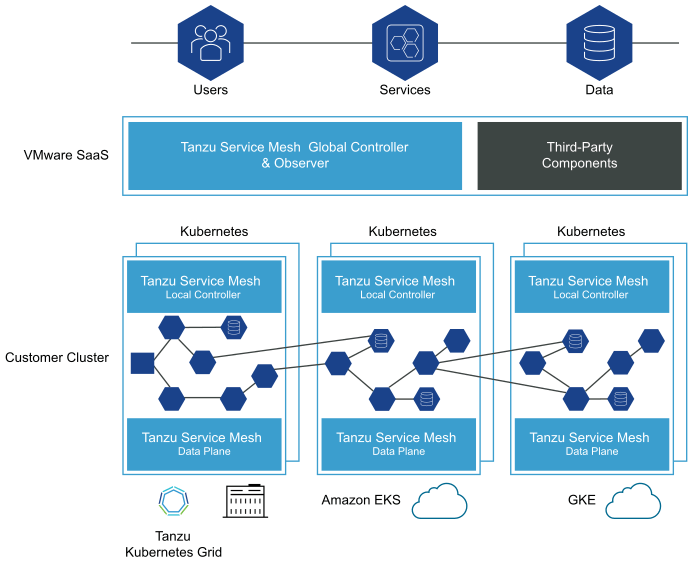
What is Tanzu Service Mesh (TSM)?
TSM builds upon the principals mentioned above, offering consumers a full enterprise-class service mesh, designed to solve challenges across distributed micro-service applications by extending service mesh services outside Kubernetes clusters and providing a unified operational layer across platforms and technologies.
-
Extends the service mesh capability (discovery, connectivity, control, security, and observability) to users and data, and across clusters and clouds.
-
Facilitates the development and management of distributed applications across multiple clusters, multiple clouds, and in hybrid-cloud environments with Global Namespaces (discussed below), supporting federation across organizational boundaries, technologies, and service meshes.
-
Implements consistent application-layer traffic management and security policies across all your clusters and clouds.
Global Namespace - is a key concept introduced by TSM, that extends service mesh capabilities for resources in a distributed application by arranging these objects in a logical group. A global namespace is therefore not tied to a single cluster or cloud, connecting resources between two or more clusters/clouds. Each global namespace manages service discovery, observability, encryption, policies, and service-level objectives (SLOs) for its objects regardless of where they reside: in multiple clusters, sites, or clouds.
To learn more about the concepts introduced by TSM, please read the below document:
Encryption for Data in Flight
TSM provides the value of a transit between clusters and clouds. In doing so comes many challenges, one such is achieving end-to-end encryption for in-flight traffic. This can be mandatory to comply with regulatory and security governance measures.
Tanzu Service Mesh includes a top-level certificate authority (CA) to provide a trusted identity to each node on the network. In the case of microservices architecture, those nodes are the pods that run the services. Tanzu Service Mesh can set up end-to-end mutual transport layer security (mTLS) encryption using a CA function.
Activating Tanzu Service Mesh
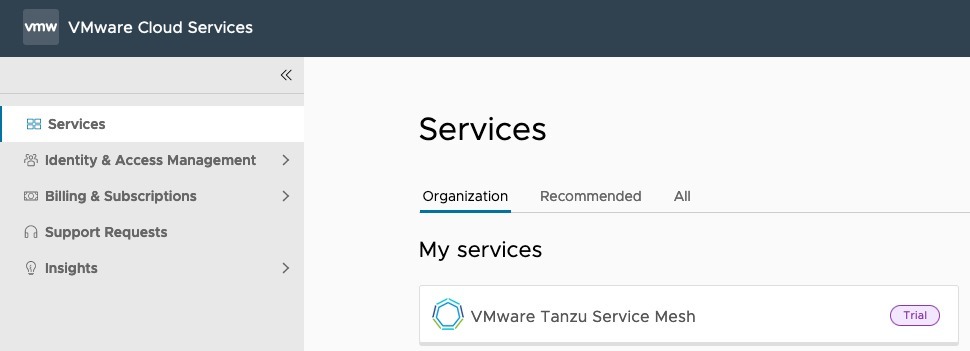
TSM is a SaaS service only from VMware, meaning no on-premises deployment for the control plane aspect. To activate, you will click the link provided when you request a trial or purchase the product,and linking it to your VMware Cloud Services Organisation (or create a new org if necessary.)
You must belong to an organization before you can access Tanzu Service Mesh.

If you are an organization owner, you have access to all the resources of the organization. You can add cloud services to your organization and then invite users.

After you add Tanzu Service Mesh to your organization, you can add users to the organization to give them access to Tanzu Service Mesh.

For more information about organizations and adding users to an organization, see the VMware Cloud Services documentation.
- Official Documentation - Sign up for Tanzu Service Mesh
Once you've activated the product, you will see it in your Cloud Services Portal as below.
Pre-requisites for Installation
This is something which caused me issues in the past, where I tried to deploy TSM to a cluster that did not have enough resources to begin with.
- Cluster with 6 nodes (though the documentation does say minimum of 3 lower down in the text)
> I've queried this

- Requires that every node in the cluster have at least 250 milliCPU and 650 MB of memory available

- Pod Limits - Requires a quota of at least 3 pods for each node on the cluster and additionally at least 30 pods for the whole cluster.
-
Official Documentation - Tanzu Service Mesh Environment Requirements and Supported Platforms
Basically, you need to make sure you have enough minimum nodes and resources.
Regarding supported Kubernetes distributions, the team validate against a number of Enterprise Kubernetes solutions as well as the upstream Kubernetes.
I deployed two new environments for my testing, an EKS and AKS cluster, with the following commands.
eksctl create cluster --name veducate-eks-tsm --region us-west-1 --nodegroup-name standard --node-type m5.xlarge --managed

az aks create -rg aks-tsm --name aks-tsm-cluster --node-count 4 --ssh-key $HOME/.ssh/id_rsa.pub -s standard_d4s_v5
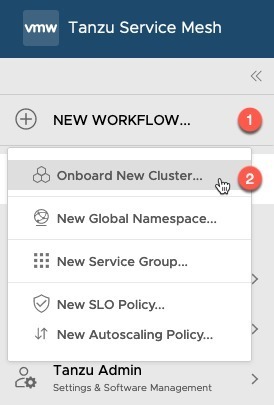
Onboarding your Clusters into Tanzu Service Mesh
Onboarding involves registering the cluster with Tanzu Service Mesh and installing the necessary software on the cluster.
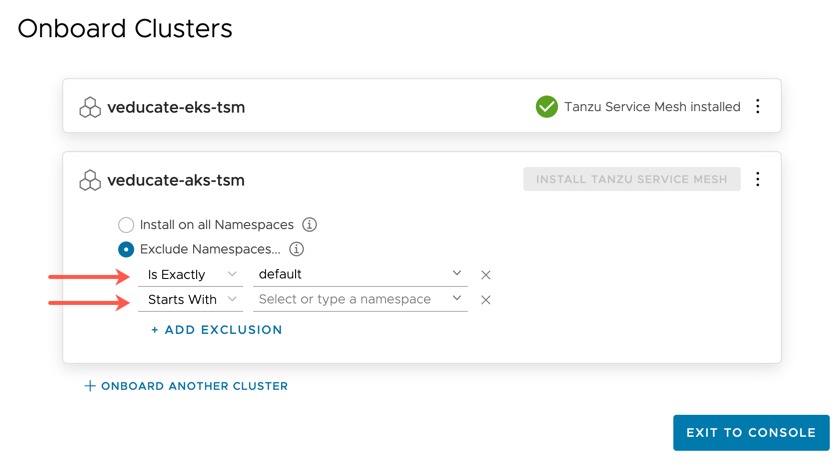
During onboarding, you can choose to install Tanzu Service Mesh in all the namespaces on the cluster or choose to not install Tanzu Service Mesh on specific namespaces by defining namespace exclusions. You exclude a namespace if you don't want to enable the service mesh capabilities in that namespace. The system namespaces on the cluster, such as kube-system, kube-public, and istio-system, are excluded from Tanzu Service Mesh by default.
You can define exclusions for namespaces that do not yet exist in the cluster but that you plan to create.
- Official Documentation - Onboarding a cluster
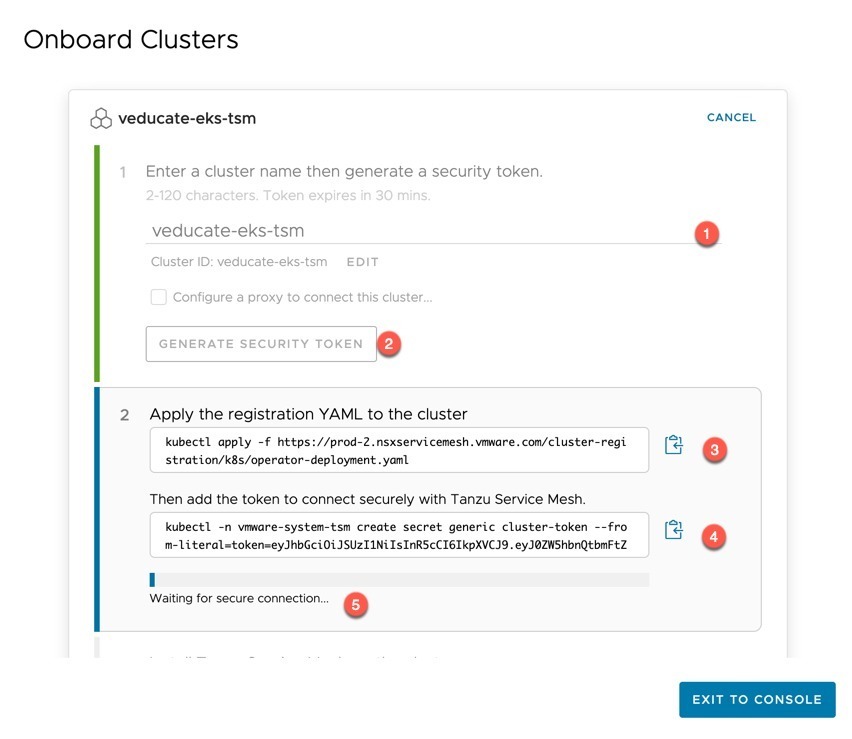
- Enter a name for the cluster as it should appear in the TSM inventory
- Click to Generate the installation links
- In step 2, copy and paste the registration YAML to the cluster, and then add the token configuration.
Once you've added these configurations, TSM will wait for the cluster to create a secure connection back to the TSM control plane SaaS service.
- When configuring the cluster, you can configure which namespaces TSM will apply to. In the below image, you can see this as I add the second cluster. (It can be modified later as well).
On the home screen, under Cluster Overview, you will see your attached clusters.
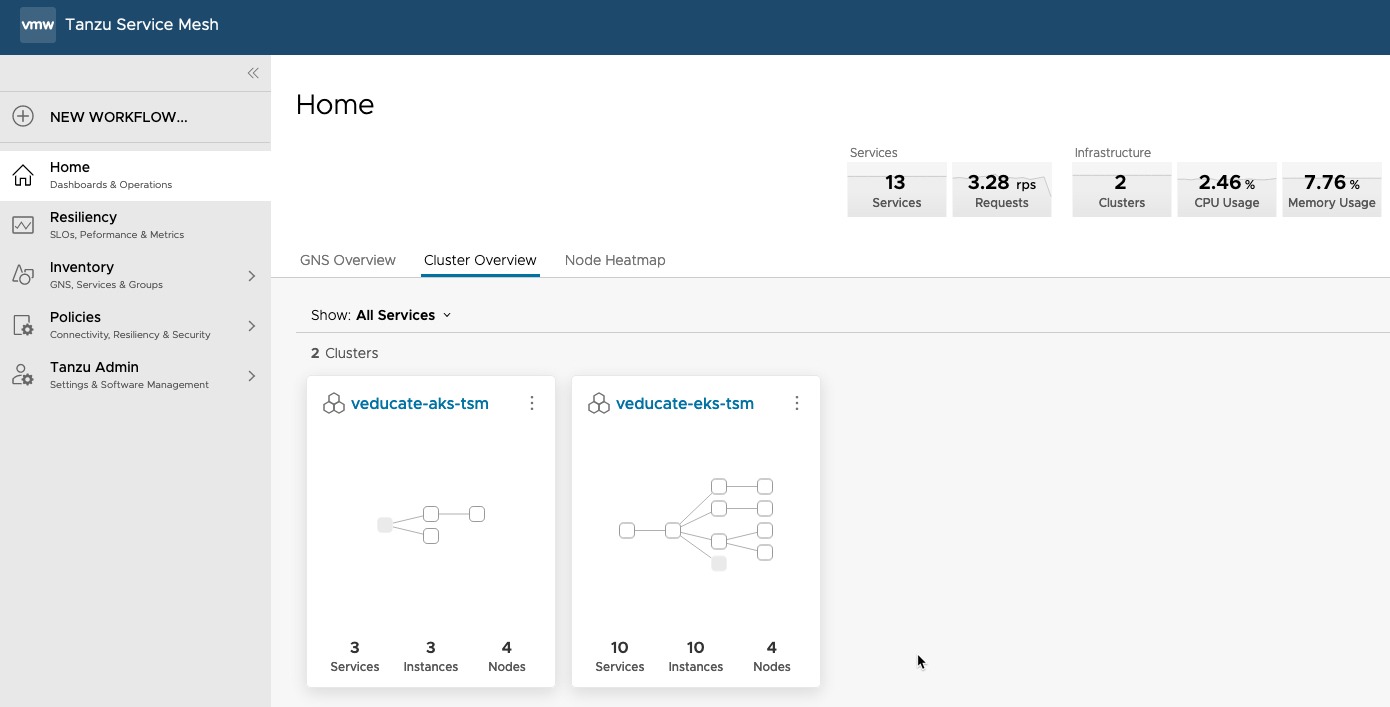
Selecting a cluster will show further information, as well as the ability to change the friendly display name and namespace exclusion rules.

Deploying a test application across clusters
I won't bore you with all the in-depth details, but I wanted to show what happens when you deploy an application across clusters. As this is, of course, one of the most important features with TSM. The ability to connect disparate clusters together via a mesh, so that an application can be deployed across clusters for locality and resilience.
For this part of the blog, I am using VMware’s ACME sports store app.
Cluster 1 will run all the front-end services, Cluster 2 will run the backend catalog database that contains the details and images for the products for sale.
In Cluster 1, the application will reference the Global Namespace domain (created in the new section) to be able to access the catalog service which is located in Cluster 2.
# Ensure the namespace you are deploying into is enabled for istio injection
kubectl label namespace default istio-injection=enabled

# Clone the repo
git clone https://github.com/vmwarecloudadvocacy/acme_fitness_demo -b dkalani-dev3

## Cluster 1 configuration (EKS)
# Deploy the istio gateway
kubectl apply -f acme_fitness_demo/istio-manifests/gateway.yaml

# Deploy the secrets used by the application
kubectl apply -f acme_fitness_demo/kubernetes-manifests/secrets.yaml

# Edit the following manifest file, change the ENV key: CATALOG_HOST value, to match a name you will use for your Global namespace
vim acme_fitness_demo/kubernetes-manifests/acme_fitness_cluster1.yaml

# Deploy the cluster services
kubectl apply -f acme_fitness_demo/kubernetes-manifests/acme_fitness_cluster1.yaml

## Accessing the application, you need to get the address of the Istio Gateway
kubectl get services -n istio-system | grep istio-ingressgateway

## Navigate using a browser to http://<ingress IP>, you should see the Acme store but without pictures of products (we haven’t connected the catalog service yet)
We will now move onto the configuration of the second cluster (AKS).
# Deploy the Istio gateways
kubectl apply -f acme_fitness_demo/istio-manifests/gateway.yaml

# Deploy the secrets
kubectl apply -f acme_fitness_demo/kubernetes-manifests/secrets.yaml

# Deploy the cluster2 services
kubectl apply -f acme_fitness_demo/kubernetes-manifests/acme_fitness_cluster2.yaml
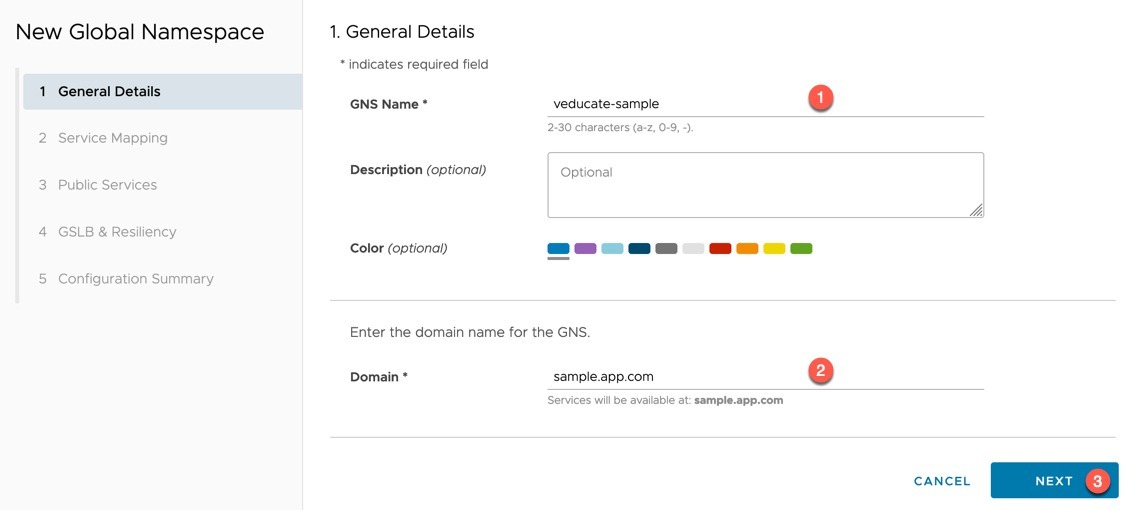
Create the Global Namespace
Click the New Workflow option on the left-hand navigation window, or the button if you are already viewing the global namespaces UI page.

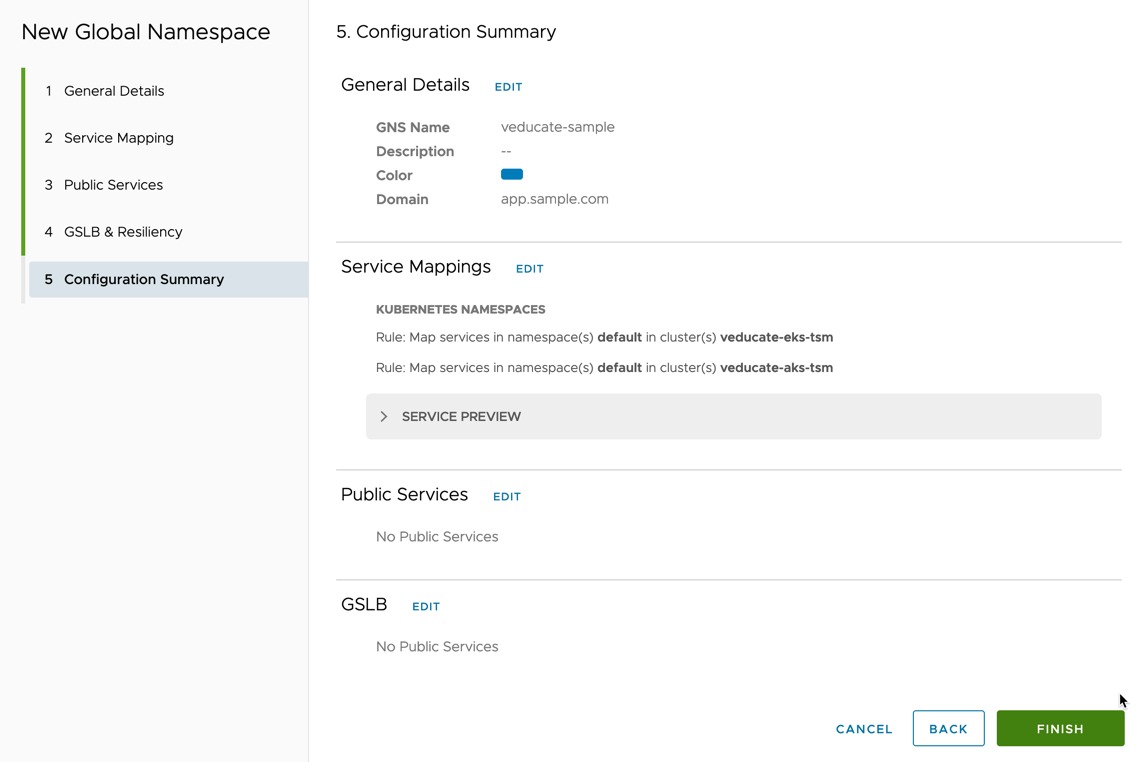
- Provide a name for the global namespace
- Provide a Domain to be used across the clusters
- In my example I used sample.app.com
- .local is not a supported domain suffix
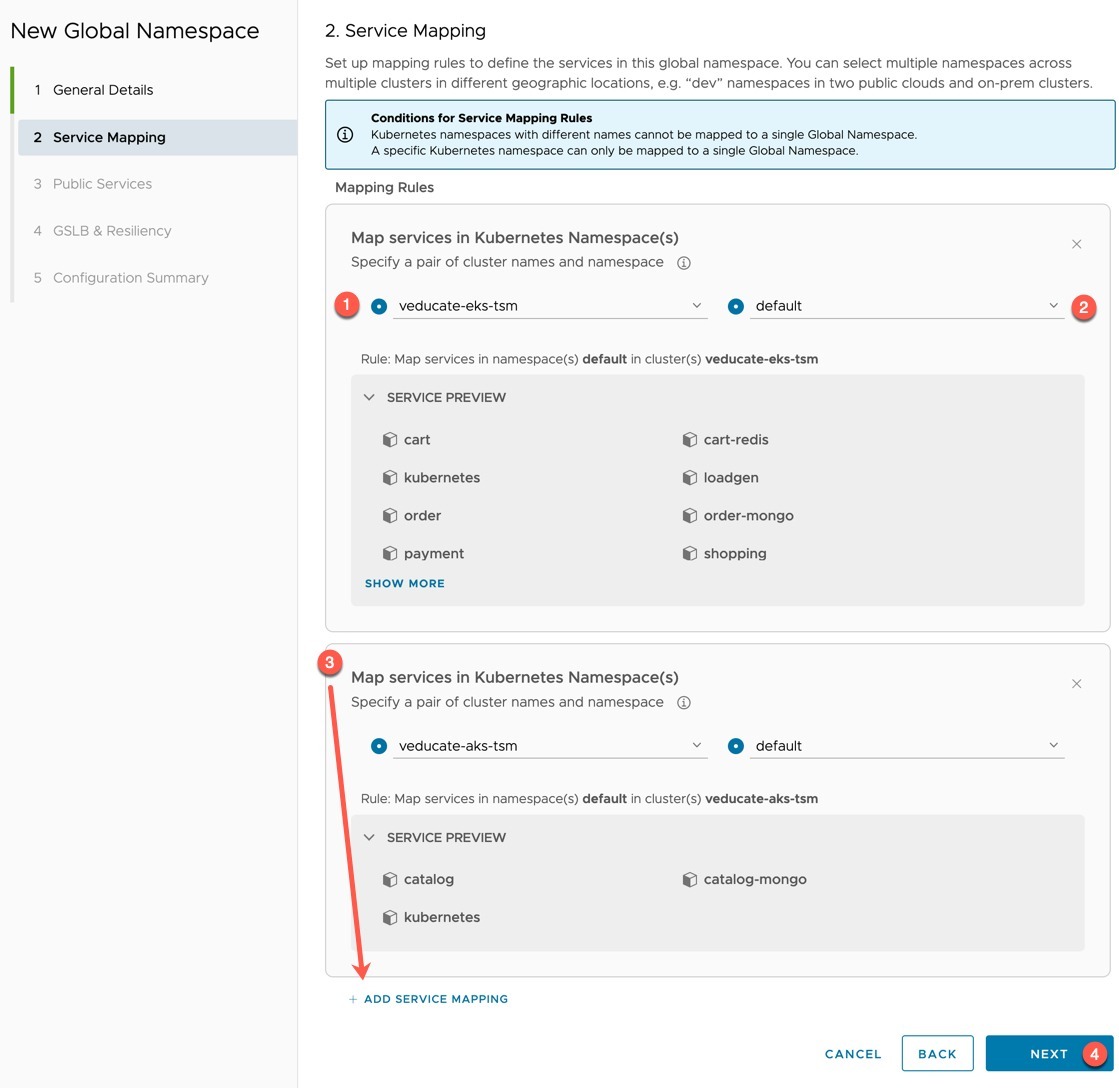
- Map your services together by selecting the clusters and namespaces where your app is located.
- The service preview will show you the deployments that are configured in the namespace
- The "Add service mappings" will allow you to continue to add multiple clusters.
- In this example we won't be configuring public services or Global Service Load Balancing.
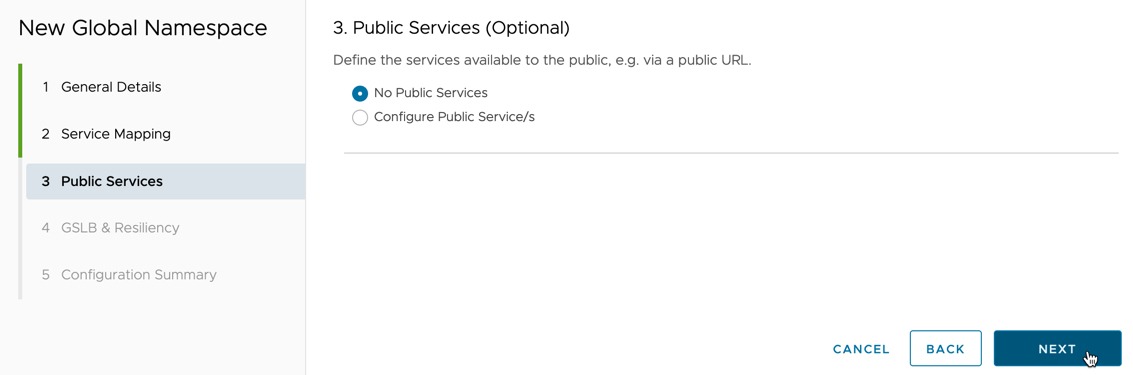
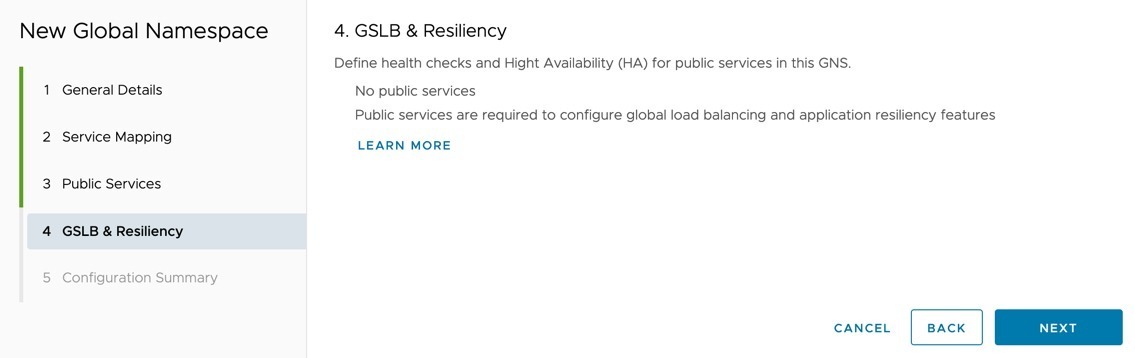
- Review the configuration summary, then click finish.
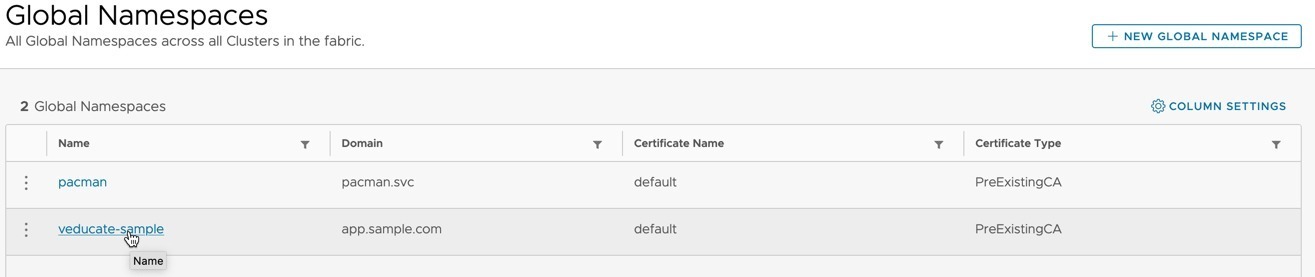
Select the new global namespace.
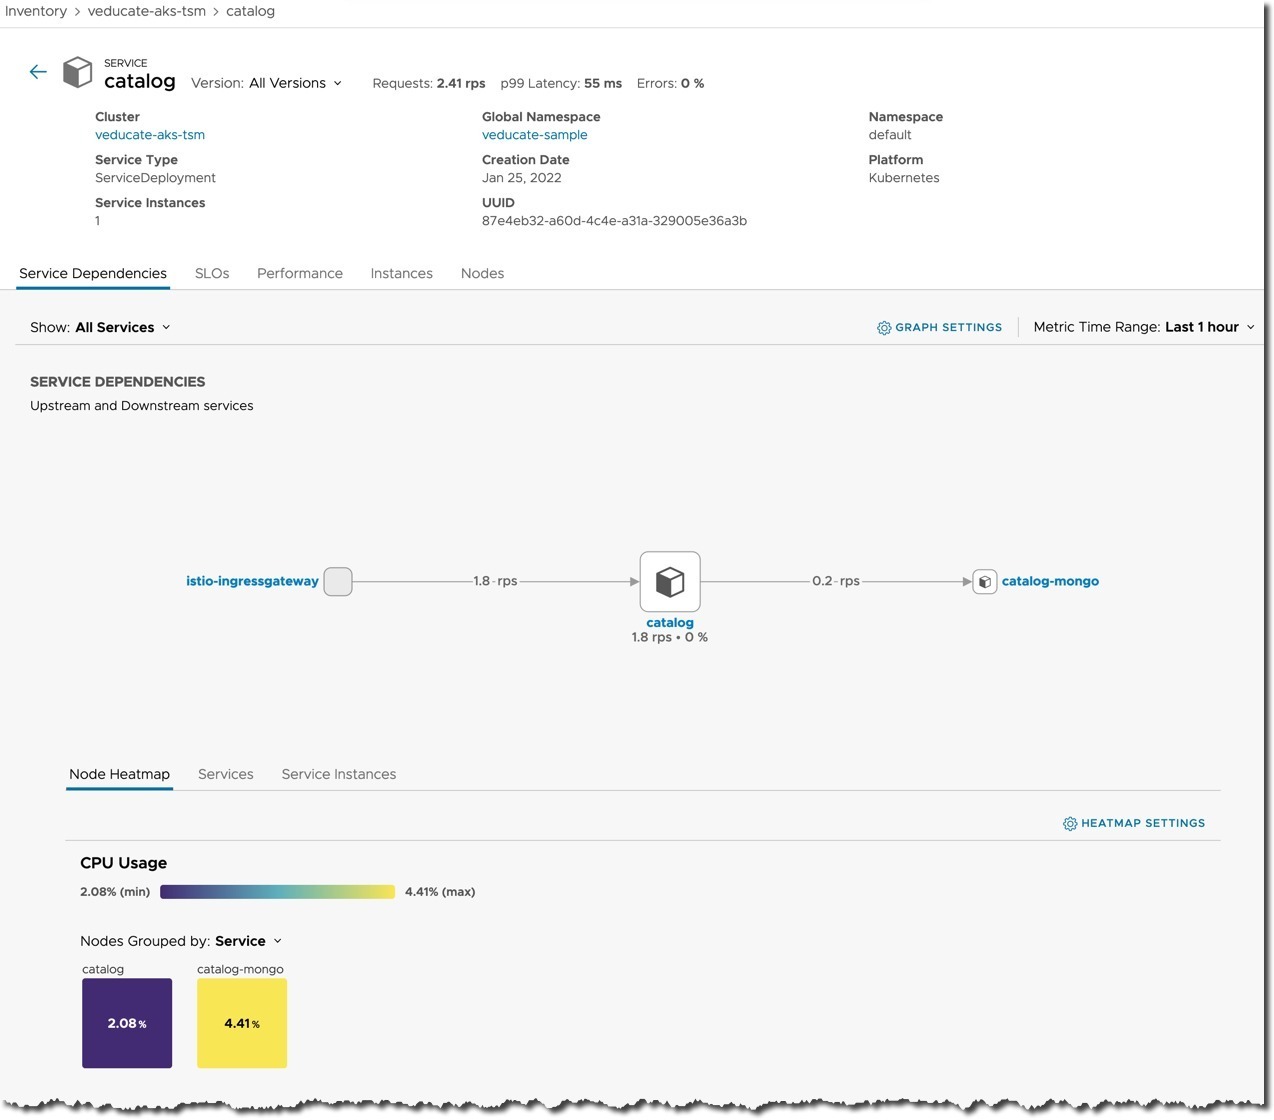
After a few minutes you will see the GNS Topology map built up, including showing traffic paths between the applications and services across the clusters. You can read more about this view below:
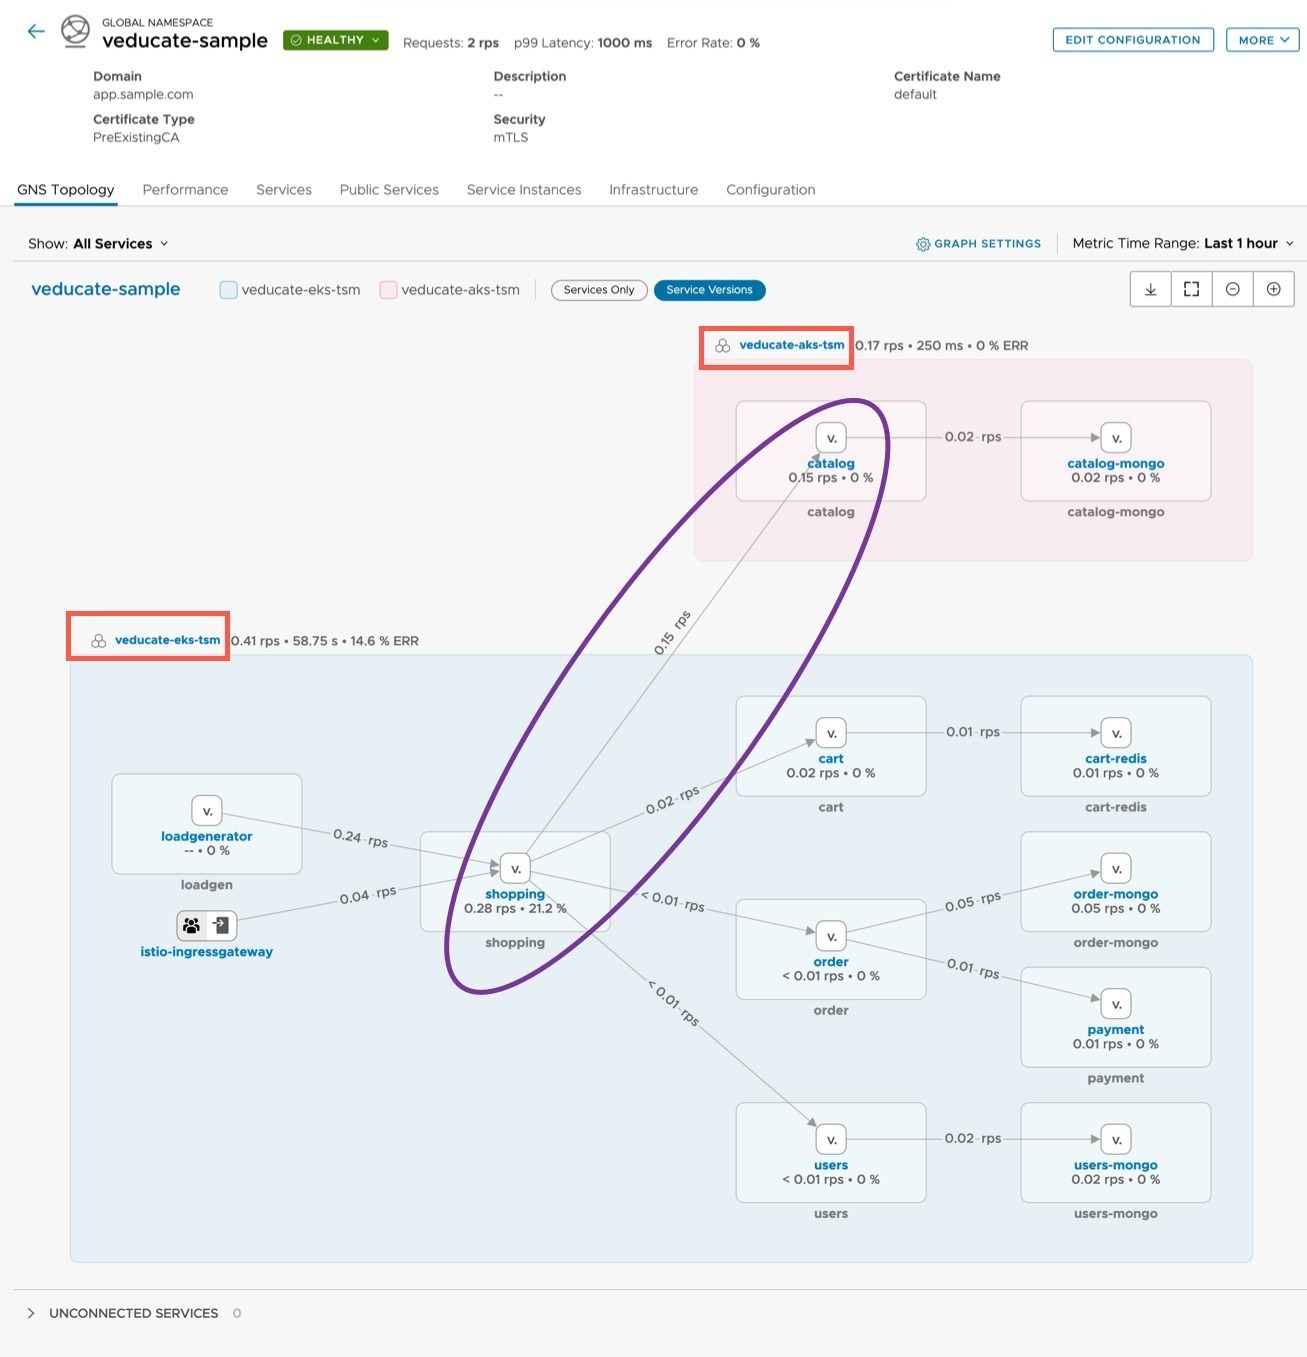
You can also select each service displayed and interrogate it for further information.
Deploying the Pac-Man App
I decided to deploy my own favourite demo app, to understand the configuration a little more.
git clone https://github.com/saintdle/pacman-tanzu.git
I created a new gateway and virtual service for the Istio component of TSM, where needed matching the labels to my pacman deployment. These were deployed into the namespace of my app (the previous example was all done on the default namespace).
This is deployed to both clusters.
apiVersion: networking.istio.io/v1alpha3
kind: Gateway
metadata:
  name: pacman-gateway
  namespace: pacman
spec:
  selector:
    istio: ingressgateway # use istio default controller
  servers:
  - port:
      number: 80
      name: http
      protocol: HTTP
    hosts:
    - "*"
---
apiVersion: networking.istio.io/v1alpha3
kind: VirtualService
metadata:
  name: pacman
  namespace: pacman
spec:
  hosts:
  - "*"
  gateways:
  - pacman-gateway
  http:
  - match:
    - uri:
        prefix: /
    route:
    - destination:
        host: pacman
        port:
          number: 8080
In Cluster 1 (EKS) which will host the front end I deploy the following files:
- pacman-tanzu/deployments/pacman-deployment.yaml
- Within this file I edit the Mongo host location to match my GNS I will deploy:
        env:
        - name: MONGO_SERVICE_HOST
          value: mongo.pacman.svc
- pacman-tanzu/services/pacman-service.yaml
- Change the service to ClusterIP
- pacman-tanzu/security/rbac.yaml
- pacman-tanzu/security/secret.yaml
Within Cluster 2 (AKS) which hosts the Database backend, I deploy the following files:
- pacman-tanzu/deployments/mongo-deployment.yaml
- pacman-tanzu/persistentvolumeclaim/mongo-pvc.yaml
- pacman-tanzu/services/mongo-service.yaml
- pacman-tanzu/security/rbac.yaml
- pacman-tanzu/security/secret.yaml
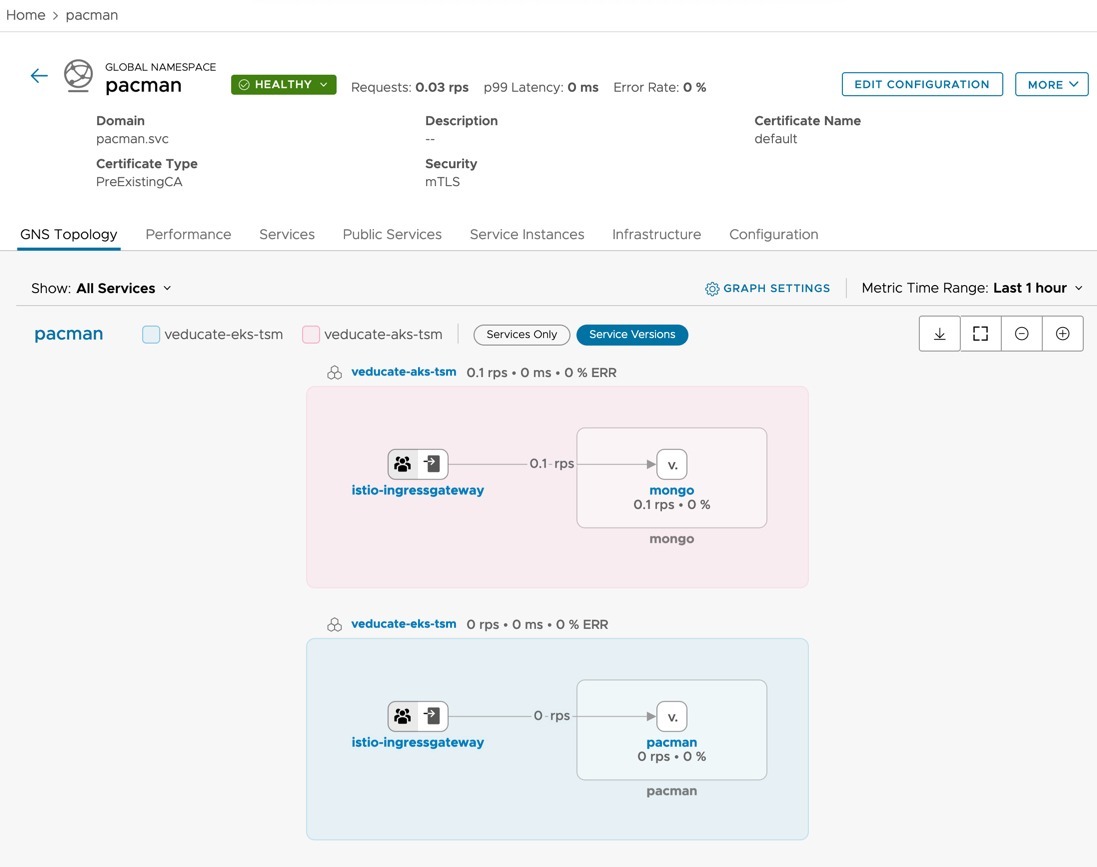
Now to create my GNS I follow similar steps as above; however I select the "pacman" namespace, and use the GNS domain pacman.svc.
Once everything is deployed you get access to the same as in the above example.
One issue I came across, is that the topology view doesn't show the same connectivity flow between clusters. This is because currently the TSM topology mapping component only covers HTTP/s traffic. As my connectivity is between Web front end directly to the DB on port TCP 27017, this doesn't show.
This only affects the visual view but does not affect any of the features or implementation. My Web Front End can still communicate with the DB across clusters.
Determine the health of the components on a cluster
Tanzu Service Mesh Lifecycle Manager Operator automatically manages the Tanzu Service Mesh components on onboarded clusters. You can use Tanzu Service Mesh Lifecycle Manager Operator to determine the health of the components on a cluster.
On your given cluster you can run the following command
kubectl --context {cluster_name} -n vmware-system-tsm get tsmclusters.tsm.vmware.com tsm-client-cluster -o yaml

# Below is an example output from my EKS cluster
apiVersion: tsm.vmware.com/v1
kind: TsmCluster
metadata:
  creationTimestamp: "2022-01-25T07:56:32Z"
  generation: 5
  name: tsm-client-cluster
  namespace: vmware-system-tsm
  resourceVersion: "8085"
  uid: 4701d094-5dc7-4545-ad85-1738b2deeda7
spec:
  uuid: ""
  version: v1.13.8
status:
  components:
  - healthState: Healthy
    kind: Deployment
    name: k8s-cluster-manager
    previousStates:
    - lastUpdateTime: "2022-01-25T07:56:39Z"
      state: ""
    previousVersion: ""
    size: 1
    state: OK
    version: v4.2.0-1
  - healthState: Healthy
    kind: Deployment
    name: allspark-ws-proxy
    previousStates:
    - lastUpdateTime: "2022-01-25T07:56:39Z"
      state: ""
    previousVersion: ""
    size: 1
    state: OK
    version: v3.2.0
  - healthState: Unknown
    kind: Job
    name: kickstarter
    previousStates:
    - lastUpdateTime: "2022-01-25T07:56:39Z"
      state: ""
    previousVersion: ""
    size: 0
    state: OK
    version: 1a4ccab4
  currentVersion: v1.13.8
  previousVersion: ""
  state: OK
Troubleshooting
The usual troubleshooting applies when it comes to Kubernetes, use the "kubectl" command line and verify your configurations. And of course, TSM gives you a fantastic way to visualise your configurations and connectivity.
As TSM layers ontop of Istio, you can also use the "istioctl" command line tool as well. But read the warning below.
- GitHub - Istio - Releases
Using the istioctl tool to modify or configure TSM deployment will not be supported in any way, as this is outside of the control-plane. Don't do it!
The single reason why I mentioned this tool, is due to the "analyze" command, which may assist you when you make mistakes deploying a gateway or virtual service such as this example:
> istioctl analyze
Info [IST0118] (Service default/loadgen) Port name loadgen (port: 80, targetPort: 8089) doesn't follow the naming convention of Istio port.
Error: Analyzers found issues when analyzing namespace: default.
See https://istio.io/v1.12/docs/reference/config/analysis for more information about causes and resolutions.
Wrap-up and Resources
Finally finding time to test out TSM was fun. I think it really started to make sense to me once I created essentially an encrypted backbone between to completely separate clusters deployed into two completely different clouds (AWS and Azure).
Then through the global namespace, I could split my application deployments between both clusters but connect them together and use them as if they operated within a single cluster.
And this is just the tip of the iceberg for the capabilities of TSM as well.
- TSM - Official Documentation home page
- TSM Glossary - Because there is a hell of a lot of new terms to get to grips with!
Regards