
Recently, I'm seeing more and more queries about migrating to Cilium within an existing Red Hat OpenShift cluster, due to Cilium's advanced networking capabilities, robust security features, and enhanced observability out-of-the-box. This increase of interest is also boosted by the fact that Cilium became the first Kubernetes CNI to graduate in the CNCF Landscape.
In this blog post, we'll cover the step-by-step process of migrating from the traditional OpenShiftSDN (default CNI pre-4.12) or OVN-Kubernetes (default CNI from 4.12) to Cilium, exploring the advantages and considerations along the way.
If you need to understand more about the default CNI options in Red Hat OpenShift first, then I highly recommend this blog post, as pre-reading before going through this walkthrough.
Cilium Overview
For those of you who have not heard of Cilium, or maybe just the name and know there's a buzz about it. In short Cilium, is a cloud native networking solution to provide security, networking and observability at a software level.
The reason why the buzz is so huge is due to being implemented using eBPF, a new way of interacting and programming with the kernel layer of the OS. This implementation opens a whole new world of options.
I'll leave you with these two short videos from Thomas Graf, co-founder of Isovalent, the creators of Cilium.
https://www.youtube.com/watch?v=yjLJ2mib2zI
https://www.youtube.com/watch?v=6duLt4KicOg
Does Red Hat support this migration?
Cilium has achieved the Red Hat OpenShift Container Network Interface (CNI) certification by completing the operator certification and passing end-to-end testing. Red Hat will support Cilium installed and running in a Red Hat OpenShift cluster, and collaborate as needed with the ecosystem partner to troubleshoot any issues, as per their third-party software support statements. This would be a great reason to look at Isovalent Enterprise for Cilium, rather than using Cilium OSS, to get support from both vendors.
However, when it comes to performing a CNI migration for an active existing OpenShift cluster, Red Hat provides no guidance, unless it's migrating from OpenShiftSDN to OVN-Kubernetes.
This means CNI migration to a third party CNI in an existing running Red Hat OpenShift Cluster is a grey area.
I'd recommend speaking to your Red Hat account team before performing any migration like this in your production environments. I have known large customers to take on this work/burden/supportability themselves and be successful.
Follow along with this video!
If you prefer watching a video or seeing things live and following along, like I do at times, then I've got you covered with the below video that covers the content from this blog post.
https://www.youtube.com/watch?v=0Jpam_NnvB4
Pre-requisites and OpenShift Cluster configuration
As per the above, understand this process in detail, and if you follow it, you do so at your own risk.
For this walkthrough, I've deployed a OpenShift 4.13 cluster with OVN-Kubernetes, with a sample application (see below). You can see these posts I've written for deployments of OpenShift, or follow the official documentation.
- 90DaysOfDevOps - Red Hat OpenShift - deep dive into features and installation
- Deploying OpenShift clusters (IPI) using vRA Code Stream
- How to specify your vSphere virtual machine resources when deploying Red Hat OpenShift
- How to deploy OpenShift 4.3 on VMware vSphere with Static IP addresses using Terraform
Here is a copy of my install-config.yaml file. It was generated using the openShift-install create install-config wizard. Then I ran the openshift-install create cluster command.
## install-config.yaml
additionalTrustBundlePolicy: Proxyonly
apiVersion: v1
baseDomain: simon.local
compute:
- architecture: amd64
  hyperthreading: Enabled
  name: worker
  platform: {}
  replicas: 2
controlPlane:
  architecture: amd64
  hyperthreading: Enabled
  name: master
  platform: {}
  replicas: 3
metadata:
  creationTimestamp: null
  name: ocp-test
networking:
  clusterNetwork:
  - cidr: 10.128.0.0/14
    hostPrefix: 23
  machineNetwork:
  - cidr: 10.0.0.0/16
  networkType: OVNKubernetes
  serviceNetwork:
  - 172.30.0.0/16
platform:
  vsphere:
    apiVIPs:
    - 192.168.200.140
    failureDomains:
    - name: generated-failure-domain
      region: generated-region
      server: vcenter.veducate.local
      topology:
        computeCluster: /Datacenter/host/Cluster
        datacenter: Datacenter
        datastore: /Datacenter/datastore/Datastore
        networks:
        - OpenShift_NW1
        resourcePool: /Datacenter/host/Cluster/Resources/veducate/
      zone: generated-zone
    ingressVIPs:
    - 192.168.200.141
    vcenters:
    - datacenters:
      - Datacenter
      password: VMware1!
      port: 443
      server: vcenter.veducate.local
      user: [email protected]
publish: External
pullSecret: '{"auths":{"xxxxx........'
sshKey: |
  ssh-rsa AAAAB3xxxxxvbjxPKE= dean@veducate
Ensure that your cluster is in a fully operational state before continuing.
Kube-Proxy considerations
When an Openshift cluster is created with OpenShift SDN or OVN, by default kube-proxy is not deployed. This means that while we don’t need to carefully remove it. We do need to configure cluster network operator to ensure that it doesn’t deploy kube-proxy as part of the reconfiguration.
We also need to configure Cilium, so it understands to replace kube-proxy component. You will see this in the cluster-network-07-cilium-ciliumconfig.yamlfile that we'll configure later on in this walkthrough with the line kubeProxyReplacement: strict.
There are times that Kube-Proxy is configured with OpenShift SDN, potentially for legacy reasons, and if this is the case, additional consideration are necessary as part of the migration. This goes beyond the scope of this blog post.
Deploying a sample application
We need an application to monitor whilst performing the migration, and show us how the changes affect the system.
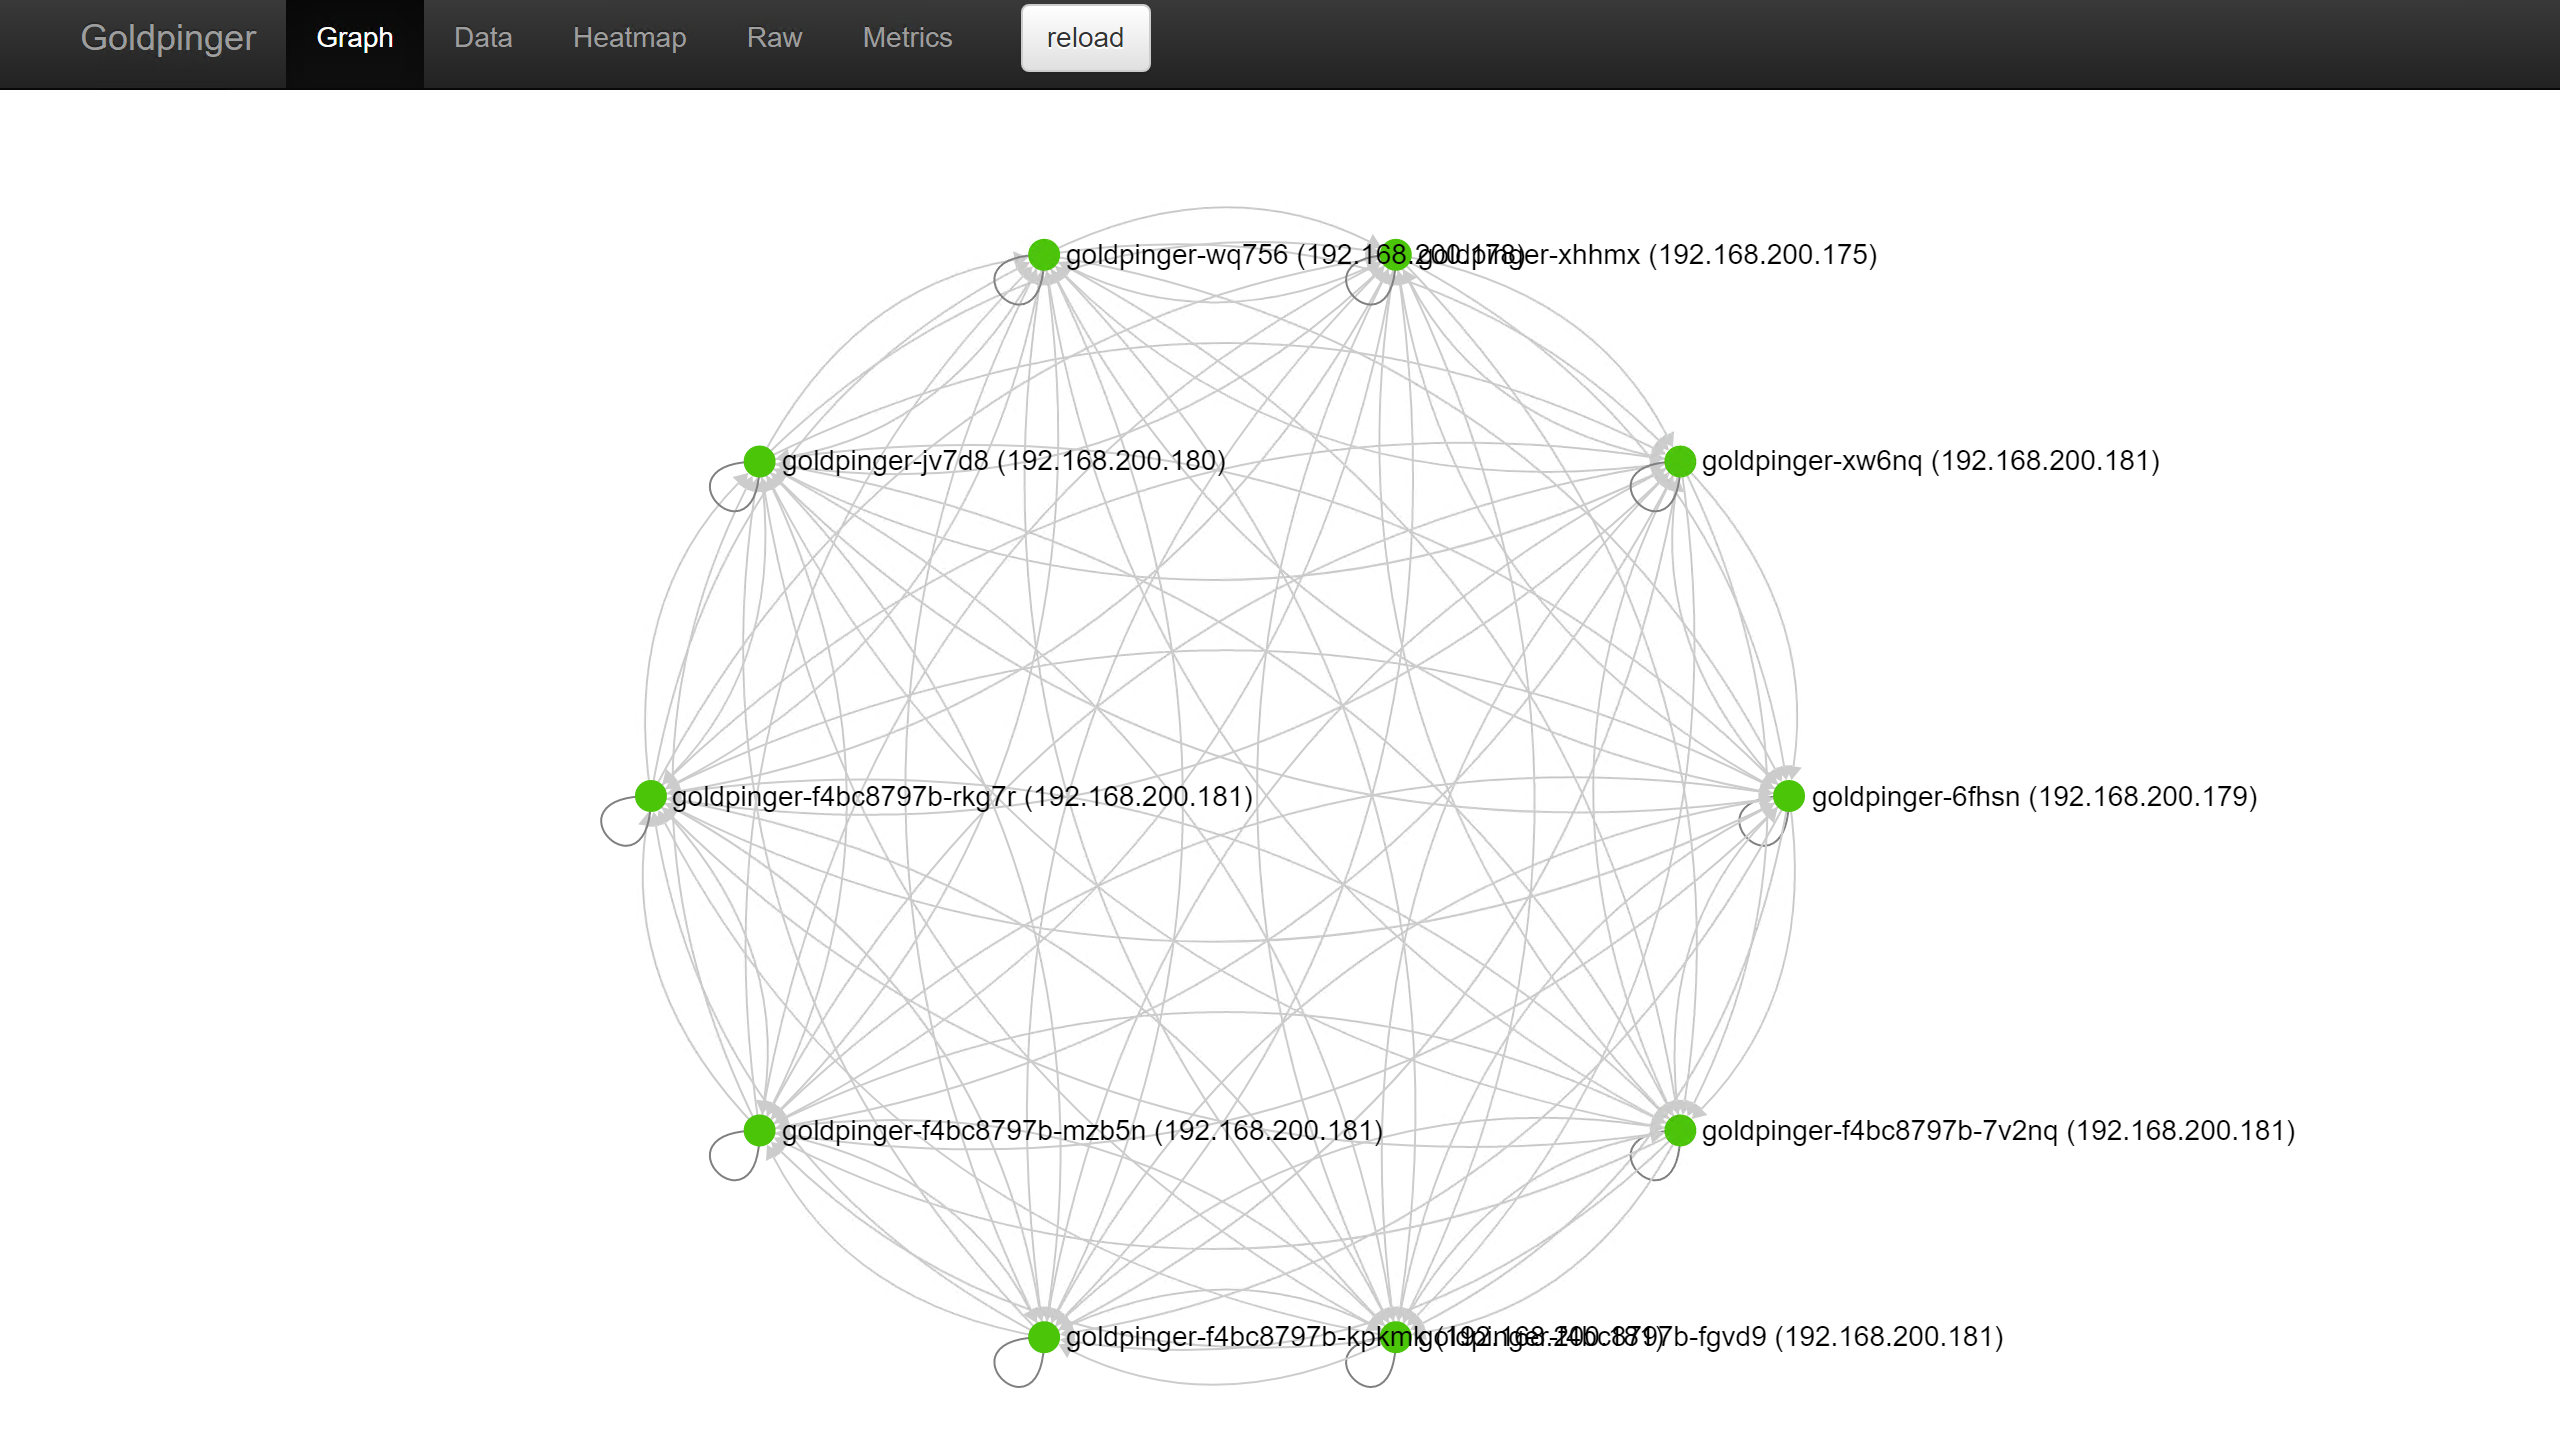
For this I have deployed Goldpinger, a container-based software that makes calls between its instances to monitor your networking. It runs as a daemonset on the OpenShift cluster and produces Prometheus metrics that can be scraped, visualised and alerted on, as well as providing it's own UI with a graph.
You can find the code for deployment in my GitHub gist, or follow the above GitHub link to the software docs.
oc apply -f https://gist.githubusercontent.com/saintdle/d4bf90c5a487ed3ffd674900517955a0/raw/3b1b8c8257965516e25305797990e6fa11b350a3/goldpinger.yaml

oc expose service goldpinger --hostname=goldpinger.apps.{cluster}.{basedomain}
Once up and running, and the UI exposed, browsing to the web URL should present a graph as below, with each of your nodes represented and green dots for each. If there are any errors, you'll see red dots. Before you continue, ensure all connections are green.
Migrating to Cilium
We are now ready to migrate to Cilium. Let's start by pulling the Cilium OLM manifests. These are hosted by Isovalent, they offer both an OpenShift Certified Operator for Cilium OSS and Cilium Enteprise.
For this walkthrough, I am using the latest available Cilium version at the time of this blog post.
cilium_version="1.14.5"
git clone https://github.com/isovalent/olm-for-cilium.git
Disable the Cluster Network Operator
The first step is to temporarily disable the cluster-network-operator. The CVO (cluster version operator) is responsible for ensuring that the cluster network operator is configured according to the desired state of an Openshift cluster version.
It can be configured to ignore specific clusteroperators through the configuration of overrides.
We are disabling the management of the network operator, so we can clean out the configured state, update the CNI to Cilium and then re enable it.
The below commands create a patch file to perform the required action and apply the patch file.
cat << EOF > cvo-netop-disable.yaml
- op: add
  path: /spec/overrides
  value:
  - kind: Deployment
    group: apps
    name: network-operator
    namespace: openshift-network-operator
    unmanaged: true
EOF

oc patch clusterversion version --type json --patch-file cvo-netop-disable.yaml
This now allows the ability to scale down the network operator pods to 0, effectively disabling the network operator management of the cluster.
oc scale deployment -n openshift-network-operator network-operator --replicas=0
Change the default CNI to Cilium
We are now ready for the most complex part of the operation, and this will incur downtime. There are a few steps to complete and it’s important that each step is completed successfully before moving on to the next action.
First, ensure that there are no pods running in the openshift-network-operator namespace. If there are any pods running, then the previous step where we scaled the Cluster Network Operator deployment to zero and disabled management of the CNO, has failed, you will need to troubleshoot this before proceeding further.
oc get pods -n openshift-network-operator
We will now remove the applied-cluster configmap in the openshift-network-operator namespace.
oc delete configmap applied-cluster -n openshift-network-operator
This removes the state file that was created when the cluster was initially brought up. The CNO will reference this file to determine if it should apply a change made to the network.config or network.operator cluster objects.
Next, we want to reconfigure the network.config and network.operator objects to align with the change we want to make.
When a change is made to those objects, the nodes will automatically reboot as the openshift-machine-operator will detect a change in configuration for the nodes.
To avoid this, we will update the machineconfigpool to stop this from happening, giving us control of rebooting the nodes later in the process.
oc patch --type=merge --patch='{"spec":{"paused":true}}' mcp/master
oc patch --type=merge --patch='{"spec":{"paused":true}}' mcp/worker
Update the network.operator and network.config objects
We need to change the pod CIDR network and remove the status from each of the
these objects, as well as inform the cluster that the default network type is now Cilium going forward.
Since the ciliumconfig we'll use in this walkthrough uses the 10.244.0.0/16 network, here is an example patch for that network, you'll need to match this to your own environment. You will need to ensure this new network doesn't overlap with the existing pod networking used by the default CNI.
oc patch network.config cluster --type=merge --patch='{"spec":{"clusterNetwork":[{"cidr":"10.244.0.0/16","hostPrefix":24}],"networkType":"Cilium"},"status":null}'
When configuring the network.operator we also need to configure it not to deploy kube-proxy on restart. This change is persistent and any subsequent upgrades to the cluster will not include kube-proxy.
Even if your cluster does not have Kube-Proxy deployed, adding this configuration is recommended.
oc patch network.operator cluster --type=merge --patch='{"spec":{"clusterNetwork":[{"cidr":"10.244.0.0/16","hostPrefix":24}],"defaultNetwork":{"type":"Cilium"},"deployKubeProxy":false},"status":null}'
Deploy Cilium to the cluster
Navigate to the Cilium manifests folder in the repo you cloned earlier, and configure the file cluster-network-07-cilium-ciliumconfig.yaml with the below minimum configuration to install and configure Cilium on the OpenShift platform. The Hubble section is optional if you want to deploy this component. At the end of this walkthrough, I quickly show you Hubble observing network flows from OpenShift.
- You will need to configure the
k8sServiceHostandk8sServicePortas per your environment, you can run the commandoc config view --minify | grep server, to gather this information. - Ensure the
clusterPoolIPv4PodCIDRListmatches the pod cidr configured in the network.operator in the previous section.- Older versions of Cilium used the key
clusterPoolIPv4PodCIDR, in 1.14.5 this key gave me an error and I had to update to append "list" to the end of the key, this error was printed out in the cilium agent logs.
- Older versions of Cilium used the key
## cluster-network-07-cilium-ciliumconfig.yaml
apiVersion: cilium.io/v1alpha1
kind: CiliumConfig
metadata:
  name: cilium
  namespace: cilium
spec:
  sessionAffinity: true
  securityContext:
    privileged: true
  kubeProxyReplacement: strict
  k8sServiceHost: api.ocp-test.simon.local
  k8sServicePort: 6443
  ipam:
    mode: "cluster-pool"
    operator:
      clusterPoolIPv4PodCIDRList: "10.244.0.0/16"
      clusterPoolIPv4MaskSize: 24
  cni:
    binPath: "/var/lib/cni/bin"
    confPath: "/var/run/multus/cni/net.d"
    exclusive: false
    customConf: false
  prometheus:
    enabled: true
    serviceMonitor: {enabled: true}
  nodeinit:
    enabled: true
  extraConfig:
    bpf-lb-sock-hostns-only: "true"
    export-aggregation: "connection"
    export-aggregation-ignore-source-port: "false"
    export-aggregation-state-filter: "new closed established error"
  hubble:
    enabled: true
    metrics:
      enabled:
      - dns:labelsContext=source_namespace,destination_namespace
      - drop:labelsContext=source_namespace,destination_namespace
      - tcp:labelsContext=source_namespace,destination_namespace
      - icmp:labelsContext=source_namespace,destination_namespace
      - flow:labelsContext=source_namespace,destination_namespace;sourceContext=workload-name|reserved-identity;destinationContext=workload-name|reserved-identity
      - "kafka:labelsContext=source_namespace,source_workload,destination_namespace,destination_workload,traffic_direction;sourceContext=workload-name|reserved-identity;destinationContext=workload-name|reserved-identity"
      - "httpV2:exemplars=true;labelsContext=source_ip,source_namespace,source_workload,destination_ip,destination_namespace,destination_workload,traffic_direction;sourceContext=workload-name|reserved-identity;destinationContext=workload-name|reserved-identity"
      serviceMonitor: {enabled: true}
    relay: {enabled: true}
  operator:
    unmanagedPodWatcher:
      restart: false
    metrics:
      enabled: true
    prometheus:
      enabled: true
      serviceMonitor: {enabled: true}
Now we can apply the Cilium manifests to the cluster.
You may need to apply the manifests twice to ensure that the ciliumconfig is accepted. This is because the first time through, the CRD isn’t setup yet and we need to apply the ciliumconfig a second time.
oc apply -f olm-for-cilium/manifests/cilium.v1.14.5/

### You may see the following error stating the ciliumconfig could not be applied, meaning the manifests need to be applied a second time now the CRD is configured

error: unable to recognize "olm-for-cilium/1.14.5/cluster-network-07-cilium-ciliumconfig.yaml": no matches for kind "CiliumConfig" in version "cilium.io/v1alpha1"
Wait for cilium to completely deploy. This will look like all this in the cilium namespace:
$ oc get pods -n cilium
NAME                               READY   STATUS    RESTARTS        AGE
cilium-6j4sp                       1/1     Running   0               7m7s
cilium-95kwh                       1/1     Running   0               7m7s
cilium-9ssqt                       1/1     Running   0               7m7s
cilium-dtf9z                       1/1     Running   0               7m7s
cilium-mgm2j                       1/1     Running   0         7m7s
cilium-olm-6db4989b9f-6lngh        1/1     Running   2 (3m52s ago)   7m57s
cilium-node-init-77wj9             1/1     Running   0               7m7s
cilium-node-init-7nk6v             1/1     Running   0               7m7s
cilium-node-init-8djjl             1/1     Running   0         7m7s
cilium-node-init-qxwll             1/1     Running   0               7m7s
cilium-node-init-xlnlk             1/1     Running   0               7m7s
cilium-operator-76f7859ccc-hxl6w   1/1     Running   2 (3m19s ago)   7m7s
cilium-operator-76f7859ccc-k9qxf   1/1     Running   2 (2m55s ago)   7m7s
hubble-relay-f8fc5bcc-v9fp7        1/1     Running   0               7m7s
Scale the Cluster Network Operator
Now we can re-enable the cluster network operator to manage the platform again, with Cilium as the CNI.
oc scale deployment -n openshift-network-operator network-operator --replicas=1
And we'll configure the cluster version operator to once again manage the network operator.
oc patch clusterversions version --type=merge --patch '{"spec":{"overrides":null}}'
Reboot the OpenShift nodes
At this point all that is left is a reboot of all nodes. Since we paused the machine config operator previously, we can now revert this and allow the MCO to reboot the nodes in a safe way.
Note that unpausing these will result in pretty much immediate action and will start to work through rebooting all nodes associated with the machineconfigpool below.
oc patch --type=merge --patch='{"spec":{"paused":false}}' mcp/master
oc patch --type=merge --patch='{"spec":{"paused":false}}' mcp/worker
Progress of the updates to the nodes and the machine configs can be monitored with the following command:
$ oc get mcp -w
NAME     CONFIG                                             UPDATED   UPDATING   DEGRADED   MACHINECOUNT   READYMACHINECOUNT   UPDATEDMACHINECOUNT   DEGRADEDMACHINECOUNT   AGE
master   rendered-master-08e6dd82543959e5cef7e377f6e60b21   True      False      False      1              1                   1                     0                      7h24m
worker   rendered-worker-cc791ecb700b5f66e0594e9a3e2ac198   False     True       False      3              1                   1                     0                      7h24m
worker   rendered-worker-cc791ecb700b5f66e0594e9a3e2ac198   False     True       False      3              2                   2                     0                      7h25m
worker   rendered-worker-4843ada12a54674bd2dfb6afc0f2b6c1   True      False      False      3              3                   3                     0                      7h28m
Once all nodes have been successfully configured to the new config the work is complete.
In my environment, I found that unpausing the machineconfigpool was not enough. One control plane and compute plan node went into schedulingDisabled status, but no further.
I had to manually cordon, drain and reboot each node. After this each node came back online, and had the following condition:
$ oc describe node
<output ommitted>

Conditions:
Type Status LastHeartbeatTime LastTransitionTime Reason Message
---- ------ ----------------- ------------------ ------ -------
NetworkUnavailable False Fri, 29 Dec 2023 16:42:09 +0000 Fri, 29 Dec 2023 16:42:09 +0000 CiliumIsUp Cilium is running on this node
You can gracefully reboot OpenShift nodes by performing the following steps:
oc adm cordon {node name}
oc adm drain {node name} --ignore-daemonsets --delete-emptydir-data --force

# If you have pod disruption budgets configured, you will need to run

oc adm drain <node1> --ignore-daemonsets --delete-emptydir-data --force --disable-eviction

# Access the node
# You may not see a return for the terminal when running this, just sumbit the next command
oc debug node/{node name}

# Change root directory to /host
chroot /host

# Restart the node
systemctl reboot
Check that all your nodes are reporting as ready. And that all pods are running as expected.
oc get nodes

oc get pods --all-namespaces -o wide --sort-by='{.spec.nodeName}'
Check all the Cluster Operators are working as expected.
oc get clusteroperators
When you are happy everything is healthy, remove the associated namespace from the CNI you have migrated from.
oc delete namespace openshift-sdn
oc delete namespace openshift-ovn-kubernetes
If we inspect the Goldpinger UI, we can see that everything should be back up and running again, and that the pod IP's have updated to use the pod CIDR network range configured in Cilium.

Perform Cilium Networking Tests
To perform the Cilium network tests, we first must create a SecurityConstraintContext to allow the test to run with the correct privileges within the cluster.
# Run this command to create a file with the following configuration

cat << EOF > cilium-tests.yaml
apiVersion: security.openshift.io/v1
kind: SecurityContextConstraints
metadata:
  name: cilium-test
allowHostPorts: true
allowHostNetwork: true
users:
  - system:serviceaccount:cilium-test:default
priority: null
readOnlyRootFilesystem: false
runAsUser:
  type: MustRunAsRange
seLinuxContext:
  type: MustRunAs
volumes: null
allowHostDirVolumePlugin: false
allowHostIPC: false
allowHostPID: false
allowPrivilegeEscalation: false
allowPrivilegedContainer: false
allowedCapabilities: null
defaultAddCapabilities: null
requiredDropCapabilities: null
groups: null
EOF

# Now apply this to the cluster

oc apply -f cilium-tests.yaml
Now we can deploy the pods with run the tests:
Applying this YAML file, creates several deployments that will use various connectivity paths to connect to each other. The connectivity paths include both with and without service load-balancing and various network policy combinations. The pod name indicates the connectivity variant and the readiness and liveness gate indicate success or failure of the test:
$ oc get pods -n cilium
NAME READY STATUS RESTARTS AGE
echo-a-568cb98744-t6dpj 1/1 Running 0 15h
echo-b-64db4dfd5d-4rtqk 1/1 Running 0 15h
echo-b-host-6b7bb88666-5qp4q 1/1 Running 0 15h
host-to-b-multi-node-clusterip-6cfc94d779-2qpvq 1/1 Running 0 15h
host-to-b-multi-node-headless-5458c6bff-wb7gq 1/1 Running 0 15h
pod-to-a-allowed-cnp-55cb67b5c5-zp5dj 1/1 Running 0 15h
pod-to-a-c9b8bf6f7-dz2rm 1/1 Running 0 15h
pod-to-a-denied-cnp-85fb9df657-qnmzh 1/1 Running 0 15h
pod-to-b-intra-node-nodeport-55784cc5c9-rqbvw 1/1 Running 0 15h
pod-to-b-multi-node-clusterip-5c46dd6677-c4bhd 1/1 Running 0 15h
pod-to-b-multi-node-headless-748dfc6fd7-nwdkw 1/1 Running 0 15h
pod-to-b-multi-node-nodeport-f6464499f-8gpgq 1/1 Running 0 15h
pod-to-external-1111-96c489555-pcg5n 1/1 Running 0 15h
pod-to-external-fqdn-allow-google-cnp-5f747dfc7-8j2gq 1/1 Running 0 15h
Summary
There we have it, a successful migration from OpenShiftSDN or OpenShift OVN-Kubernetes to Cilium.
It is quite a simple process but does require downtime. For larger environments, more planning will be required, and you may need to make the decision is it better to migrate your applications and data to a new OpenShift cluster with Cilium installed rather than in-place migrate the CNI to Cilium. If this is the case, I recommend looking at a tool like Kasten, which can provide flexibility in migrating apps and data. I have a guide for using Kasten with OpenShift here.
In the example ciliumconfig, Hubble Relay was enabled too, and you can access that by exposing the relay port, and using the Hubble CLI. Further configuration is needed to enable the Hubble UI etc.
$ kubectl port-forward svc/hubble-relay -n cilium 4245:80 &
$ hubble observe
Handling connection for 4245
Dec 30 12:21:19.757: 10.244.0.214:59426 (host) -> openshift-monitoring/prometheus-k8s-0:9091 (ID:17068) to-endpoint FORWARDED (TCP Flags: ACK, RST)
Dec 30 12:21:19.788: default/goldpinger-jv7d8:53046 (ID:21030) -> default/goldpinger-6fhsn:8080 (ID:21030) to-overlay FORWARDED (TCP Flags: ACK, PSH)
Dec 30 12:21:19.788: 192.168.200.180:46932 (host) -> 192.168.200.179:8472 (kube-apiserver) to-network FORWARDED (UDP)
Dec 30 12:21:19.789: default/goldpinger-jv7d8:53046 (ID:21030) <- default/goldpinger-6fhsn:8080 (ID:21030) to-endpoint FORWARDED (TCP Flags: ACK, PSH)
Dec 30 12:21:19.792: 10.244.0.214:45850 (remote-node) <> openshift-ingress-canary/ingress-canary-zm77w:8080 (ID:44510) to-overlay FORWARDED (TCP Flags: SYN)
Dec 30 12:21:19.792: 10.244.0.214:45850 (host) -> openshift-ingress-canary/ingress-canary-zm77w:8080 (ID:44510) to-overlay FORWARDED (TCP Flags: SYN)
Dec 30 12:21:19.792: 192.168.200.180:38905 (host) -> 192.168.200.181:8472 (remote-node) to-network FORWARDED (UDP)
Thanks to Duffie Cooley for his assistance with pointing me in the right direction to get going with this walkthrough.
Regards