Tag Archives: Red Hat

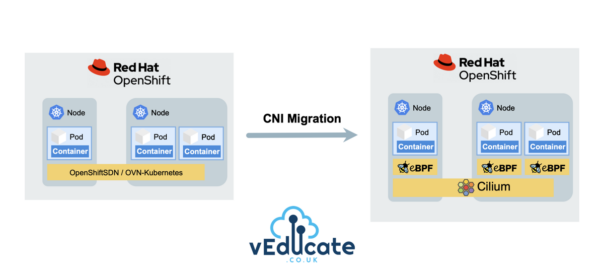
Red Hat OpenShift - Cilium CNI Migration - Header

How to migrate from Red Hat OpenShiftSDN/OVN-Kubernetes to Cilium

Recently, I’m seeing more and more queries about migrating to Cilium within an existing Red Hat OpenShift cluster, due to Cilium’s advanced networking capabilities, robust security features, and enhanced observability out-of-the-box. This increase of interest is also boosted by the fact that Cilium became the first Kubernetes CNI to graduate in the CNCF Landscape.

In this blog post, we’ll cover the step-by-step process of migrating from the traditional OpenShiftSDN (default CNI pre-4.12) or OVN-Kubernetes (default CNI from 4.12) to Cilium, exploring the advantages and considerations along the way.

If you need to understand more about the default CNI options in Red Hat OpenShift first, then I highly recommend this blog post, as pre-reading before going through this walkthrough.

Cilium Overview

For those of you who have not heard of Cilium, or maybe just the name and know there’s a buzz about it. In short Cilium, is a cloud native networking solution to provide security, networking and observability at a software level.

The reason why the buzz is so huge is due to being implemented using eBPF, a new way of interacting and programming with the kernel layer of the OS. This implementation opens a whole new world of options.

I’ll leave you with these two short videos from Thomas Graf, co-founder of Isovalent, the creators of Cilium.

Does Red Hat support this migration?

Cilium has achieved the Red Hat OpenShift Container Network Interface (CNI) certification by completing the operator certification and passing end-to-end testing. Red Hat will support Cilium installed and running in a Red Hat OpenShift cluster, and collaborate as needed with the ecosystem partner to troubleshoot any issues, as per their third-party software support statements. This would be a great reason to look at Isovalent Enterprise for Cilium, rather than using Cilium OSS, to get support from both vendors.

However, when it comes to performing a CNI migration for an active existing OpenShift cluster, Red Hat provides no guidance, unless it’s migrating from OpenShiftSDN to OVN-Kubernetes.

This means CNI migration to a third party CNI in an existing running Red Hat OpenShift Cluster is a grey area.

I’d recommend speaking to your Red Hat account team before performing any migration like this in your production environments. I have known large customers to take on this work/burden/supportability themselves and be successful.

Follow along with this video!

If you prefer watching a video or seeing things live and following along, like I do at times, then I’ve got you covered with the below video that covers the content from this blog post.

Pre-requisites and OpenShift Cluster configuration
As per the above, understand this process in detail, and if you follow it, you do so at your own risk.

For this walkthrough, I’ve deployed a OpenShift 4.13 cluster with OVN-Kubernetes, with a sample application (see below). You can see these posts I’ve written for deployments of OpenShift, or follow the official documentation.

Here is a copy of my install-config.yaml file. It was generated using the openShift-install create install-config wizard. Then I ran the openshift-install create cluster command. Continue reading How to migrate from Red Hat OpenShiftSDN/OVN-Kubernetes to Cilium
Red Hat OpenShift Header

Red Hat OpenShift – Sorry, your reply was invalid: IP expected to be in one of the machine networks

The Issue

When running the command:

openshift-install create cluster

And you provide an API IP address which is not in the CIDR range 10.0.0.0/16, you recieve the below error.

INFO Defaulting to only available network: VM Network 
X Sorry, your reply was invalid: IP expected to be in one of the machine networks: 10.0.0.0/16
? The VIP to be used for the OpenShift API.
OpenShift-Install create cluster - Sorry, your reply was invalid- IP expected to be in one of the machine networks- 10.0.0.0-16
The Cause

This is a known bug in the openshift-install tool (GitHub PR,Red Hat Article), where by the software installer is hardcoded to only accept addresses in the 10.0.0.0/16 range.

The Fix

The current work around for this is to run openshift-install create install-config provide ip addresses in the 10.0.0.0/16 range, and then alter the install-config.yaml file manually before running openshift-install create cluster, which will read the available install-config.yaml file and create the cluster (rather than presenting you another wizard).

In the wizard (below screenshot), I’ve provided IP’s on the range from above, and set my base domain and cluster name as well. The final piece is to paste in my Pull Secret from the Red Hat Cloud console.

OpenShift-install create install-config

Now if I run ls on my current directory I’ll see the install-config.yaml file. It is recommended to save this file now before you run the create cluster command, as this file will be removed after this, as it contains plain text passwords.

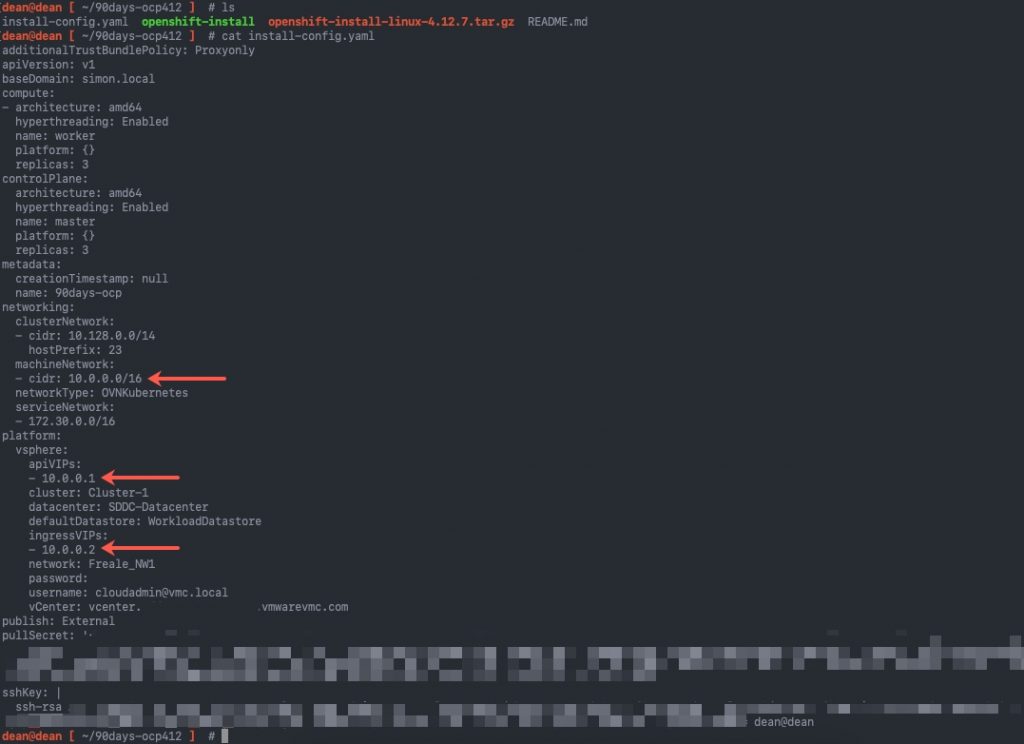
I’ve highlighted in the below image the lines we need to alter.

OpenShift install install config.yaml file

For the section:

machineNetwork: - cidr: 10.0.0.0/16

This needs to be changed to the network subnet the nodes will run on. And for the platform section, you need to map the right IP addresses from your DNS records.

platform:
  vsphere:
    apiVIP: 192.168.200.192 <<<<<<< This is your api.{cluster_name}.{base_domain} DNS record
    cluster: Cluster-1
    folder: /vEducate-DC/vm/OpenShift/
    datacenter: vEducate-DC
    defaultDatastore: Datastore01
    ingressVIP: 192.168.200.193 <<<<<<< This is your *.apps.{cluster_name}.{base_domain} DNS record

Now that we have our correctly configured install-config.yaml file, we can proceed with the installation of the cluster, which after running the openshift-install create cluster command, is hands off from this point forward. The system will output logging to the console for you, which you can modify using the --log-level= argument at the end of the command.

Regards

Dean Lewis

VMware Tanzu Mission Control Red Hat OpenShift header

Enabling Tanzu Mission Control Data Protection on Red Hat OpenShift

Just a quick blog on how to get the Data Protection feature of Tanzu Mission Control on Red Hat OpenShift. By default you will find that once the data protection feature is enabled, the pods for Restic component of Velero error.

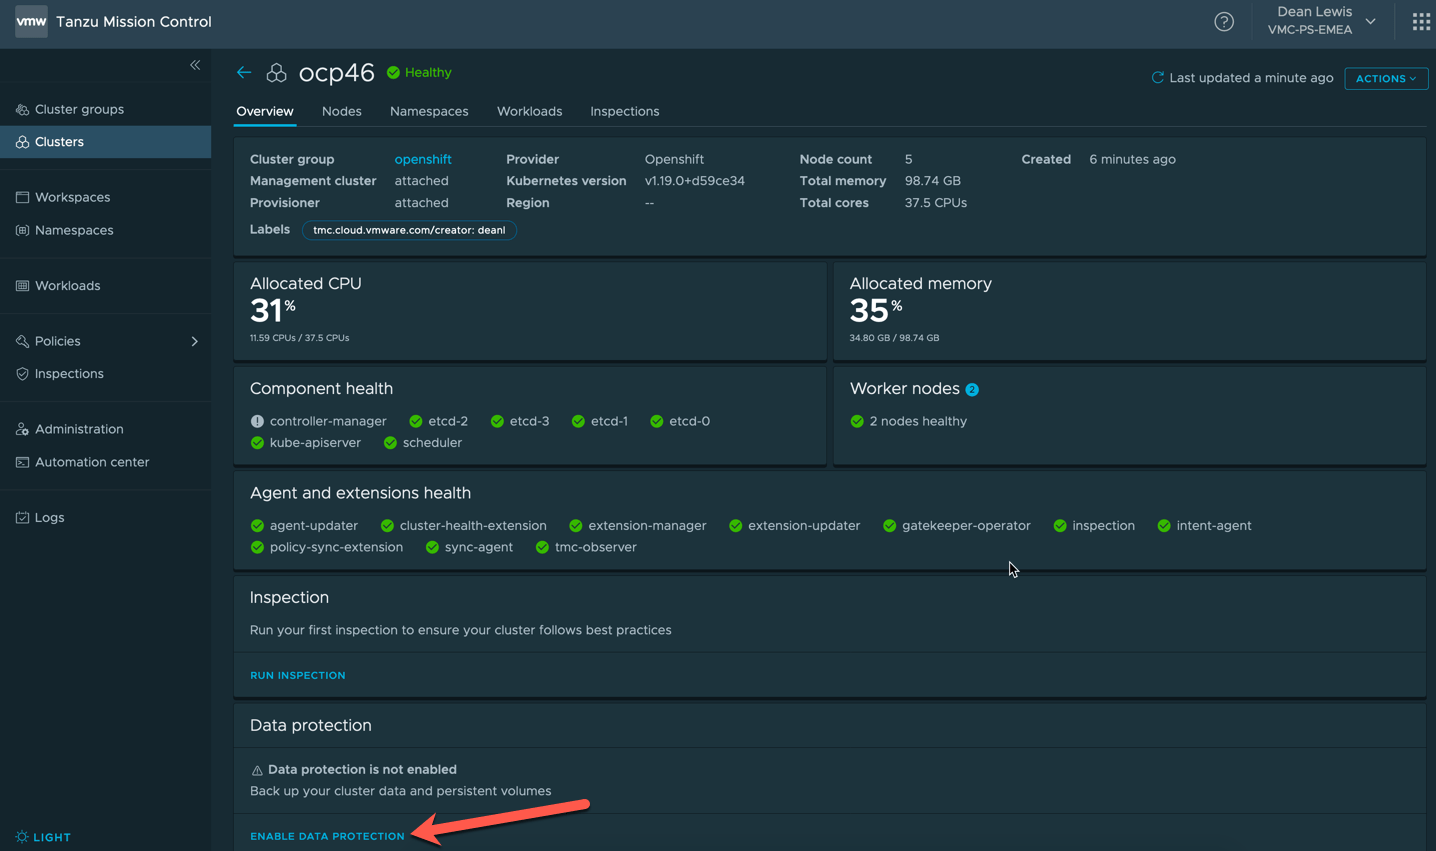
  • Enable the Data Protection Feature on your Openshift cluster

TMC Cluster Overview enable data protection

  • You will see the UI change to show it’s enabling the feature.

TMC Enabling Data Protection 2

  • You will see the Velero namespace created in your cluster.

TMC oc get projects velero vmware system tmc

However the “Data Protection is being enabled” message in the TMC UI will continue to show without user intervention. If you show the pods for the Velero namespace you will see they error.

This is because OpenShift has a higher security context out of the box for containers than a vanilla Kubernetes environment.

TMC oc get pods restic error crashloopbackoff

The steps to resolve this are the same for a native install of the Project Velero opensource install to your cluster.

  • First we need to add the velero service account to the privileged SCC.
oc adm policy add-scc-to-user privileged -z velero -n velero

TMC oc adm policy add scc to user privileged velero

  • Secondly we need to patch the DaemonSet to allow the containers for Restic run in a privileged mode.
oc patch ds/restic \
--namespace velero \
--type json \
-p '[{"op":"add","path":"/spec/template/spec/containers/0/securityContext","value": { "privileged": true}}]'

After this, if we run the command to get all pods under the Velero namespace again, we’ll see that they are replaced with the new configuration and running.

TMC oc get pods restic running

Going back to our TMC Console, we’ll see the Data Protection feature is now enabled.

TMC data protection enabled

Regards