Monthly Archives: September 2020

Folding@Home Header

How to use FAHControl to manage multiple Folding@Home Client instances

This blog post will cover managing a number of Folding@Home Clients using FAHControl.

If you are using the VMware F@H Fling, then this appliance will be configured for remote control on deployment.

This blog is based on Folding@home deployed on Linux, but the same applied for Windows.

Installing FAHControl to monitor multiple installations 

For Windows instances, this is installed as part of the FAHClient 

  • “C:\Program Files (x86)\FAHClient\FAHControl.exe

For Linux, you will need to install FAHControl separately 

For Mac OS X Instances, this is installed as part of the FAHClient 

  • Applications > Folding@Home > FAHControl

Configuring your FAHClient for remote access  

On your deployed OVAs 

  1. Connect via SSH 
  2. Edit the config.xml file 
  3. vi /etc/fahclient/config.xml 
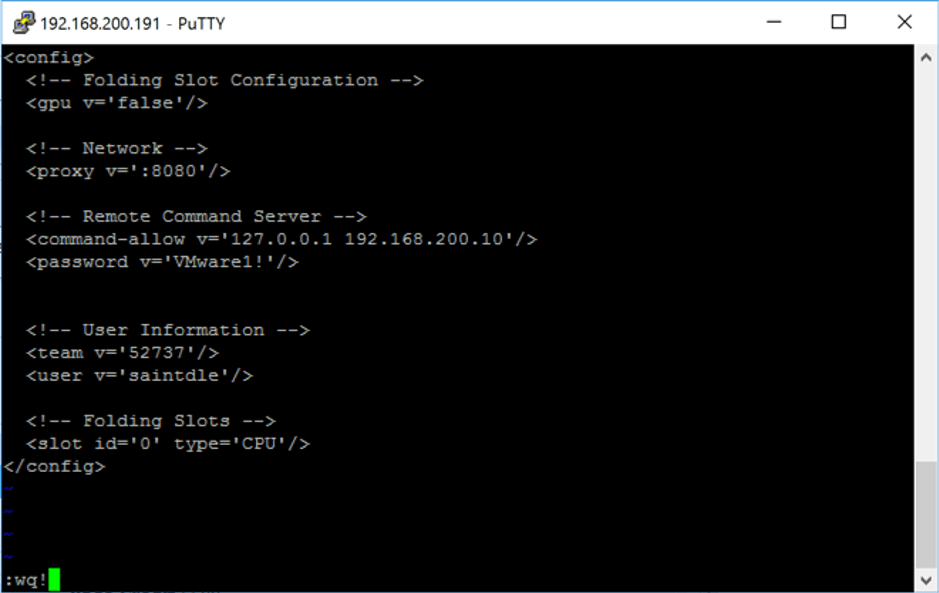
  4. Insert the following code to enable FAHControl access 
  5. From within vi press ‘i foldingathome client edit
  6. To configure a single address to access your client foldingathome client restart services
  7. Without passwords; 
<command-allow-no-pass v='127.0.0.1 x.x.x.x’ /> 
  1. With Password; 
<command-allow v='127.0.0.1 192.168.200.10' /> 

<password v='VMware1!' /> 

N.B. The localhost address must remain configured, otherwise the client work run 

Examples: 

Using password with a single IP restriction 

  <!-- Remote Command Server --> 

  <command-allow v='127.0.0.1 192.168.200.10' /> 

  <password v='VMware1!'/> 

Without a password against a single IP restriction 

  <!-- Remote Command Server --> 

  <command-allow-no-pass v='127.0.0.1 192.168.200.10' /> 

Without either a password or IP restriction 

<!-- Remote Command Server --> 

  <command-allow-no-pass v='127.0.0.1 0.0.0.0/0' /> 
  1. Save the config.xml file 
  1. Press ESC key 
  1. Enter without quotes “:wq!”
  1. Reload the FAHClient 
  1. /etc/init.d/FAHClient restart

If you see “Starting fahclient … FAIL” check your XML file again for any syntax errors.  

Connecting FAHControl to your clients 

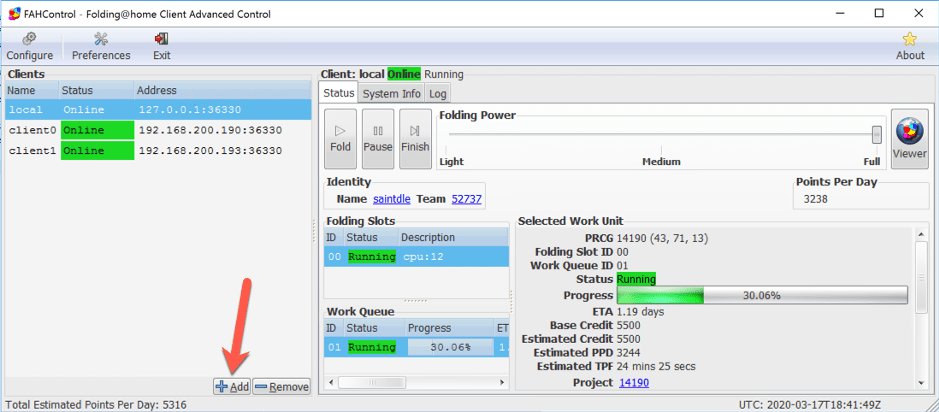
  1. Open your FAHControl and click Add foldingathome FAHControl Add client
  2. Enter the name of your client as you would like it to be displayed, the IP address of your client and your password if necessary, and click save. foldingathome FAHControl Add client settings
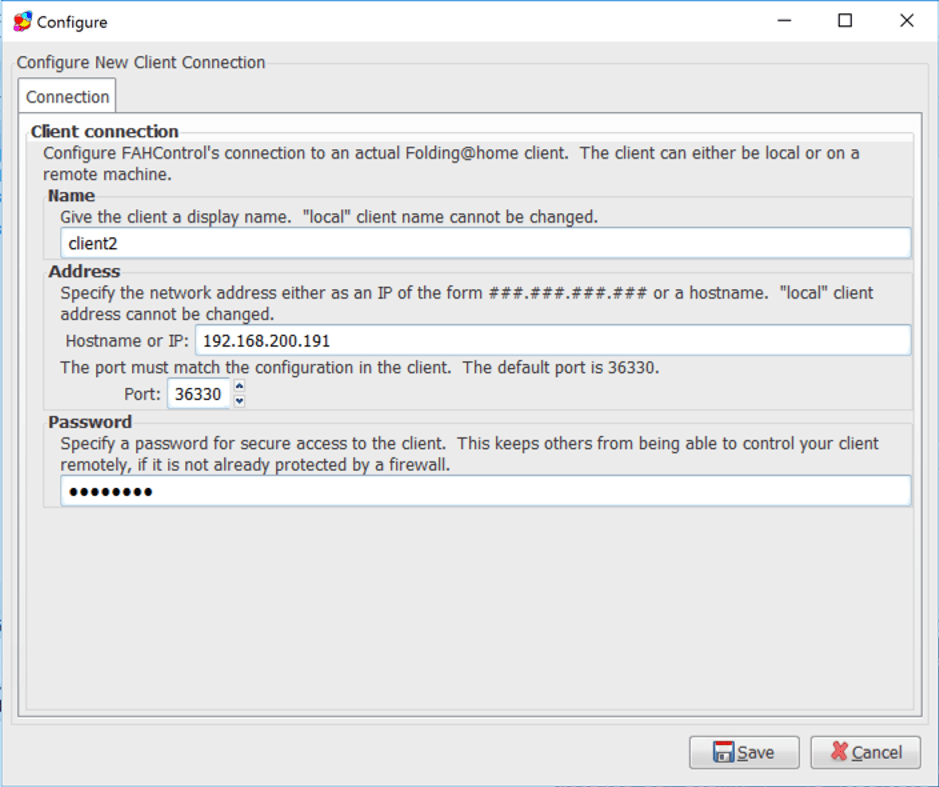
  3. You should now see your client is connected in FAHControl. 

foldingathome FAHControl Add client new client

Appendix 

Firewall rules 

If you are using iptables, the below firewall rules will need to be configured for Linux allow for FAHControl to remotely manage FAHClient.

iptables -A INPUT -p tcp --dport 36330 -m conntrack --ctstate NEW,ESTABLISHED -j ACCEPT 

iptables -A OUTPUT-p tcp --dport 36330 -m conntrack --ctstate NEW,ESTABLISHED -j ACCEPT 

foldingathome FAHControl filewall rules iptables

Regards

AVI Networks Header

How to generate self-signed certificates in AVI Networks for use with Windows Services

Note: AVI Networks is also referenced as NSX Advanced Load Balancer as the product is absorbed into the VMware Solutions

The AVI Vantage controller has the ability to generate self-signed certificates for use with your services. As Self-Signed will not be trusted by your browser, it is recommended that you only use these for testing your environments.

Generating a Self-Signed certificate with an exportable private key in the UI is quite simple.

1. Go to the Templates view

2. Select the Security tab

3. Select the SSL/TLS Certificates tab

4. Click the green Create button, and select your type of certificate. (in my example I am creating an application certificate)

AVI Networks Create SSL Certificate

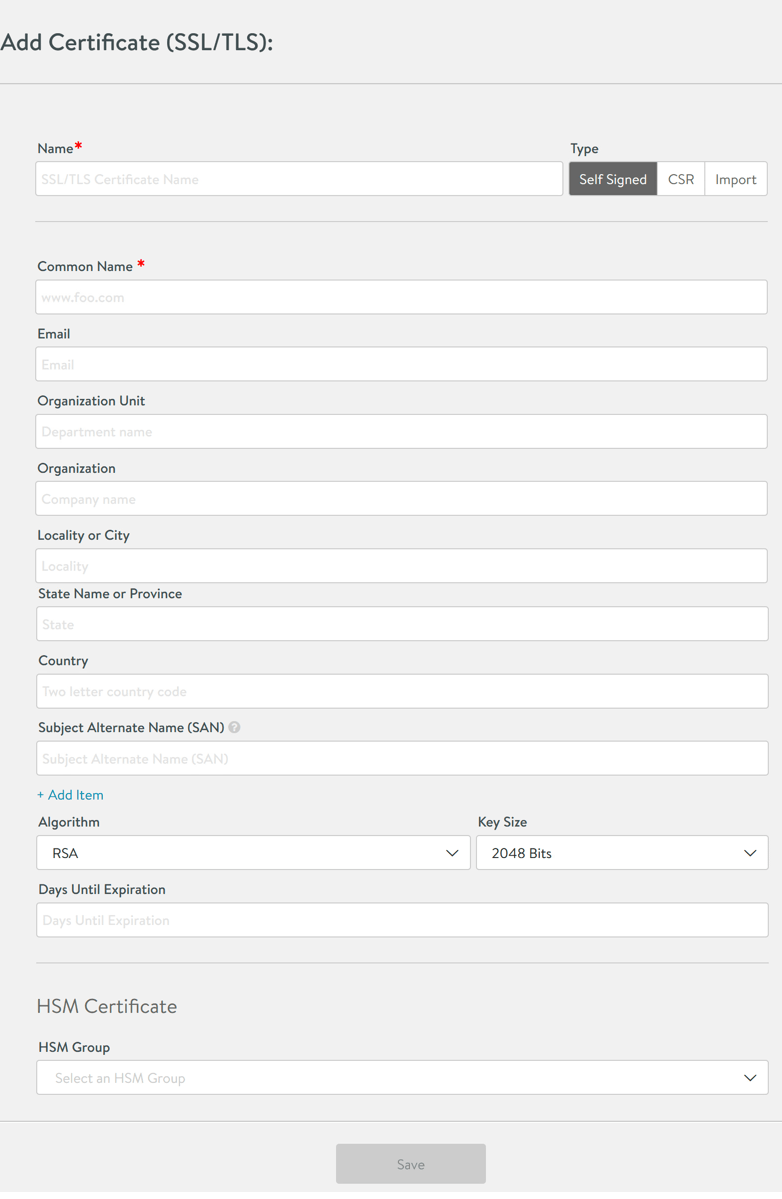
Filling out the forms, the options are as you would expect when working with generating a CSR and CAs.

Fill in your details and click Save.

AVI Networks Add Certificate

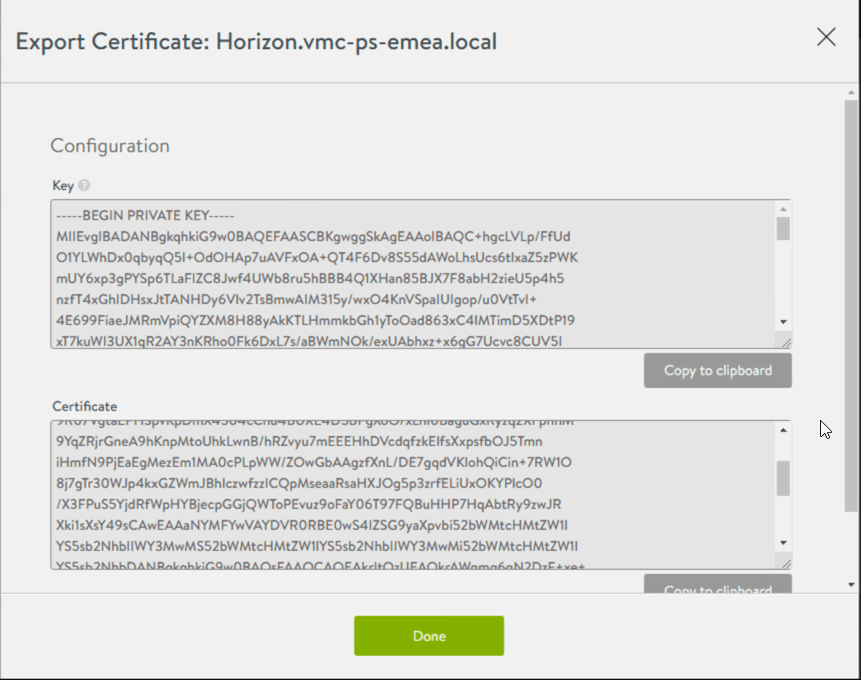
Once you have a SSL generated, the next step is downloading for use with your servers.

AVI Networks - Download SSL Certificate

As you can see, clicking download doesn’t give you a usable SSL file with the private key, so you need to use a tool such as OpenSSL to take the output and convert it into a usable format. Continue reading for the steps.

AVI Networks Self Signed Certificate

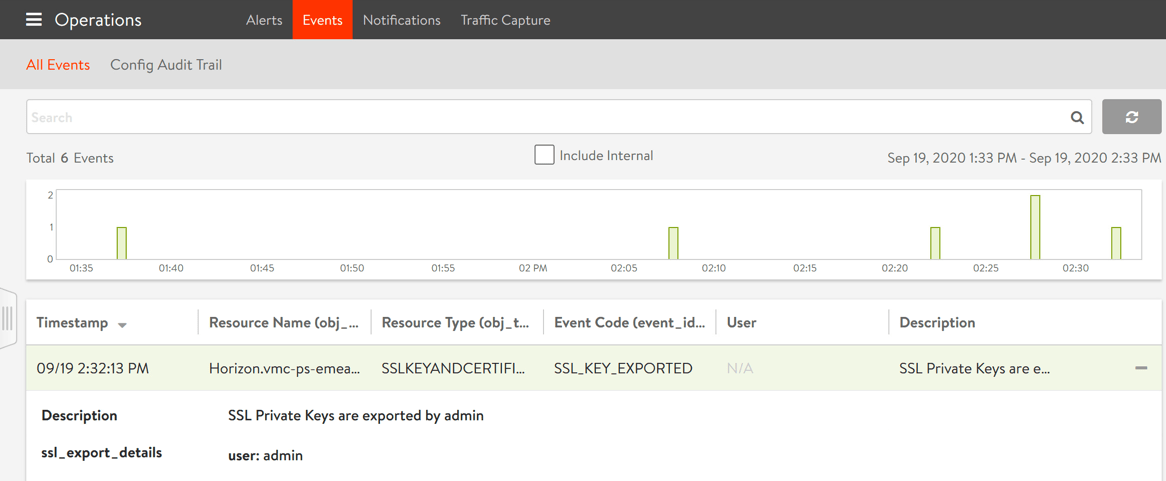
Note: Viewing or exporting the private key generates a system event, tracking the administrator’s export action. Avi Networks recommends using role-based access to control which users are allowed to use a certificate versus export the key.

You can see this below.

AVI Networks SSL Export logged in events

Using OpenSSL to convert the CSR into a PFX file

Download OpenSSL if you do not already have it.

Save the above SSL outputs from AVI Networks interface to two files;

  • Key > certficate.key
  • Certificate > certificate.crt

Next we will run the following command which will create a single PFX file that contains the exportable key.

openssl pkcs12 -export -out {file_name.pfx} -inkey {private key file} -in {CRT file}

After entering the command, you will be prompted to enter and verify an export password to protect the PFX file. You will use this to export the certificates and key.

Breakdown of the command;

openssl – the command for executing OpenSSL
pkcs12 – the file utility for PKCS#12 files in OpenSSL

-export -out certificate.pfx – export and save the PFX file as certificate.pfx

-inkey privateKey.key – use the private key file privateKey.key as the private key to combine with the certificate.

-in certificate.crt – use certificate.crt as the certificate the private key will be combined with.

(Source)

For me, I needed this for us with VMware Horizon, if you hadn’t already realised from the earlier screenshots. So to complete my use case, its a case of opening up the MMC and Certificates snap-in, import the PFX file and input the password.

Regards

VMware.cloud .logo

vCenter patching failed to update the VAMI build “Got exception while trying to save metadata to a file: Unexpected content in /etc/issue file”

The issue

After patching/upgrading your vCenter 6.7 appliance, the vCenter UI shows the latest build number, but in VAMI you see the older VAMI build number.

To troubleshoot upgrade issues, you can look at the following file;

  • /var/log/vmware/software-packages.log

In the log, you see the following error;

INFO:vmware.vherd.base.software_update:Setting appliance version to 6.7.0.31000 build 13643870

ERROR:vmware.vherd.base.software_update:Got exception while trying to save metadata to a file: Unexpected content in /etc/issue file. Data: {Unique_Data}

The cause

This issue is thrown when a custom login banner is set by configuring the advanced setting “config.etc.issue” and the default values which include the version number and deployment type have been removed.

Default lines example;

VMware vCenter Server Appliance 6.7.0.31000
Type: vCenter Server with an external Platform Services Controller
  • William Lam documents how to configure custom banners in this blog post.

The Fix

To workaround this issue follow the steps below:

  • Modify the /etc/issue file to the original before patching.

The file ‘/etc/issue’ contents can be customized but the defaults lines which has the version number and deployment type must be kept for patching to succeed.

  • Check the VAMI page for product version and type and update the /etc/issue file accordingly.
Example: /etc/issue  :: (Original Content from a LAB).
Note line 1 and 3 should be blank. Line 2 will have the version and line 4 will have the deployment type, as shown in the below example:

root@vcsa1 [ ~ ]# less -N /etc/issue
      1
      2 VMware vCenter Server Appliance 6.7.0.31000
      3
      4 Type: vCenter Server with an external Platform Services Controller
      5
/etc/issue (END)

This issue will be fixed in a future release.

Note: Since I originally drafted this blog post, VMware have now produced an external KB.
https://kb.vmware.com/s/article/76024

Regards

Kubernetes

How To Fix A PVC Stuck in Terminating Status in Kubernetes: Troubleshooting Guide

Having trouble deleting a persistent volume claim (PVC) stuck interminating status in Kubernetes/Openshift? We‘ve got the fix. Read on to learn how to patch the PVC to allow the final unmount and delete the PVC.

The Issue

Whilst working on a Kubernetes demo for a customer, I was cleaning up my environment and deleting persistent volume claims (PVC) that were no longer need.

I noticed that one PVC was stuck in “terminating” status for quite a while.

Kubernetes pvc terminating

Note: I am using the OC commands in place of kubectl due to this being a Openshift environment

The Cause

I had a quick google and found I needed to verify if the PVC is still attached to a node in the cluster.

kubectl get volumeattachment

I could see it was, and the reason behind this was the configuration for the PVC was not fully updated during the delete process.

Kubernetes pvc terminating kubectl get volumeattachment

The Fix

I found the fix on this github issue log .

You need to patch the PVC to set the “finalizers” setting to null, this allows the final unmount from the node, and the PVC can be deleted.

kubectl patch pvc {PVC_NAME} -p '{"metadata":{"finalizers":null}}'

Kubernetes pvc terminating kubectl patch pvc

Regards