Category Archives: General

Cloudflare Route53 Header

Configuring DNS Delegation from CloudFlare to AWS Route53

This blog post covers how to delegate DNS control from Cloudflare to AWS Route53. So that you can host records in Route53 for services deployed into AWS, that are resolvable publicly, despite your primary domain being held by another provider (Cloudflare).

My working example for this, I was creating an OpenShift cluster in AWS using the IPI installation method, meaning the installation will create any necessary records in AWS Route 53 on your behalf. I couldn’t rehost my full domain in Route53, so I just decided to delegate the subdomain.

  • You will need access to your Cloudflare console and AWS console.

Open your AWS Console, go to Route53, and create a hosted zone.

AWS - Route 53 - Create Hosted Zone

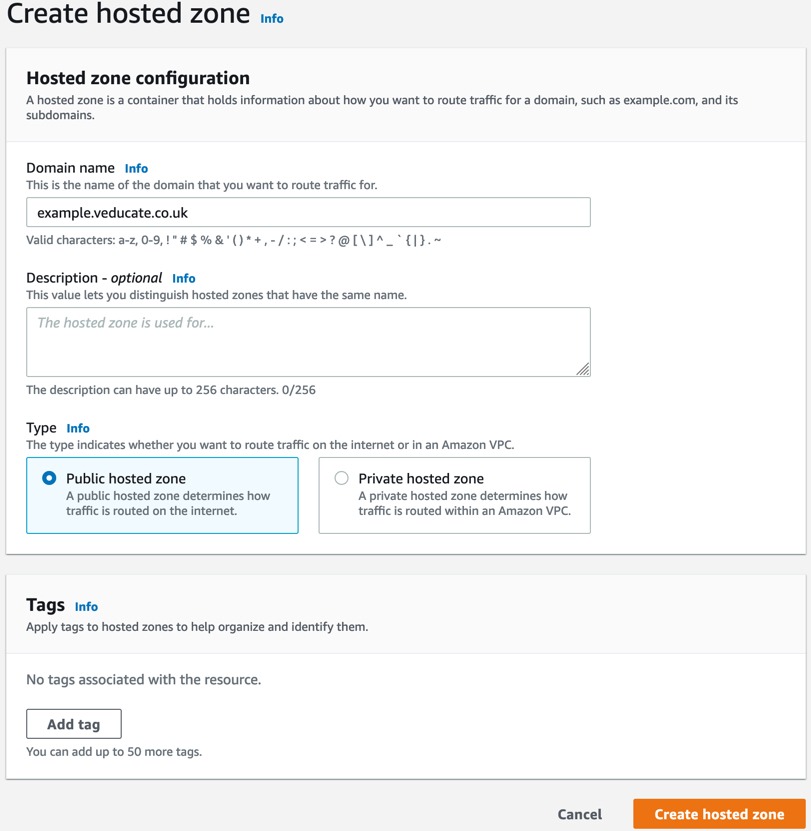
Configure a domain name, this will be along the lines of {subddomain}.{primarydomain}, for example my main domain name is veducate.co.uk, the sub domain I want AWS to manage is example.veducate.co.uk.

I’ve selected this to be a public type, so that I can resolve the records I create publicly.

AWS - Route 53 - Create Hosted Zone - Configuration

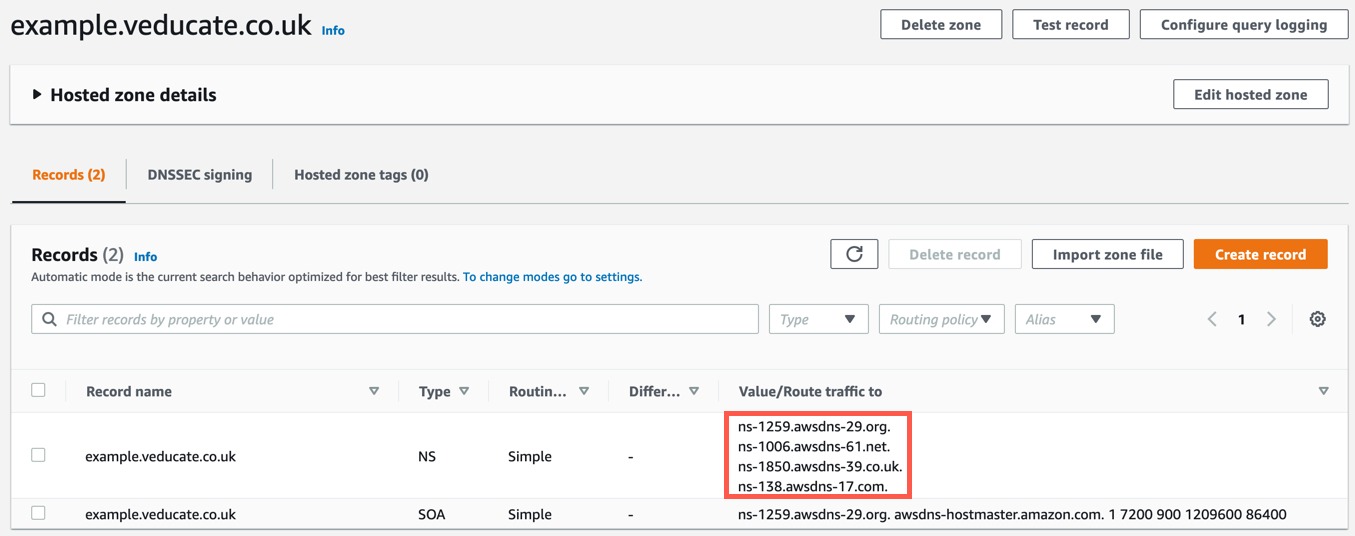
Now my zone is created, I have four Name Servers which will host this zone (Red Box). Take a copy of these.

AWS - Route 53 - Hosted Zone - NS Servers

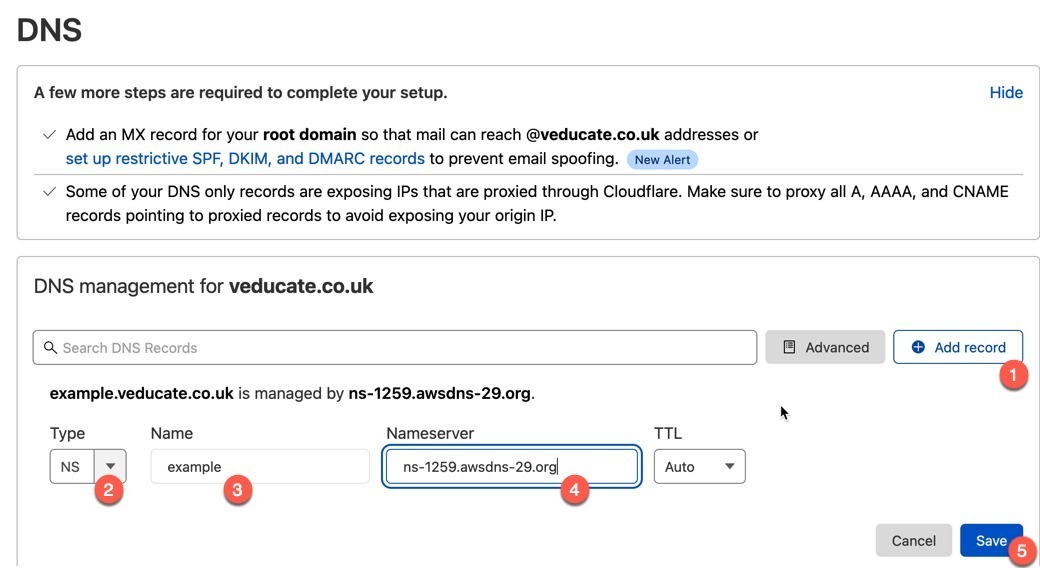
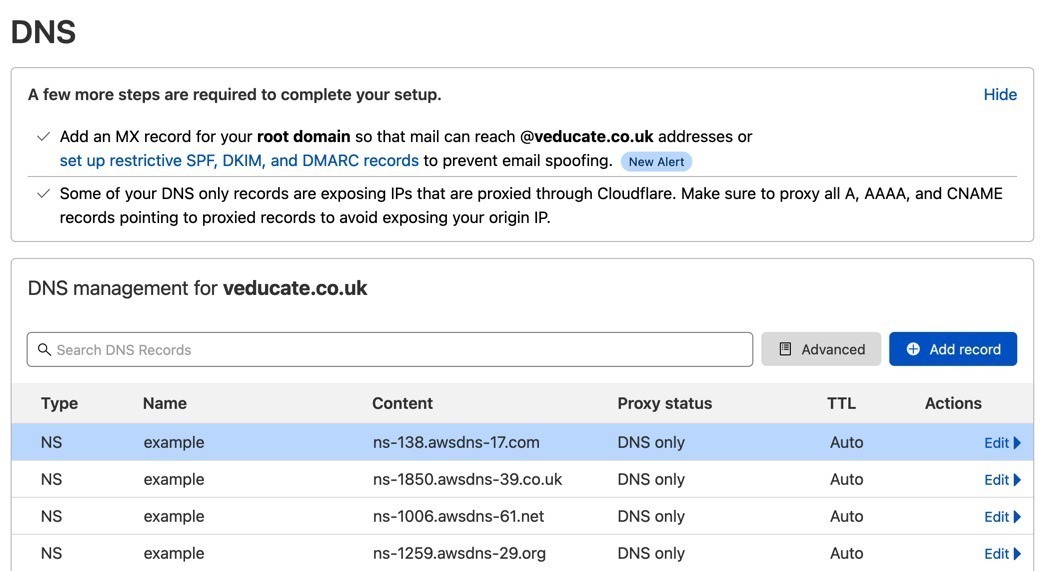
In your DNS provider, for this example, Cloudflare, create a record of type: NS (Name Server), the record name is subdomain, and Name Server is one of the four provided by AWS Route53 Hosted Zone.

Repeat this for each of the four servers.

Cloudflare - create ns record

Below you can see I’ve created the records to map to each of the AWS Route53 Name Servers.

Cloudflare - create ns record - all records created

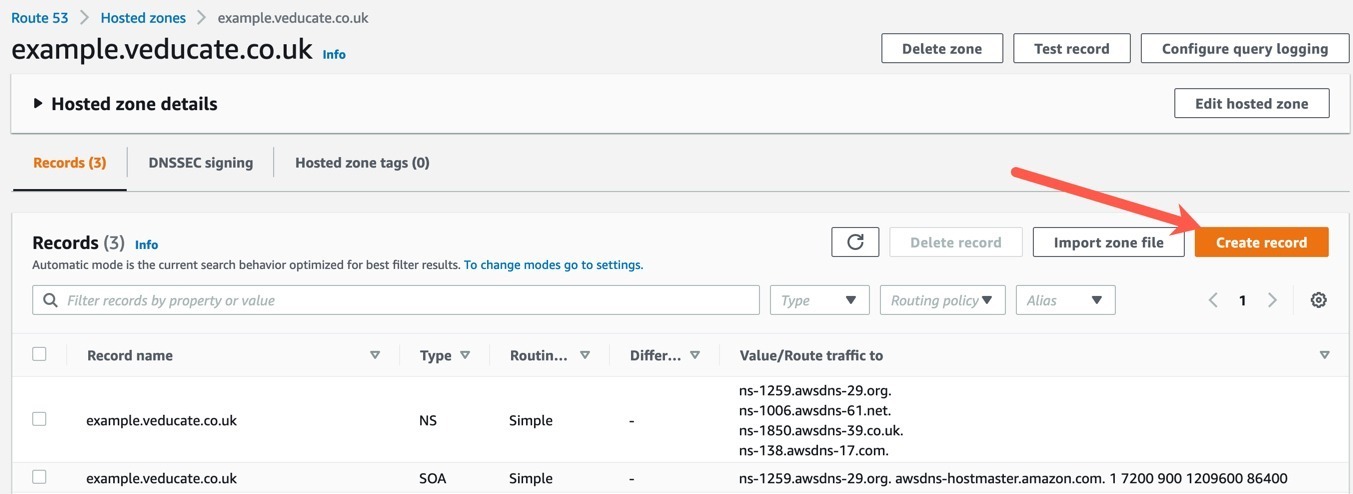
Now back in our AWS Console, for the Route53 service within my hosted zone. I can start to create records.

AWS - Route53 - Create record

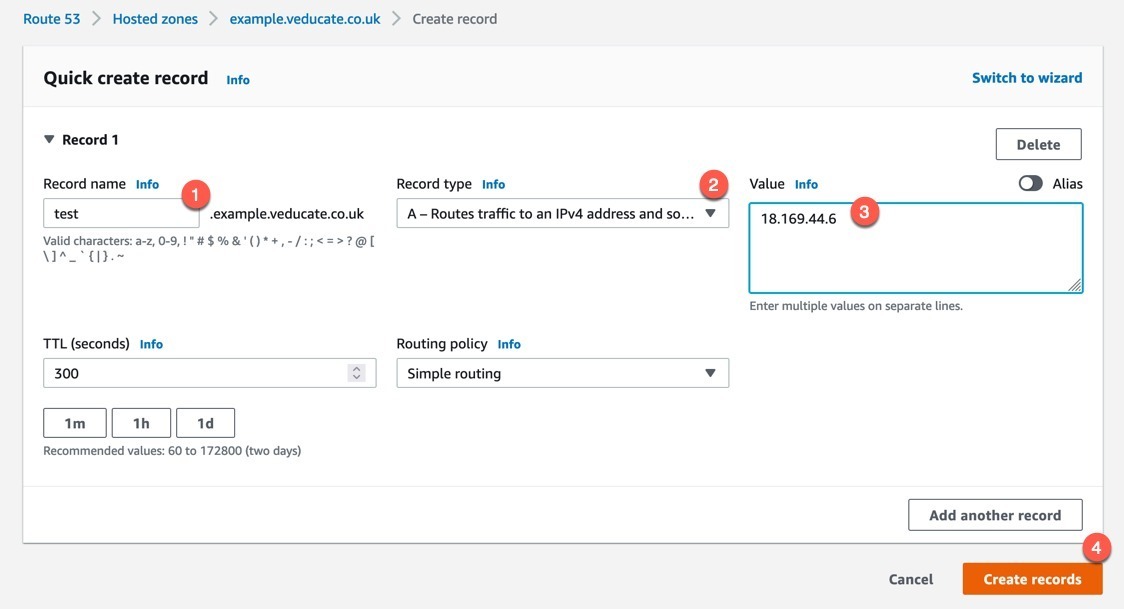
Provide the name, type and value and create.

AWS - Route53 - Quick create record

Below you can see the record has been created.

AWS - Route53 - Records

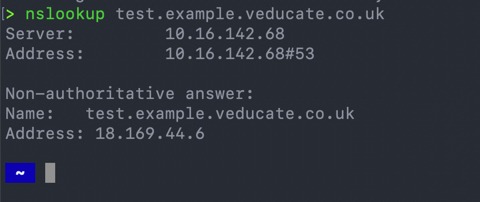
And finally, to test, we can see the DNS record resolving from my laptop.

nslookup example

Regards

Dean Lewis

git header

Exploring the Git command line – A getting started guide

What is Git?

Git is distributed version control software.

Version Control is the ability to save and track changes over time, without interfering with previous versions. As the software is distributed, it means all users can have a copy of an entire repository, containing all commits, branches, and files.

There are a few things you should know before we dive in:

  • Branches are lightweight and cheap, so it’s OK to have many of them
  • Git stores changes in SHA hashes, which work by compressing text files. That makes Git a very good version control system (VCS) for software programming, but not so good for binary files like images or videos.
  • Git repositories can be connected, so you can work on one locally on your own machine and connect it to a shared repository. This way, you can push and pull changes to a repository and easily collaborate with others.
Why Use Git?

Version Control is important in development, whether for software, or simply for developing your automation scripts. Without it, you can risk losing your work. By using Git, you can make a “commit”, which is a snapshot of your point in time work. This provides you the capability to rollback to previous commits if needed.

Install the command line tool
# Executable Installers (all OSes)
https://git-scm.com/downloads 

# Command Line Installer 
# Mac OS X
brew install git
# Linux
sudo apt-get install git-all

# Validate installation
git version
Authenticating to GitHub and creating a repository

To make life easier, I am going to use GitHub as my main source control platform.

I am going to start off creating a repository on the GitHub website. This is simple to complete, so I will not document the steps, but you can view this page for more information.

I would also recommend at this point setting up the authentication with GitHub as well to your local CLI.

Cloning a Repository locally

Once our repository is created, we start off by cloning the repository locally.

git clone {url}

#Example
git clone https://github.com/saintdle/veducate-git-example.git

git clone

Create and commit our first file

Continue reading Exploring the Git command line – A getting started guide

Tanzu Blog Logo Header

vSphere with Tanzu – Can I disable DRS?

Can I disable DRS?

No.

Why can’t I disable DRS when Workload Management is enabled?

DRS is a mandatory feature for workload management, the WCP service relies on objects such as Resource Pools to operate.

  • Update – 29th October

The vSphere with Tanzu Documentation has now been updated with this statement.

Caution: Do not disable vSphere DRS after you configure the Supervisor Cluster. Having DRS enabled at all times is a mandatory prerequisite for running workloads on the Supervisor Cluster. Disabling DRS leads to breaking your Tanzu Kubernetes clusters.
What happens if I attempt to disable DRS?

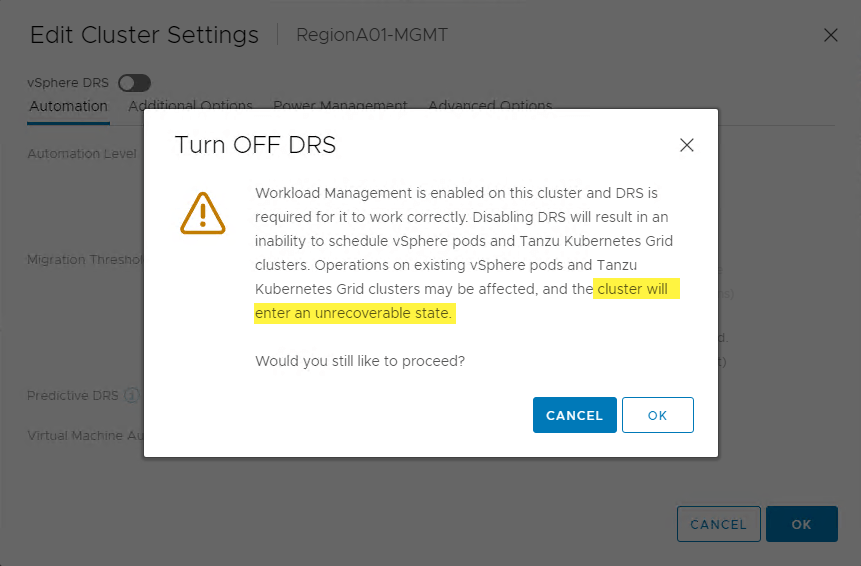
If you disable DRS in a cluster where Workload Management is enabled you will be presented the following message.

The key part of the message below is “the cluster will enter an unrecoverable state.”

The system will let you proceed past this message and disable DRS. DON’T DO IT!

wcp - disable drs message

What if I need to stop VM’s being vMotioned in my cluster?

Keep DRS enabled, and set the DRS mode to manual or Partially Automated.

wcp - drs mode

I really need to disable DRS, what do I do?

Ring VMware Support and discuss with them your need and the situation you find yourself in.

How do I stop my admins accidentality disabling DRS?

This KB article may help, as well as setting appropriate RBAC permissions for anyone accessing your vCenter rather than giving them full administrator rights so they can change settings they shouldn’t.

If you are unsure about any of this, contact VMware Support.

Do you have a fantastic meme to end this blog post with?

Yes.

just because you can doesn't mean you should

Regards

Dean Lewis

Terraform Header

How to Escape Strings in Terraform with a Dollar Sign ($)

The Issue

When using Terraform to perform an action, and the input is using a $, you can end up with an output such as the below.

│ Error: Invalid character
│ 
│  on main.tf line 104, in resource "vra_blueprint" "this":
│ 104:      network: '${resource.Cloud_Network_1.id}'
│ 
│ This character is not used within the language.

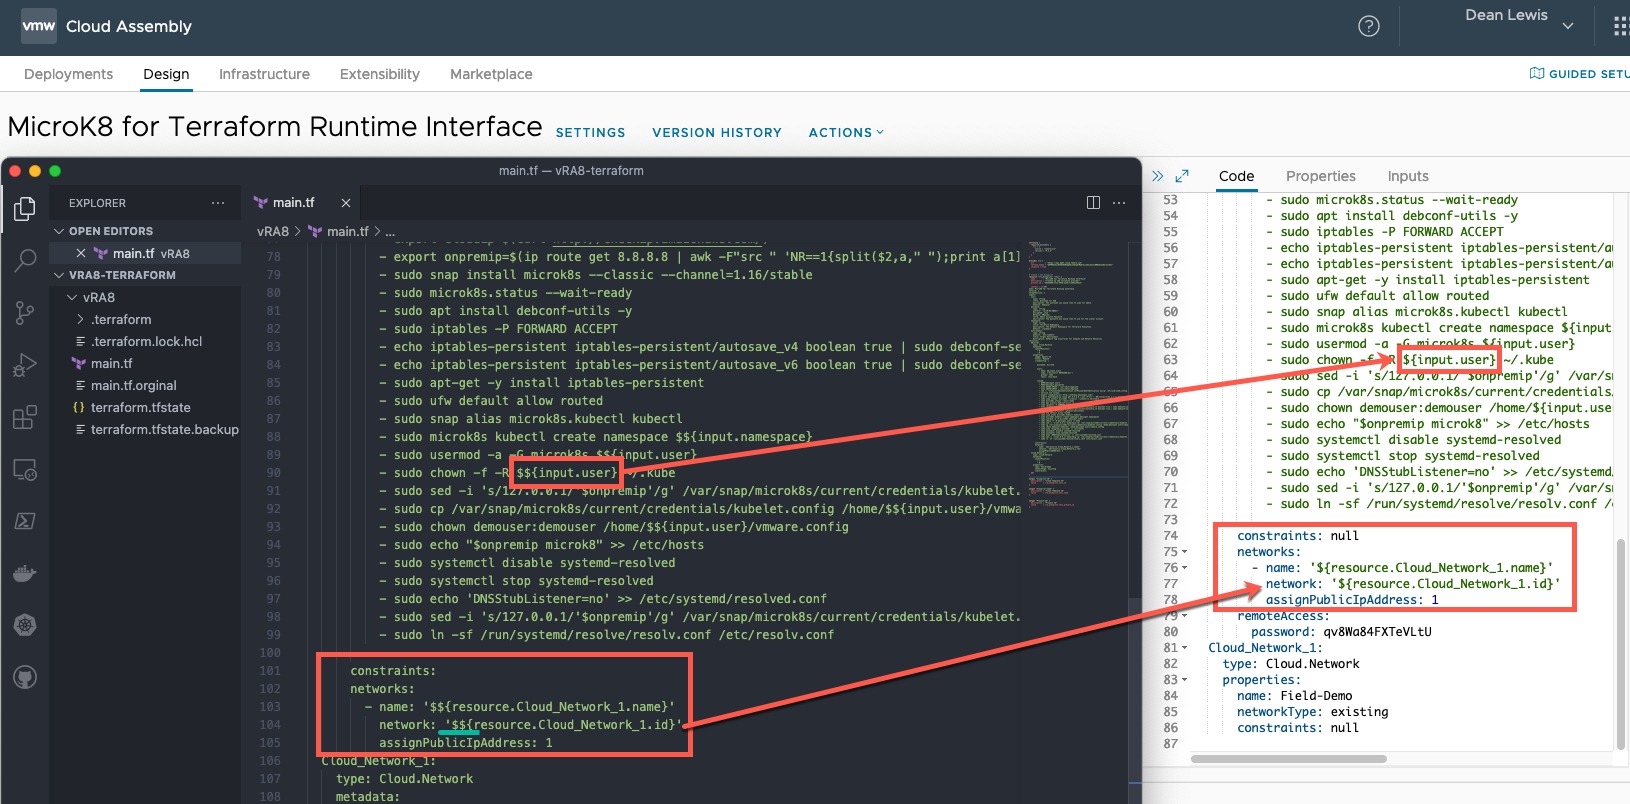
This happened to me when I was using the Terraform vRA Provider to create Cloud Templates (blueprints) in my vRA environment. The vRA cloud templates use a syntax such as ${input.something}, which clashes with the syntax used by Terraform to identify inputs.

The Cause

Terraform implements a interpolations syntax. These interpolations are wrapped in ${}, such as ${var.foo}.

The interpolation syntax is powerful and allows you to reference variables, attributes of resources, call functions, etc.

The Fix

You can escape interpolation with double dollar signs: $${foo} will be rendered as a literal ${foo}.

Terraform Interpolation Syntax example

Regards

Dean Lewis


vRA 8.0 header

Passing JSON into vRA Code Stream CI Task – MalformedJsonException

The Issue

Whilst working with a vRA Code Stream CI Task, I needed to build a YAML file in my container, which I would use to provide the values to my CLI Tool I was running. Within this YAML File, there is a section of JSON input (yep I know, it’s a Red Hat thing!!!).

I wanted to pass in this JSON section as a vRA variable, as it contains my authentication details to the Red Hat Cloud Website.

So my vRA variable would be as below:

{"auths":{"cloud.openshift.com":{"auth":"token-key","email":"[email protected]"},"registry.connect.redhat.com":{"auth":"token-key","email":"[email protected]"},"registry.redhat.io":{"auth":"token-key","email":"[email protected]"}}}

So my CI Task looked something like this:

cat << EOF > install-config.yaml
apiVersion: v1
baseDomain: simon.local
compute: 
- hyperthreading: Enabled 
  name: worker
  replicas: 1
  platform:
    vsphere: 
      cpus: 4
      coresPerSocket: 1
      memoryMB: 8192
      osDisk:
        diskSizeGB: 120
PullSecret: '${var.pullSecret}'
EOF

When running the Pipeline, I kept hitting an issue where the task would fail with a message similar to the below.

com.google.gson.stream.MalformedJsonException: Unterminated array at line 1 column 895 path $[39]
The Cause

This, I believe is because the tasks are passed to the Docker Host running the container via the Docker API using JSON format. The payload then contains my outer wrapping of YAML and within that more JSON. So the system gets confused with the various bits of JSON.

The Fix

To get around this issue, I encoded my JSON data in Base64. Saved this Base64 code to the variable. Then in my CI task I added an additional line before creating the file which creates a environment variable which decodes my base64 provided from a vRA variable.

Below is my new CI Task code.

export pullSecret=$(echo ${var.pullSecret} | base64 -d)

cat << EOF > install-config.yaml
apiVersion: v1
baseDomain: simon.local
compute: 
- hyperthreading: Enabled 
  name: worker
  replicas: 1
  platform:
    vsphere: 
      cpus: 4
      coresPerSocket: 1
      memoryMB: 8192
      osDisk:
        diskSizeGB: 120
PullSecret: '$pullSecret'
EOF


Regards