Tag Archives: AWS

VMware Aria Hub Header

VMware Aria Hub and AWS Setup: A Guide to Getting Started

In this blog post, I am going to take you through how to get started with VMware Aria Hub, and connect your first public cloud account, in this example, AWS.

What is VMware Aria Hub?

Before we dive into the technical pieces, what is VMware Aria Hub?

If we take the marketing definition:

VMware Aria Hub is a transformational multi-cloud management solution unifying cost, performance, and config and delivery automation in a single platform with a common control plane and data model for any cloud, any platform, any tool, and every persona

To make this simple, VMware Aria Hub is one of the key SaaS based services which sits at the center of the new VMware Aria Cloud Management platform. In which it gives you a single control plane to be able to access and interrogate data across the previously named vRealize Suite of products, now rebranded as Aria [insert product name], store metadata from all of your Infrastructure platforms (VMware, AWS, Azure, Google) and in the future, bring in data from third party systems.

This centralization of data is key. That part in VMware Aria, is called “Aria Graph”, which uses an Entity Datastore, a component derived from an existing VMware product, CloudHealth SecureState product (now VMware Aria Automation for Secure Clouds). This unique component, which is based on GraphQL, provides the product a unique way to store data, query into other products, and enable the consumer to write new data into the platform as well.

Let’s take this practical example, I have my application which is made up of the typical three tier app standards:

  • Load Balancer – AWS
  • 2 x Web Servers – AWS
  • App Server – AWS
  • Database Server – On-Prem DC – vSphere

All these components are deployed by Aria Automation (vRealize Automation), monitored by Aria Operations (vRealize Operations), with application logs sent to Aria Operations for Logs (vRealize Log Insight). The AWS environment is further secured by Aria Automation for Secure Clouds (CloudHealth SecureState), which ensures a number of specific resource tags exist, and they conform to the appropriate CIS benchmark.

Now If I need to query the following information for my application; App owner (who deployed it), Cost Centre, Resource Sizing, and active security alerts. I will need to pretty much either browse the UI or query the API for each of the products mentioned.

By leveraging the new capabilities of VMware Aria Hub, I can browse a single interface to reference all the components of my application, and where this data is stored into the other Aria products, it will pull that data through for me. This would be the same if I am querying for information via the VMware Aria Graph as well, for my programmatic access.

Watch the recording!

As a growing trend is video content, I’ve also produced a recording of the same content of this blog post! So, you can follow along below!

Getting Started with Aria Hub

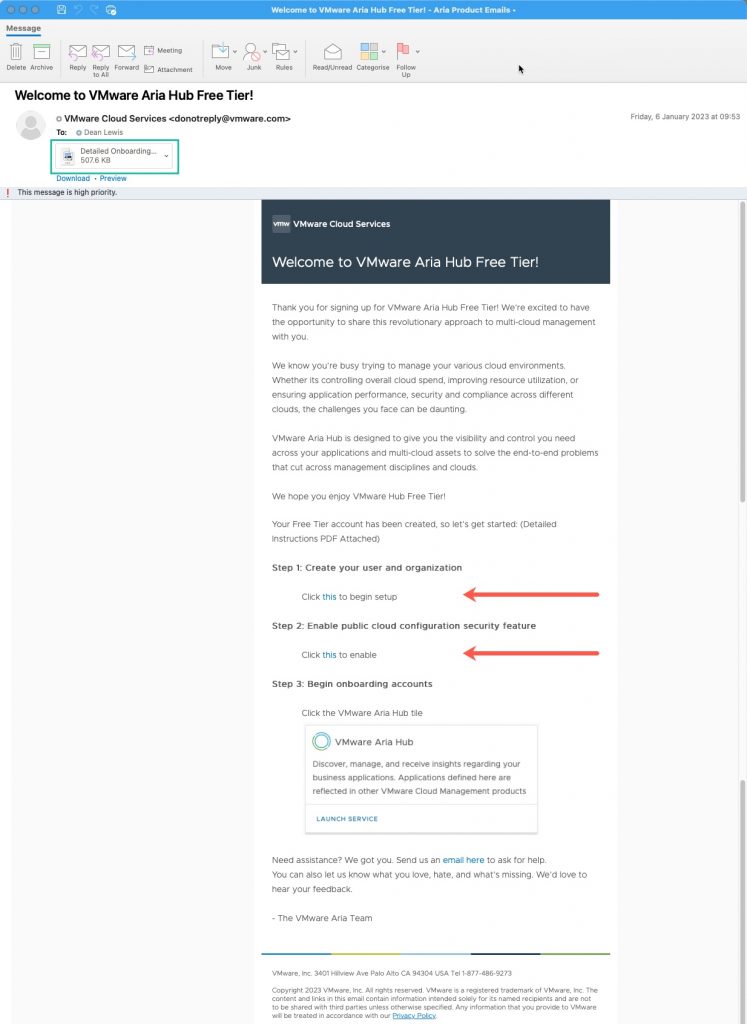
First, you should have an email from VMware welcoming you to the VMware Aria Hub Free Tier. Below I’ve provided a sample email, there are three things to note;

  • You need to click on the links in step 1 + 2 to activate the VMware Aria Hub product within the VMware Cloud Services Portal, and enable the Free Tier for VMware Aria Automation for Secure Clouds, which provides the Public Cloud Security Features into the Aria Hub UI
  • To setup your VMware Cloud Services Portal organisation and enable the product, there is a PDF attached to the email showing the step-by-step instructions and screenshots if needed (shown in the green box).

VMware Aria Hub - Getting Started with AWS - Welcome Email

Once enabled, in the VMware Cloud Services Portal, click the VMware Aria Hub tile (as in the above email screenshot, step 3).

This will present you with the below opening page.

To get started, you only have one option here:

  • Click the “Connect your first data source” blue button.

Continue reading VMware Aria Hub and AWS Setup: A Guide to Getting Started

AWS EKS Header

EKS – Kubectl – Unable to connect to the server – Exec plugin is configured to use API version client.authentication.k8s.io/v1alpha1

The Issue

After moving my life over to a new Macbook and installing the latest AWS CLI tools including “aws-iam-authenticator” tool, I couldn’t run commands against my EKS Clusters. I kept hitting the following issue;

> kubectl get pods

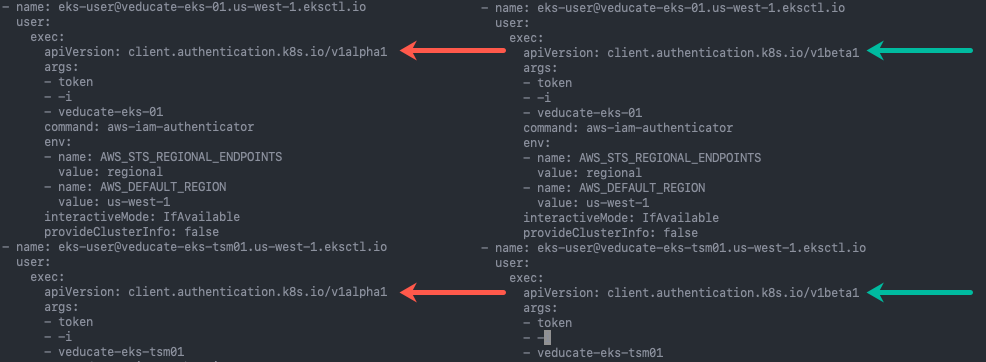
Unable to connect to the server: getting credentials: exec plugin is configured to use API version client.authentication.k8s.io/v1alpha1, plugin returned version client.authentication.k8s.io/v1beta1
eks - aws-iam-authenticator - unable to connect to cluster
The Cause

AWS updated the aws-iam-authenicator component in version 0.5.4 to require v1beta1 your kubeconfig file for the cluster context. You will be using v1alpha1 more than likely, which generates this error.

The Fix

Update your kubeconfig file as necessary, replacing “v1alpha1” for “v1beta1” for any contexts for EKS clusters.

vi ~/.kube/config

# Alernatively you could run something like the below to automate the changes. This will also create a "config.bak" file of the orignal file before the changes

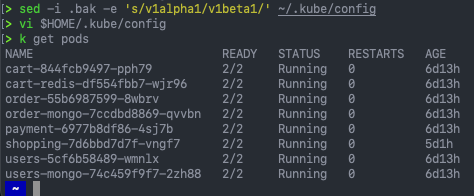
sed -i .bak -e 's/v1alpha1/v1beta1/' ~/.kube/config

eks - aws-iam-authenticator - v1alpha1 - v1beta1 - kubeconfig file

Below you can see I used the “sed” command, checked my file using “vi” then run the kubectl command successfully.

eks - aws-iam-authenticator - sed -i .bak -e 's:v1alpha1:v1beta1:' ~:.kube:config

Official GitHub Page


Regards

Dean Lewis

Cloudflare Route53 Header

Configuring DNS Delegation from CloudFlare to AWS Route53

This blog post covers how to delegate DNS control from Cloudflare to AWS Route53. So that you can host records in Route53 for services deployed into AWS, that are resolvable publicly, despite your primary domain being held by another provider (Cloudflare).

My working example for this, I was creating an OpenShift cluster in AWS using the IPI installation method, meaning the installation will create any necessary records in AWS Route 53 on your behalf. I couldn’t rehost my full domain in Route53, so I just decided to delegate the subdomain.

  • You will need access to your Cloudflare console and AWS console.

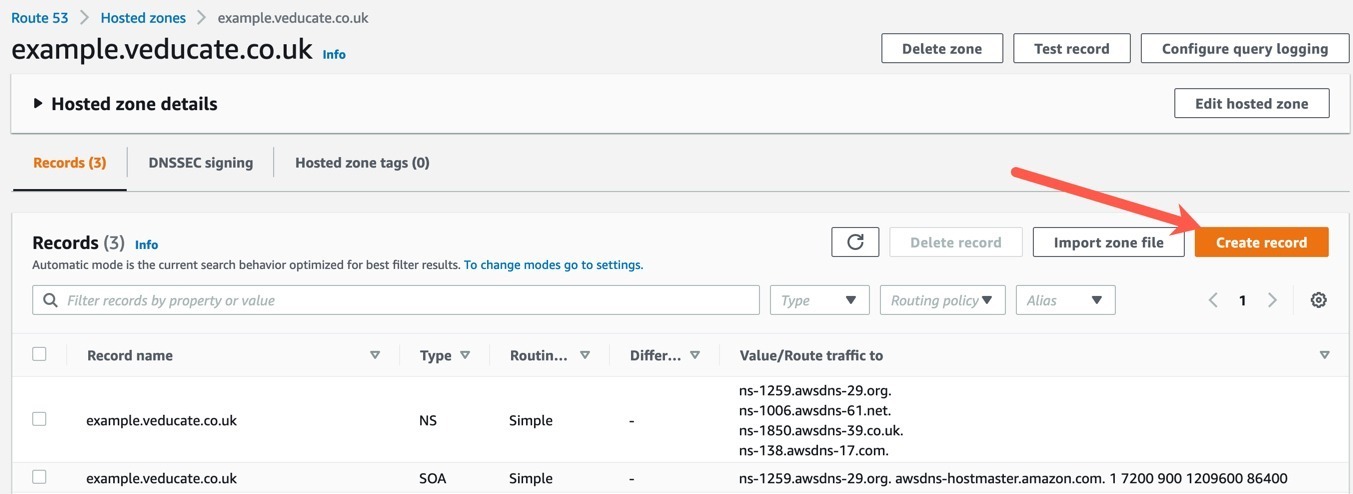
Open your AWS Console, go to Route53, and create a hosted zone.

AWS - Route 53 - Create Hosted Zone

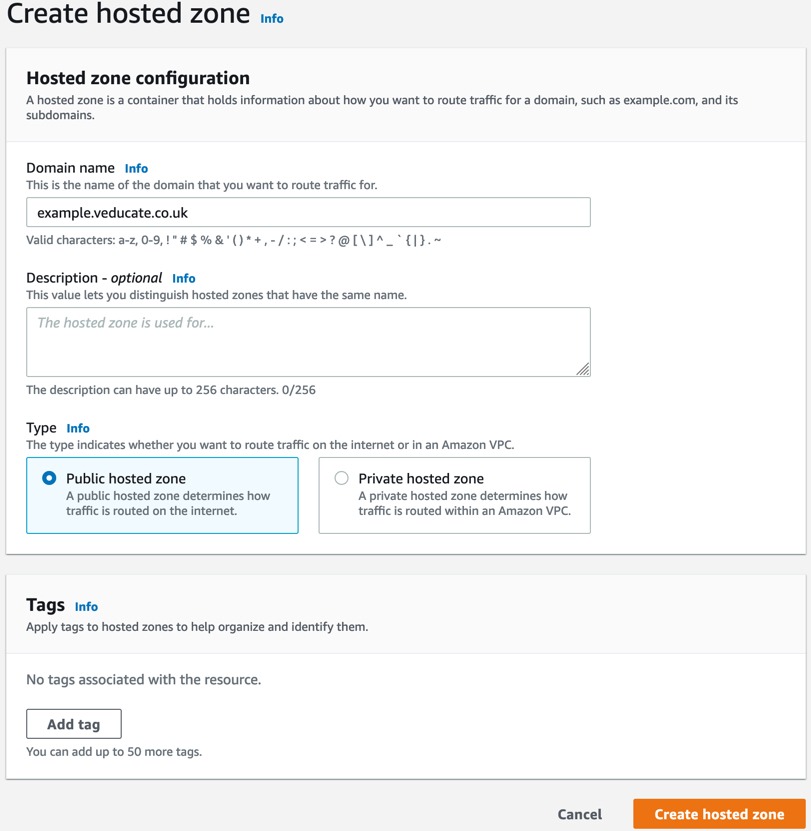
Configure a domain name, this will be along the lines of {subddomain}.{primarydomain}, for example my main domain name is veducate.co.uk, the sub domain I want AWS to manage is example.veducate.co.uk.

I’ve selected this to be a public type, so that I can resolve the records I create publicly.

AWS - Route 53 - Create Hosted Zone - Configuration

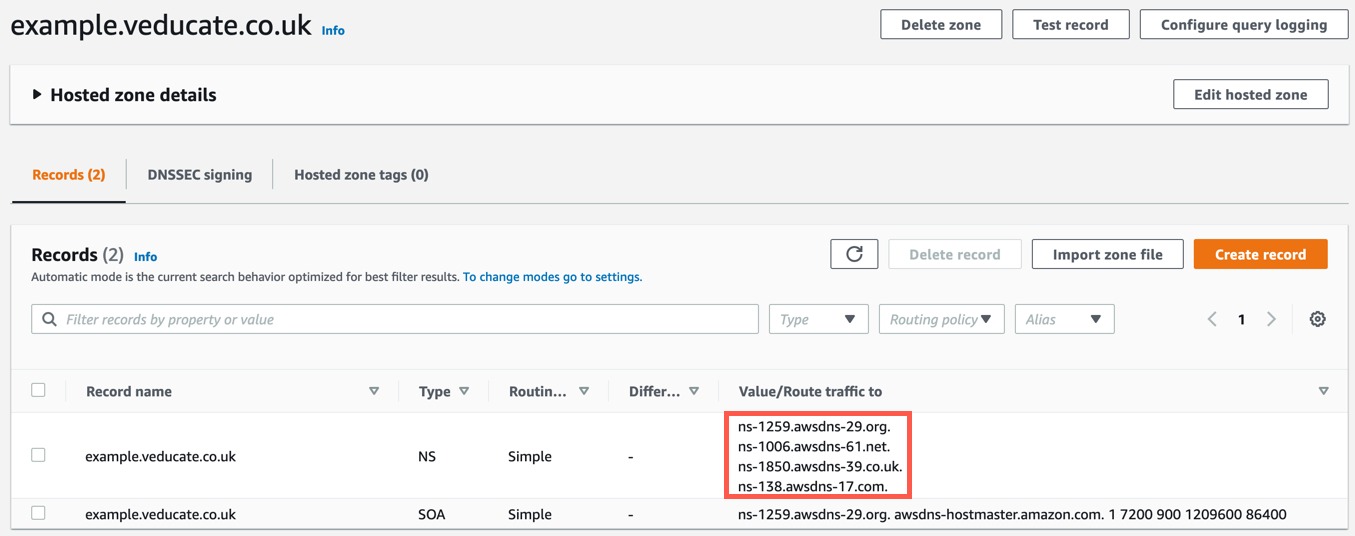
Now my zone is created, I have four Name Servers which will host this zone (Red Box). Take a copy of these.

AWS - Route 53 - Hosted Zone - NS Servers

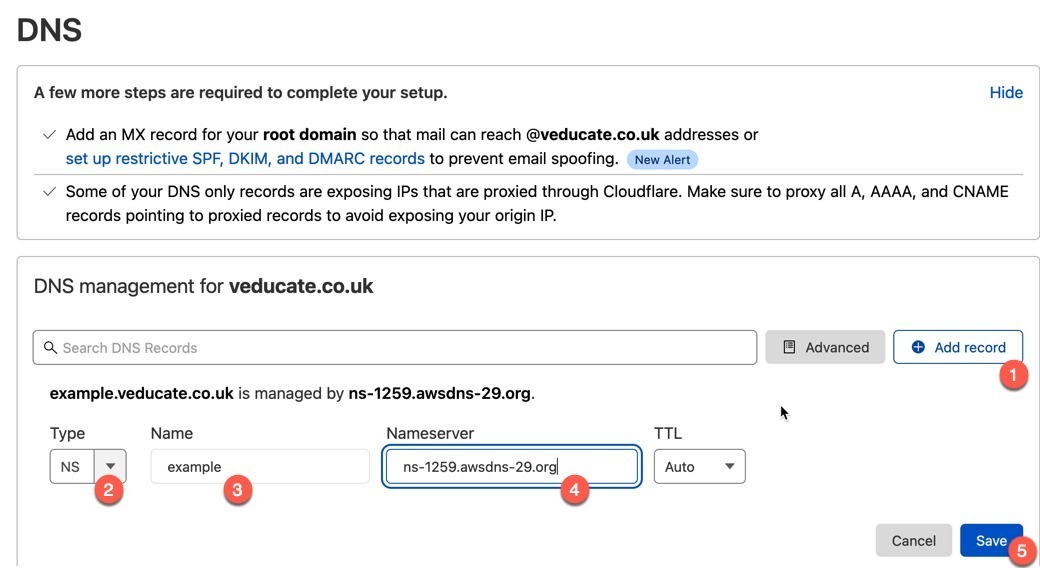
In your DNS provider, for this example, Cloudflare, create a record of type: NS (Name Server), the record name is subdomain, and Name Server is one of the four provided by AWS Route53 Hosted Zone.

Repeat this for each of the four servers.

Cloudflare - create ns record

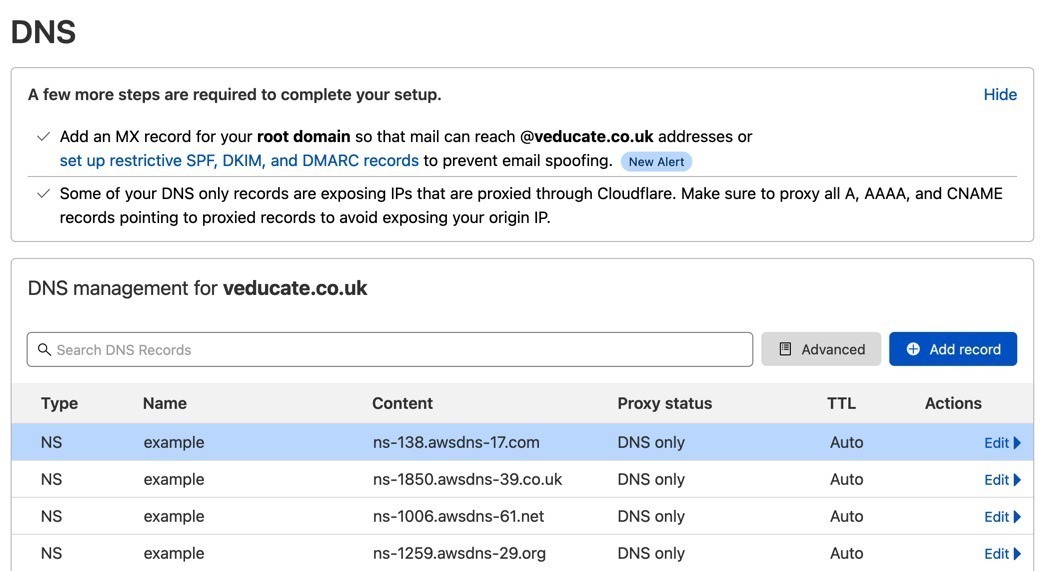
Below you can see I’ve created the records to map to each of the AWS Route53 Name Servers.

Cloudflare - create ns record - all records created

Now back in our AWS Console, for the Route53 service within my hosted zone. I can start to create records.

AWS - Route53 - Create record

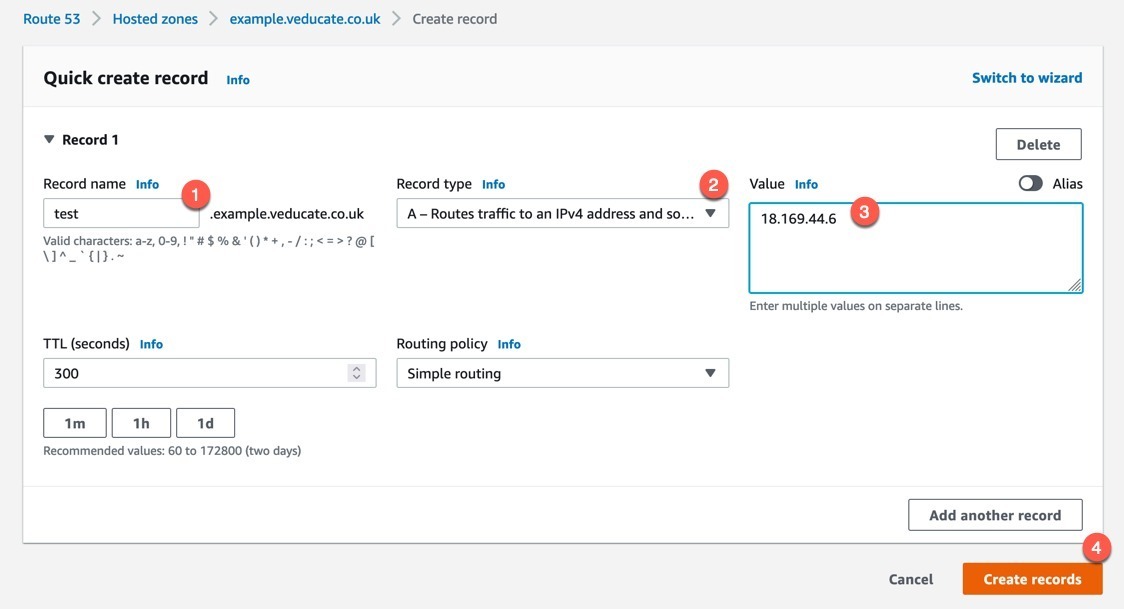
Provide the name, type and value and create.

AWS - Route53 - Quick create record

Below you can see the record has been created.

AWS - Route53 - Records

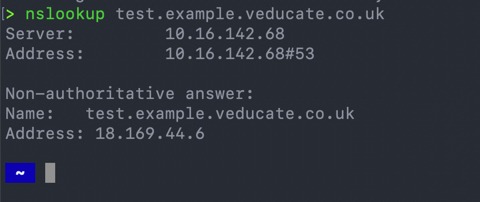
And finally, to test, we can see the DNS record resolving from my laptop.

nslookup example

Regards

Dean Lewis

AWS EKS Header

Quick Fix – AWS Console – Current user or role does not have access to Kubernetes objects on this EKS Cluster

The Issue

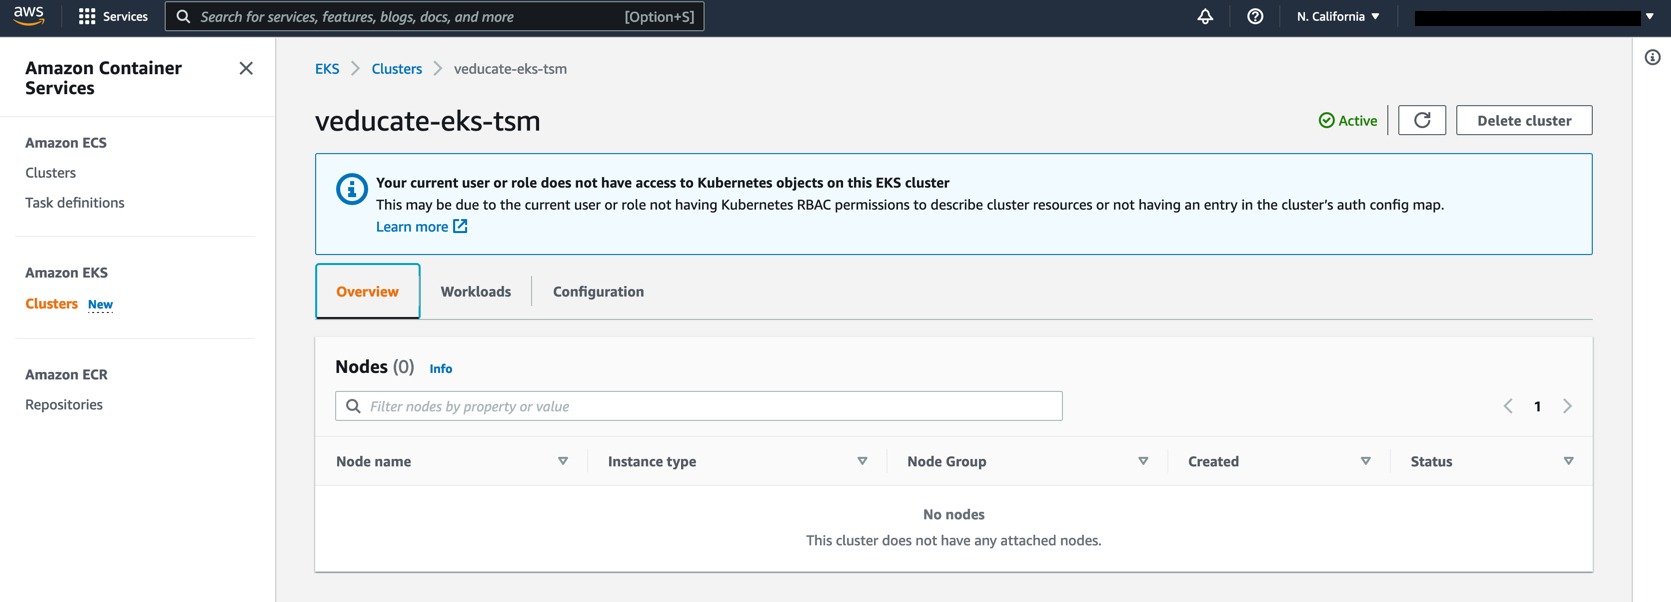
Once you’ve deployed an EKS cluster, and try to view this in the AWS Console, you are presenting the following message:

Your current user or role does not have access to Kubernetes objects on this EKS Cluster

AWS Console - Container Services - Current user or role does not have access to Kubernetes objects on this EKS Cluster

The Cause

This is because you need to run some additional configuration on your cluster to allow your AWS user IAM to access the cluster.

The Fix

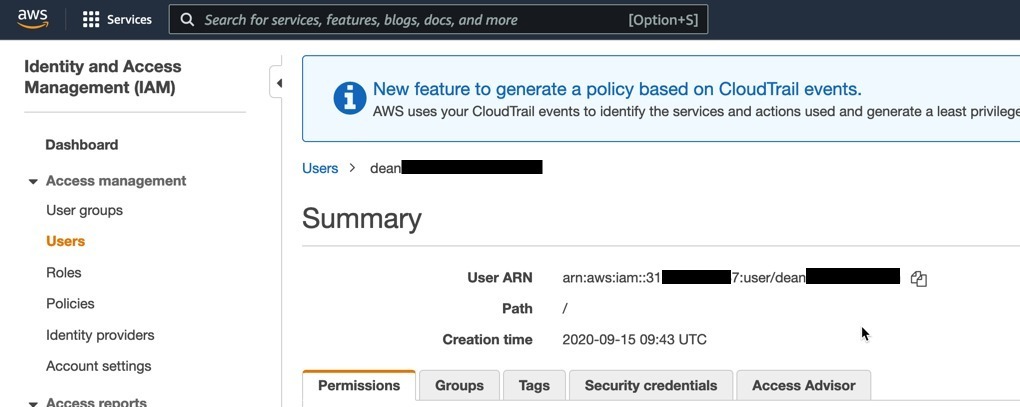
Grab your User ARN from the Identity and Access Management (IAM) page.

aws console - user IAM

Download this template YAML file for configuring the necessary ClusterRole and ClusterRoleBinding and then apply it to your EKS cluster.

curl -o eks-console-full-access.yaml https://amazon-eks.s3.us-west-2.amazonaws.com/docs/eks-console-full-access.yaml

kubectl apply -f eks-console-full-access.yaml

apply eks console full access configmap

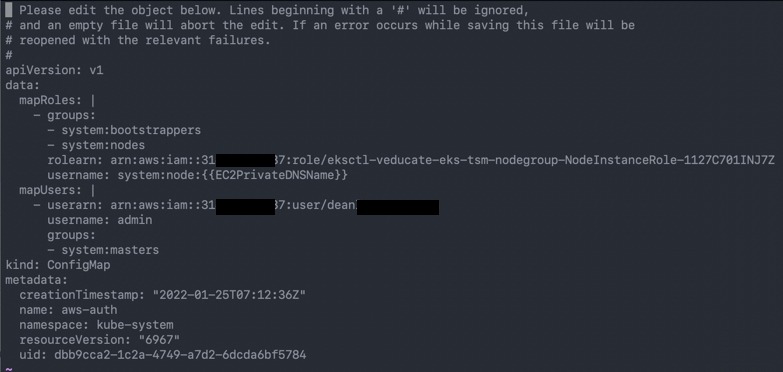
Now edit the following configmap:

kubectl edit configmap/aws-auth -n kube-system

Add in the following under the data tree:

mapUsers: |
  - userarn: arn:aws:iam::3xxxxxxx7:user/[email protected]
    username: admin
    groups:
      - system:masters

apply eks console full access - edit configmap

After a minute or so, once you revisit the EKS Cluster page in the AWS console, you will see all the relevant details.

AWS Console - Container Services - EKS cluster view

Regards

Dean Lewis

Tanzu Nvidia Header

Deploying Nvidia GPU enabled Tanzu Kubernetes Clusters

In this blog post I’m going to detail how deploy and configure a Nvidia GPU enabled Tanzu Kubernetes Grid cluster in AWS. The method will be similar for Azure, for vSphere there are a number of additional steps to prepare the system. I’m going to essentially follow the official documentation, then run some of the Nvidia tests. Like always, it’s good to get a visual reference and such for these kinds of deployments.

Pre-Reqs
  • Nvidia today only support Ubuntu deployed images in relation to a TKG deployment
  • For this blog I’ve already deployed my TKG Management cluster in AWS
Deploy a GPU enabled workload cluster

It’s simple, just deploy a workload cluster that for the compute plane nodes (workers) that uses a GPU enabled instance.

You can create a new cluster YAML file from scratch, or clone one of your existing located in:

~/.config/tanzu/tkg/clusterconfigs

Below are the four main values you will need to change. As mentioned above, you need a GPU enabled instance, and for the OS to be Ubuntu. The OS version will default if not set to 20.04.

CONTROL_PLANE_MACHINE_TYPE: t3.large
NODE_MACHINE_TYPE: g4dn.xlarge
OS_ARCH: amd64
OS_NAME: ubuntu
OS_VERSION: "20.04

The rest of the file you configure as you would for any workload cluster deployment. Continue reading Deploying Nvidia GPU enabled Tanzu Kubernetes Clusters