Using Command Prompt to log off terminal / Remote User – #vDM30in30

A quick post. I had an issue the other day where I had to remotely administer a server on another site. When I logged in I was greeted by a white screen.

I needed to boot off this account and then log back in as the same user. Unfortunately this was the only administrator account available.

So I logged as a power user, opened up a command prompt by holding down “Shift” + Right Click to display the “Run as different user” option.

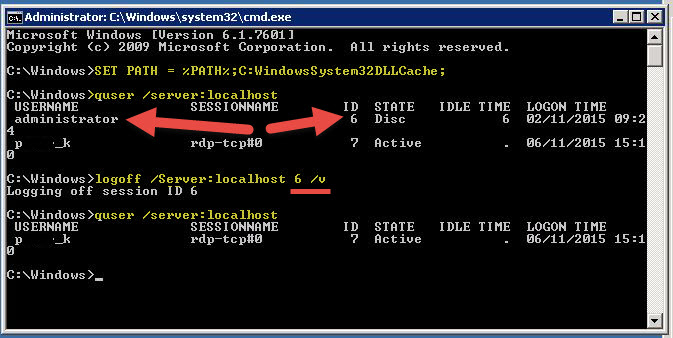
I then used the following options to view the logged in users and their session ID’s and used that information to log off the troublesome account.

SET PATH = %PATH%;C:WindowsSystem32DLLCache;
quser /Server:Localhost

This allows you to query the user  sessions on the local server or a remote device.

C:\>quser /?
Display information about users logged on to the system.

QUERY USER [username | sessionname | sessionid] [/SERVER:servername]

  username            Identifies the username.
  sessionname         Identifies the session named sessionname.
  sessionid           Identifies the session with ID sessionid.
  /SERVER:servername  The server to be queried (default is current).

From here, I take the Session ID and execute the “logoff” command pointing to the localhost.

logoff /Server:localhost 6 /v

Below are the options available with this command, the 6 represents the sessionID, and /v outputs the details to the console

C:\d.lewis>logoff /?
Terminates a session.

LOGOFF [sessionname | sessionid] [/SERVER:servername] [/V] [/VM]

  sessionname         The name of the session.
  sessionid           The ID of the session.
  /SERVER:servername  Specifies the Remote Desktop server containing the user
                      session to log off (default is current).
  /V                  Displays information about the actions performed.
  /VM                 Logs off a session on server or within virtual machine. The unique ID of the session needs to be specified.

Finally hears a screenshot of my console window.

command line log off user.JP

Regards

Dean

XD7.6 logo

Citrix XenDesktop – Password Reset not working on Wyse Terminals

The Issue

Users password has expired

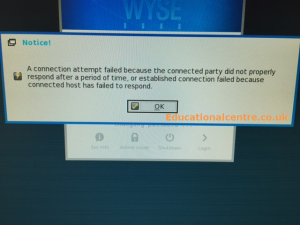
When logging onto a Wyse Client (in this case a C10LE or Dx0D running the latest firmware), you are told your password has expired. You are given the option to change your password, once you click OK, you are presented with the following message;
2015-09-21_11-26-17

The Cause

Turning on Verbose mode on the Storefront server and running Microsoft DebugView Tool to view the output files (C:\Program Files\Citrix\Receiver Storefront\Admin\Trace)

Here is the Citrix KB on setting up verbose logging and reading the trace files.

Add-PSSnapin Citrix.DeliveryServices.Framework.Commands

Set-DSTraceLevel –All –TraceLevel Verbose

Get-Service "CitrixConfigurationReplication" | Restart-Service
Get-Service "CitrixCredentialWallet" | Restart-Service
Get-Service "CitrixDefaultDomainService" | Restart-Service
Get-Service "CitrixSubscriptionsStore" | Restart-Service
Get-Service "Citrix Peer Resolution Service" | Restart-Service

Set-DSTraceLevel –All –TraceLevel Off
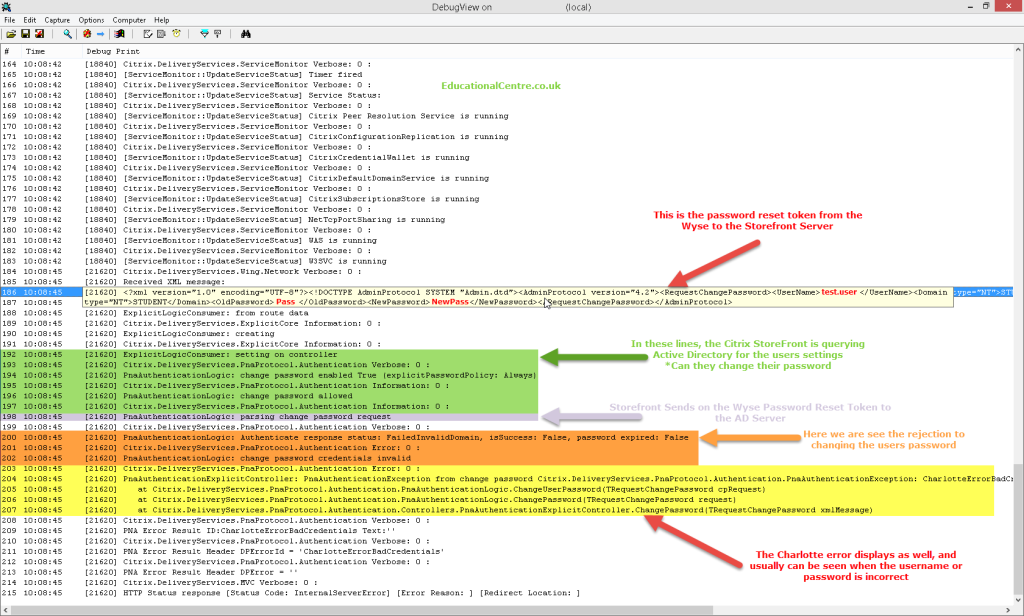
  • In the debug we could see that when the password reset tokens were sent;
[21620] <?xml version="1.0" encoding="UTF-8"?><!DOCTYPE AdminProtocol SYSTEM "Admin.dtd">test.user</UserName><Domain type="NT">STUDENT</Domain><OldPassword>oranges</OldPassword><NewPassword>apples</NewPassword></RequestChangePassword></AdminProtocol>

Here you can make out that the above highlighted words are the user credentials and the old and new password.

  • There was a response stating;
[21620] PnaAuthenticationLogic: Authenticate response status: FailedInvalidDomain, isSuccess: False, password expired: False
  • We also seen a “Charlotte” error as well;
[21620] PnaAuthenticationExplicitController: PnaAuthenticationException from change password Citrix.DeliveryServices.PnaProtocol.Authentication.PnaAuthenticationException: CharlotteErrorBadCredentials

Below is a dissection of the debug output;
2015-09-21_11-41-12

The Fix

The fix was to change the Wyse configuration file (WNOS.ini) for the line that puts in the available domains to the FQDN rather than the NETBIOS name for each domain.

Our old configuration was;

  • DomainList=”Student,Admin”

Our new configuration was;

  • DomainList=”Student.educationalcentre.co.uk,Admin.educationalcentre.co.uk”

We could then see that in the debug file, the line describing the domain details, includes the FQDN.

<Domain type="NT">STUDENT.Educationalcentre.co.uk</Domain>

This issue was not apparent when using Citrix XenDesktop 5.5 and Citrix Web Interface, only when we migrated to XenDesktop 7.6 and StoreFront Services, which I imagine uses a higher level of security, meaning passing the NETBIOS name through is unacceptable now.

Regards

Dean

podcast

Guest appearance on the AdminAdmin Podcast

This is a little of a late post but back in June I was invited by the amigos over at AdminAdmin Podcast to chat about my favourite subject. Me!

This was prompted after they mentioned my How to document posts, and I reached out to say thanks as it had generated extra traffic for my blog.

You can click this sentence to listen to the episode.

So thank you for having me guys and keep up the great work.

You can add them on twitter as well.

citrix 580x224 tcm21 26525

Citrix StoreFront – Creating a Public SSL Certificate

The latest versions of Citrix receiver require that you use HTTPS for the server bound connections, otherwise you cannot connect.

Citrix reciever https error

And the information on the Citrix website can be a bit thin when it comes to using a Public CA SSL Certificate. Here is the documentation link to using certificates for the Storefront component.

Here I am covering;

  • Workaround – Bypassing the HTTPS SSL warning when adding a store to Citrix Receiver
  • Creating the Public SSL Certificate request for your StoreFront Server
  • Importing the Public SSL Certificate onto your StoreFront Server
  • Exporting the SSL Certificate for use on additional servers
  • Linking the SSL Certificate in IIS to the StoreFront Website

Continue reading Citrix StoreFront – Creating a Public SSL Certificate

2015 07 27 18 17 53

HP Virtual Connect – Upgrade from version 3.30 to 4.41

Hi,

Only a quick post, but after my last bashing of HP virtual connect. I’ve had to endevour another upgrade for a different customer. This time with two HP chassis that are connected together.

For this customer they are on version 3.30 and need to upgrade to the latest version 4.41.

After speaking with HP support, the suggested upgrade path is;

3.60 / 3.70 / 4.10 / 4.20 / 4.31 / 4.41

For me the each firmware took around 35 to 45 minutes to complete. And you need “Virtual Connect Support Utility 1.11.0” to upgrade to 4.31 and above.

Note: that if you use the vcsu.exe tool and have mutliple flex-10 modules connected together in a domain, the firmware will update all the modules at once, you cannot upgrade just 2 modules of 4, for example.

How to update the Virtual Connect Manager

Note: Please plan downtime for this, as in my case it took everything offline whilst updating both modules.

So to update the Virtual Connect Manager, leave the web interface, as you don’t do it there, you need to download the “Virtual Connect Support Utility”, you can find the latest version here.

To do this, you open up the command interface,

2014-08-13_09-37-45

2014-08-13_09-39-43

As you can see this launches a command prompt in the install area of the utility.

1. Type vcsu.exe and enter

2. Type update and enter

3. Enter the IP address of the Onboard Administrator, username and password.

4. Drag your firmware file from its location into the CMD prompt window and this will automatically out the file location in for you.

4. Click through the options until it says “Initializing, please wait… [Step 1 of 2]”

5. When prompted it will tell you its discovered the Virtual Connect domain, enter the username and password for the Virtual Connect Manager

6. Enter yes after confirming the version you are on and version you are going to.

7. Once done it will tell you its completed and where the log files are loaded.

Here is a full screenshot of the process, with the steps highlighted in yellow with green marks for easy identification.

2014-08-13_09-41-59

Things to know about the Virtual Connect Support Utility

it saves everything in your temp location, so where it tells you it’s saved the log, copy the location and open it up

2014-08-13_09-55-181

So it doesn’t just output a file which is the copy of your update session, which in this case is called “vcsu-15044.log”

It saves a copy of your Virtual Connect Manager settings before the upgrade, of which mine was called “vcConfig-8895406-BLE01_vc_domain-201408130822

And finally there is the Support Info output which can be used by HP support to determine the status of your hardware before and after the firmware update “vcSupportInfo-8895406-BLE01_vc_domain-201408130823

If you run the “collect” command, then it produces an output to the temp location for the following files

– Session output

– ShowAll of OA

– ShowAll of Virtual Connect Manager

2014-08-13_10-08-11
Regards

Dean