Category Archives: VMware

Folding@Home Header

Deploying the VMware Appliance for Folding@Home using Terraform

To simplify the deployment of Folding@Home appliances to vSphere environments, I have wrote a set of Terraform configuration files (script).

You will need two packages downloaded to your jump host.

And either download locally the VMware Folding@Home Appliance, or host it at remote location.

Use the git software to download my Terraform Git folder which contains the folder called Deploy-FAH.

git clone https://github.com/saintdle/Terraform.git

Move into the “Deploy-FAH” folder, and edit the terraform.tfvars file as needed;

cd Deploy-FAH
vi terraform.tfvars

Below is an example;

// Name of the vSphere server. E.g "vcsa.vmware.local"
vsphere_server = "vcenter.veducate.local"

// User on the vSphere server. E.g "[email protected]"
vsphere_user = "[email protected]"

// Password of the user on the vSphere server. E.g "password"
vsphere_password = "Password1234!"

// Name of the vSphere data center. E.g "datacenter"
vsphere_datacenter = "Datacenter"

// Name of the vSphere cluster. E.g "Cluster"
vsphere_cluster = "Cluster"

// Name or IP of the vSphere host in the cluster to deploy your VM to. E.g "esxi-01" or "192.168.1.20"
vsphere_host = "10.10.2.4"

// Name of the vSphere data store to use for the VMs. E.g "VSAN"
vsphere_datastore = "Datastore"

// Network to connect virtual machine
vm_network = "Freale_NW1"

// Number of instances to deploy
instance_count = 2

// VM Machine Name (an index will be appended i.e FAH-1, FAH-2,)
vm_name = "dean-test"

// Number of CPUs to set on deployed Virtual Machines
num_cpu = 2

// Memory to set on deployed Virtual Machines (in MB)
memory = 4096

// Name of vSphere Resouce Pool to be created. E.g "FAH-VMs"
vsphere_resource_pool = "dean-test"

// Name of VM folder to be created. E.g "FAH-VMs"
vsphere_vm_folder = "dean-test"

// Location of OVA file if using a local location - if using remote location, leave this as null
local_ovf_path = "/home/dean/Deploy-FAH-3/VMware-Appliance-FaH_1.0.4.ova"

// Location of OVA file if using a remote location - if using local location, leave this as null
remote_ovf_path =

// Enable SSH in FAH Appliance (True or False)
ssh_enable = "True"

// FAH appliance root password
root_password = "VMware1!"

// FAH Username you wish to be associated with in the statistics tables
fah_user = ""

// FAH Team you wish to be associated with in the statistics tables
fah_team = "52737"

// FAH Passkey to verify your user in the statistical tables (this is optional from FAH project)
fah_passkey = "unique_id"

That’s it, no more changes needed, it’s as simple as running the following to deploy your appliances;

#This will download the terraform providers as needed

terraform init

#This will show you the planned changes and make sure they are possible

terraform plan

#This will run the configuration to run the deployment

terraform apply

You can use the latest version of Terraform, version 0.13.5 as of the publishing of this post.

Quick notes

This terraform configuration uses some advance configuration in the folder “FAH-Appliance”, under the main.tf file. Here it reads the “remote_ovf_path” variable, and acts based on if it is null or not. If there is a variable set, then it runs the command to deploy from a remote location. If variable is null, then it looks to the “local_ovf_path”, and processes this to deploy an OVF/OVA from the local location.

  dynamic "ovf_deploy" {
  for_each = "${var.local_ovf_path}" != "" || "${var.remote_ovf_path}" != "" ? [0] : []
  content {
  // Path to local or remote ovf/ova file
  local_ovf_path = "${var.local_ovf_path}" != "" ? "${var.local_ovf_path}" : null
  remote_ovf_url = "${var.remote_ovf_path}" != "" ? "${var.remote_ovf_path}" : null
   disk_provisioning    = "thin"
   ovf_network_map = {
        "VM Network" = data.vsphere_network.network.id
    }
   }
  }

Thanks to Grant Orchard from HashiCorp helping me with this part of the config.

Interesting in where you can take this further, check out this post from Robert Jenson, using VMware CodeStream for an Infrastructure as Code deployment using GitHub as a source repository, and terraform for the deployment.

Regards
VMware AWS Header

How to delete vCenter Roles in VMC

The Issue

Whilst testing in VMC a PowerCLI script to create some vCenter roles, I noticed in the UI, then I deleted them, they remained, even though I was using the [email protected] account.

I also tried to delete them using PowerCLI and received the error message;

Remove-VIRole : 07/11/2020 09:00:42 Remove-VIRole Permission to perform this operation was denied. Required privilege 'VApp.PullFromUrls' on managed object with id 'Folder-group-d1'.
At line:1 char:1
+ Remove-VIRole OpenShift-Install
+ ~~~~~~~~~~~~~~~~~~~~~~~~~~~~~~~
+ CategoryInfo : NotSpecified: (:) [Remove-VIRole], NoPermission
+ FullyQualifiedErrorId : Client20_InventoryServiceImpl_RemoveRole_VIError,VMware.VimAutomation.ViCore.Cmdlets.Commands.PermissionManagement.RemoveVIRole

You should not create roles with permissions higher than that of the CloudAdmin Account. You can find further information of these permissions here.

If you do this, the only fix is to log a support call with VMware to resolve.

The Fix

VMware have a KB for this issue and how to delete the vCenter roles.

To resolve you use the vCenter Managed Objects Browser (MOB).

Note: When using the MOB to make changes, users will not be prompted for confirmation before making any changes, including removing roles. A custom role can not have privileges higher than the CloudGlobalAdmin role.

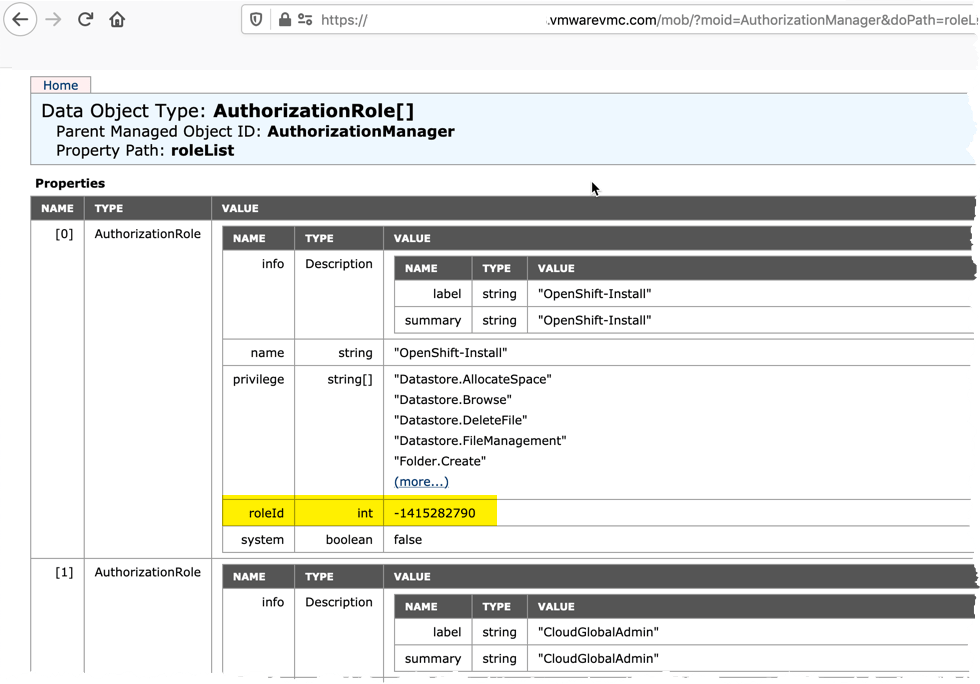
First to view all your existing roles in your browser go to;

  •  https://{VMC_VC_FQDN}/mob/?moid=AuthorizationManager&doPath=roleList

This will list all roles, and note the roleId for the role you want to remove.

vCenter MOB AuthorizationRole

To remove a role: Continue reading How to delete vCenter Roles in VMC

Folding@Home Header

How to deploy the VMware Appliance for Folding@Home

In this blog post we will go through the steps to deploy the VMware Appliance for Folding@Home to;

  • vCenter
  • Standalone ESXi host
  • VMware Fusion/Workstation

And also cover some basic troubleshooting.

Getting started with the VMware Folding@Home Appliance (vBrownBag Recording)

Deploy the VMware Appliance for Folding@Home to vCenter

Continue reading How to deploy the VMware Appliance for Folding@Home

OpenShift

How to specify your vSphere virtual machine resources when deploying Red Hat OpenShift

When deploying Red Hat OpenShift to VMware vSphere platform, there are two methods:

  • User Provisioned Infrastructure (UPI)
  • Installer Provisioned Infrastructure (IPI)

There are several great blogs covering both options and deployment methods.

In this blog, we are going to use the IPI method but customize the settings of our Virtual Machines that are deployed setting CPU and Memory that is different from the default settings.

Getting Started
Setting up your Jump host Machine

I’ll be using an Ubuntu Machine as my jumphost for the deployment.

Download the OpenShift-Install tool and OC command line tool. (I’ve used version 4.6.4 in my install)

Extract the files and copy to your /usr/bin/local directory

tar -zxvf openshift-client-linux.tar.gz
tar -zxvf openshift-install-linux.tar.gz

Have an available SSH key from your jump box, so that you can connect to your CoreOS VMs one they are deployed for troubleshooting purposes.

You need to download the vCenter trusted root certificates from your instance and import them to your Jump Host.

curl -O https://{vCenter_FQDN}/certs/download.zip

Then the following to import (ubuntu uses the .crt files, hence importing the win folder);

unzip download.zip
cp certs/win/* /usr/local/share/ca-certificates
update-ca-certificates

You will need an account to connect to vCenter with the correct permissions for the OpenShift-Install to deploy the cluster. If you do not want to use an existing account and permissions, you can use this PowerCLI script to create the roles with the correct privileges based on the Red Hat documentation.

If you are installing into VMware Cloud on AWS, like myself, you will also need to allow connectivity from your segments as follows:

  • Compute gateway
    • OCP Cluster network to the internet
    • OCP Cluster network to your SDDC Management Network
  • Management gateway
    • OCP Cluster network to ESXi – HTTPs traffic

DNS Records – You will need the two following records to be available on your OCP Cluster network in the same IP address space that your nodes will be deployed to.

  • {clusterID}.{domain_name}
    • example: ocp46.veducate.local
  • *.apps.{clusterID}.{domain_name}
    • example: *.apps.ocp46.veducate.local

If your DNS is a Windows server, you can use this script here. Continue reading How to specify your vSphere virtual machine resources when deploying Red Hat OpenShift

OpenShift

Red Hat OpenShift on VMware vSphere – How to Scale and Edit your cluster deployments

Working with Red Hat OpenShift on vSphere, I’m really starting to understand the main infrastructure components and how everything fits together.

Next up was understanding how to control the cluster size after initial deployment. So, with Red Hat OpenShift, there are some basic concepts we need to understand first, before we jump into the technical how-to’s below in this blog.

In this blog I will cover the following;

- Understanding the concepts behind controlling Machines in OpenShift
- Editing your MachineSet to control your Virtual Machine Resources
- Editing your MachineSet to scale your cluster manually
- Deleting a node
- Configuring ClusterAutoscaler to automatically scale your environment

Machine API

The Machine API is a combination of primary resources that are based on the upstream Cluster API project and custom OpenShift Container Platform resources.

The Machine API performs all node host provisioning management actions as a post cluster installation method, providing you dynamic provisioning on top of your VMware vSphere platform (and other public/private cloud platforms).

The two primary resources are:

Machines
An object that describes the host for a Node. A machine has a providerSpec, which describes the types of compute nodes that are offered for different cloud platforms. For example, a machine type for a worker node on Amazon Web Services (AWS) might define a specific machine type and required metadata.
MachineSets
Groups of machines. MachineSets are to machines as ReplicaSets are to Pods. If you need more machines or must scale them down, you change the replicas field on the MachineSet to meet your compute need.

These custom resources add capabilities to your OpenShift cluster:

MachineAutoscaler
This resource automatically scales machines in a cloud. You can set the minimum and maximum scaling boundaries for nodes in a specified MachineSet, and the MachineAutoscaler maintains that range of nodes. The MachineAutoscaler object takes effect after a ClusterAutoscaler object exists. Both ClusterAutoscaler and MachineAutoscaler resources are made available by the ClusterAutoscalerOperator.
ClusterAutoscaler
This resource is based on the upstream ClusterAutoscaler project. In the OpenShift Container Platform implementation, this is integrated with the Machine API by extending the MachineSet API. You can set cluster-wide scaling limits for resources such as cores, nodes, memory, GPU, etc. You can configure priorities so that the cluster prioritizes pods so that new nodes are not brought online for less important pods. You can also set the ScalingPolicy, so that for example, you can scale up nodes but not scale down the node count.

MachineHealthCheck

This resource detects when a machine is unhealthy, deletes it, and, on supported platforms, creates a new machine. You can read more here about this technology preview feature in OCP 4.6.

Editing your MachineSet to control your Virtual Machine Resources

To view the current MachineSet objects available run; Continue reading Red Hat OpenShift on VMware vSphere – How to Scale and Edit your cluster deployments