What is the Management Pack Builder?
Well, it’s exactly as the name suggests, a tool for building your own vRealize Operations Management Pack, to bring data into vROPs whereby there is no existing Management Pack today.
How do I get access to it?
You can sign up for the BETA here. Currently VMware is taking feedback from customers to help shape the future of this product.
You can find documentation and videos on the product on this page.
Note: VMware does not commit to delivering features discussed in this program in any generally available product.
Installing the Appliance
Setup the Management Pack Builder
Log into the appliance using “admin/admin” and you will be prompted to change your password.
You will need to licence the product (using the beta key).
- Click the little person icon in the top right
- Select “Licence”
- Apply the licence
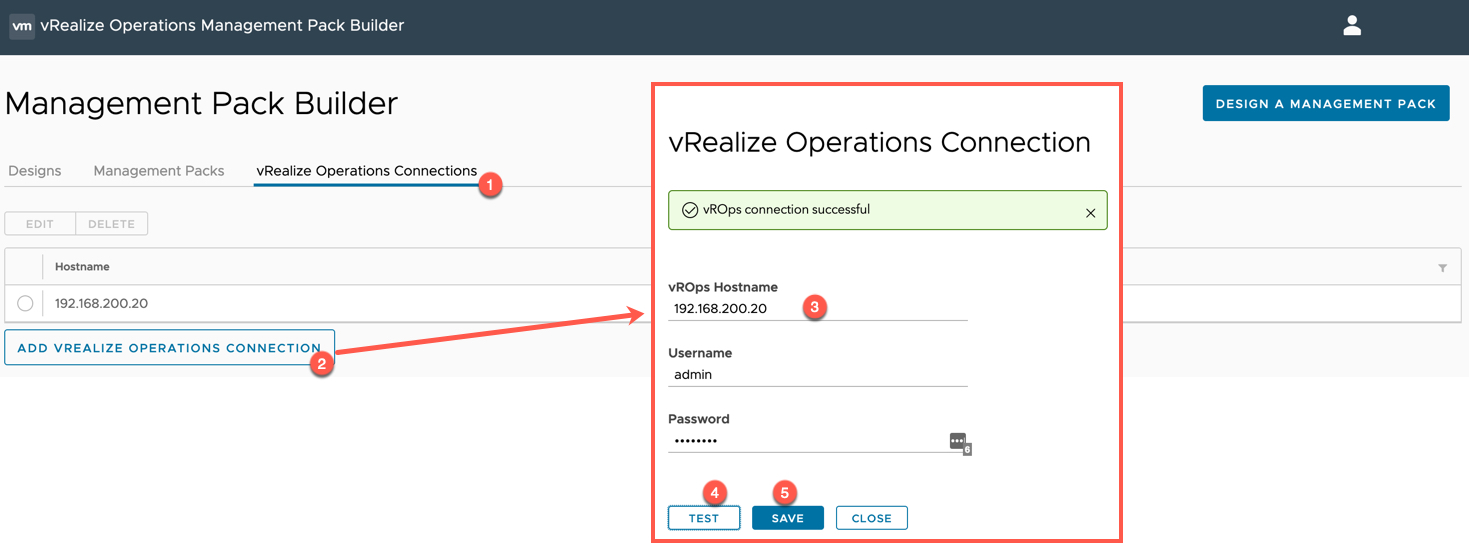
Next, we need to create a connection to our vRealize Operations environment. While this step is not necessary at all to get started. If you want to create relationships for data objects with existing vROPs objects, you need to configure this connection.
- Select the “vRealize Operations Connections Tab”
- Click “Add vRealize Operations Connection” button
- Input your details
- Click Test
- Click Save
Creating your first management pack
Now I’m going to run through the high-level steps for creating your first management pack. In my example I am connecting to a Veeam Backup and Replication Server (API Docs).
I recommend you understand your chosen endpoints API and authentication methods in depth before you continue.
For my example, I spent half a day using Postman to test API calls, and see what data was available that was useful to me.
To create the management pack:
- Click “Design a Management Pack”
Connect a data source
- Create a name for your Management Pack by clicking the Pencil symbol
- Select your chosen data source
- In this example it will be a HTTP Data Source
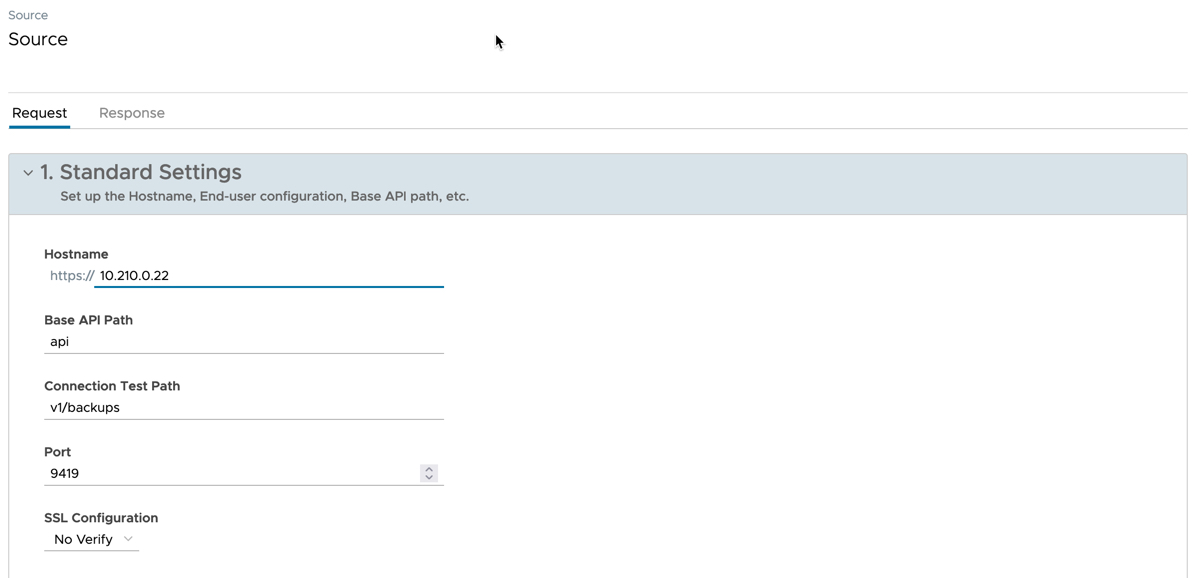
- Set the hostname/IP of your API Endpoint
- Set the Base API path that requests are made too
- Set a test path for a working API request that should return data
- Set the API Port + SSL verification configuration
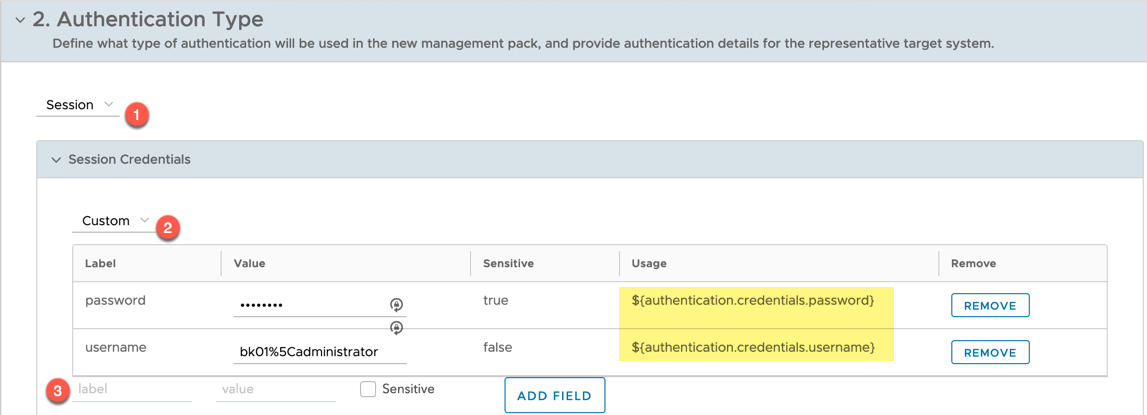
Under the “Authentication Type” Header
- Set you Auth Type, for the Veeam VBR server, it is Session base
- Configure the Session credentials
- As my username had a “\” I had to provide the replacement code for this
- Under usage you will be given the parameters you can use elsewhere for the authentication methods.
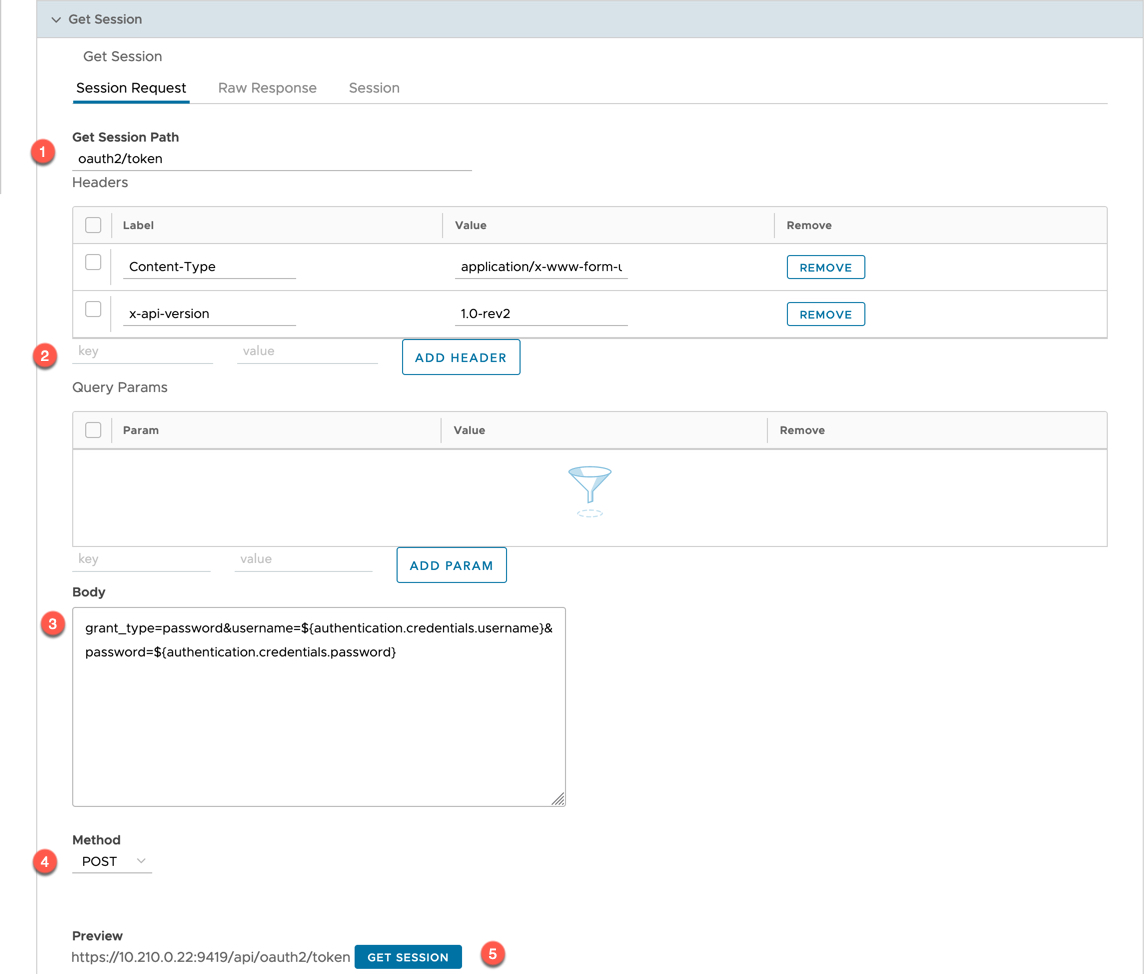
Next is configuring how to get an authenticated session.
- Set the Session Path
- Set any necessary headers
- Set any necessary query parameters
- Set any necessary request body
- Here you can I referenced the credentials input from the last screenshot
- Set the API Method
Click “Request” to see if the configuration is successful.
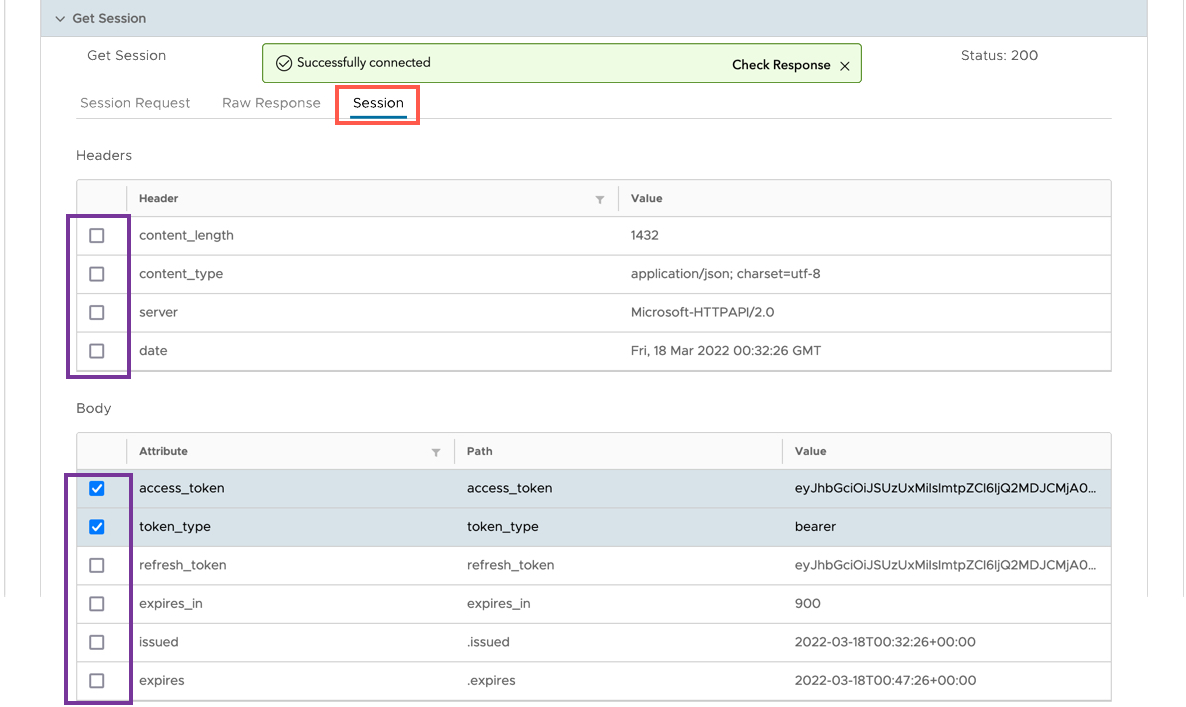
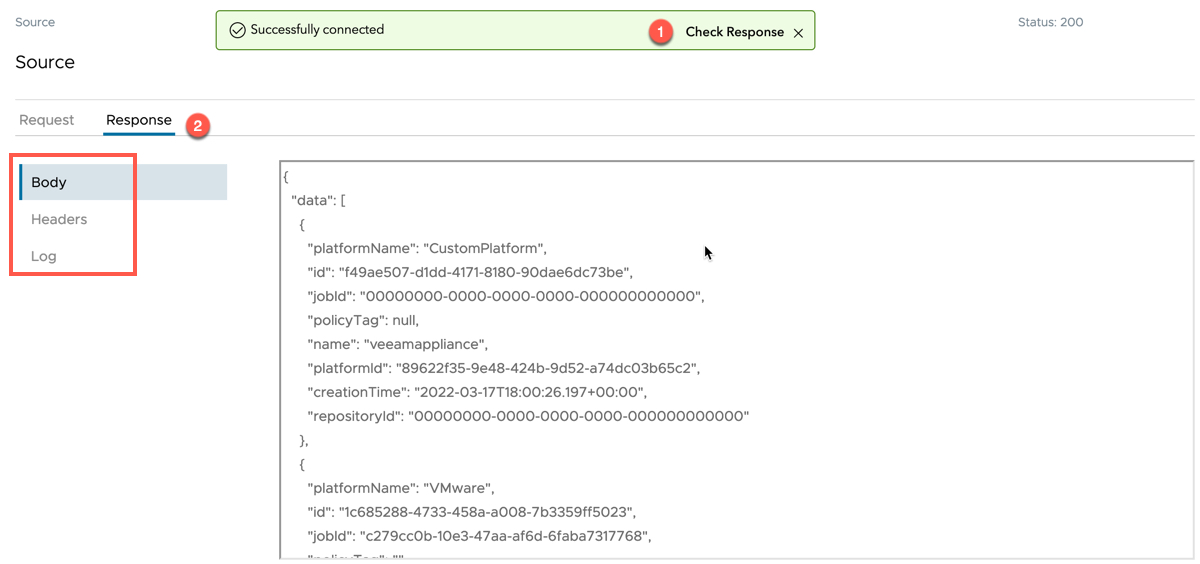
You will get a floating dialog box on the status, click to see the response
- Select the Session Tab
- Select any necessary headers you need to use for your authentication method
- In Veeam VBR there are two returned values in the response body with your Auth Tokens
Once selected, you will see these as Session Attributed with variables that can be used.
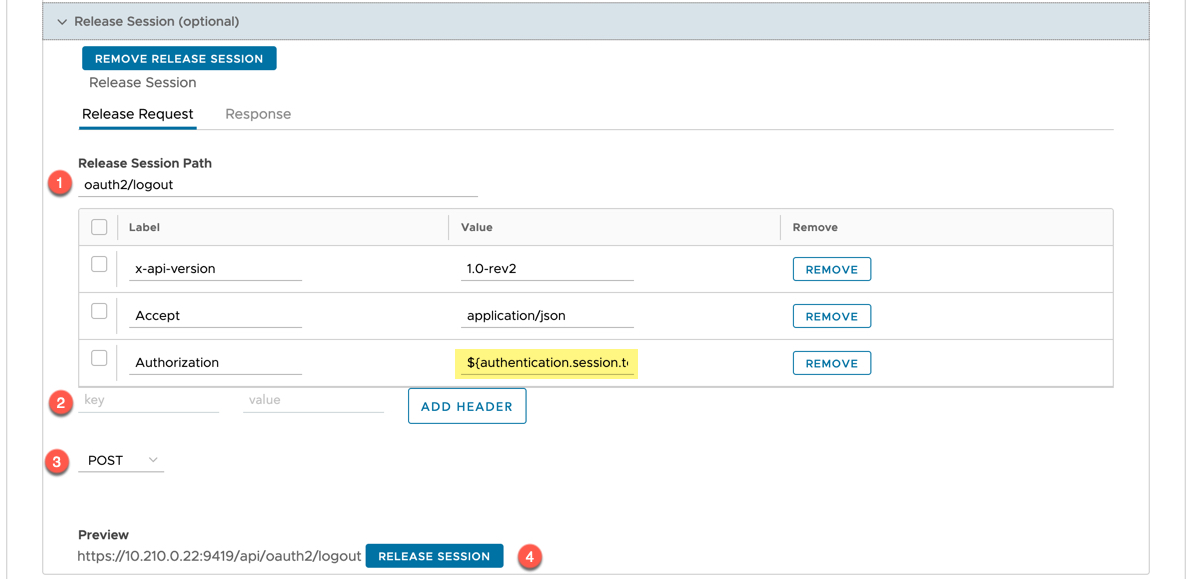
If necessary, configure a Release session, which is used to delete the Authenticated Session.
- Provide the Release Session PAth
- Any necessary headers
- I used the Variable provided above
- Set the Method
Click “Release Session” to test the configuration and API call.
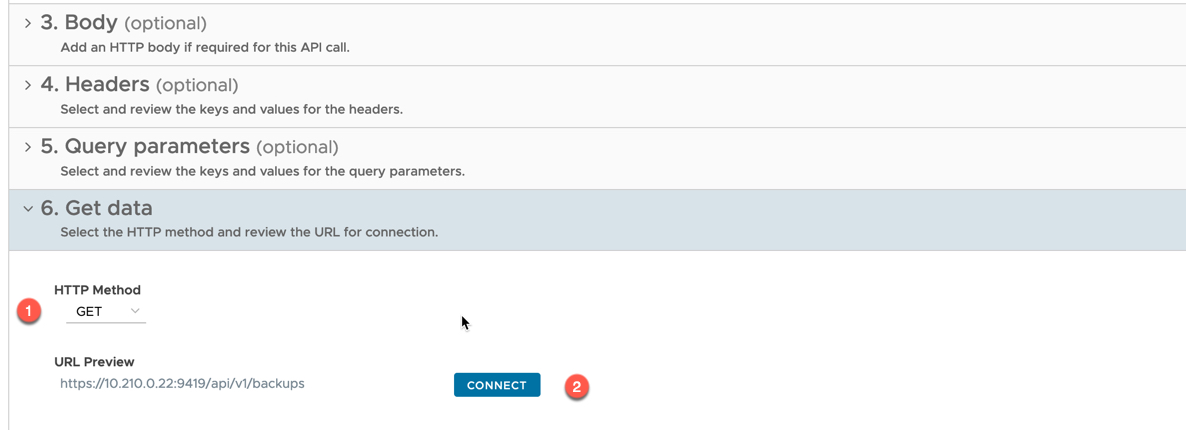
Back to configuring any necessary pieces for the test connection to the data source. I don’t need them in my example, so I go straight to the “6. Get Data” Section.
- Set the Method for the test
- Click Connect
View the response to ensure it outputs the data as you expected.
Getting data from your Endpoint with a REST API Call
Now we need to start building out API calls to get data from the Endpoint which is useful for us.
- Click Data on the left-hand side
- Click for a “New Request”
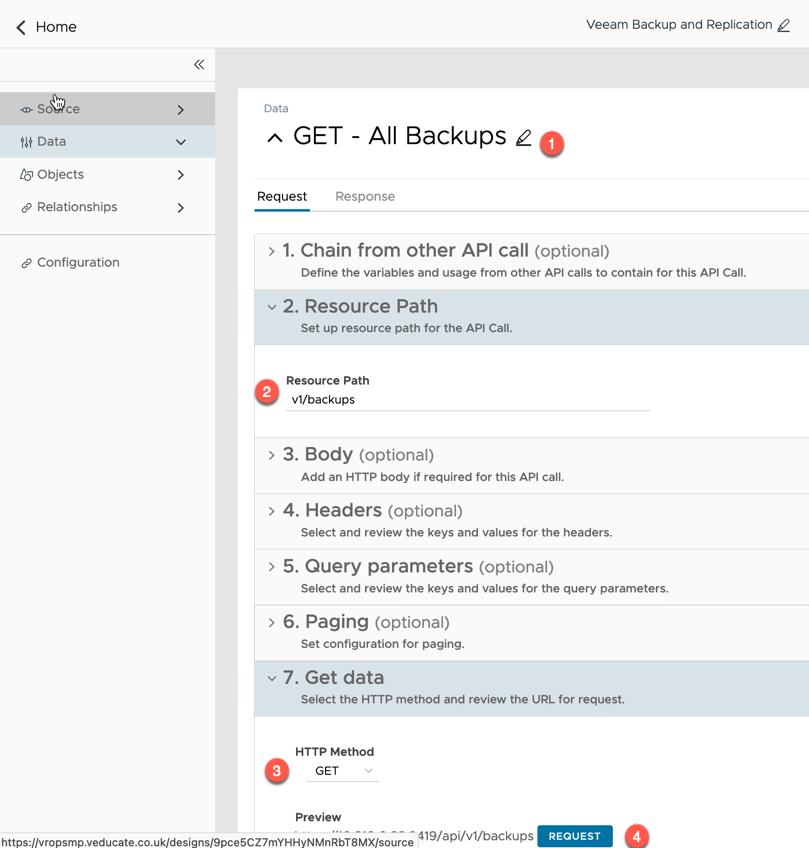
- Click the Pencil icon to give your request a name
I’ll cover chained requests further down.
- Set the API Call resource path
- Set any necessary API Call parameters,
- Configure the Method
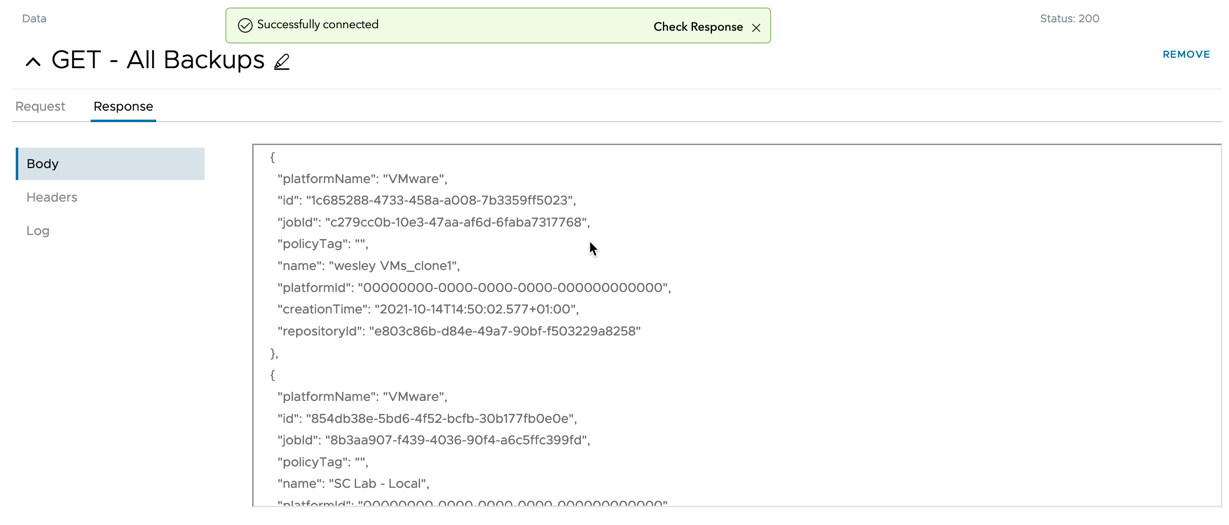
- Click “Request” to see the response data and validate
Below I can see all the backups, but if I want to create a vROPS object of “Backup” I need to get the individual backups
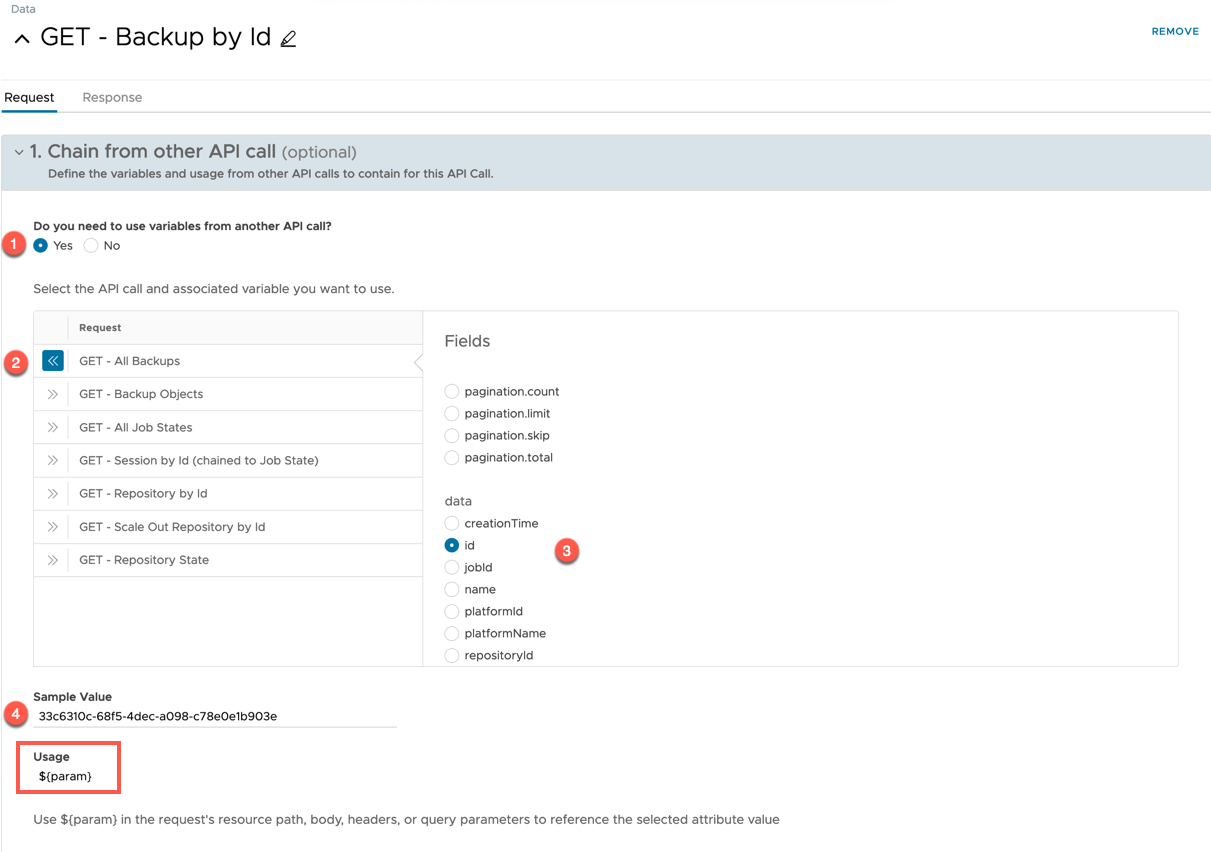
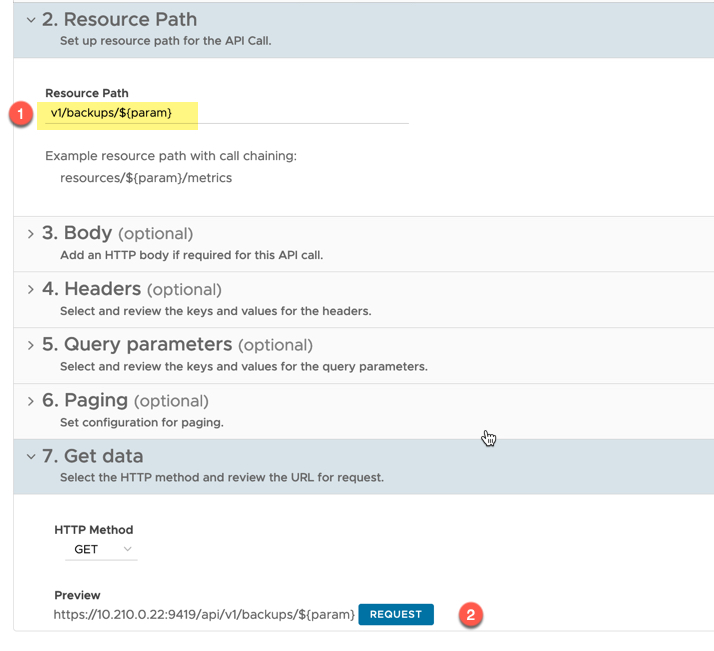
Below I’ve created a new request. This request will use the existing “Get All Backups” and use the Backup Id values to get individual responses for each Backup Id.
- I select “Chain from another API call”
- Select the variable you want to associate
- Set a Sample value for testing
To use this variable in the rest of the API Call, it will be referenced as ${param}.
Below you can see I’ve set the resource path and the parameter. Click Request.
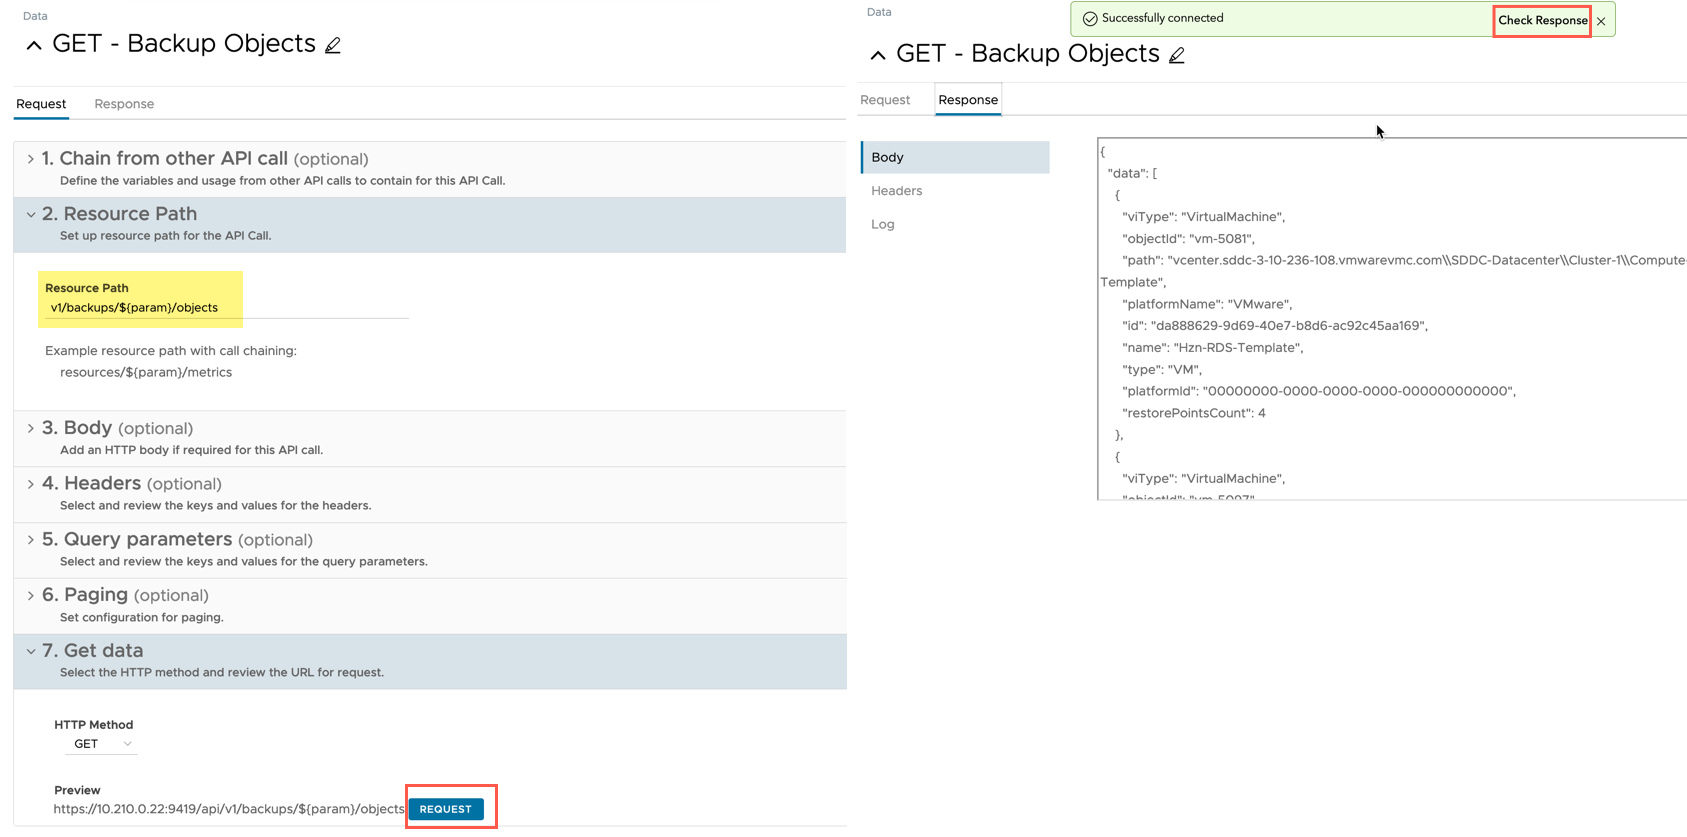
Now in the response we can see that I get a single Backup rather than all of them.
Here is another example where I used the chained request to the get the backup objects configured for a backup job.
Defining an vRealize Operations Object
Now we need to create some vRealize Operations Objects to store our data against.
- Click the Objects tab on the left-hand navigation
- Create a New Object
- Edit the name using the Pencil
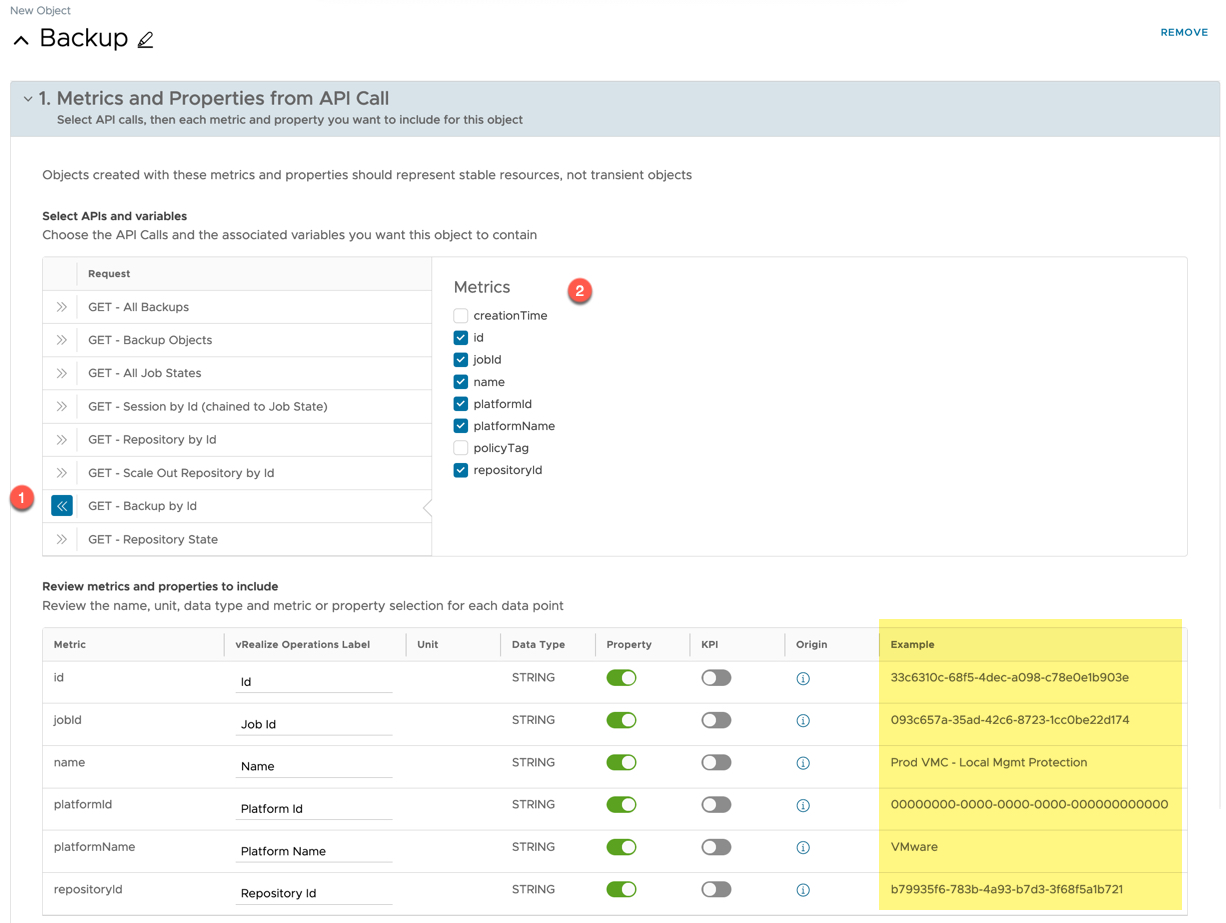
- Select which API call you want to pull the data from
- You can pull data from multiple API calls, but the there needs to be a unique object ID value between the API call responses.
- Select the Metrics and Property data you are interested in.
- Below in yellow, you can see you are show example data from your API call test requests.
- Set any Units as necessary, you can also convert metrics to properties and vice versa. Be careful with this setting.
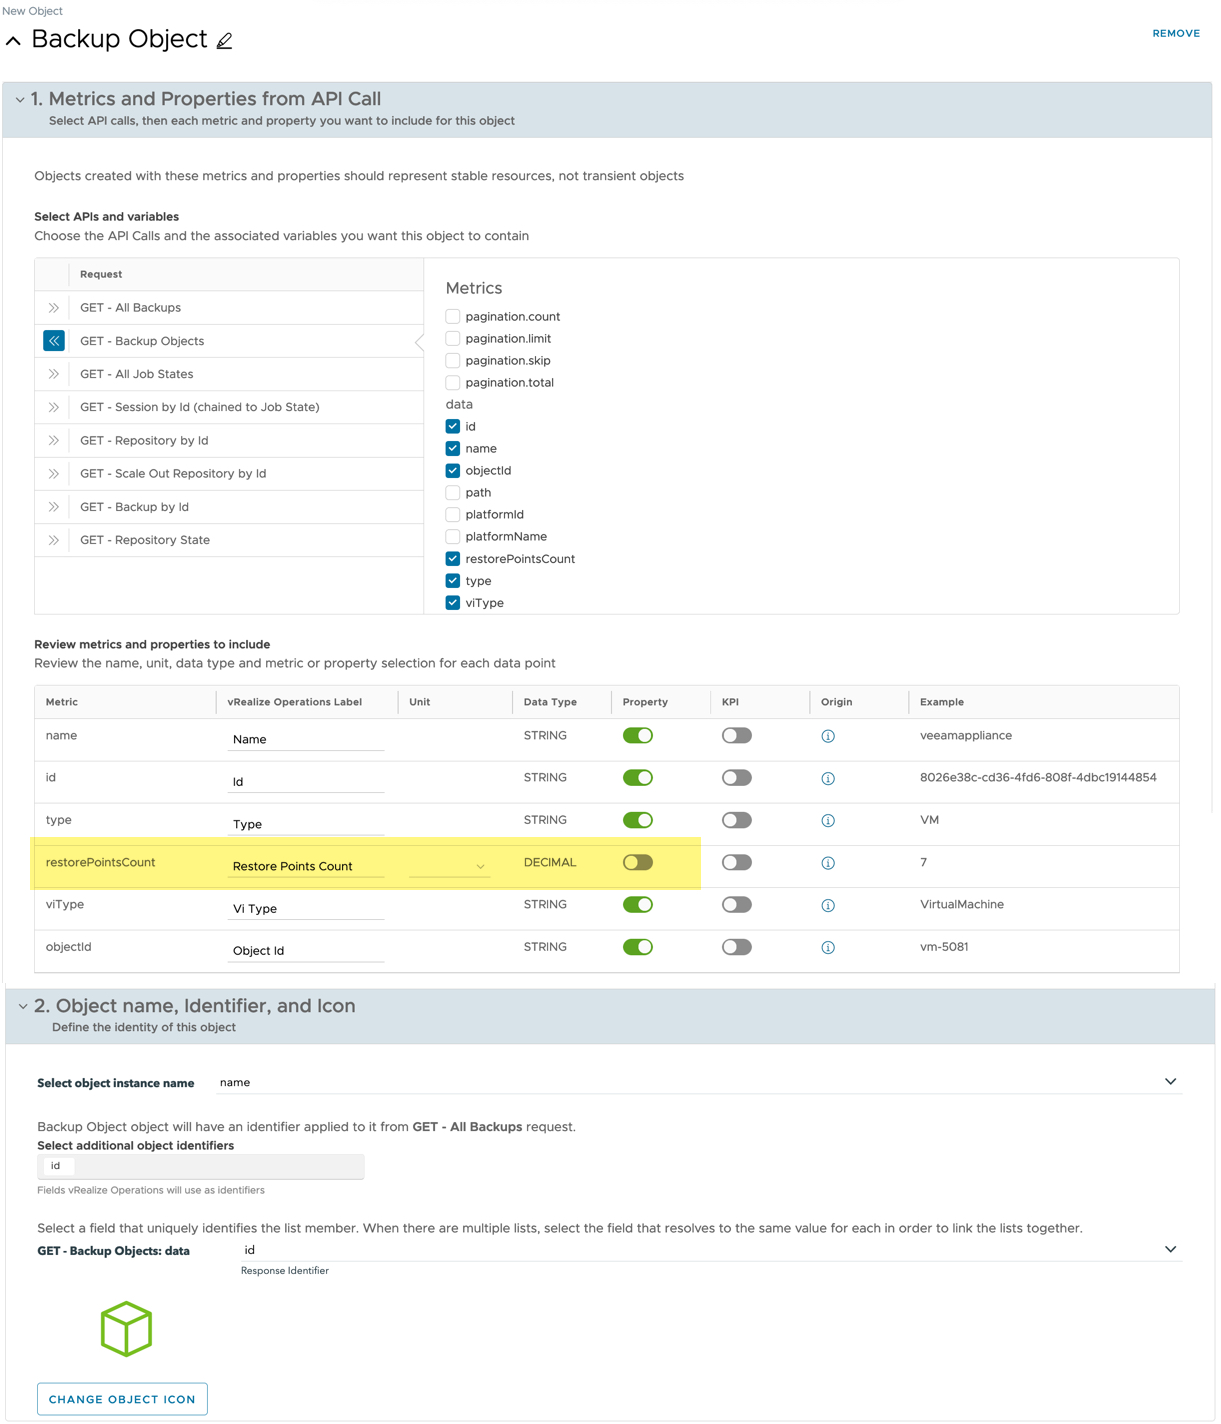
- Set Object instance name – this is the human friendly name as displayed in vROPS
- Set the unique identification for the objects in case the name is duplicated
- Set the Icon (you can only use what’s specified today)
Below is an example of another object I created with a metric + properties.
Defining relationships between Objects
Now we have our objects, we can create some relationships. So, I am going to create a relationship for some of the new objects, and also to our vSphere virtual machine objects that already exist in vROPs.
- Click on the “Relationships” tab on the left-hand navigation
- Create a new relationship
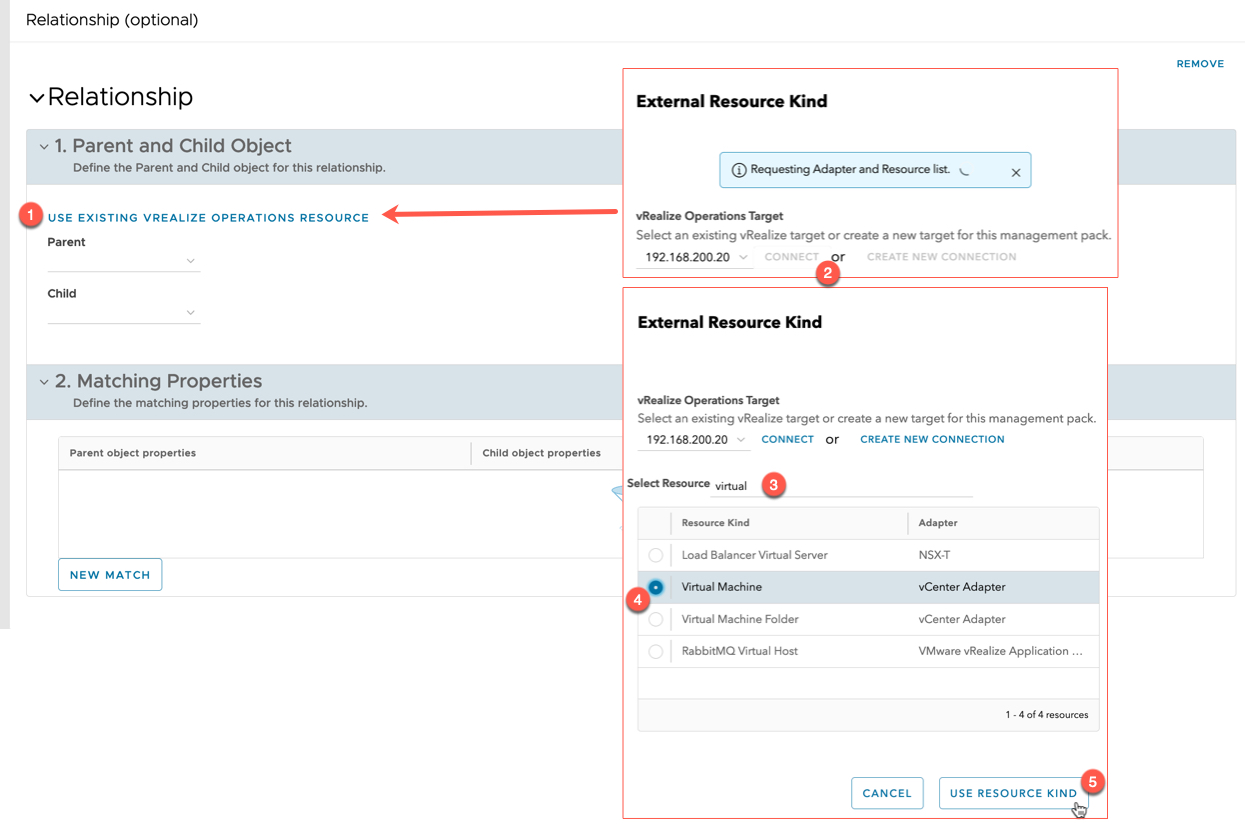
First, lets link our backup object from Veeam, which is a vSphere VM, to our actual vSphere VM object in vROPs.
- Click “Use existing vRealize Operations Resource)
- Click connect on your vROPs target (this is why we created it earlier).
- Search for your resource
- Select it and click “Use Resource Kind”
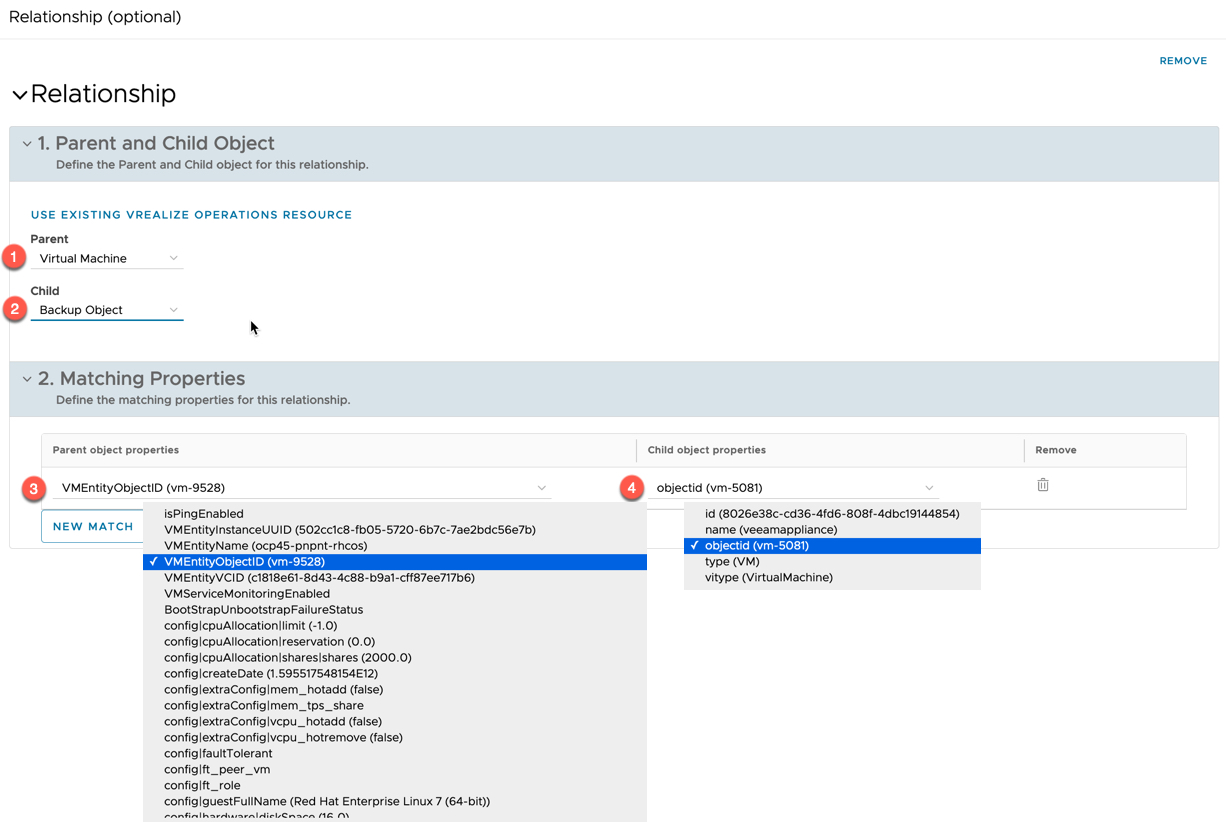
Now set as the parent or the child for the Virtual Machine object. I want it to be the parent.
- Set your child object
- Set how the two objects are matched
- In my example Veeam VBR API returned the vSphere VM Entity ID, which is helpful!
You will get example values in brackets for each property, when connecting to vROPs, it picks the first values returned for the vROPs object. So, you might not always have the exact match on either side.
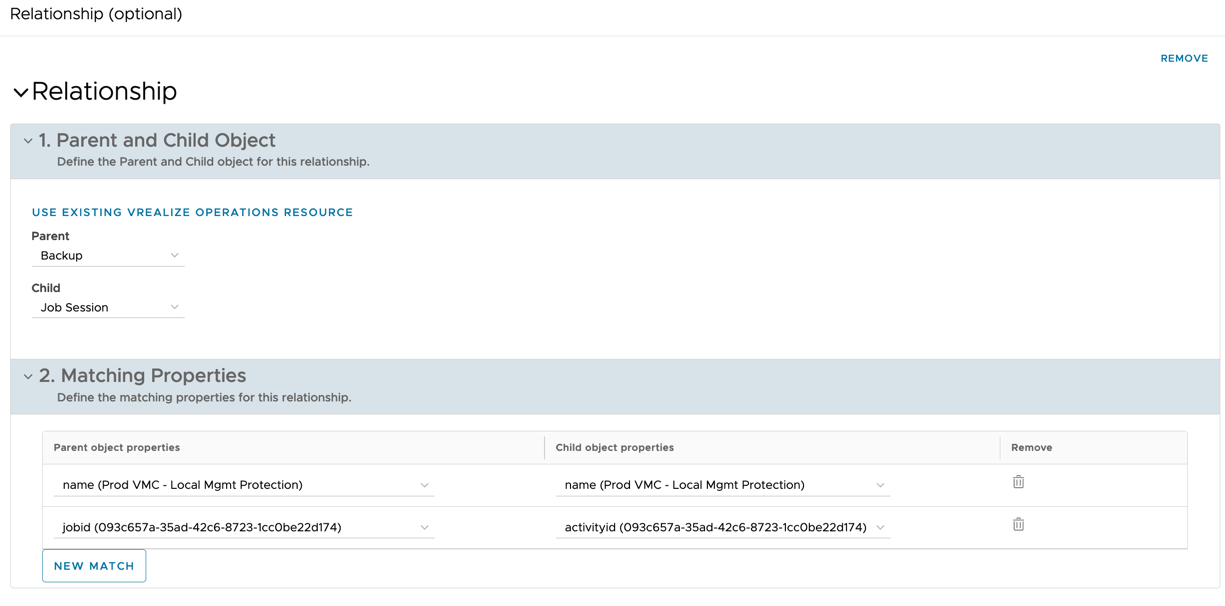
Below is an example where I’ve matched two new objects together view two matching properties. The example values are pulled from my Data API calls, which use the sample values I provided.
Management Pack Configurations
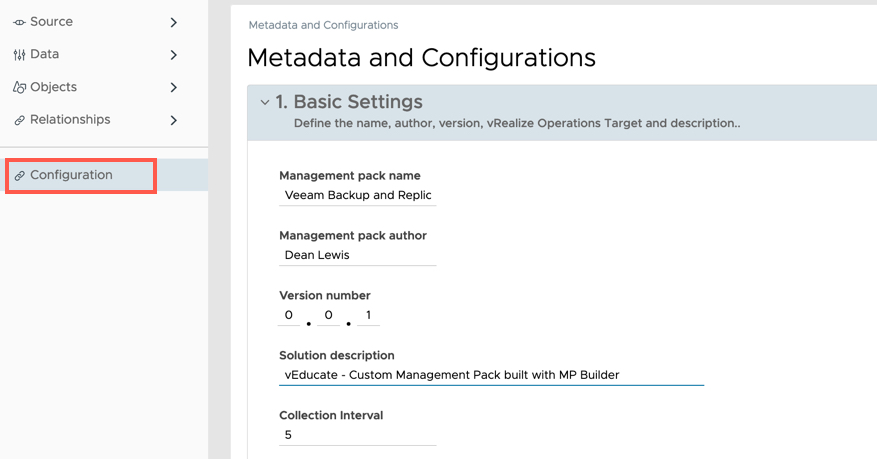
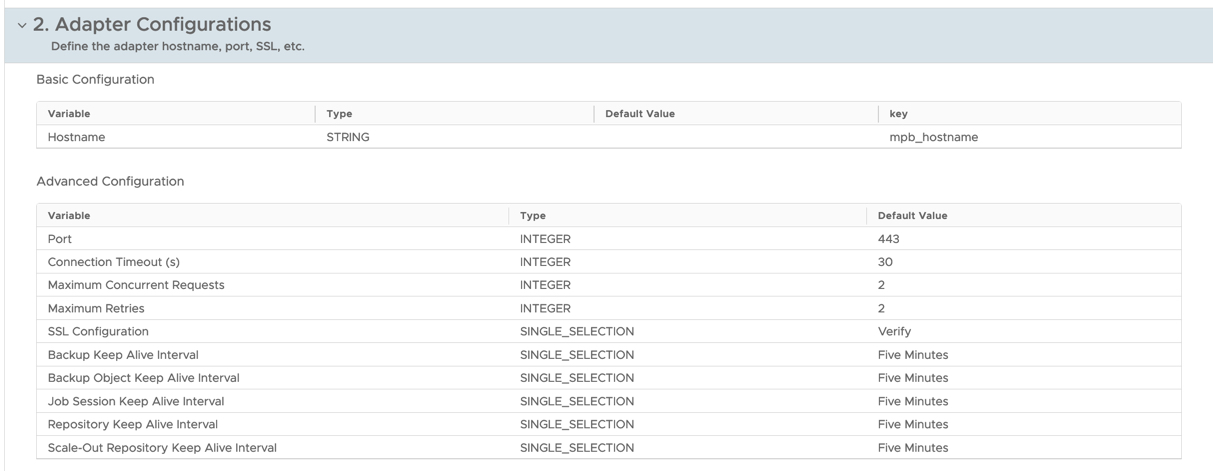
Finally, we can configure the overall settings of our Management Pack as per the below.
Not all settings are configurable in the Management Pack creation but can be changed when installed into vROPs.
Validating, Previewing, and Building the Management Pack
We are ready to validate and build our Management Pack!
- Click the “Preview” button
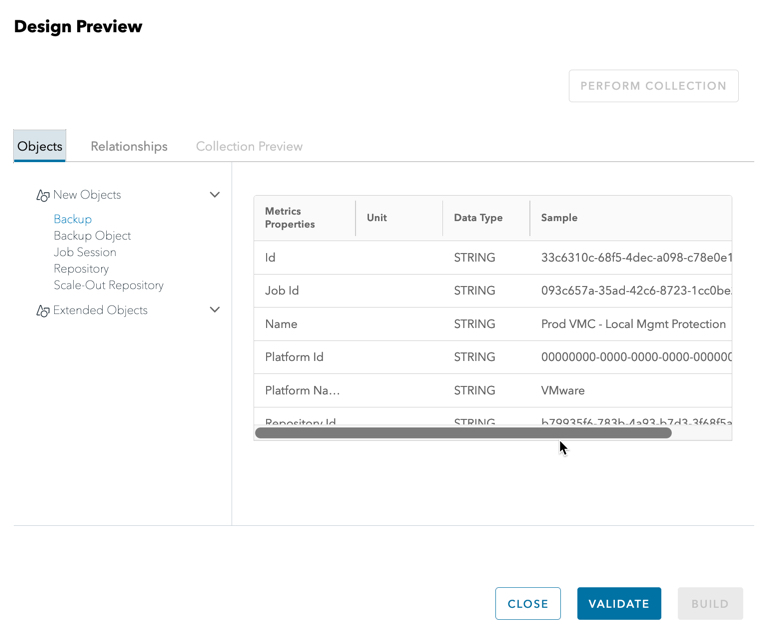
You will now have opened the “Design Preview” dialog box.
This will show you all the validations, expected object data etc we have just configured.
- Click validate to ensure it passes the internal tests
You will get the Valid Design message. Or an error and it should point you what’s at fault.
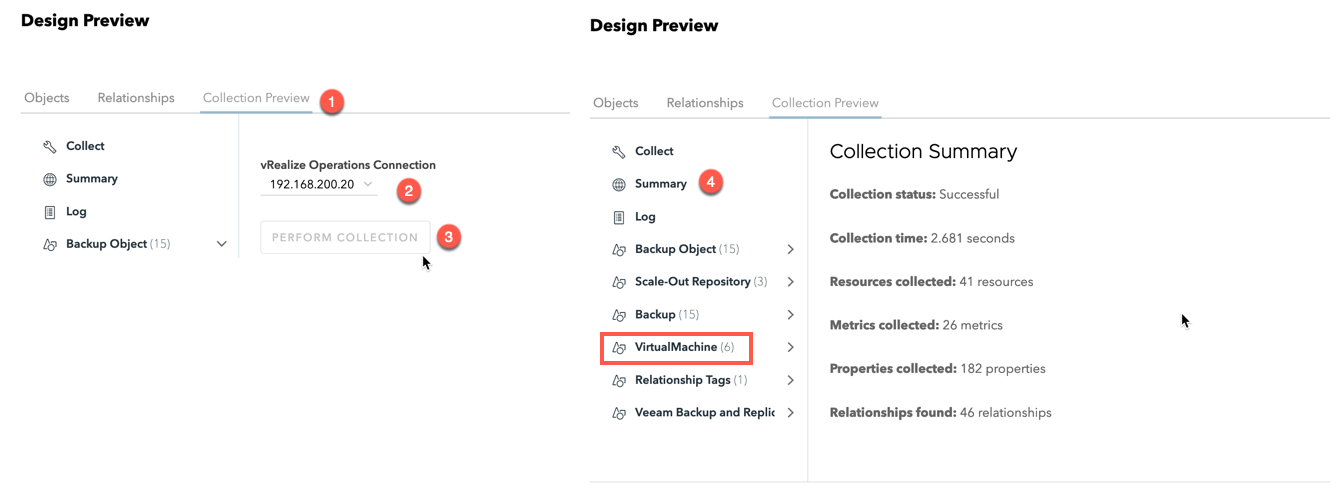
Next, we need to do a collection preview against our vROPS environment.
- Select the “Collection Preview” Tab
- Select your vROPS server
- Select to Perform the collection
You will now see all the objects matched against your Endpoint and what’s in vRealize Operations such as Virtual Machine, and associated data.
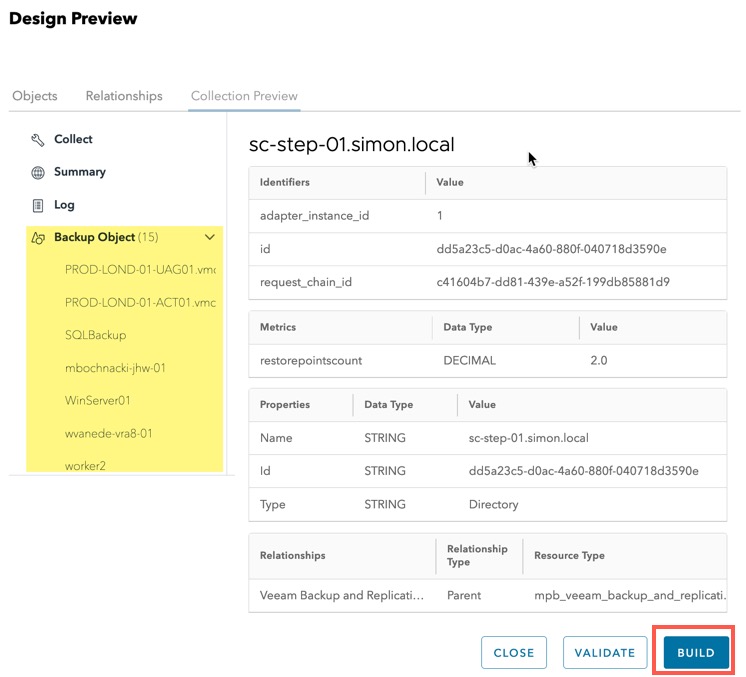
Below I’ve also shown the new “Backup” Object from our Endpoint and the sample data it will push into vROPs.
If everything is correct, we are now ready to build the management pack.
- Click “Build”
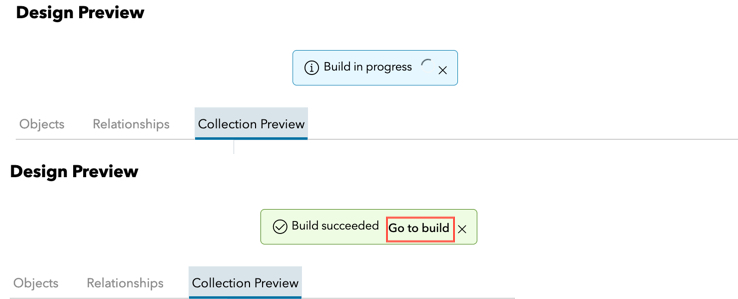
You will see a status dialog box appear.
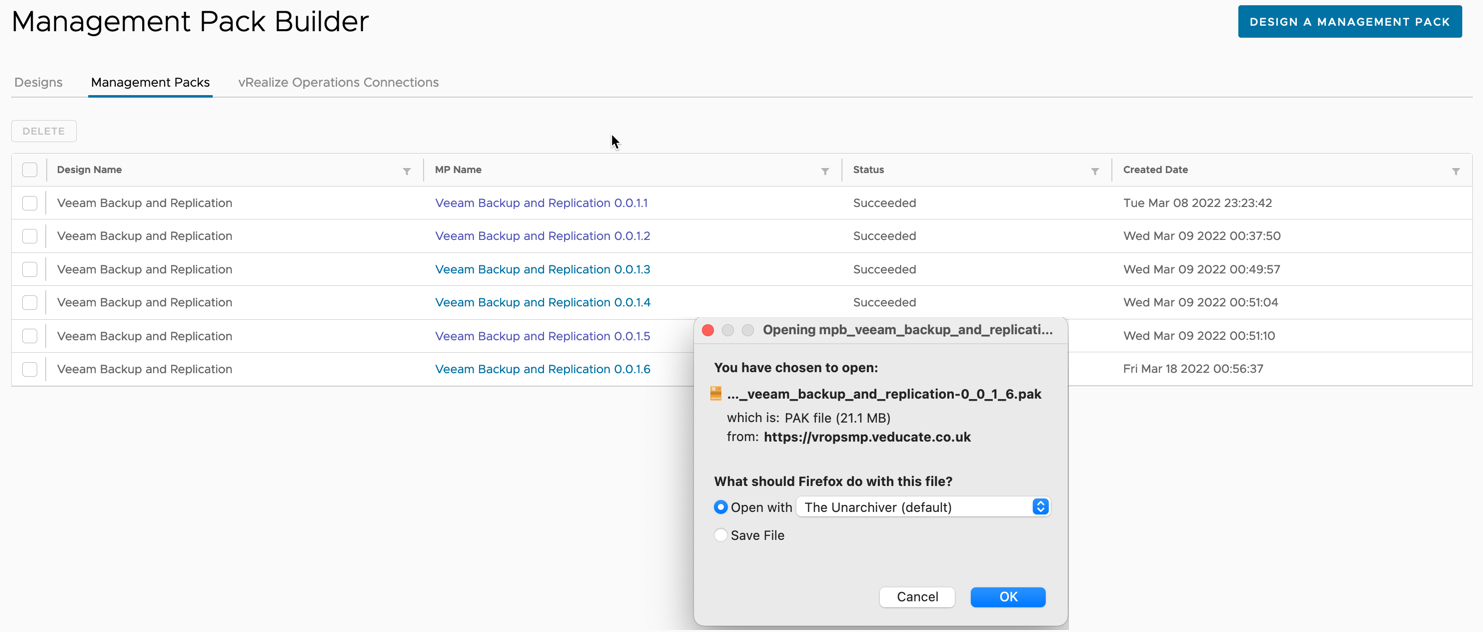
- Once you get the “Build Succeeded” message > Click “Go to Build”
Click the buildand download the .pak file. And move on to the next steps, installing the new Management Pack into vRealize Operations.
Install the Management Pack
Installing the Management Pack is the same as any other.
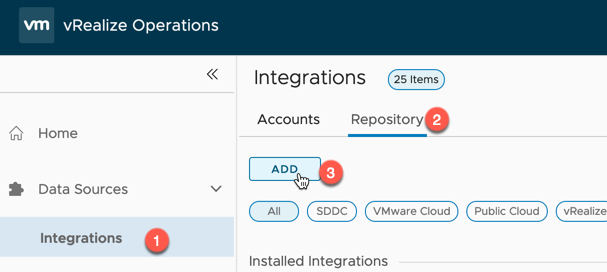
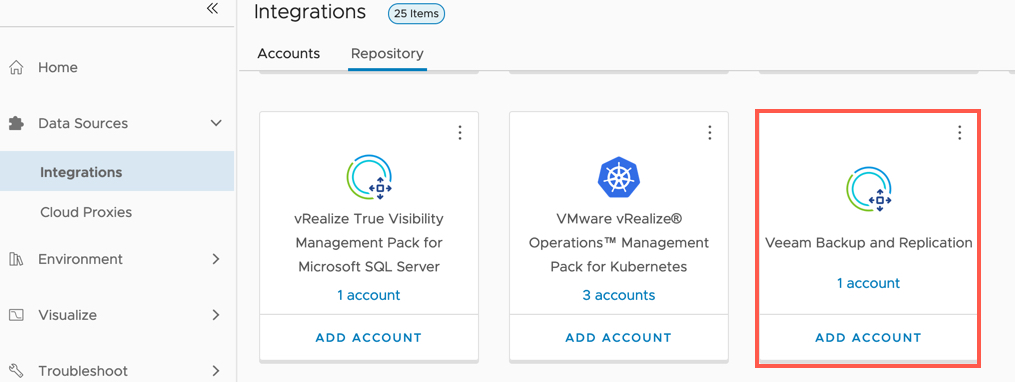
- Go to Data Sources > Integrations
- Repository Tab
- Click Add
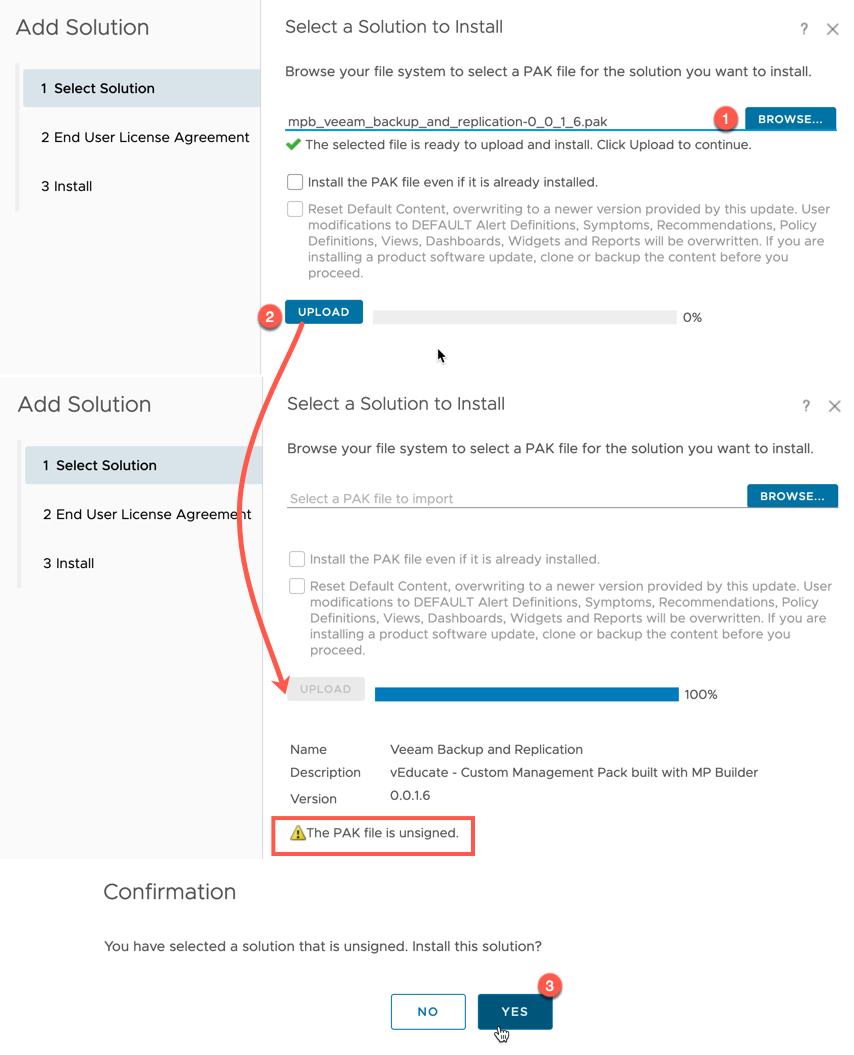
- Select your Management Pack file
- Click upload
You will get a message that this PAK file is unsigned.
- Click to install the PAK file
- Accept the unsigned PAK file confirmation
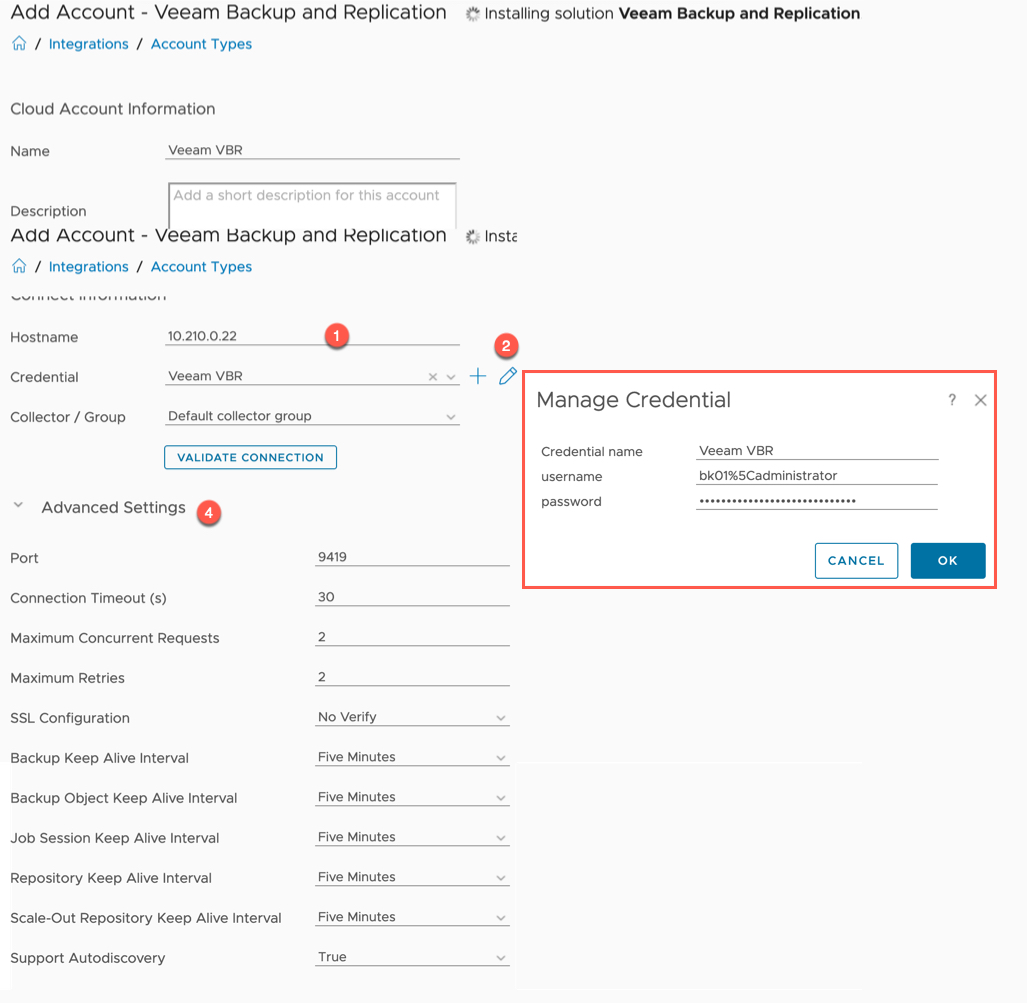
Now the Management Pack will show up alongside all your others, and you can click to add an account.
Fill in the details as you usually would. You can also change those advanced settings for the MP that I pointed out earlier.
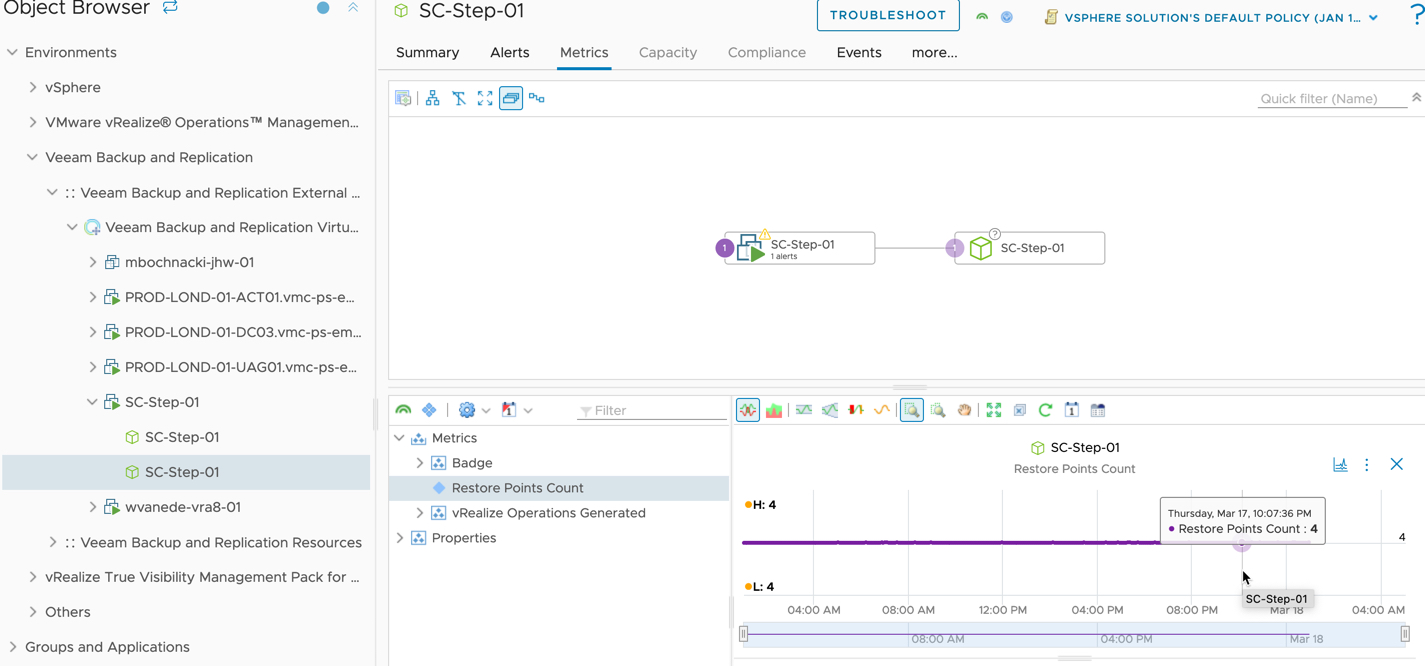
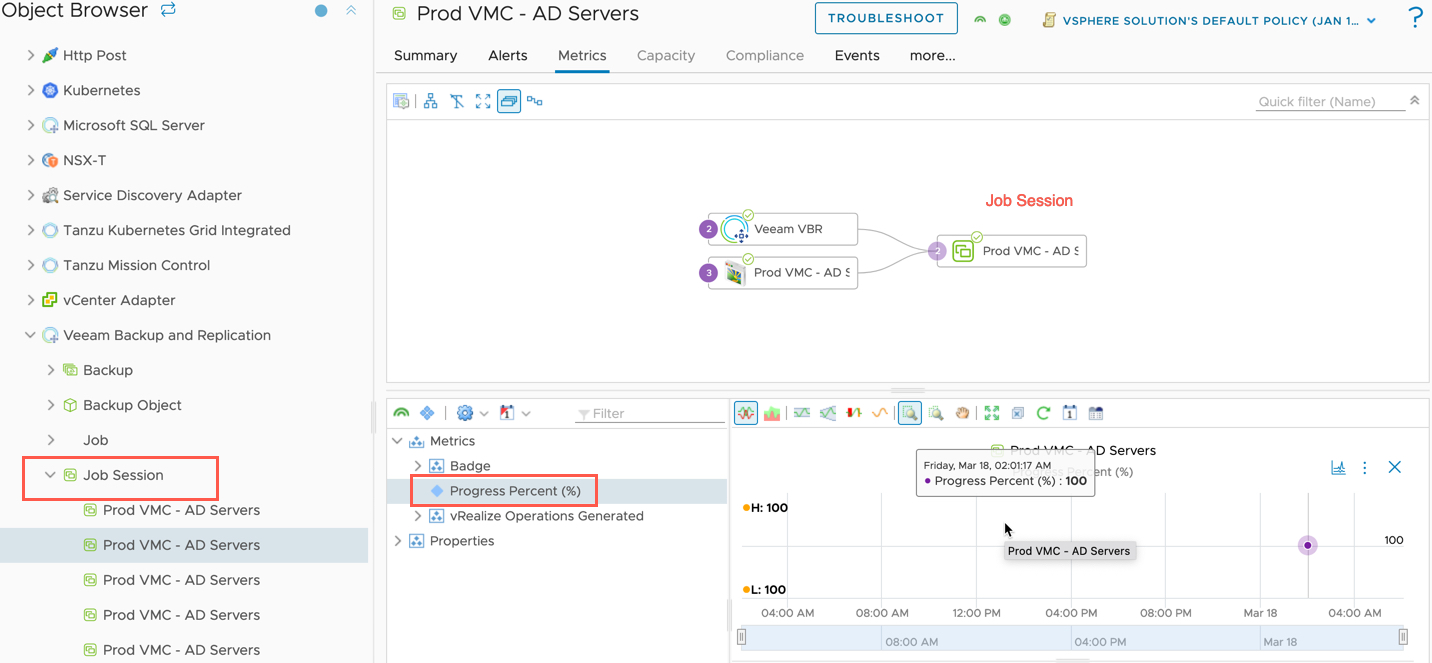
After a while, you’ll see the Objects available in the “Objects Browser” view.
Below you can see a vSphere Virtual Machine Object, with a relationship to a Veeam Backup Object. And how many restore points are available.
- We can just add this metric directly to the VM object in a more advanced configuration
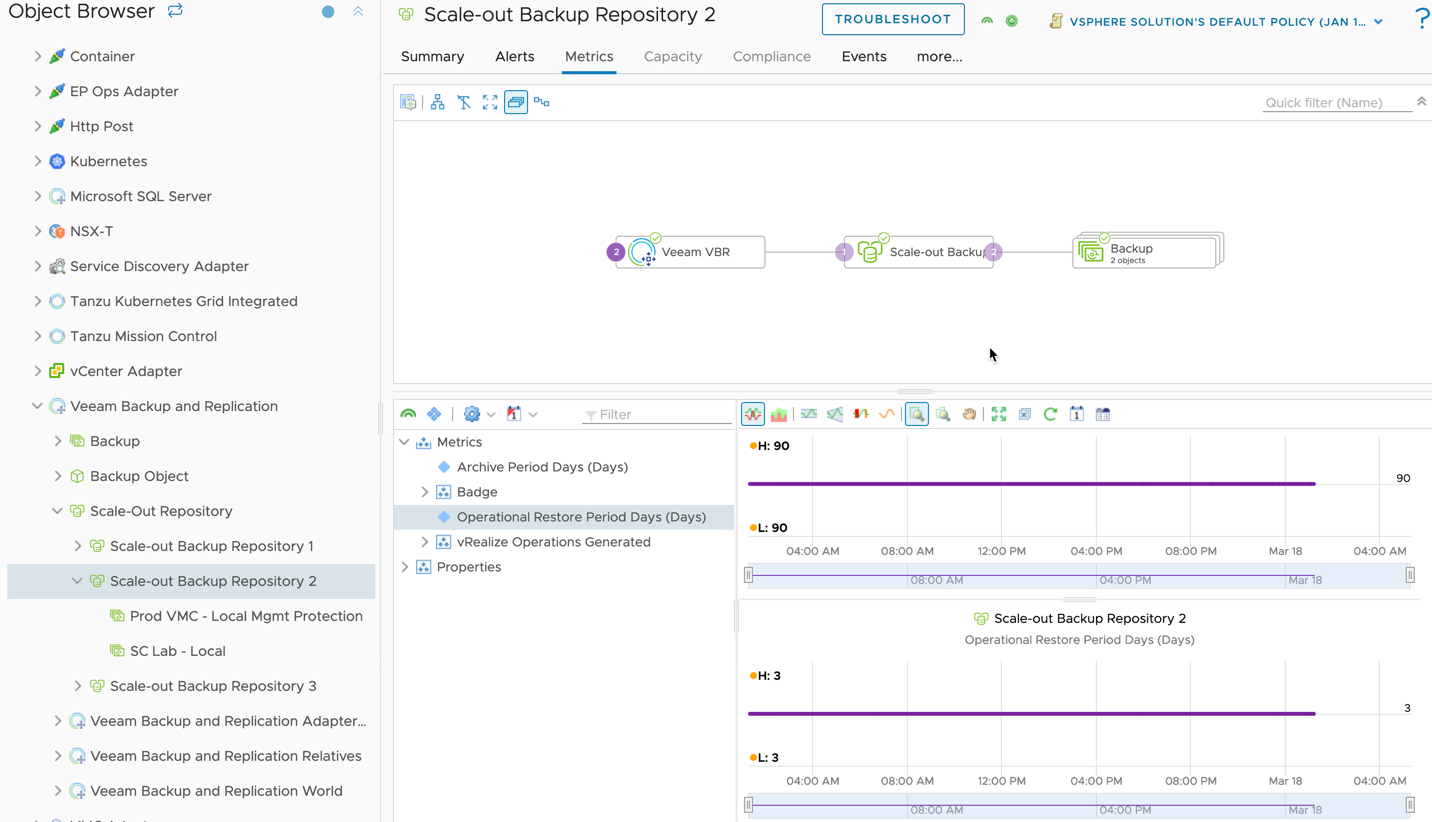
Another example is showing the configured Scale-out Backup Repositories, and associated Veeam Backup Jobs that use them.
Troubleshooting
One of the issues I noticed was the lack of Job objects/data being pulled in. If I was paying more attention, I would have noticed this when I was looking at the validate screen that Job’s object was missing.
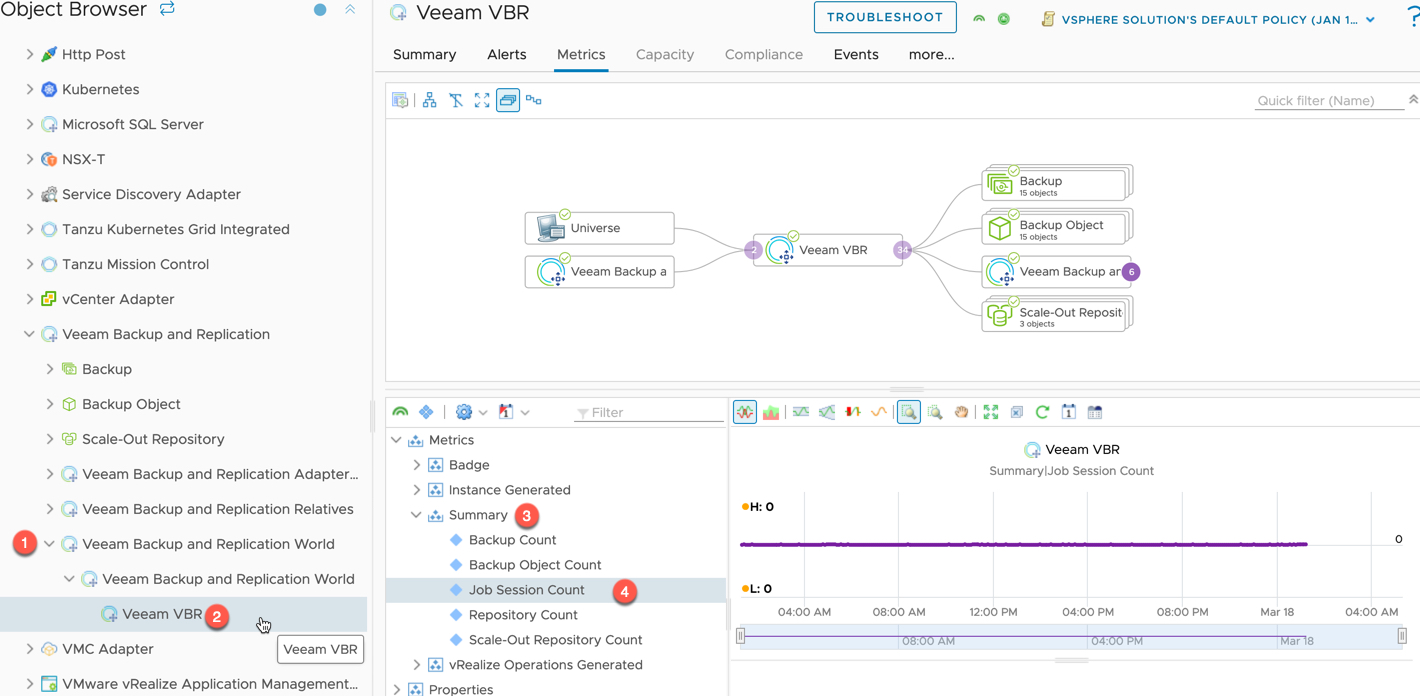
You can browse to the adapter itself and view the metrics for the objects discovered and pulled in. As we can see below, that is zero, meaning something somewhere is broken. So I need to go back to the API calls and see what isn’t linking properly when I try to create a relationship.
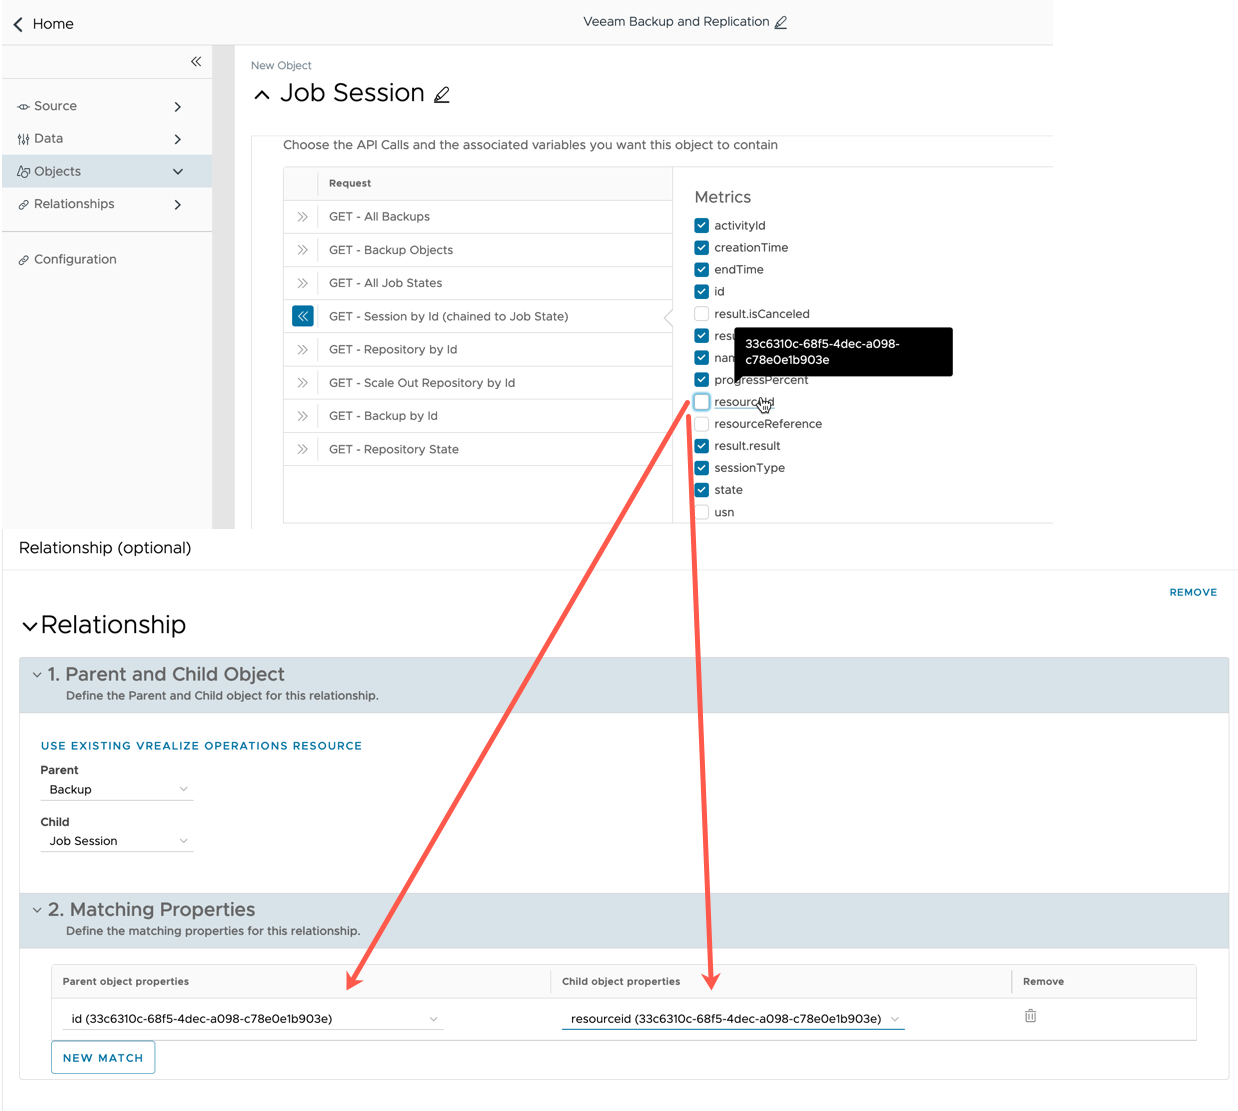
Going back into the Management Pack Builder, I realised that the way I was linking Job Sessions to the Backup Object was wrong, and I needed to fix that.
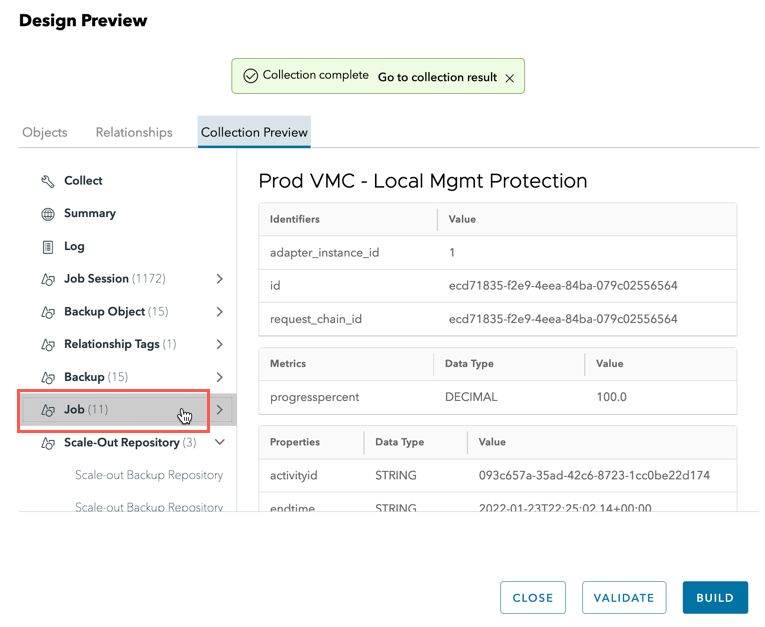
Now when I validate, I can see the Job object appear in the collection preview!
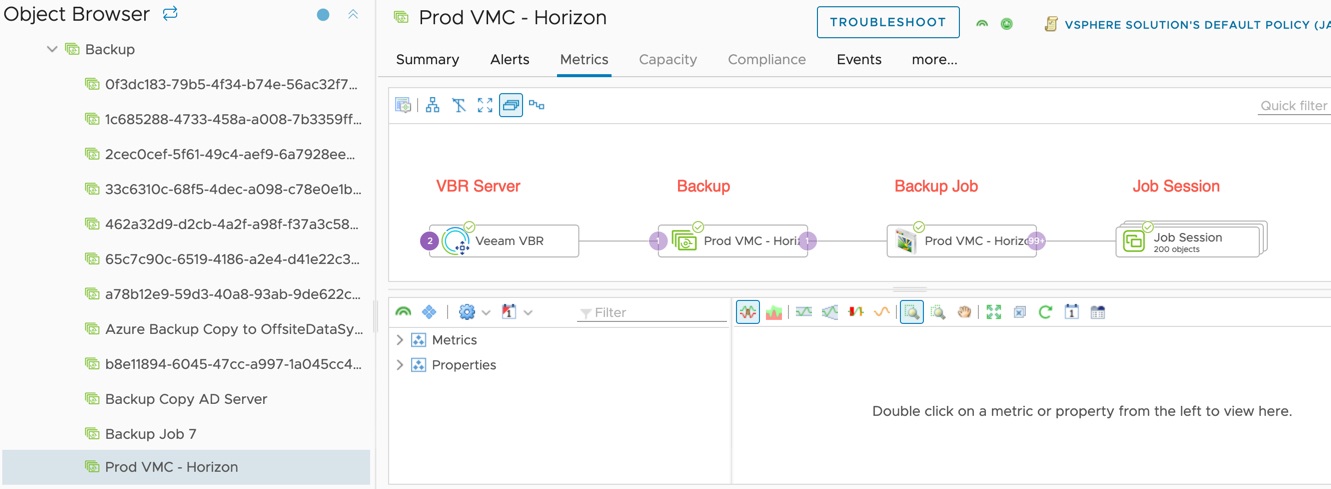
Finally, I can now see a full relationship view and the Job and Session Data in vROPs!
Summary
I was quite impressed with using this for a first beta release. My main issues were more around the data from my API endpoint (I wrote about this to Veeam). Hopefully in the future thanks to customer feedback from the beta, we’ll see this product fully released!
But ultimately this took no time at all to spin up, build and deploy. A very smooth experience!
So, get signed up for the Beta, and provide VMware some feedback!!!
Regards









Hi
I have came across this today and wanted to see if I could get it working, but unfortunately I cannot get the Make Get Session Request to work. I just keep getting test-source client unauthorized. Check the supplied credentials. I can successfully connect with using Postman. Any Ideas thanks
Sorry it’s been a long time since I saw this product in action and it’s changed a lot since this blog post. I’d imagine you’ll need to do some sort of packet capture to check headers etc. I’m sure VMware/BC support will be happy to jump in.