Tag Archives: vrops

vROPs Header

Collect VM Notes in (Aria) vRealize Operations: A Step-by-Step Guide

One of the most common questions I’ve come across in previous years is how do I get the VM notes held in vCenter into vRealize (Aria) Operations?

Great news, in vRealize Operations 8.10 and later, you can now collect those properties for the virtual machines simply by enabling the property to be collected in your Policy.

Enable the Notes property on your Policy
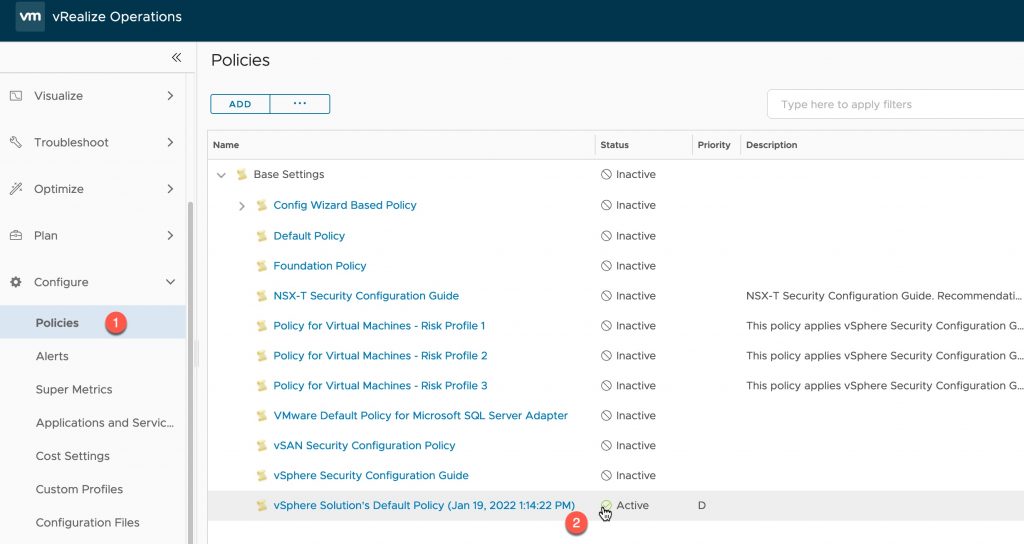
  • Click on Policies under Configure in the left-hand navigation pane
  • Select your active policy that you want to alter
    • You may need to change multiple policies due to inheritance settings

vROPs - VM Notes - Edit Policy

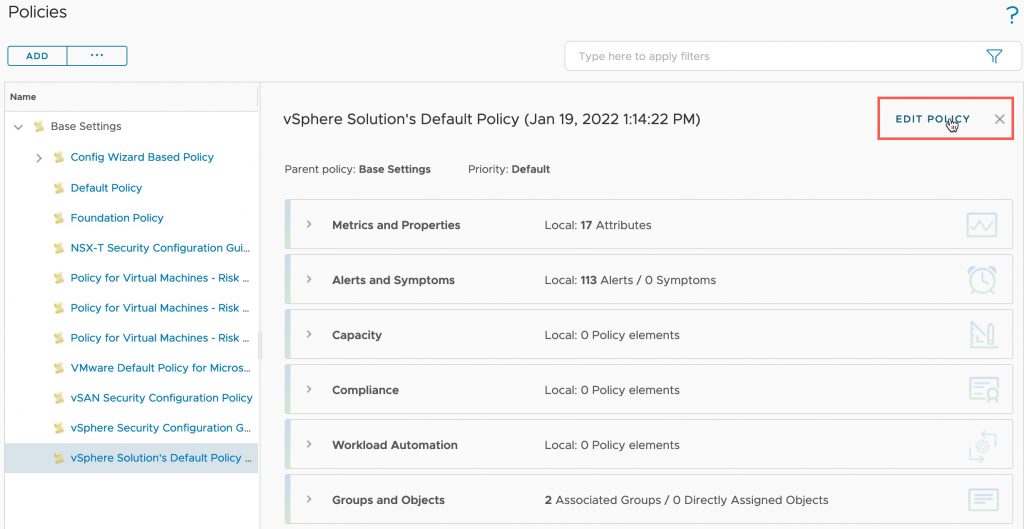
  • Select the Edit Policy in the far right-hand side

vROPs - VM Notes - Edit Policy 2

  • Set the object type as “Virtual Machine”
  • Search “note” to curate the list to show just the property we are interested in
  • Expand Properties > System
  • Highlight Notes and click on “Deactivated” and change to “Activated”
  • Click Save

vROPs - VM Notes - Edit Policy - Metrics and Properties - Virtual Machine - Enable System Notes

vROPs - VM Notes - Edit Policy - Metrics and Properties - Virtual Machine - System Notes - Activated

Viewing the VM notes and adding them to a view and reports

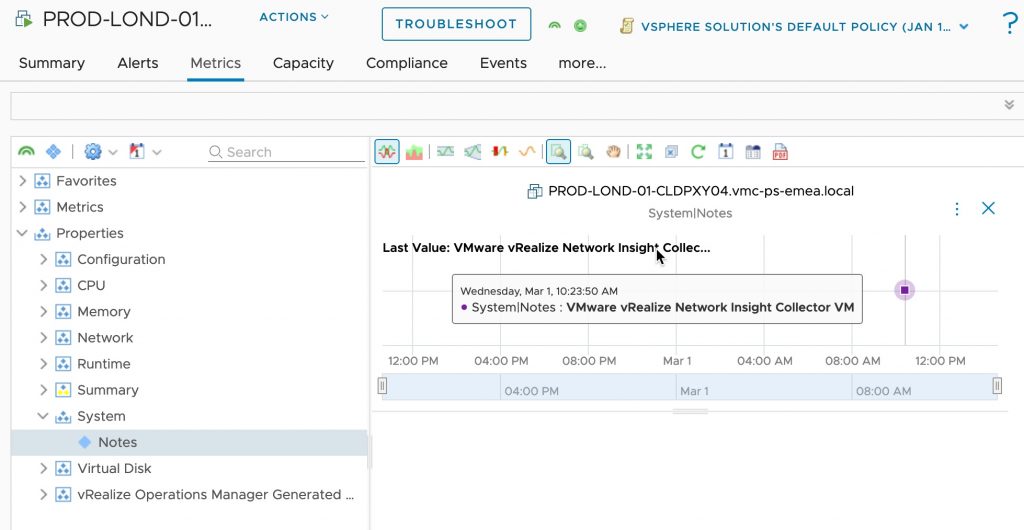
Now it’s a case of wait for the collection cycle of your vSphere environment, below you can see an example of a virtual machine which is configured with a note. Any note changes will also be captured.

vROPs - VM Notes - Virtual Machine Property - System - Notes

Now let’s look at adding this property to an existing report as well.

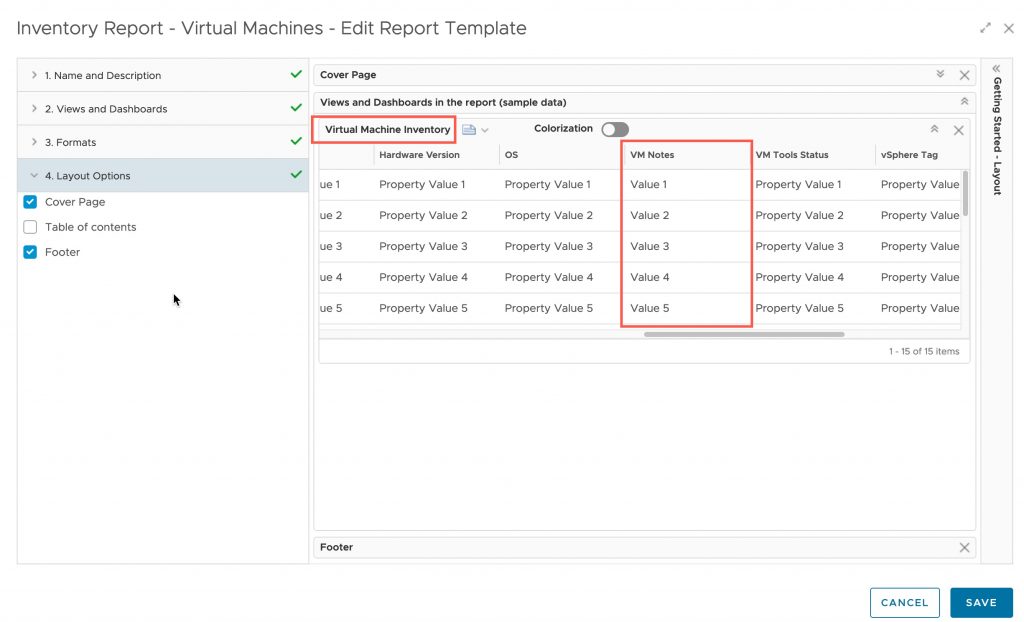
In the below, I’m going to edit the view “Virtual Machine Inventory” which is used to power the out-of-the-box report “Inventory Report – Virtual Machines”

  • Under Visualize on the left-hand navigation, click on Views
  • Click Manage Views, find your view and click to edit
  • Go to Step 2 – Data
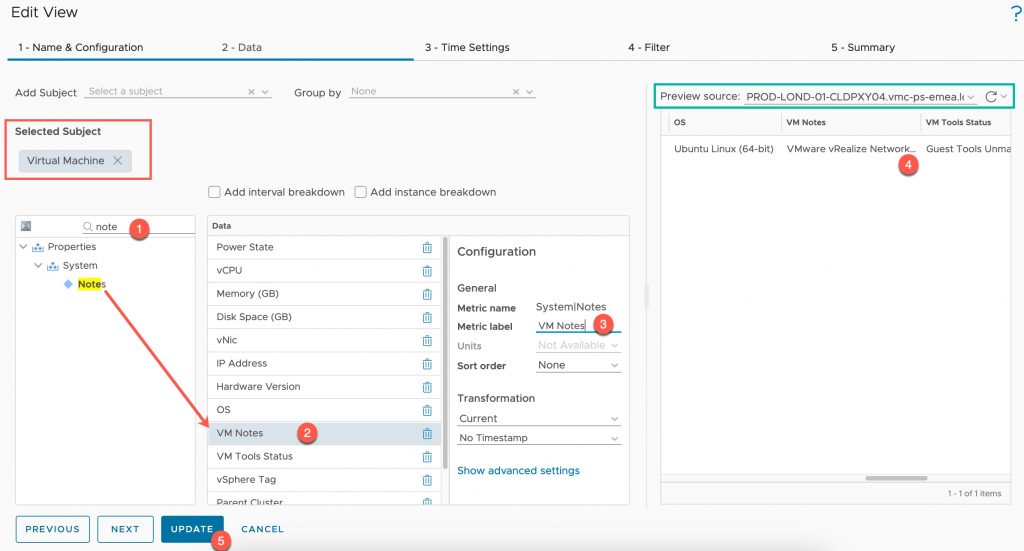
  • The Selected Subject will already be Virtual Machine (red box)
  • Search for Note (1)
  • Drag the note property to the data column (2)
  • Set a vanity name for the property (3)
  • Set a preview source (green box)
    • Ensure that the VM note displays as expected (4)
  • Click Update

vROPs - VM Notes - Edit View

Now let’s check this updated view is reflected in our report:

  • Under Visualize on the left-hand navigation, click on Reports
  • Click to edit your chosen report
  • Expand the Views and Dashboards section in the report
  • In the red boxes you can see the matching name of the view I edited in the above screenshots, and the VM Notes Column is present

vROPs - VM Notes - Edit Report

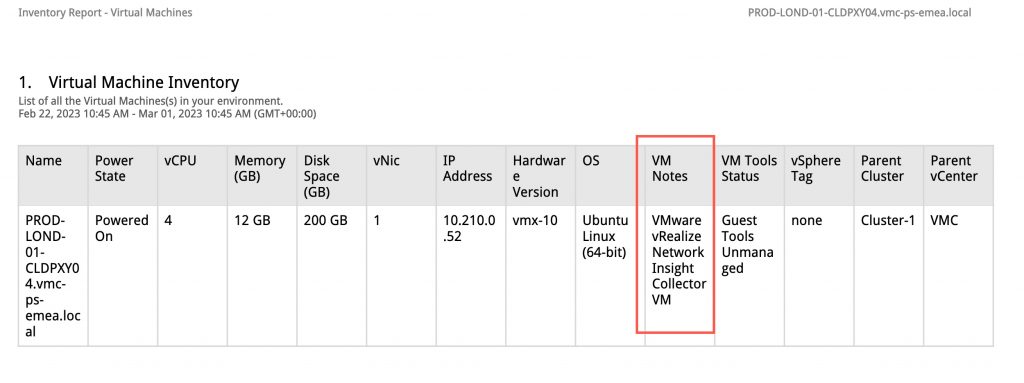
Finally, when I run this report, I can see the additional VM note data added to the report.

vROPs - VM Notes - Run Report

Hopefully this new simple but much asked for feature will help in the ongoing management of your environments.

Regards

Dean Lewis

vRealize Operations Header

How to Add vSphere Tags to vRealize Operations Alert Emails using a Custom Payload

Wondering how to add the vSphere Tag for a virtual machine to emails sent out for alerts? I recently came across this Reddit post, so decided to try out the Custom Payload feature from vRealize (Aria) Operations and want to share the steps I took to achieve this setting.

Here‘s how to configure a Payload Template and Notification to include the vSphere Tag:

Creating the custom payload template to include the vSphere Tag

To get started, within your vRealize Operations interface (SaaS or on-premises), go to:

  • Configure > Alerts
  • Click on Payload Templates icon
  • Click Add to create a new template

vROPS - Custom Payload - Alerts - Payload Templates

  • Give your custom payload template a name,
  • a description,
  • and set which outbound method it’s tied to. For my example, it will be email.
  • Click Next

Continue reading How to Add vSphere Tags to vRealize Operations Alert Emails using a Custom Payload

vRealize Operations Header

vRealize Operations – Where did my “Object Relationships” view go?

The Issue

From vRealize Operations 8.6.2, it’s been noticed that the “Object Relationships” page has disappeared from the navigation column/settings pages in the product UI.

The Cause

This page is being redesigned by the VMware team, and is hidden from view in current releases.

The Workaround

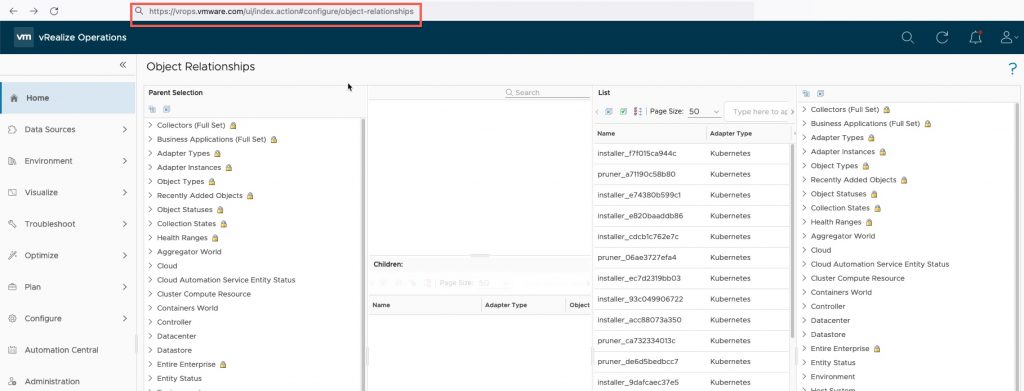
You can manually access the page by going to the following web page suffix:

  • ui/index.action#configure/object-relationships
    • For example
      • https://vrops.vmware.com/ui/index.action#configure/object-relationships

vRealize Operations - Object Relationships


Regards

Dean Lewis

vRealize Operations ElasticStack Header

Sending vRealize Operations Alerts to ElasticStack (ELK)

This blog post is thanks to an internal query, that I thought should be easy enough to complete, however my usage of an ELK environment is limited, so it was a good chance to dig in and learn something new.

In this blog post, I’m going to detail the configurations for pushing vRealize Operations Alert notifications to ElasticStack (aka ElasticSearch, ELK) using the Notification Webhook feature.

Again, I am not an ELK expert here, so there may (read this as probably) better ways to configure this when it comes to the date handling.

Configure an ingestion timestamp in ELK

One of the first issues I hit when testing all of this, is the fact that ELK doesn’t seem to like the date formats that vROPs alerts uses. Once an index (store of data records) is created, the fields are parsed, and the type attributed to a field cannot be changed. I went through various options to remedy this, so that my logs could be searched based on time stamps, but it seemed not easily feasible. If anyone knows of the best way to achieve this, let me know, see the end of this blog post for more details.

For those of you who do know ElasticSearch, vROPs sends the time/date in the notification payload in the following format "EEE LLL dd HH:mm:ss z uuuu"

The best way I found around this, is to add in the ability to create a ingestion timestamp on the data received by Elasticsearch, and add it to the settings of the created index.

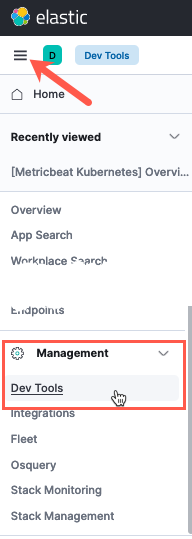
To create this ingestion rule, in your Elastic UI, click on Three Lines to open the navigation options, then click on Dev Tools, under Management.

vROPS ELK - Elastic - Management - Dev Tools

This will give you an in-browser console access to send configurations to the Elastic environment. When reading the documentation, you’ll notice that the configuration for Elastic is provided a lot of the time via API commands and payloads. It seems like this is the preferred way to configure the system, with the UI lacking the ability to make these changes for most options.

Paste the content below the screenshot, which creates a pipeline rule to provide processing on the data that comes into the system.

When the syntax is validated, you will see a small Green Arrow appear to apply the configuration. The right-hand side console window shows the output from running the API call and payload.

vROPS ELK - Elastic - Create pipeline - ingestion timestamp

PUT _ingest/pipeline/set-timestamp
{
  "description": "sets the timestamp",
  "processors": [
    {
      "set": {
        "field": "timestamp",
        "value": "{{{_ingest.timestamp}}}"
      }
    }
  ]
}
Create the outbound webhook in vRealize Operations

Continue reading Sending vRealize Operations Alerts to ElasticStack (ELK)

CloudHealth vRealize Operations Header

CloudHealth – Configuring vRealize Operations cost visibility for your private datacenters

In this blog post, we are going to synchronise our vRealize Operations costing information with CloudHealth, to provide the ability to have true multi-cloud cost reporting, that includes our on-premises VMware Datacenter.

Configuring the CloudHeath Integration
Pre-Requisites

Your vRealize Operations instance will need to have the basic cost settings configured, I have written a deep dive post on this here.

  • vROPs no longer has to be set to USD for this integration
    • If you are integrating multiple vROPs instances, and they all have the same currency, this is also supported for non-USD
    • If you are integrating multiple vROPs instances, and they have differing currencies settings, CH will default the platform to the instance that was first configured for integration.
  • vROPs must be version 8.2 of higher
  • vROPS FIPs mode is not supported

Ensure that the vROPs instance (or collector) can reach CloudHealth Graphql endpoint:

You can find the official documentation here and the vROPS Integration FAQ here.

In the CloudHealth interface, when you go to the vRealize Operations Accounts page under setup, you’ll see that this page points you to the documentation and the VMware Marketplace. As this configuration is initiated by the vRealize Operations Management Pack.

  • Data Center Tab > Setup > Accounts > vRealize Operations

vRealize Operations - CloudHealth Integration - CloudHealth vRealize Operations Account Page

Download the Management Pack

Start by downloading the management pack from the VMware Marketplace.

vRealize Operations - CloudHealth Integration - Download Management Pack

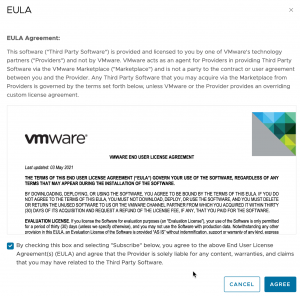
  • Accept the EULA

vRealize Operations - CloudHealth Integration - Download Management Pack - Accept EULA

Your download will start.

Generating a CloudHealth API Key

We need to generate an API key from our CloudHealth account, that will be used by vROPs to send data to CloudHealth. These APIs are generated against your account.

  • Log into your CloudHealth Account.
  • Click your username in the top right-hand corner
  • Click your username on the navigation pane that appears
  • At the bottom of your profile information, copy the API Access Key for later use
    • by default an API key will not be present, they can generate one (or a new key) by clicking Generate New API Key

Continue reading CloudHealth – Configuring vRealize Operations cost visibility for your private datacenters