vRealize Automation - VMware Tanzu Header

Deploying vSphere with Tanzu Clusters using vRA and Cluster Plans

In this blog post I am covering the vRealize Automation native feature that allows you to deploy Tanzu clusters via the Tanzu Kubernetes Grid Service of vCenter.

If you have been following my posts in 2021, I wrote a blog and presented as part of VMworld on how to deploy Tanzu Clusters using vRA Code Stream, due to the lack of native integration.

Now you have either option!

Pre-requisites
  • A working vSphere with Tanzu setup
  • Create a Supervisor Namespace that we can deploy clusters into
    • vRA requires an existing Supervisor namespace to deploy clusters into, despite the separate capability that vRA can create Supervisor namespaces via a Cloud Template
    • This namespace needs a VM Class and Storage Policy to be attached.
Configuring the vRealize Automation Infrastructure settings
  • Create a Cloud Account for your vCenter
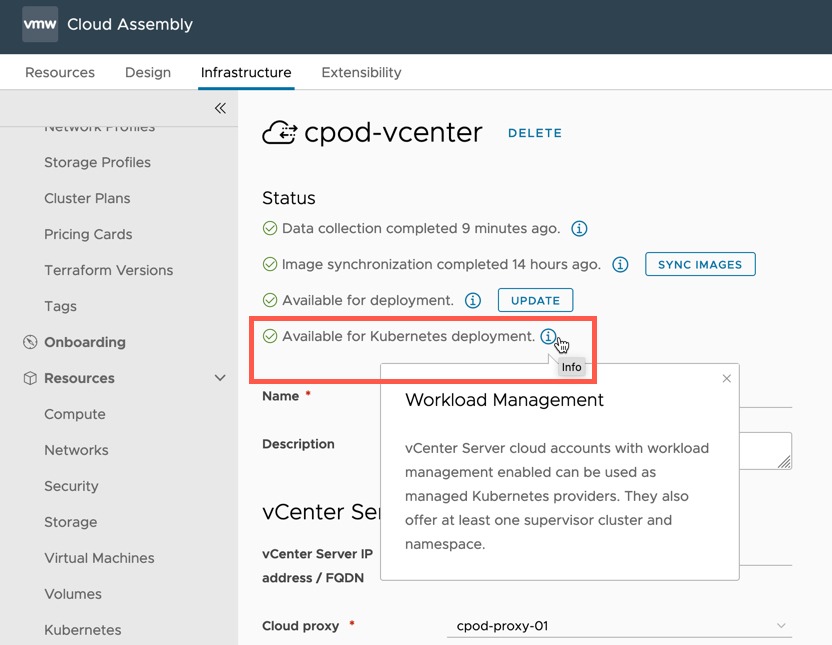
    • Ensure that once the data collection has run, the account shows “Available for Kubernetes deployment”

vRA - Cloud Account - vCenter - Available for Kubernetes deployment

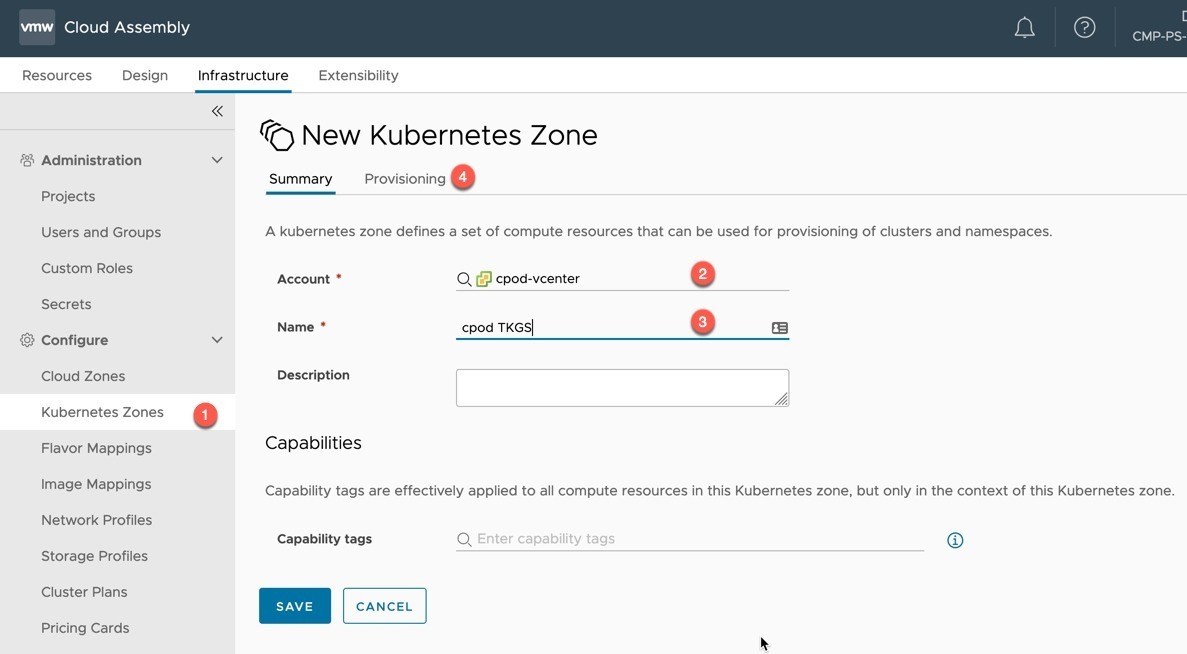
  • Create a new Kubernetes Zone
    • Select your Cloud Account linked vCenter
    • Provide a name
  • Select the Provisioning tab

vRA - New Kubernetes Zone

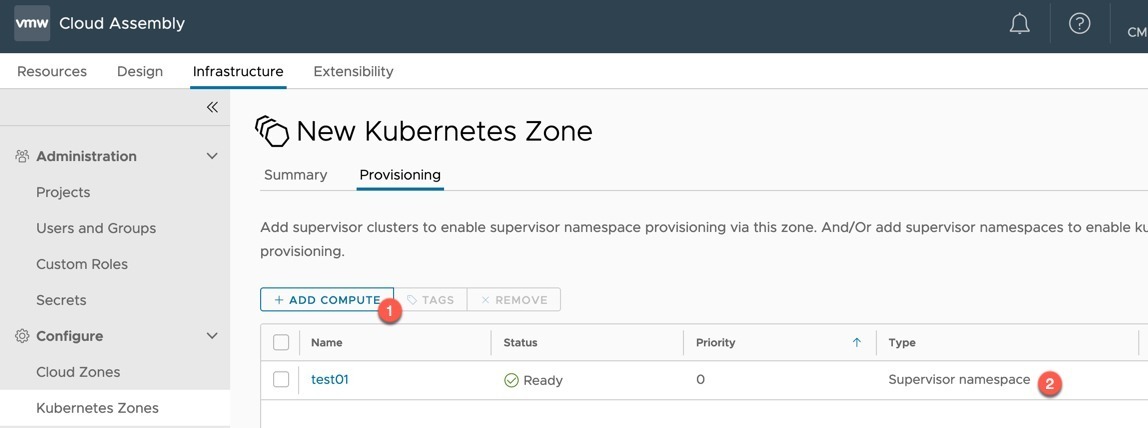
  • Click to add compute to the zone.
    • For the Tanzu Cluster deployment, this needs to be into existing Supervisor namespaces (as in the pre-reqs).
    • Add your existing Supervisor namespaces you are interested in using

You can add the Supervisor cluster itself, but it won’t be used in this feature walk-through. If you have multiple Supervisor namespaces, I recommend tagging them in this view. So that you can use it as a constraint tag in the Cloud Template.

vRA - New Kubernetes Zone - Provisioning

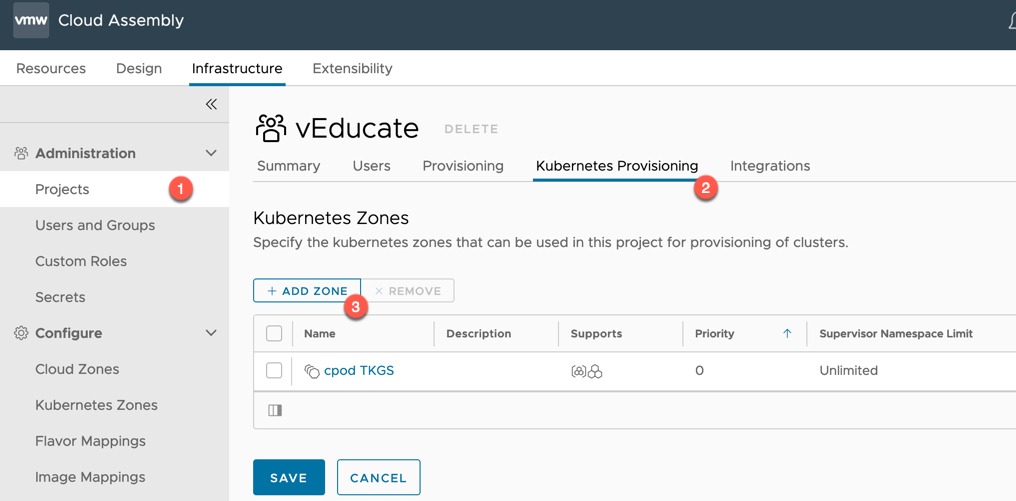
  • Click Projects, select your chosen project
  • Select the Kubernetes Provisioning tab
  • Add your Kubernetes Zone

vRA - Projects - Kubernetes Provisioning

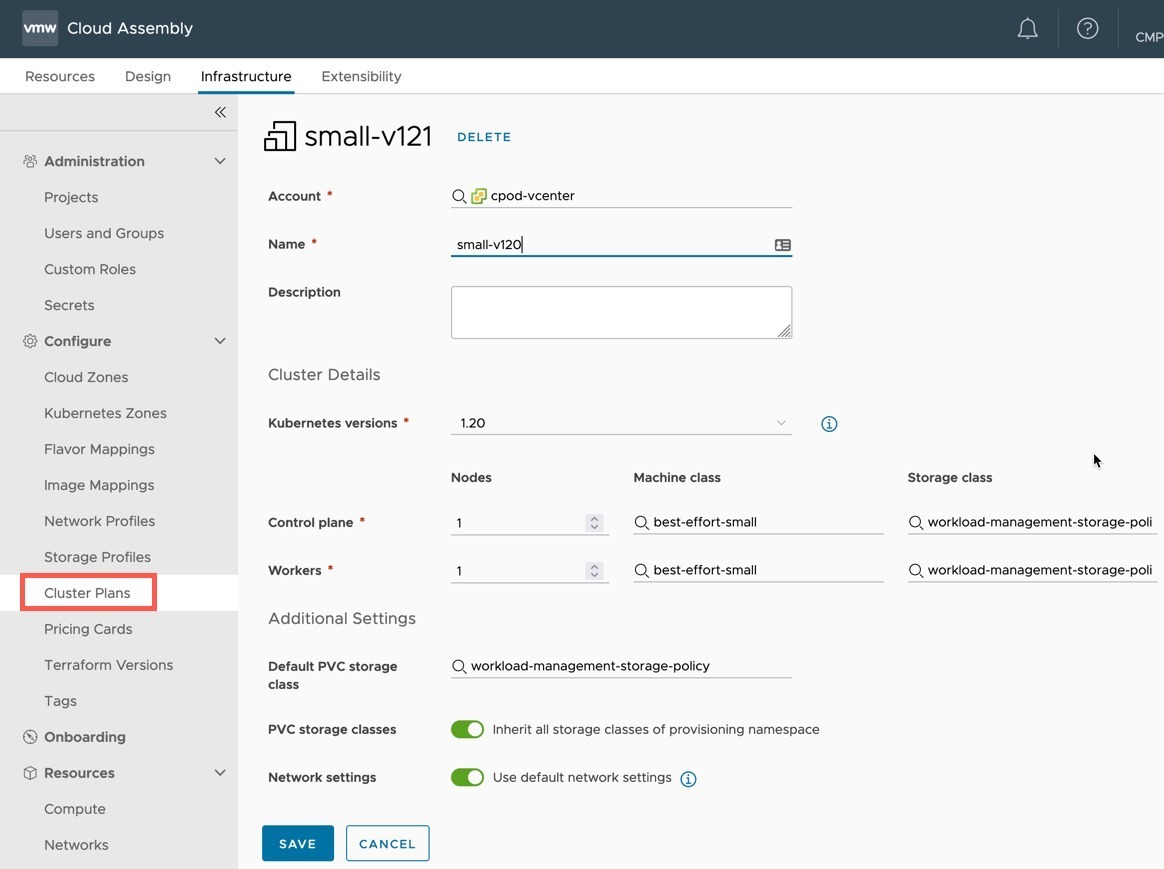
  • Click Cluster Plans under Configure heading
  • Create a new Cluster Plan with your specification
    • Select the vCenter Account it will apply to
    • Provide a name (a-z,A-Z,0-9,-)
      • The UI will allow you to input characters that are not supported on the Cloud Template for name property
    • Select your Kubernetes version to deploy
    • Number of Nodes for Control and Worker nodes
    • The Machine Class (VM Class on the Supervisor Namespace) for each Node Type
      • You will be able to select from the VM classes added at the Supervisor namespace in vCenter
    • Select the Storage Class for each Node Type
    • Select the default PVC storage class in the cluster
    • Enable/disable including all Supervisor Namespace storage classes
    • Choose either default networking deployment for clusters or provide your own specification.

vRA - Cluster Plans

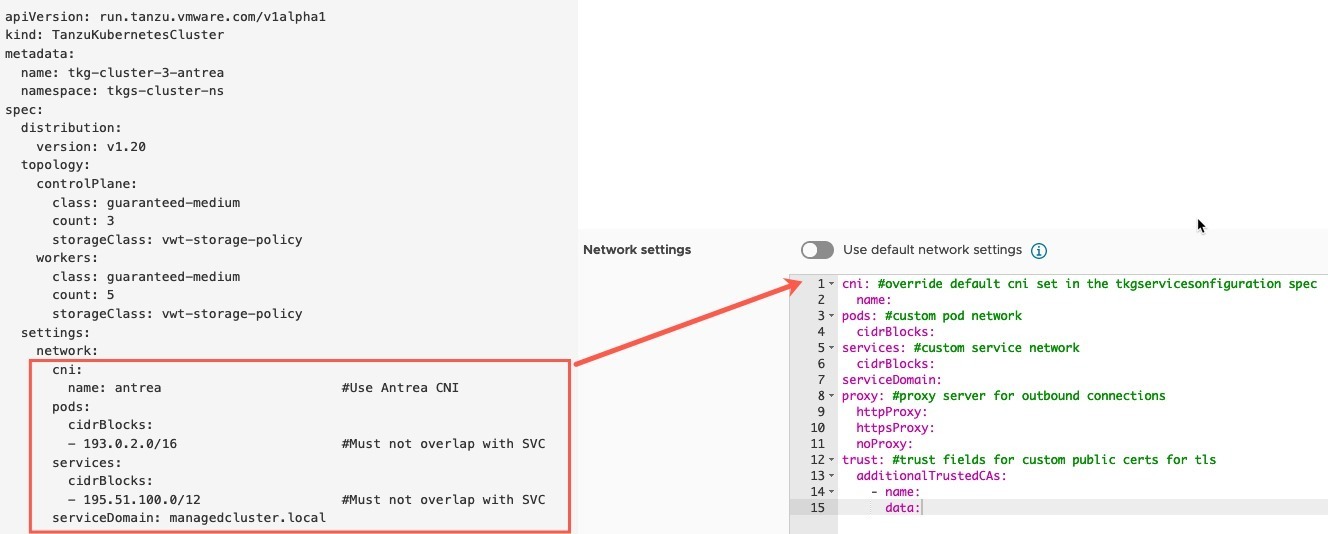
Regarding the network settings, below in the image I have highlighted how the Tanzu Kubernetes Grid Service v1alpha1 API YAML format for a cluster creation request maps across to the settings expected by vRA.

You can find further examples here.

vRA - Cluster Plans - Network Settings

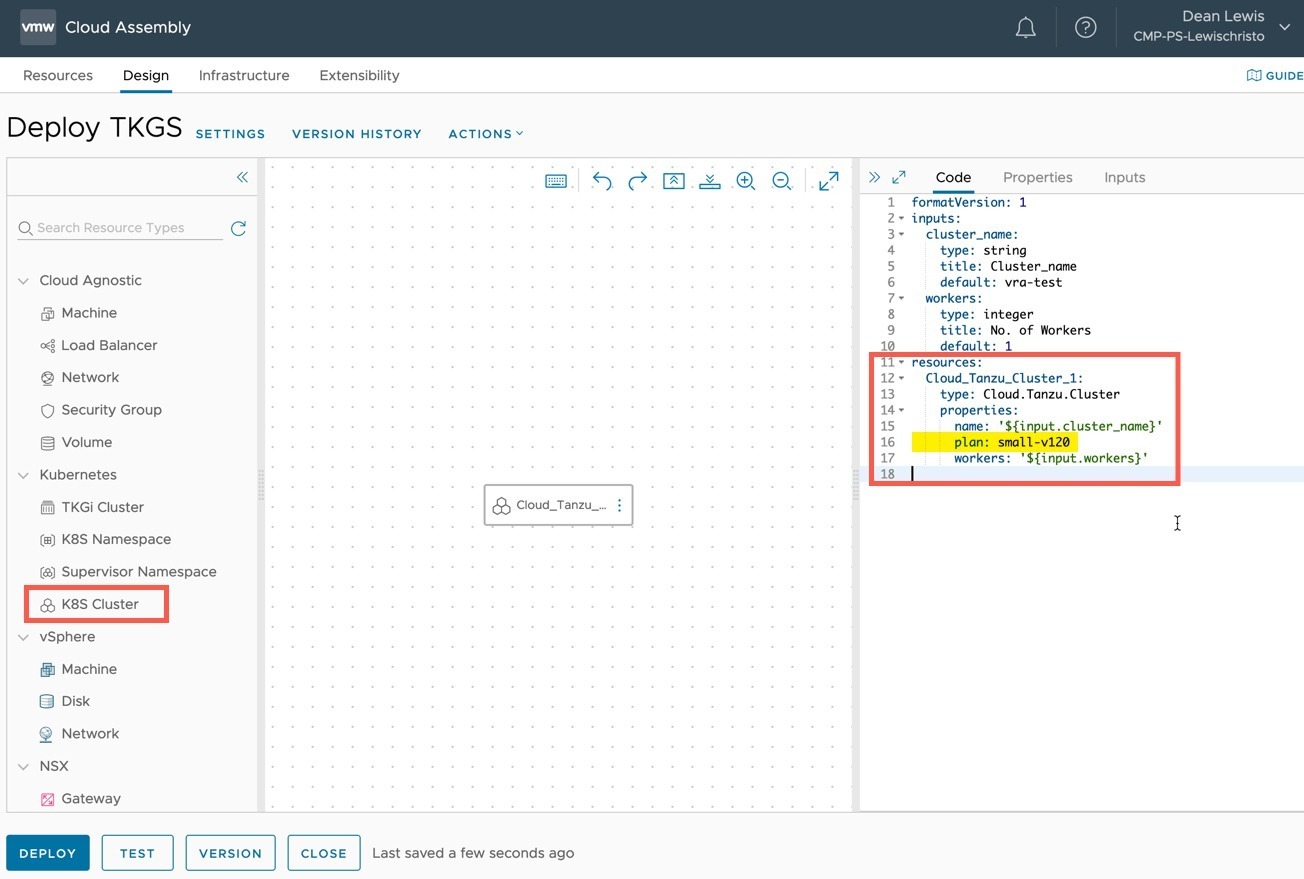
  • Create a Cloud Template
  • Place the “K8s Cluster” resource object on your canvas
  • Configure the properties as needed
    • The workers property will override the workers number in the Cluster Plan

Below is the example I used.

formatVersion: 1
inputs:
  cluster_name:
    type: string
    title: Cluster_name
    default: vra-test
  workers:
    type: integer
    title: No. of Workers
    default: 1
resources:
  Cloud_Tanzu_Cluster_1:
    type: Cloud.Tanzu.Cluster
    properties:
      name: '${input.cluster_name}'
      plan: small-v120
      workers: '${input.workers}'

Once you are happy, deploy the Cloud Template.

vRA - Cloud Template - type cloud.tanzu.cluster

Successful Deployment of a Tanzu Cluster

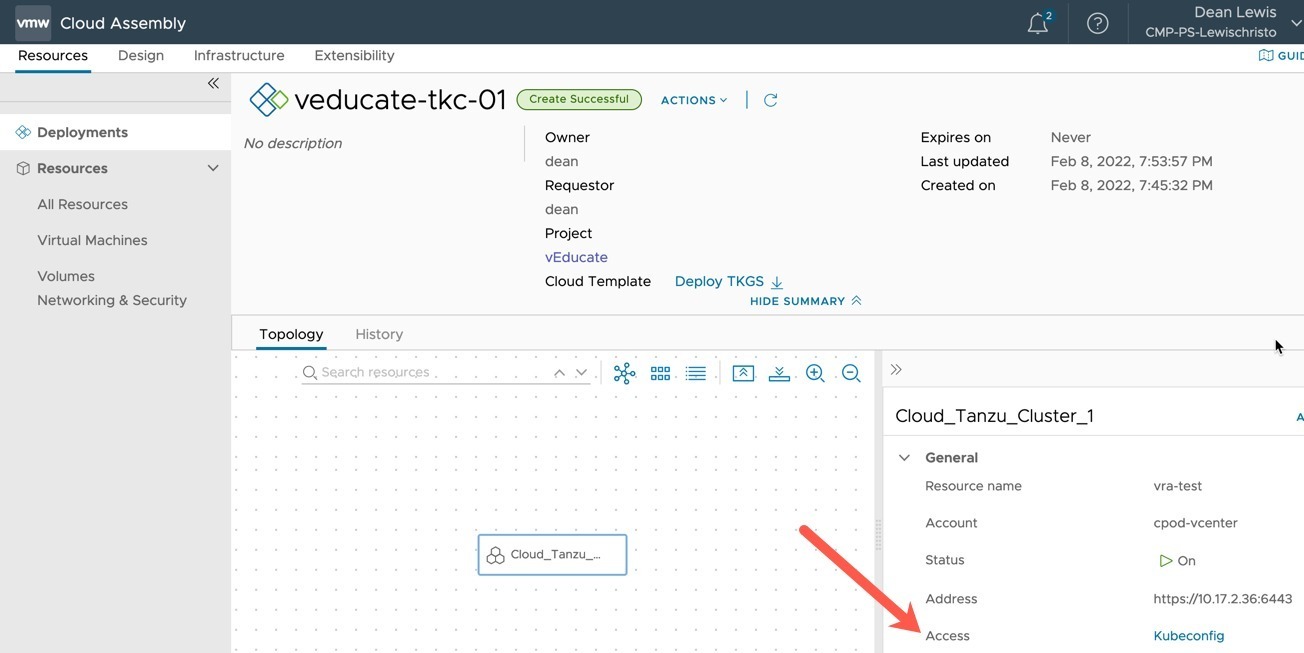
In the below screenshots, you can see the completed deployment.

  • Clicking on the Resource Object, you have the ability to download a Kubeconfig file to access the cluster.

vRA - Deployment completed - Resource Object details

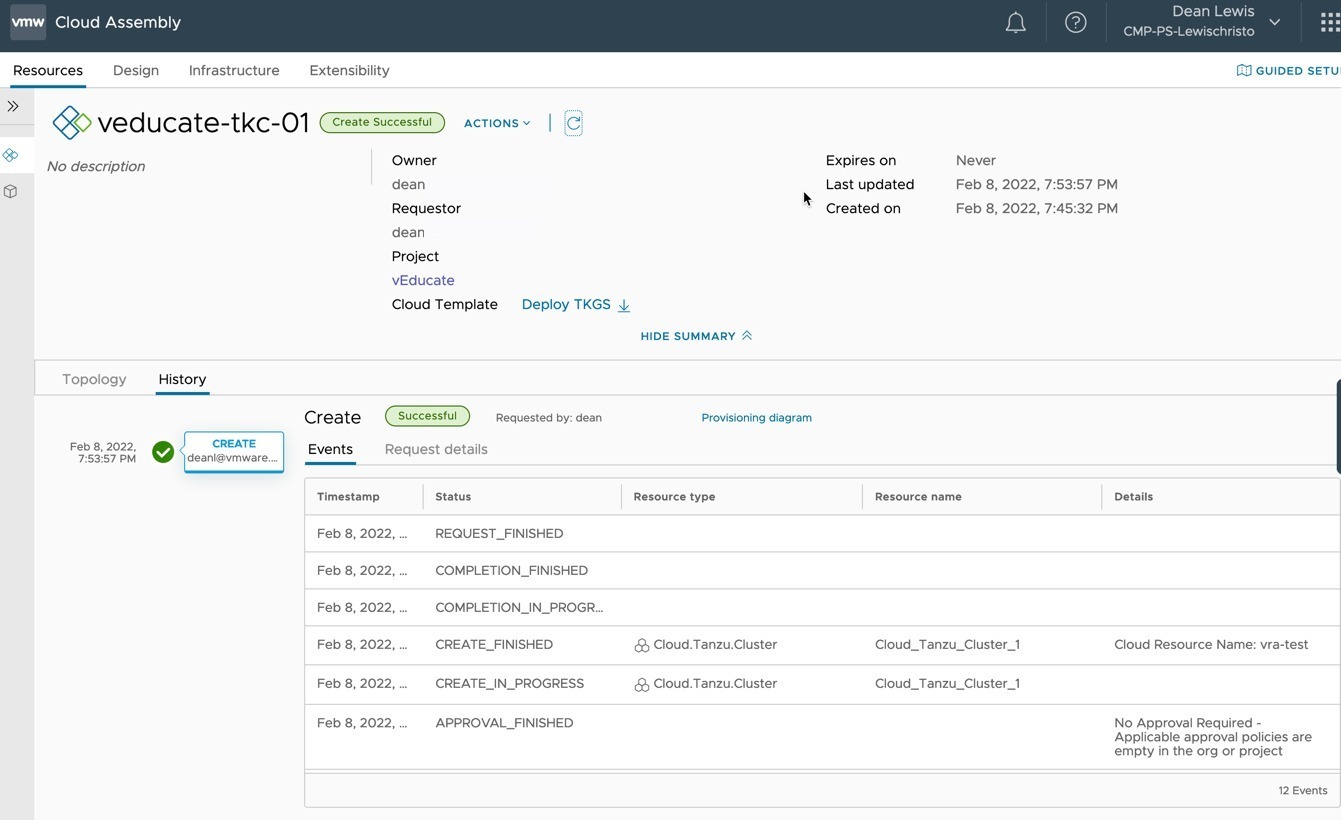
  • Viewing the History Tab will show you details about the creation.

vRA - Deployment completed

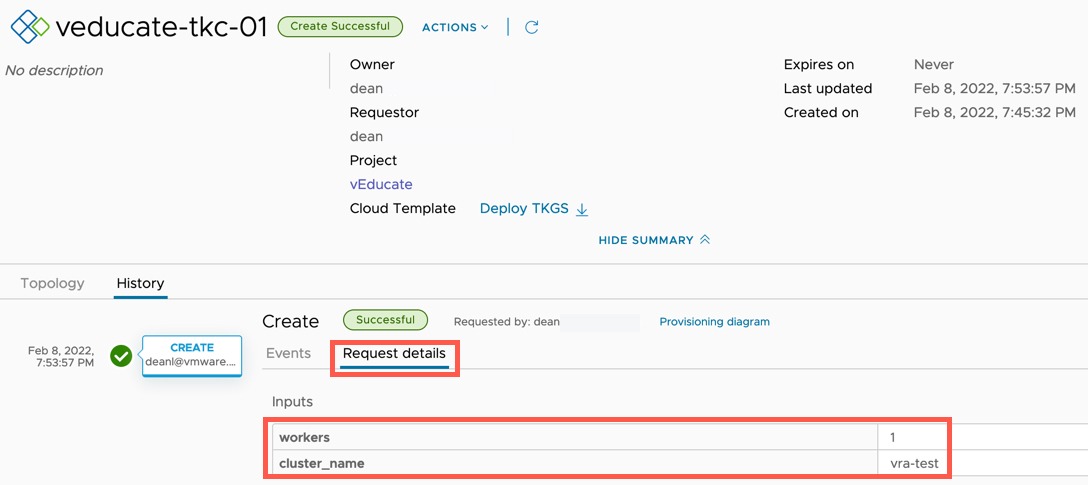
  • Clicking on Request Details Tab will show you the user inputs take at the time of deployment.

vRA - Deployment completed - Request Details

If you look at the “Infrastructure” tab and the configuration under Kubernetes, you will see this cluster is onboarded into vRA. You can further use other cloud templates against this cluster to create Kubernetes namespaces within the cluster, for example.

vRA - Infrastructure - Kubernetes - Cluster

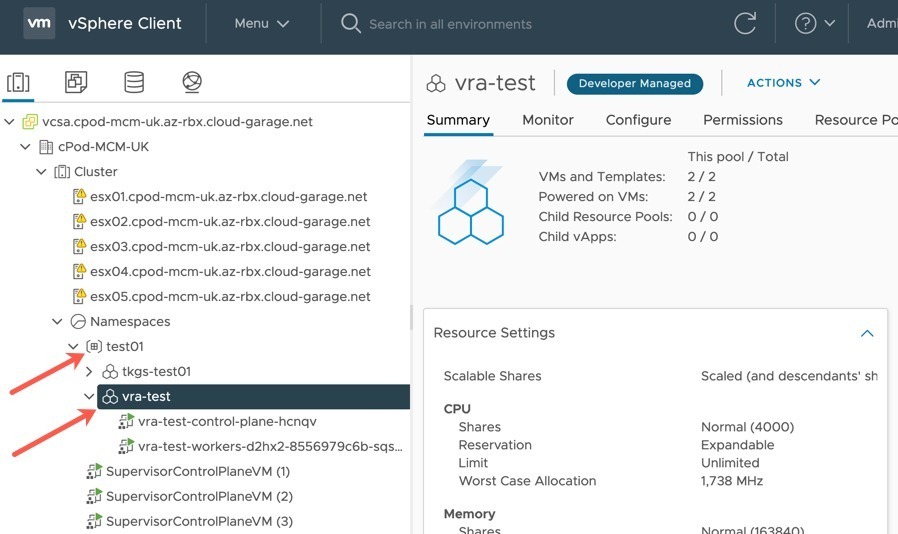
Finally, within my vCenter you can see my deployed cluster, to the Supervisor Namespace I specified in the Kubernetes Zone.

vRA - Deployed Tanzu cluster in vCenter Supervisor Namespace

Regards

Dean Lewis

git header

Exploring the Git command line – A getting started guide

What is Git?

Git is distributed version control software.

Version Control is the ability to save and track changes over time, without interfering with previous versions. As the software is distributed, it means all users can have a copy of an entire repository, containing all commits, branches, and files.

There are a few things you should know before we dive in:

  • Branches are lightweight and cheap, so it’s OK to have many of them
  • Git stores changes in SHA hashes, which work by compressing text files. That makes Git a very good version control system (VCS) for software programming, but not so good for binary files like images or videos.
  • Git repositories can be connected, so you can work on one locally on your own machine and connect it to a shared repository. This way, you can push and pull changes to a repository and easily collaborate with others.
Why Use Git?

Version Control is important in development, whether for software, or simply for developing your automation scripts. Without it, you can risk losing your work. By using Git, you can make a “commit”, which is a snapshot of your point in time work. This provides you the capability to rollback to previous commits if needed.

Install the command line tool
# Executable Installers (all OSes)
https://git-scm.com/downloads 

# Command Line Installer 
# Mac OS X
brew install git
# Linux
sudo apt-get install git-all

# Validate installation
git version
Authenticating to GitHub and creating a repository

To make life easier, I am going to use GitHub as my main source control platform.

I am going to start off creating a repository on the GitHub website. This is simple to complete, so I will not document the steps, but you can view this page for more information.

I would also recommend at this point setting up the authentication with GitHub as well to your local CLI.

Cloning a Repository locally

Once our repository is created, we start off by cloning the repository locally.

git clone {url}

#Example
git clone https://github.com/saintdle/veducate-git-example.git

git clone

Create and commit our first file

Continue reading Exploring the Git command line – A getting started guide

Tanzu Blog Logo Header

Tanzu Service Mesh – First look at deploy, configure and managing an app between clusters

I’ve finally found the time to dive into Tanzu Service Mesh (TSM), a product which has intrigued me greatly. In this blog post I cover setting up TSM, and configuring application connectivity between two clusters running in different public clouds.

What is a Service Mesh?

In software architecture, a service mesh is a dedicated infrastructure layer for facilitating service-to-service communications between services or micro-services, using a proxy. This then provides additional capability such as transit layer between platforms, observability, traffic management and more.

A service mesh provides the capability to secure and simplify your application communications between platforms/clusters/clouds without the need for introduction of lots of other software such as API Gateways.

A service mesh introduces a proxy component which sits side by side with any deployed service. And any inbound and outbound communication flows through the proxy to/from the service. This allows the proxy to provide all the functions needed to offer the capabilities discussed above and in the rest of this blog post.

What is Tanzu Service Mesh (TSM)?

TSM builds upon the principals mentioned above, offering consumers a full enterprise-class service mesh, designed to solve challenges across distributed micro-service applications by extending service mesh services outside Kubernetes clusters and providing a unified operational layer across platforms and technologies.

  • Extends the service mesh capability (discovery, connectivity, control, security, and observability) to users and data, and across clusters and clouds.

  • Facilitates the development and management of distributed applications across multiple clusters, multiple clouds, and in hybrid-cloud environments with Global Namespaces (discussed below), supporting federation across organizational boundaries, technologies, and service meshes.

  • Implements consistent application-layer traffic management and security policies across all your clusters and clouds.

Global Namespace – is a key concept introduced by TSM, that extends service mesh capabilities for resources in a distributed application by arranging these objects in a logical group. A global namespace is therefore not tied to a single cluster or cloud, connecting resources between two or more clusters/clouds. Each global namespace manages service discovery, observability, encryption, policies, and service-level objectives (SLOs) for its objects regardless of where they reside: in multiple clusters, sites, or clouds.

To learn more about the concepts introduced by TSM, please read the below document:
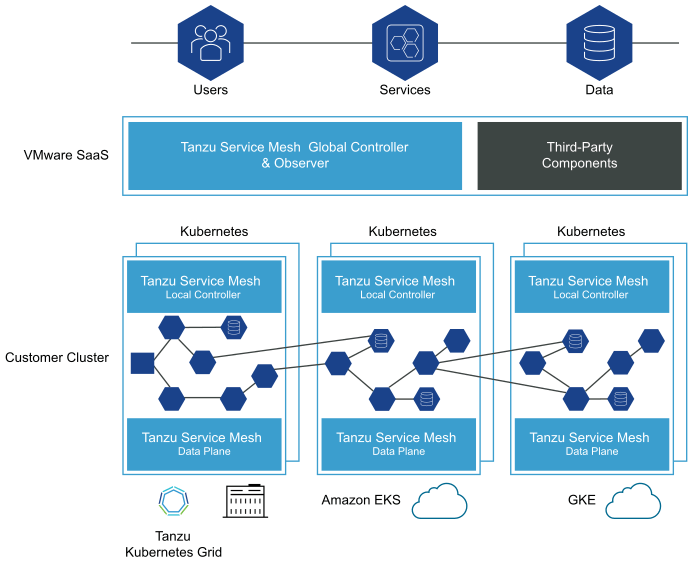
Tanzu Service Mesh - Logical Overview

Encryption for Data in Flight

TSM provides the value of a transit between clusters and clouds. In doing so comes many challenges, one such is achieving end-to-end encryption for in-flight traffic. This can be mandatory to comply with regulatory and security governance measures.

Tanzu Service Mesh includes a top-level certificate authority (CA) to provide a trusted identity to each node on the network. In the case of microservices architecture, those nodes are the pods that run the services. Tanzu Service Mesh can set up end-to-end mutual transport layer security (mTLS) encryption using a CA function.

Activating Tanzu Service Mesh

TSM is a SaaS service only from VMware, meaning no on-premises deployment for the control plane aspect. To activate, you will click the link provided when you request a trial or purchase the product,and linking it to your VMware Cloud Services Organisation (or create a new org if necessary.)

You must belong to an organization before you can access Tanzu Service Mesh. 

If you are an organization owner, you have access to all the resources of the organization. You can add cloud services to your organization and then invite users. 

After you add Tanzu Service Mesh to your organization, you can add users to the organization to give them access to Tanzu Service Mesh. 

For more information about organizations and adding users to an organization, see the VMware Cloud Services documentation.

Once you’ve activated the product, you will see it in your Cloud Services Portal as below.
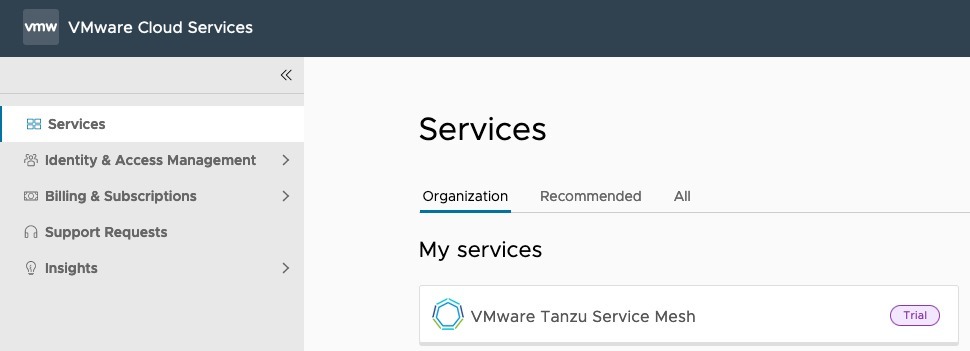
VMware Cloud Services - Tanzu Service Mesh

Pre-requisites for Installation

This is something which caused me issues in the past, where I tried to deploy TSM to a cluster that did not have enough resources to begin with.

- Cluster with 6 nodes (though the documentation does say minimum of 3 lower down in the text)
> I've queried this

- Requires that every node in the cluster have at least 250 milliCPU and 650 MB of memory available

- Pod Limits - Requires a quota of at least 3 pods for each node on the cluster and additionally at least 30 pods for the whole cluster.

Basically, you need to make sure you have enough minimum nodes and resources.

Regarding supported Kubernetes distributions, the team validate against a number of Enterprise Kubernetes solutions as well as the upstream Kubernetes.

I deployed two new environments for my testing, an EKS and AKS cluster, with the following commands.

eksctl create cluster --name veducate-eks-tsm --region us-west-1 --nodegroup-name standard --node-type m5.xlarge --managed

az aks create -rg aks-tsm --name aks-tsm-cluster --node-count 4 --ssh-key $HOME/.ssh/id_rsa.pub -s standard_d4s_v5
Onboarding your Clusters into Tanzu Service Mesh

Onboarding involves registering the cluster with Tanzu Service Mesh and installing the necessary software on the cluster. Continue reading Tanzu Service Mesh – First look at deploy, configure and managing an app between clusters

AWS EKS Header

Quick Fix – AWS Console – Current user or role does not have access to Kubernetes objects on this EKS Cluster

The Issue

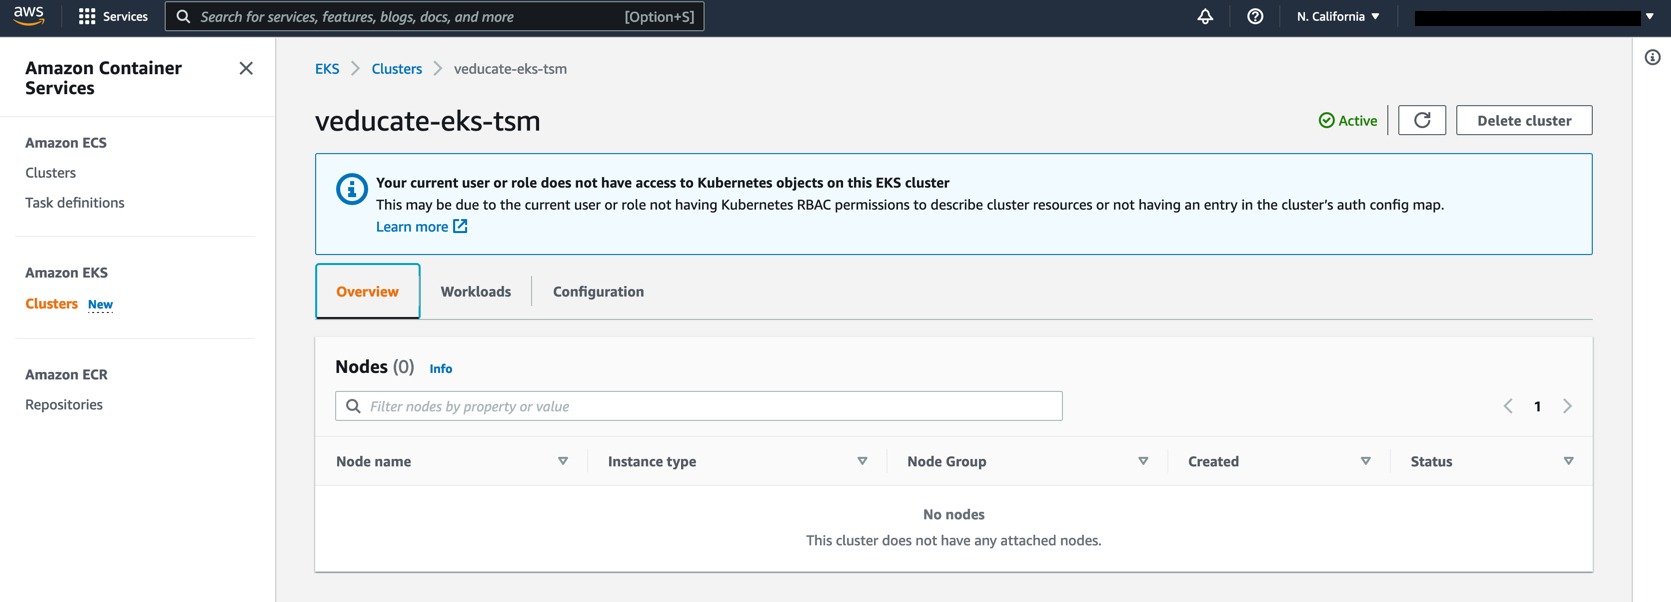
Once you’ve deployed an EKS cluster, and try to view this in the AWS Console, you are presenting the following message:

Your current user or role does not have access to Kubernetes objects on this EKS Cluster

AWS Console - Container Services - Current user or role does not have access to Kubernetes objects on this EKS Cluster

The Cause

This is because you need to run some additional configuration on your cluster to allow your AWS user IAM to access the cluster.

The Fix

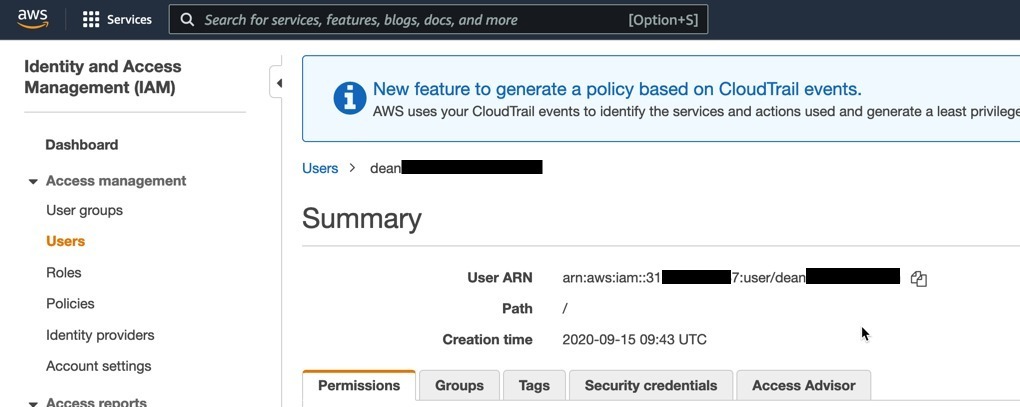
Grab your User ARN from the Identity and Access Management (IAM) page.

aws console - user IAM

Download this template YAML file for configuring the necessary ClusterRole and ClusterRoleBinding and then apply it to your EKS cluster.

curl -o eks-console-full-access.yaml https://amazon-eks.s3.us-west-2.amazonaws.com/docs/eks-console-full-access.yaml

kubectl apply -f eks-console-full-access.yaml

apply eks console full access configmap

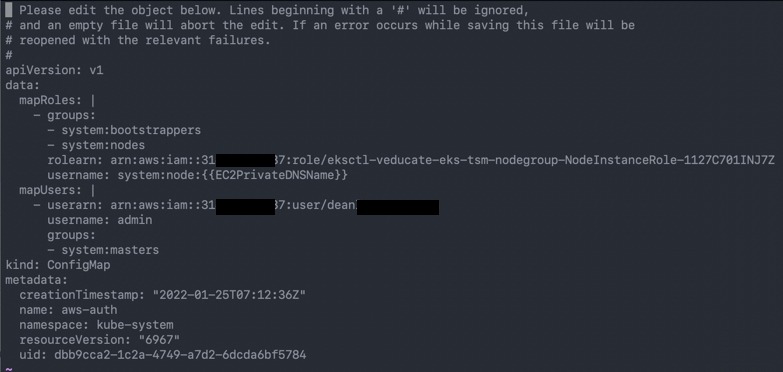
Now edit the following configmap:

kubectl edit configmap/aws-auth -n kube-system

Add in the following under the data tree:

mapUsers: |
  - userarn: arn:aws:iam::3xxxxxxx7:user/[email protected]
    username: admin
    groups:
      - system:masters

apply eks console full access - edit configmap

After a minute or so, once you revisit the EKS Cluster page in the AWS console, you will see all the relevant details.

AWS Console - Container Services - EKS cluster view

Regards

Dean Lewis

Red Hat OpenShift + VMware Header

OpenShift on VMware – Integrating with vSphere Storage, Networking and Monitoring.

I was honoured to be a guest on the “Ask an OpenShift Admin” webinar recently. Where I had the chance to talk about OpenShift on VMware, always a hot topic, and how we co-innovate and work together on solutions.

You can watch the full session below. Keep reading to see the content I didn’t get to cover on a separate recording I’ve produced.

Ask an OpenShift Admin (Ep 54): OpenShift on VMware and the vSphere Kubernetes Drivers Operator

However, I had a number of topics and demo’s planned, that we never got time to visit. So here is the full content I had prepared.

Some of the areas in this webinar and my additional session we covered were:

  • Answering questions live from the views (anything on the table)
  • OpenShift together with VMware
  • Common issues and best practices for deploying OpenShift on VMware vSphere
  • Consuming your vSphere Storage in OpenShift
  • Integrating with the VMware Network stack
  • Infrastructure Up Monitoring
OpenShift on VMware – Integrating with vSphere Storage, Networking and Monitoring

Resources

Regards

Dean Lewis