Tanzu Blog Logo Header

Tanzu Kubernetes Grid – How to edit Node resources and Scale a Cluster Vertically With kubectl

In this blog post I am going to walk you through how to edit the Machine Resource configurations for nodes deployed by Tanzu Kubernetes Grid.

Example Issue – Disk Pressure

In my environment, I found I needed to alter my node resources, as several Pods were getting the evicted status in my cluster.

By running a describe on the pod, I could see the failure message was due to the node condition DiskPressure.

  • If you need to clean up a high number of pods across namespaces in your environment, see this blog post.
kubectl describe pod {name}

TKG - kubectl describe pod - failed - evicted - pod the node had condition disk pressure

I then looked at the node that the pod was scheduled too. (You can see this in the above screenshot, 4th line “node”).

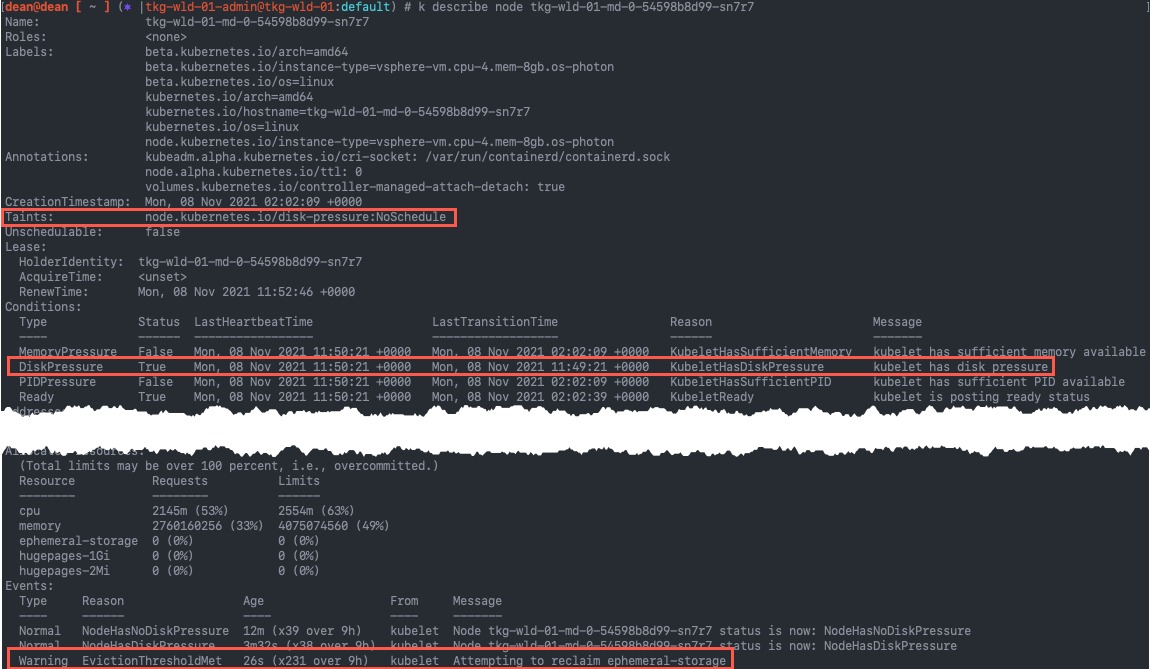
Below we can see that on the node, Kubelet has tainted the node to stop further pods from being scheduled to this node.

In the events we see the message “Attempting to reclaim ephemeral-storage”

TKG - kubectl describle node - disk pressure

Configuring resources for Tanzu Kubernetes Grid nodes

First you will need to log into your Tanzu Kubernetes Grid Management Cluster, that was used to deploy the Workload (Guest) cluster. As this controls cluster deployments and holds the necessary bootstrap and machine creation configuration.

Once logged in, locate the existing VsphereMachineTemplate for your chosen cluster. Each cluster will have two configurations (one for Control Plane nodes, one for Compute plane/worker nodes).

If you have deployed TKG into a public cloud, then you can use the following types instead, and continue to follow this article as the theory is the same regardless of where you have deployed to:

  • AWSMachineTemplate on Amazon EC2
  • AzureMachineTemplate on Azure
kubectl get VsphereMachineTemplate

TKG - kubectl get VsphereMachineTemplate

You can attempt to directly alter this file, however, when trying to save the edited file, you will be presented with the following error message:

kubectl edit VsphereMachineTemplate tkg-wld-01-worker

error: vspheremachinetemplates.infrastructure.cluster.x-k8s.io "tkg-wld-01-worker" could not be patched: admission webhook "validation.vspheremachinetemplate.infrastructure.x-k8s.io" denied the request: spec: Forbidden: VSphereMachineTemplateSpec is immutable

TKG - kubectl edit VsphereMachineTemplate - Forbidden- VSphereMachineTemplateSpec is immutable

Instead, you must output the configuration to a local file and edit it. Also, you will need to remove the following fields if you are using my below method. Continue reading Tanzu Kubernetes Grid – How to edit Node resources and Scale a Cluster Vertically With kubectl

Kubernetes

Quick Tip – Kubernetes – Delete all evicted pods across all namespaces

I’m currently troubleshooting an issue with my Kubernetes clusters where pods keep getting evicted, and this is happening across namespaces as well.

The issue now that I am faced with, is being able to keep ontop of the issues. When I run:

kubectl get pods -A | grep Evicted

I’m presented with 100’s of returned results.

kubectl get pods -A grep Evicted

So to quickly clean this up, I can run the following command: Continue reading Quick Tip – Kubernetes – Delete all evicted pods across all namespaces

Tanzu Blog Logo Header

vSphere with Tanzu – Can I disable DRS?

Can I disable DRS?

No.

Why can’t I disable DRS when Workload Management is enabled?

DRS is a mandatory feature for workload management, the WCP service relies on objects such as Resource Pools to operate.

  • Update – 29th October

The vSphere with Tanzu Documentation has now been updated with this statement.

Caution: Do not disable vSphere DRS after you configure the Supervisor Cluster. Having DRS enabled at all times is a mandatory prerequisite for running workloads on the Supervisor Cluster. Disabling DRS leads to breaking your Tanzu Kubernetes clusters.
What happens if I attempt to disable DRS?

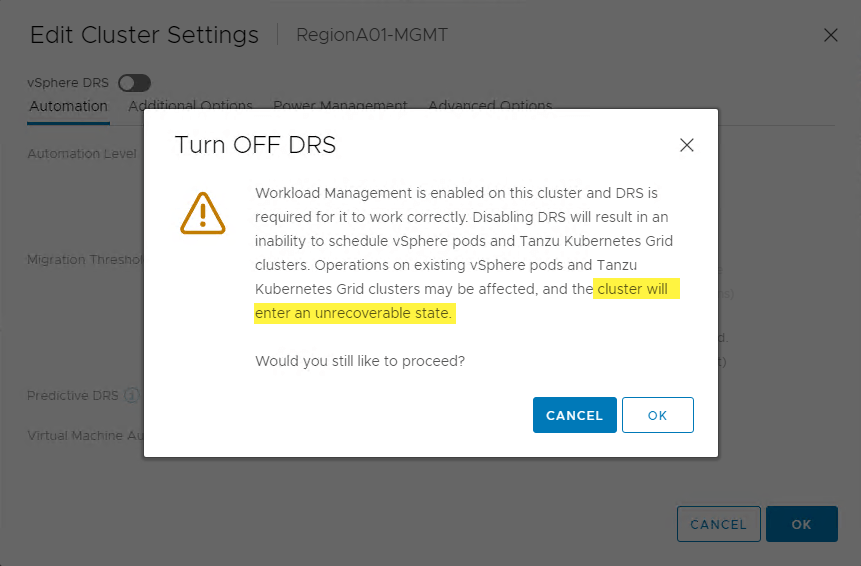
If you disable DRS in a cluster where Workload Management is enabled you will be presented the following message.

The key part of the message below is “the cluster will enter an unrecoverable state.”

The system will let you proceed past this message and disable DRS. DON’T DO IT!

wcp - disable drs message

What if I need to stop VM’s being vMotioned in my cluster?

Keep DRS enabled, and set the DRS mode to manual or Partially Automated.

wcp - drs mode

I really need to disable DRS, what do I do?

Ring VMware Support and discuss with them your need and the situation you find yourself in.

How do I stop my admins accidentality disabling DRS?

This KB article may help, as well as setting appropriate RBAC permissions for anyone accessing your vCenter rather than giving them full administrator rights so they can change settings they shouldn’t.

If you are unsure about any of this, contact VMware Support.

Do you have a fantastic meme to end this blog post with?

Yes.

just because you can doesn't mean you should

Regards

Dean Lewis

vRLI Header

Using vRealize Log Insight Cloud to archive on-premise Log Insight Data

vRealize Log Insight 8.6 brings the ability to build a hybrid log management platform, utilizing the functionality of an on-premises deployment of vRLI and vRLI Cloud.

From the release notes, in this blog post we’ll be looking at how to configure the following:

  • Simplify Log Archival with Non-Indexed Partitions: Use vRealize Log Insight Cloud to archive logs to meet your long-term retention requirements. vRealize Log Insight Cloud provides a no-limit logging solution at a low cost and eliminates any storage management overheads of the past. This enables easy accessibility to archived logs through on-demand queries.

For this, you will need access to a vRealize Log Insight Cloud Instance, with a cloud proxy deployed to your environment that can be accessed by the on-premises vRealize Log Insight platform.

The expectation is that you would forward you vRealize Log Insight on-premises logs to the vRealize Log Insight Cloud instance storing them only in a Non-Indexed Partition (discussed below). As your on-premises deployment act as your easy to analyse near time (within 30 days) copy of your logs. 

In this blog post I also explore the configuration and use of Index Partitions which essentially offers that near time usability and analysing of logs as well.

The high-level steps for the configuration discussed in this blog post are:

  • Send infrastructure or application logs to your on-premises vRealize Log Insight deployment
  • Setup the cloud proxy (if not already done)
  • Setup log forwarding from the on-premises Log Insight instance
  • In vRealize Log Insight Cloud, configure Non-Index Partition to receive the forwarded logs
What are Log Partitions?

Log Partitions are a feature that allows you to ingest logs based on user-defined filters. This feature is available as a paid subscription (or Trial).

There are two types of log Log Partitions:

  • Indexed Partitions
    • Stores logs for up to 30 days
    • Billed only for volume of logs ingested into the partition
    • Search and analyse logs in this partition without additional costs
  • Non-Indexed Partitions
    • Stores logs for up to 7 years
    • Billed for the volume of logs ingested into the partition, and for searching the logs.
    • If you need to query logs frequently, you can move logs to a recall partition for 30 days.
      • No additional cost for searching and analysing logs in the recall partition

Logs that do not match a query criteria in any of the configured partitions, will be stored in the Default Indexed Partition. This is read only and stores logs for 30 days.

Note:  

- Alerts and dashboard widgets are not operational in non-indexed partitions.
- Log partitions store logs ingested in the last 24 hours only.
- You can create a maximum of 10 log partitions in an organization.
Video Walk-through

Example Logs

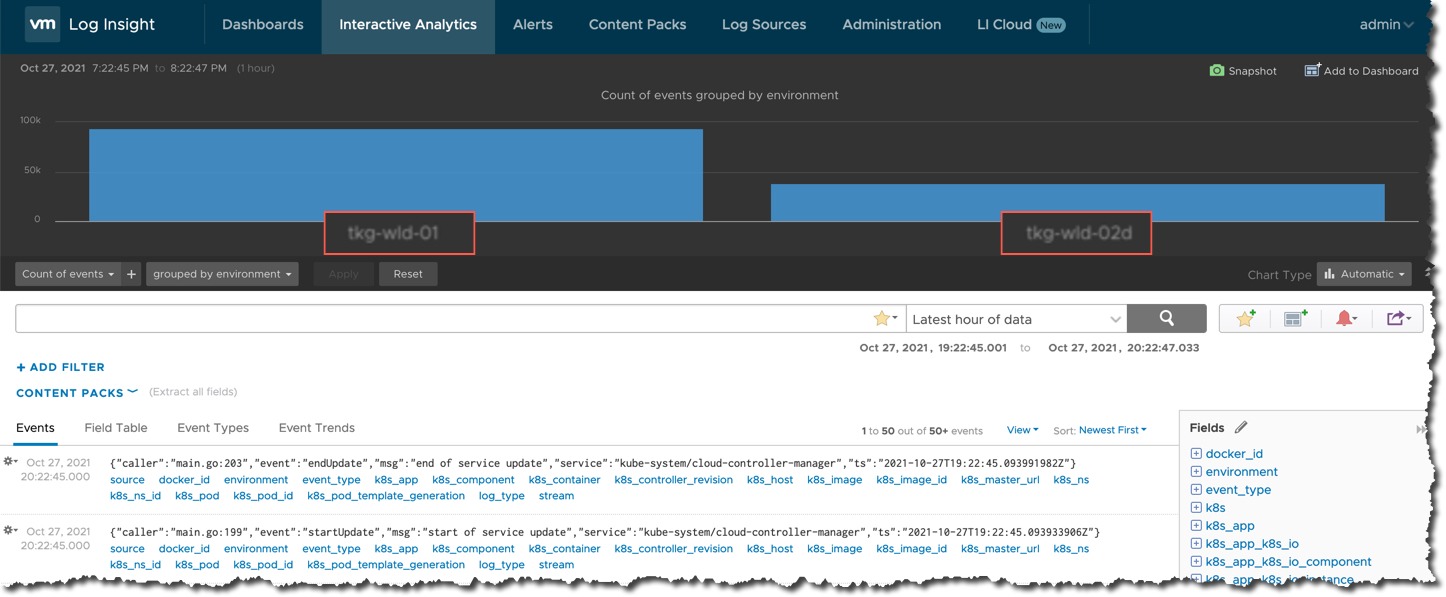
In my Log Insight environment, I have setup the FluentD configuration to forward the Tanzu Kubernetes Grid logs from two clusters to vRealize Log Insight (on-premises deployment).

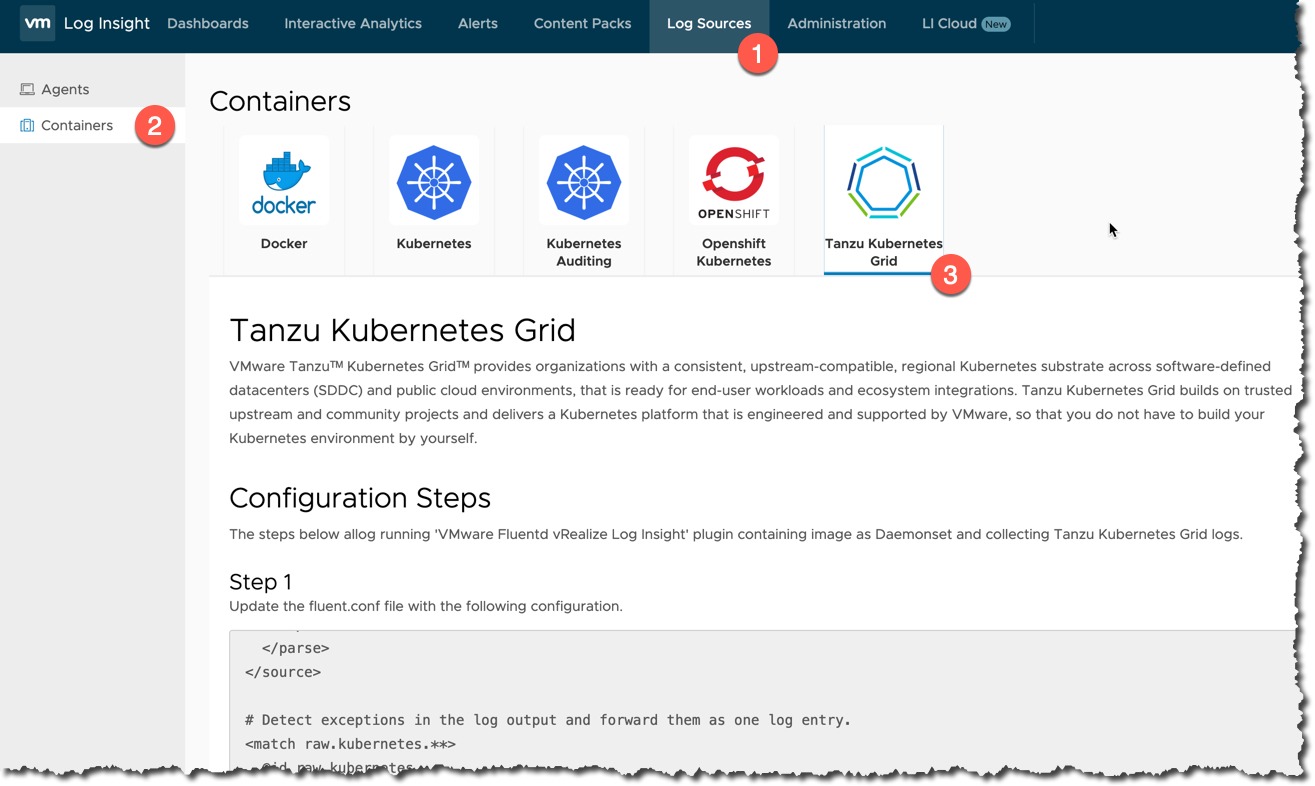
You can find the configuration settings for this within vRealize Log Insight, under the Sources Tab > Containers > Tanzu Kubernetes Grid.

vRLI Log Archive - Configure Fluentd for Tanzu Kubernetes Grid

vRLI Log Archive - Tanzu Kubernetes Grid Logs

Setup the Cloud Proxy

Continue reading Using vRealize Log Insight Cloud to archive on-premise Log Insight Data

Kasten K10 Header

Kasten K10 – Air gap installation using Harbor Image Registry

In this blog post, I will cover the steps for an air-gap installation for Kasten K10. For situations where your Kubernetes cluster doesn’t have available internet access to pull down the container images directly from their online locations.

Pre-requisites
  • Image Registry that is accessible by your Kubernetes cluster
  • Client that has access to download the container images and then to the Image Registry
    • In this example, I am using my local machine which has docker installed.
  • Helm downloaded
    • Run the following to get the helm files locally for the install.
helm repo update && \
    helm fetch kasten/k10 --version=<k10-version>

Example for Kasten K10 4.5.0

helm repo update && \ 
    helm fetch kasten/k10 --version=4.5.0

This will download a file, for example "k10-4.5.0.tgz"
Log into your Image Registry

First you need to ensure that your docker client (or similar) has authenticated to your Image Registry which your air-gap Kubernetes cluster can access.

When using Harbor and Docker, I typically use this method with a robot account for programmatic access.

However, when running the Kasten tooling which we’ll discuss next, I kept hitting an error. Continue reading Kasten K10 – Air gap installation using Harbor Image Registry