VMware logo gry RGB 300dpi

Support Ticket Template – Helping you help your vendor support teams

Below is a support template I crafted with some members of our VMware GSS team, to help my customers reduce the typical back and forth information gathering to help them get to a resolution faster.

Instead when logging a ticket, my customers can log all the necessary information upfront.

Hopefully you will find this useful, and it can be used/adapted to use with other vendor support teams or even internally within your own business.

[Customer Information]
1. Engineer name:
2. What is the Business Impact?

[Product and Environment Information]
1. Environment Name:
2. What VMware products has the customer deployed?
3. What type of environment is impacted?
4. What was the customer doing when the problem was observed?
5. List FQDN and IP for each impacted device:

[Problem Description]
1. Describe the specific problem symptoms:
2. When was the problem first observed (Date/Time)?
3. When was the problem most recently observed (Date/Time)?
4. Describe the recurrence pattern for the problem if existing:

[Problem Troubleshooting]
1. What investigation has been conducted by the customer (give a full report)?
2. If a workaround has been attempted, describe the steps and outcome:

[Ask to VMware GSS]
1.What specific request is made of GSS?

[Logs]
Please collect all relevant product logs and upload them to the SR as outlined here for review:
https://kb.vmware.com/s/article/1008524
https://kb.vmware.com/s/article/1008525

Regards

Dean
 

SynologyLogo

Synology – Moving a package between volumes

I have a Synology 8-bay NAS used for home-lab purposes, but also doubles as local home storage as well.

As part of upgrades, I was decommissioning a volume for a new one with higher capacity drives, however I had Plex installed on the volume to be decommissioned. I moved all the data using the internal file manager, but the package installation remained in place.

Migrate package to another volume

  1. Stop your application via the Synology package center UI.
  2. Login to Synology using SSH and elevate to root.
  3. Use “ls” against /VolumeX/@appstore to find your package folder name
  4. Use “mv” to move the data between the old and new volume, you may need to create the @appstore folder first.
  5. Remove the symlink from the current volume and create the new symlink to the new volume.
  6. Stop and start your package in the Synology Package Centre.

Below is an example the commands I used;

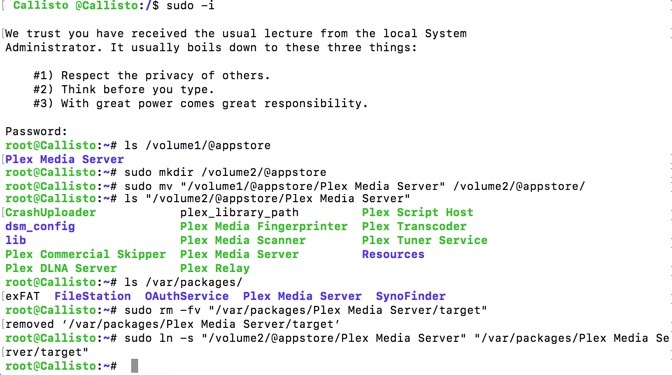
sudo mkdir /volume2/@appstore
sudo mv "/volume1/@appstore/Plex Media Server" "/volume2/@appstore"
sudo rm "/var/packages/Plex Media Server/target"
sudo ln -s "/volume2/@appstore/Plex Media Server" "/var/packages/Plex Media Server/target"

synology migrate package to new volume veducate.co .uk

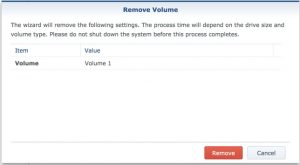
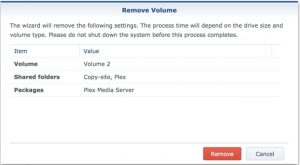
Now when you try to remove the volume, your package will now show as attached to the volume.

synology remove volume1synology remove volume2

Regards

Dean

winscp logo

How to Elevate to Root Access with WinSCP

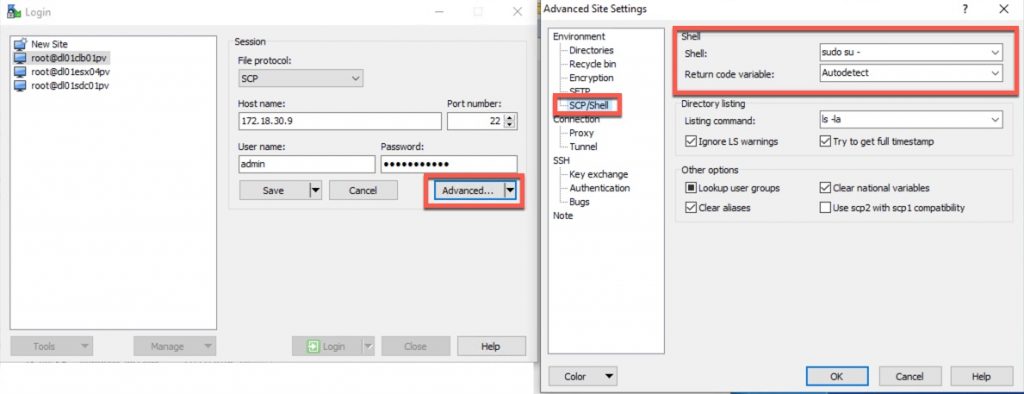
I was using WinSCP to transfer logs from a VMware CloudBuilder appliance to troubleshoot a failed lab deployment, however the files wouldn’t transfer as the user account to be used had to have root access. For this appliance, you need to elevate to root after login.

Good news, WinSCP can elevate to root after login, In your connection settings pane;

  1. Click Advanced
  2. Under “Environment” select “SCP/Shell”
  3. For the shell value, enter your command to elevate
  4. Save the configuration

When you next connect to your appliances, the command will be sent after login.

Winscp elevate to root

The official pages are here.

Regards

Dean

VMwareHorizonView

VMware Horizon Blast – Failed to Connect to Connection Server

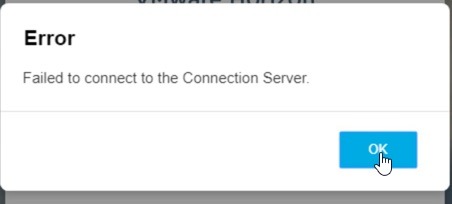
After deploying my latest horizon lab, I hit an issue where I could not hit the login page to authenticate for a Horizon desktop using BLAST, I would be greeted by the following message:

Failed to Connect to Connection Server

failed to connect to connection server

I pulled my hair out for a few minutes, before I realised I’ve hit this issue before, and the fix is quite simple.

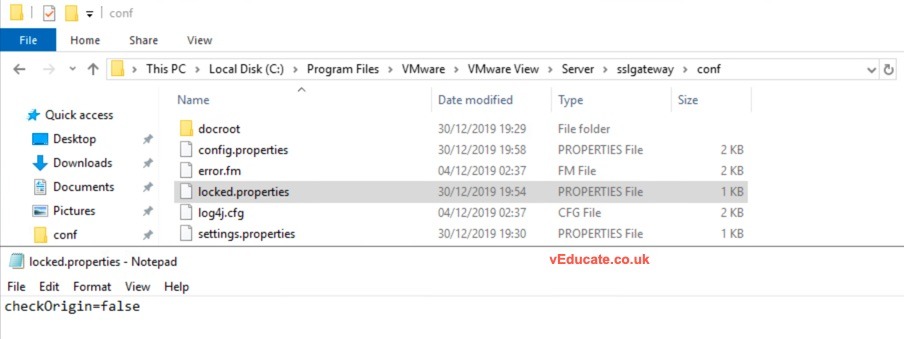
If the locked.properties file doesn’t exist in the directory C:\Program Files\VMware\VMware View\Server\sslgateway\conf then you must create it!

locked.properties checkOrigin false

Regards

Dean

cleanup

VDI Cleanup script I use before sealing any golden image before deployment

Below is the VDI Cleanup script that I’ve been using over the years. I thought I’d post this after setting up a Horizon Lab environment. I shared it earlier in the year on Reddit, and had some good suggestions which I used to update the script. The script has been taken from other blogs over the years and just edited further and further for my own/customers needs.

Optimizations to any master are done using the VMware OS Optimization Tool.

I personally just run this as bat file to clean up and shut down the master template as a final step each time I make an update.

You can find the script on Github here, or below.

REM ************************************************
REM Stopping and disabling Windows Telemetry service
REM ************************************************
sc stop DiagTrack
sc config DiagTrack start= disabled
sc stop dmwappushservice
sc config dmwappushservice start= disabled
REM *********************
REM Stop and disable Windows update service
REM *********************
sc stop wuauserv
sc config wuauserv start= disabled
REM *********************
REM Delete any existing shadow copies
REM *********************
vssadmin delete shadows /All /Quiet
REM *********************
REM delete files in c:\Windows\SoftwareDistribution\Download\
REM *********************
del c:\Windows\SoftwareDistribution\Download\*.* /f /s /q
REM *********************
REM delete hidden install files
REM *********************
del %windir%\$NT* /f /s /q /a:h
REM *********************
REM delete prefetch files
REM *********************
del c:\Windows\Prefetch\*.* /f /s /q
REM *********************
REM Update OEM Information with Build Date
reg add HKLM\SOFTWARE\Microsoft\Windows\CurrentVersion\OEMInformation /v Model /d "Build %DATE%" /t REG_EXPAND_SZ /f
REM *********************
REM Run Disk Cleanup to remove temp files, empty recycle bin
REM and remove other unneeded files
REM Note: Makes sure to run c:\windows\system32\cleanmgr /sageset:1 command 
REM       on your initially created parent image and check all the boxes 
REM       of items you want to delete 
REM *********************
c:\windows\system32\cleanmgr /sagerun:1
REM ********************
REM Defragment the VM disk
REM ********************
sc config defragsvc start= auto
net start defragsvc
defrag c: /U /V
net stop defragsvc
sc config defragsvc start = disabled
REM *********************
REM Clear all event logs
REM *********************
wevtutil el 1>cleaneventlog.txt
for /f %%x in (cleaneventlog.txt) do wevtutil cl %%x
del cleaneventlog.txt
REM *********************
REM release IP address
REM *********************
ipconfig /release
REM *********************
REM Flush DNS
REM *********************
ipconfig /flushdns
REM *********************
REM Shutdown VM
REM *********************
shutdown /s /t 0

Regards

Dean