OpenShift

How to deploy OpenShift 4.3 on VMware vSphere with Static IP addresses using Terraform

Install OpenShift 4.x on vSphere 6.x/7.x

The following procedure is intended to create VM’s from an OVA template booting with static IP’s when the DHCP server can not reserve the IP addresses.

The Problem

OCP requires that all DNS configurations be in place. VMware requires that the DHCP assign the correct IPs to the VM. Since many real installations require the coordination with different teams in an organization, many times we don’t have control of DNS, DHCP or Load balancer configurations.

The CoreOS documentation explain how to create configurations using ignition files. I created a python script to put the network configuration using the ignition files created by the openshift-install program.

Reference Architecture

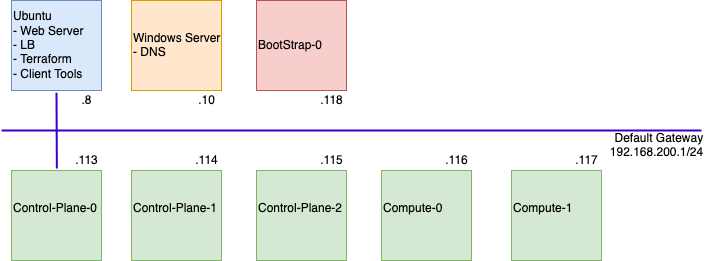
For this guide, we are going to deploy 3 master nodes (control-plane) and 2 worker nodes (compute This guide uses RHEL CoreOS 4.3 as the virtual machine image, deploying Red Hat OCP 4.3, as per the support of N-1 from Red Hat.

We will use a centralised Linux server (Ubuntu) that will perform the following functions;

  • Load Balancer – HAProxy
  • Web Server – Apache2
  • Terraform automation host – version 0.11.14
    • The deployment will be semi-automated using Terraform, so that we can easily build configuration files used by the CoreOS VM’s that have Static IP settings.
    • Using a later version of Terraform will cause failures.
  • Client Tools for OpenShift deployment
    • OC
    • Kubectl
    • Openshift-install

DNS will be provided by a Windows Server.

The installation will use a Bootstrap server to bring the cluster online, which will be removed at the end of the build process.

OpenShift Deployment Arch Diagram

Deployment Steps

In this guide we will deploy our environment in the following order;

  • Configure DNS
  • Import Red Hat Core OS image into vCenter
  • Deploy Ubuntu Host
    • Configure Apache
    • Configure HAProxy
    • Install Client-Tools
    • Install Terraform
  • Build OpenShift Cluster configuration
  • Configuring the Terraform deployment
  • Running the Terraform deployment
DNS

Openshift uses a “clusterName.BaseDomain” format.

For example; I want to call my Openshift cluster Demo. And my DNS Domain is Simon.local, then my full format used by Openshift is “demo.simon.local”

Below is a table plan of the IP addresses you will use to build the environment.

The last three addresses are cluster level resources that are available on each control-plane node, accessible via the load balancer.

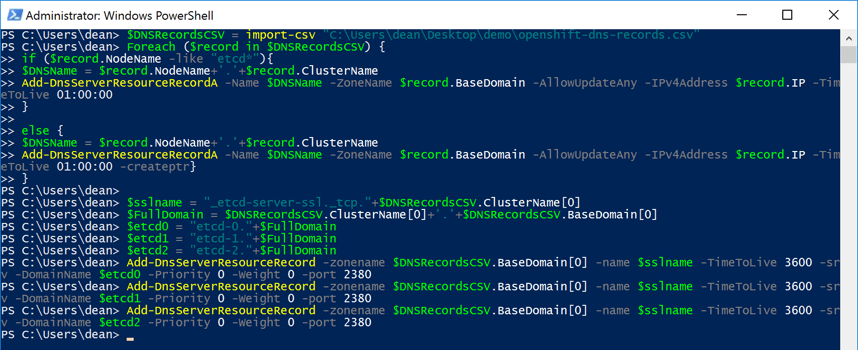
To configure the DNS records in Windows, you can use the Script and CSV file here

Deploy OpenShift VMware Static IP PowerShell Configure DNS Records

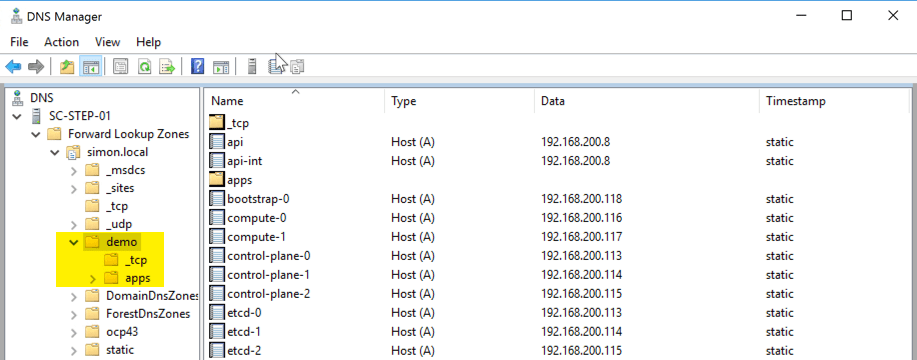
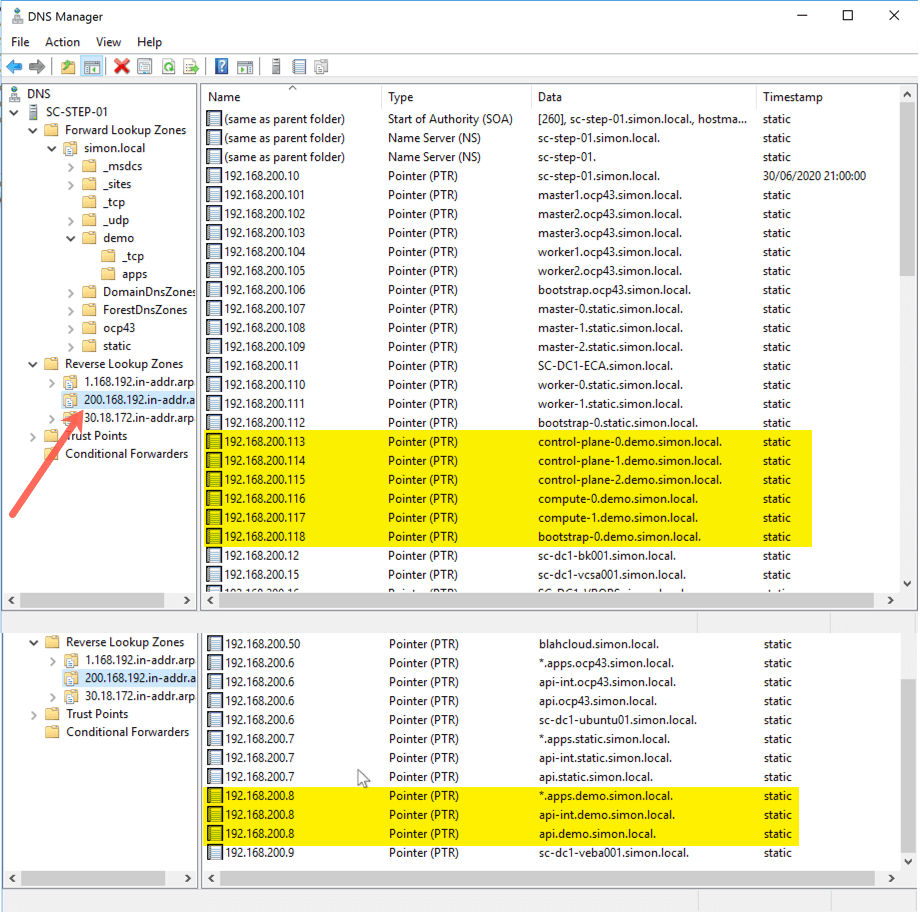
In the below screenshot, the script has created the “demo” domain folder and entered my records. It is important that you have PTR records setup for everything apart from the “etcd-X” records.
Deploy OpenShift VMware Static IP DNS Records Deploy OpenShift VMware Static IP DNS Records 2 Deploy OpenShift VMware Static IP DNS Records 3 Deploy OpenShift VMware Static IP Configure Reverse DNS Records

Import Red Hat CoreOS Image into vCenter

Continue reading How to deploy OpenShift 4.3 on VMware vSphere with Static IP addresses using Terraform

Veeam Backup for Azure Header 605

Veeam Backup For Azure – Integrating with Veeam Backup and Replication

In this blog post we will cover the following topics;

- Adding your Azure Repository to Veeam Backup and Replication
- Viewing your protected data
- What can you do with your data?
- - Backup Copy to another repository
- - File Level Recovery
- - Veeam Explorer - Application Item restore
- - Instant Virtual Machine recovery to vSphere and Hyper-v
- - Restore to Amazon EC2 or Microsoft Azure

The follow up blog posts are;

- Getting started with Veeam Backup for Azure
- - Configuring the backup infrastructure
- - Monitoring
- - Protecting your installation
- - System and session logs
- Configuring a backup policy
- - Viewing and Running a Backup Policy 
- - Looking at Session logs
- Restoring a Backup 
- - Viewing protected data 
- - File Level Recovery 
- - Virtual Machine Disk Restore 
- - Full VM Restore

If you have an Veeam Backup and Replication install up and running, either on-premise to protect VMware or Hyper-V workloads, or even running in a Public cloud to provide resiliency to your infrastructure, then it’s simple enough to integrate that deployment with the data protected by Veeam Backup for Microsoft Azure.

By linking your Veeam Backup for Azure repository (Azure Storage Account) to your Veeam Backup and Replication environment, you then get access to a whole host of options.

  • File level recovery via Veeam Backup and Replication console
  • Instant VM recovery to vSphere/Hyper-V
  • Restore VM to Amazon EC2
  • Restore VM to Microsoft Azure
  • Perform a Backup Copy to another location such as a Cloud Connect Partner.
Adding your Azure Repository to Veeam Backup and Replication

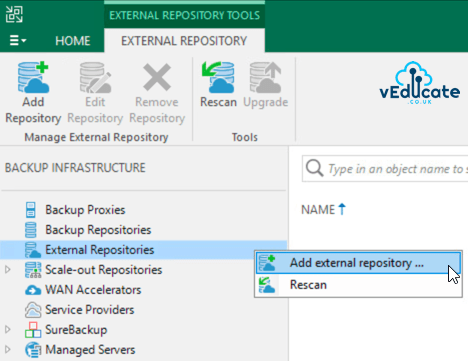
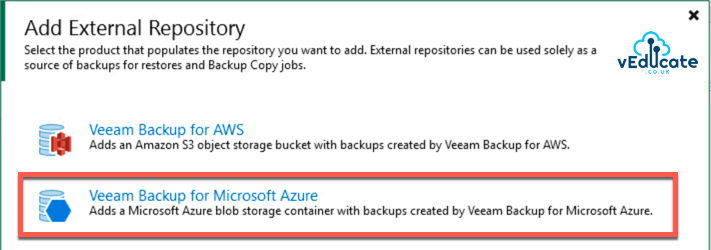
Open your Veeam Backup and Replication console > Go to the “Backup Infrastructure” tab, and right click on External Repositories > Click “Add external repositories”, this will open up the wizard.

Veeam Backup for Azure Integration with Veeam Backup and Replication Add external repository

Select “Veeam Backup for Microsoft Azure”

Veeam Backup for Azure Integration with Veeam Backup and Replication Add external repository 2 Continue reading Veeam Backup For Azure – Integrating with Veeam Backup and Replication

Veeam Header3

Veeam Backup for Azure – Configuring your first Backup Policy

In this blog post we will cover the following topics

- How a backup policy works
- Creating a Backup Policy
- Viewing and Running a Backup Policy
- - Looking at Session logs
- Summary and next steps

The follow up blog posts are;

- Getting started with Veeam Backup for Azure
- - Configuring the backup infrastructure
- - Monitoring
- - Protecting your installation
- - System and session logs
- Restoring a backup
- - Viewing protected data 
- - File Level Recovery 
- - Virtual Machine Disk Restore 
- - Full VM Restore
- Integrating with Veeam Backup and Replication
- - Adding your Azure Repository to Veeam Backup and Replication
- - Viewing your protected data
- - What can you do with your data?
- - - Restore/Recover/Protect
How a backup policy works

Veeam Backup for Microsoft Azure, allows you to create the following types of snapshots and backups:

  • Snapshots; managed & unmanaged VHDs of Microsoft Azure VMs, which includes the configuration of a VM.
  • Backups of managed & unmanaged VHDs of Microsoft Azure VMs, which includes the configuration of a VM.

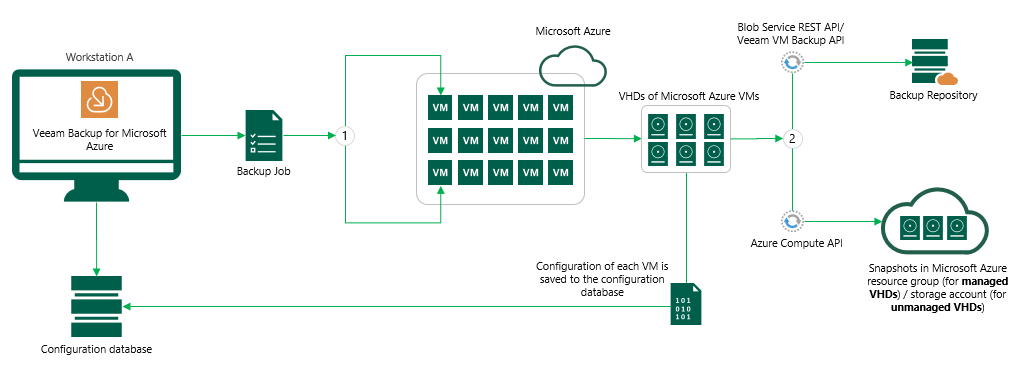
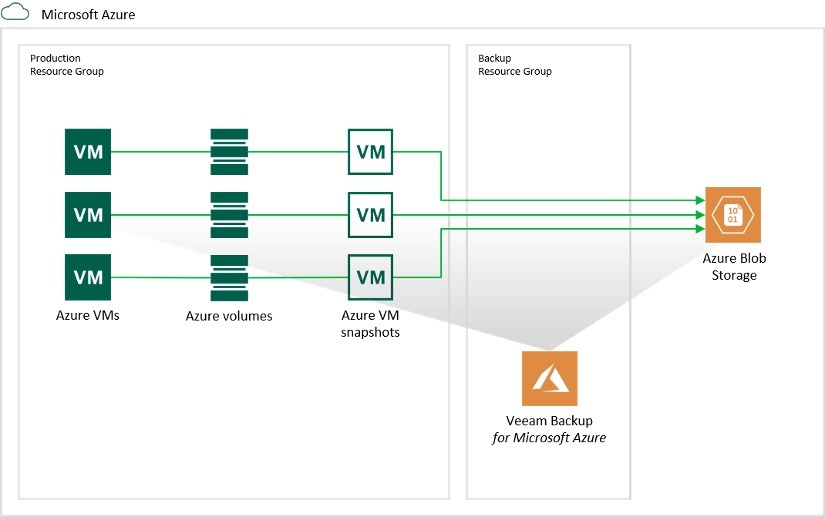
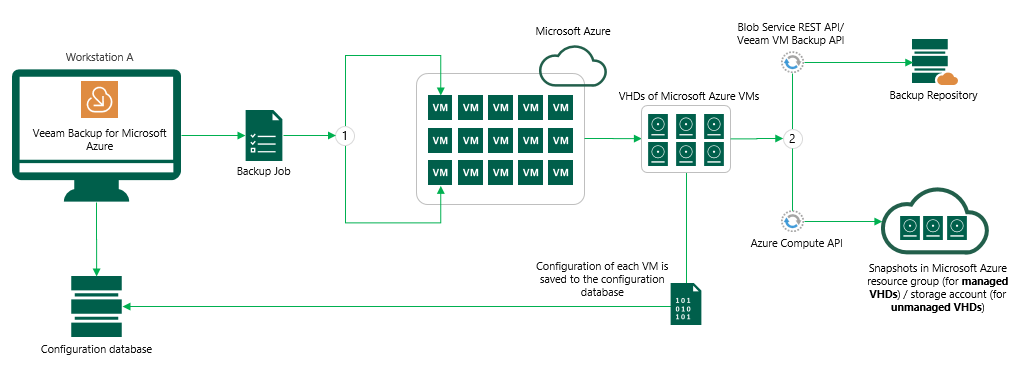
When you run a backup policy (A.k.a Backup Job), the Veeam services will perform the following tasks;

  1. Retrieve the configuration of your Microsoft Azure VMs, that are selected in the policy.
  2. Create either a backup or snapshot for the Microsoft Azure VMs, depending on the policy configuration
    • Backups – Both managed/unmanaged VHDs are saved to the configured Backup Repository.
    • Snapshots
      • Managed VHDs – snapshot saved to resource group of source VM,
      • Unmanaged VHDs – snapshots saved to Azure Storage Account of source VHD

For both backups and snapshots, the VM configuration is saved to the Veeam Backup for Microsoft Azure configuration database.

The backup services running on the workers, encrypt & compresses data that you back up to backup repositories.

Veeam Backup for Azure backup process

(Image Source)

Creating a Backup Policy

If you are in configuration mode, you can select the “exit configuration” in the top left of the UI.

Under Management, Select Policies > Add

Veeam Backup for Azure Creating a Backup Policy

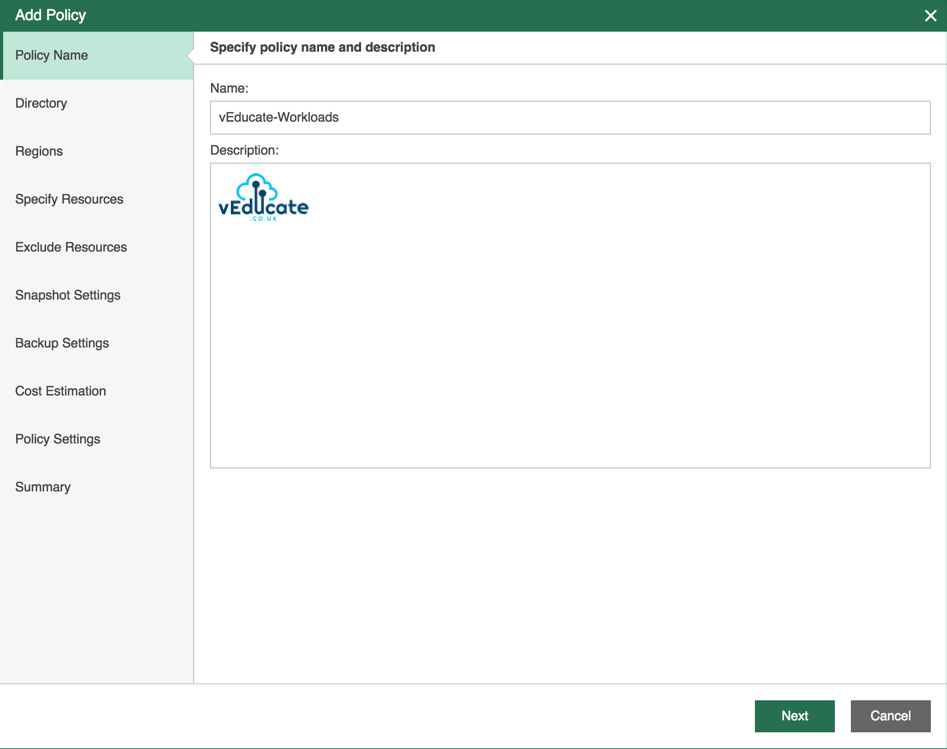
  • Set your Policy name and description

Veeam Backup for Azure Policies Add Policy

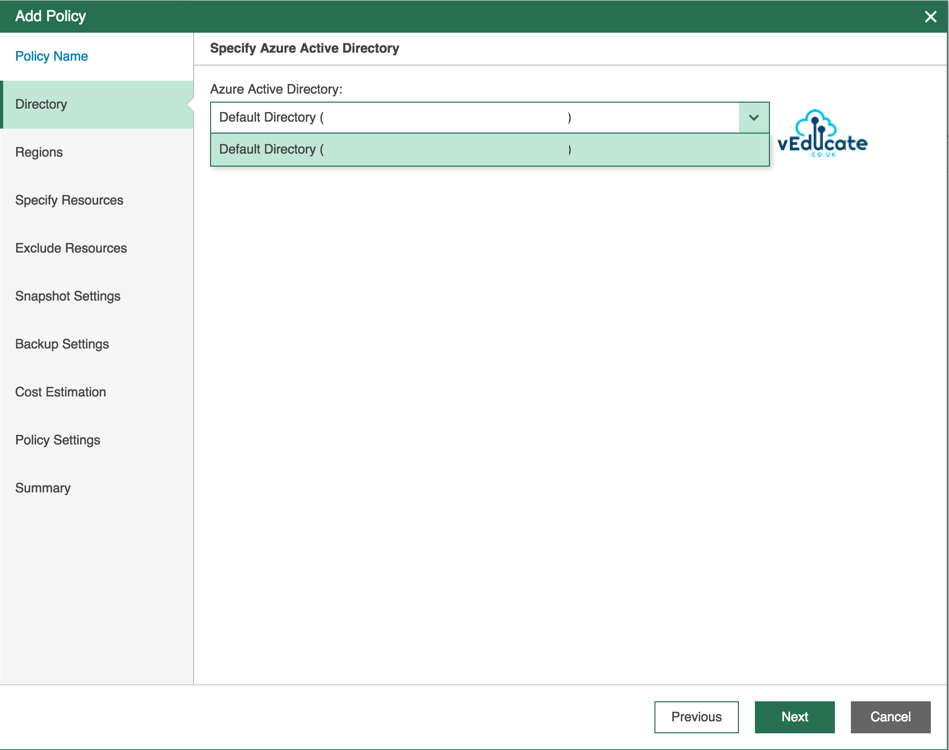
  • Select your Azure Active Directories where your workloads are located

Veeam Backup for Azure Policies Specify Azure Active Directory Continue reading Veeam Backup for Azure – Configuring your first Backup Policy

Veeam Backup for Azure Header 605

Veeam Backup for Microsoft Azure – Restoring a Backup

In this blog post we will cover the following topics

- Restoring a Backup
- - Viewing protected data
- - File Level Recovery
- - - File Level Recovery Session Log
- - Virtual Machine Disk Restore
- - Full VM Restore

The follow up blog posts are;

- Getting started with Veeam Backup for Azure
- - Configuring the backup infrastructure
- - Monitoring
- - Protecting your installation
- - System and session logs
- Configuring a backup policy
- - How a backup policy works 
- - Creating a Backup Policy 
- - Viewing and Running a Backup Policy
- Integrating with Veeam Backup and Replication
- - Adding your Azure Repository to Veeam Backup and Replication
- - Viewing your protected data
- - What can you do with your data?
- - - Restore/Recover/Protect
Viewing Protected Data

Once you have a successful backup policy run, you will find that by navigating to “Protected Data” in the left-hand navigation pane, you will find details of your protected workloads and the backups stored.

Veeam Backup for Azure Protected Data

Highlighted in the purple box above, we are able to click on each of our protected virtual machines and see the details of the restore points held.

The available restore options are;

  • VM Restore
    • Restore a full virtual machine to the same or a different location. This restore uses both the VM configuration and VHD backups.
  • Disk Restore
    • Restore only a virtual machines hard drive to the same or a different location, these will not be attached to any virtual machines when the restore is complete.
  • File-Level Recovery
    • Restore of files and folders from protected instances, which are available to download to your local machine.

Veeam Backup for Azure Protected Data Viewing available restore points Restore Options

Below, we can see the available restore points for my “Ubuntu01” virtual machine. As the backup policy has only run once, I have a single snapshot held with the VM itself, and a single backup of the full virtual machine (VHDS and VM configuration, which are located in my configured Repository.

  • Backups – Both managed/unmanaged VHDs are saved to the configured Backup Repository.
  • Snapshots
    • Managed VHDs – snapshot saved to resource group of source VM,
    • Unmanaged VHDs – snapshots saved to Azure Storage Account of source VHD

From this view, we can select to restore the Full VM, the individual VHDs, under the Restore option, or we can perform a file-level Recovery under the second self-named option.

Veeam Backup for Azure Protected Data Viewing available restore points

File Level Recovery

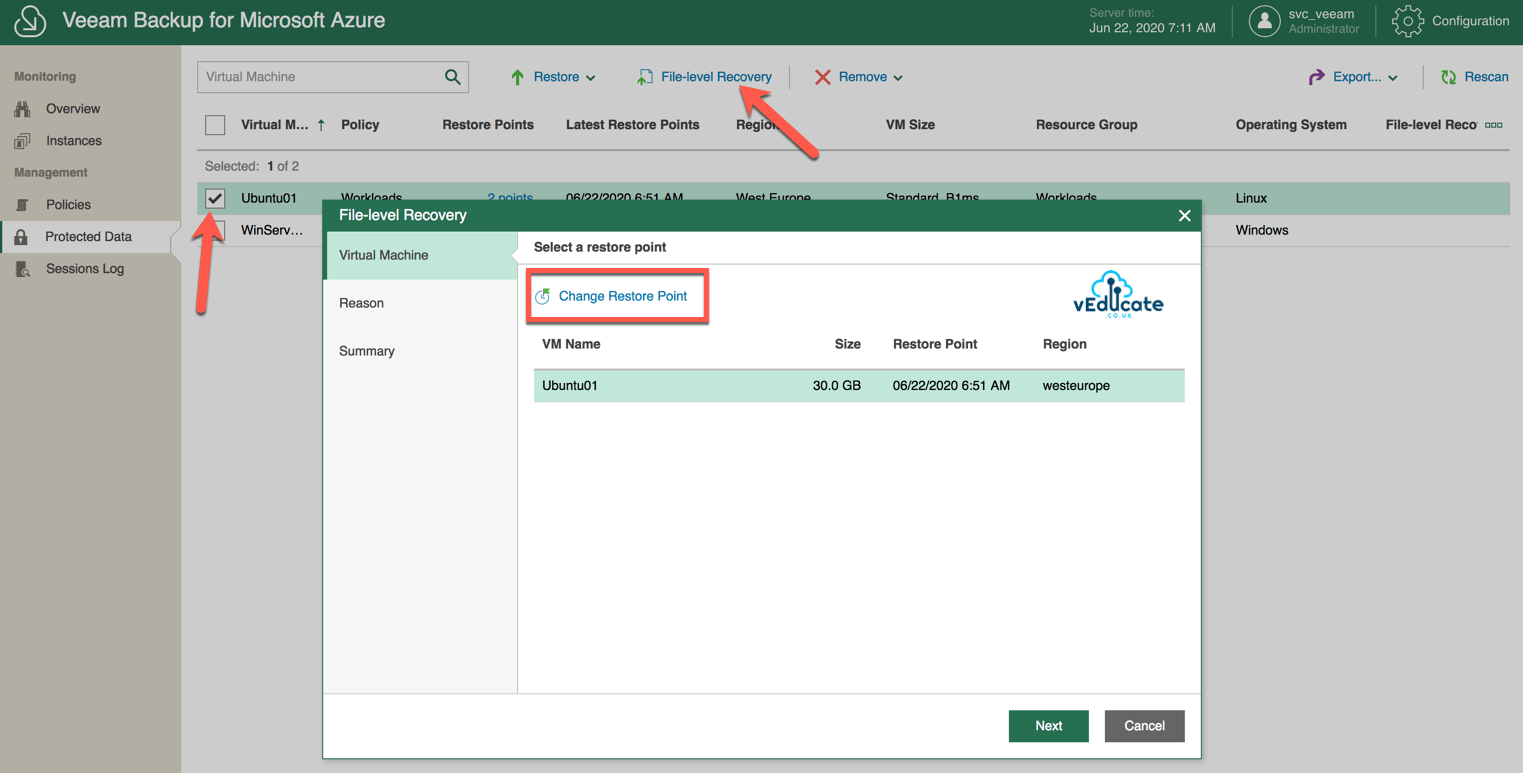
You can enter a file level recovery as per the above screenshot, or from the main screen by highlighting your protected VMs and clicking file level recovery.

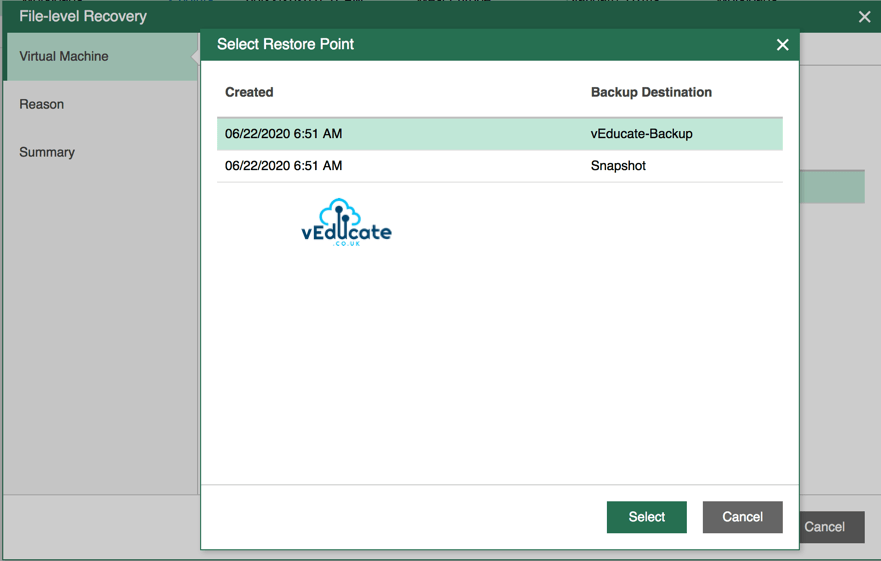
By clicking “Change Restore Point” you will of course see the various points in time available.

Veeam Backup for Azure Restore File Level Recovery Virtual Machine

Veeam Backup for Azure Restore File Level Recovery Virtual Machine Select Restore Point Continue reading Veeam Backup for Microsoft Azure – Restoring a Backup

Veeam Header3

Veeam Backup for Microsoft Azure – Getting Started: Setting up the Infrastructure

In this blog post we will cover the following topics;

- What is Veeam Backup for Azure
- Getting Started
- - Architecture
- - Deploying from Azure Marketplace
- - Logging on for the first time
- - Connecting to your Microsoft Azure Subscriptions and Storage - - Accounts
- - Configuring a repository account
- Deploying worker VMs
- Monitoring
- Protecting your Veeam Backup for Azure Appliance
- Download Logs

The follow up blog posts are;

- Configuring your first Backup Policy
- - How a backup policy works 
- - Creating a Backup Policy 
- - Viewing and Running a Backup Policy
- Restoring a backup
- - Viewing protected data 
- - File Level Recovery 
- - Virtual Machine Disk Restore 
- - Full VM Restore
- Integrating with Veeam Backup and Replication
- - Adding your Azure Repository to Veeam Backup and Replication 
- - Viewing your protected data 
- - What can you do with your data? 
- - - Restore/Recover/Protect

What is Veeam Backup for Azure?

If we look at the Microsoft document “Shared responsibility in the cloud“, we can see the very open comment;

  • Regardless of the type of deployment, the following responsibilities are always retained by you:
    • Data
    • Endpoints
    • Account
    • Access management

So, if you are always responsible for your data, that means you are responsible for protecting it, at both a security and backup point of view.

Veeam Backup for Azure is a turnkey solution that provides you a backup solution which can quickly and securely protect your data, available within the Azure Marketplace itself. Removing the need to spend hours on designing a solution and configuring the software.

Architecture

Veeam Backup for Azure Architecture

There are three main components;

  • Controller Server

A Linux VM deployed into Azure, which runs the Veeam Backup for Azure software.

  • Backup Repositories

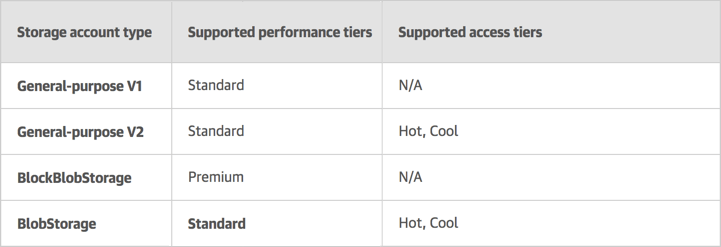
Azure blob storage accounts where your Azure VM backups will be saved. The following storage accounts are supported currently;

Veeam Backup for Azure Supported Storage Accounts

Image Source

  • Workers

These are Azure VMs which are deployed automatically or manually by Veeam Backup for Azure server and are used for backing up and restoring the data. There is the capability to scale up and scale down the number of workers as needed.

The Azure region that worker VMs are deployed to, depend on the storage account they are linked to.

Each worker can process a single VM at a time, if a worker is idle for 10 minutes or more, then it is decommissioned (when setup to auto scale). Worker VMs, run the following services; A Worker service, which is responsible for fetching data from Azure; File-level recovery service, used for mounting data from a backup to the worker VM to initiate file-level recovery.

Veeam Backup for Azure backup process 1

(Image Source)

Deploy Veeam Backup for Azure from the Azure Marketplace

The options to access the solution, which is driven via a web portal;

  • Direct via Public IP address
    • I recommend setting up firewall rules if you do this
  • Accessing the portal via a private IP address via the use of a VPN or Azure Express route.
    • If you need a VPN solution, check out VeeamPN.
    • This removes the need to publicly expose the solution.

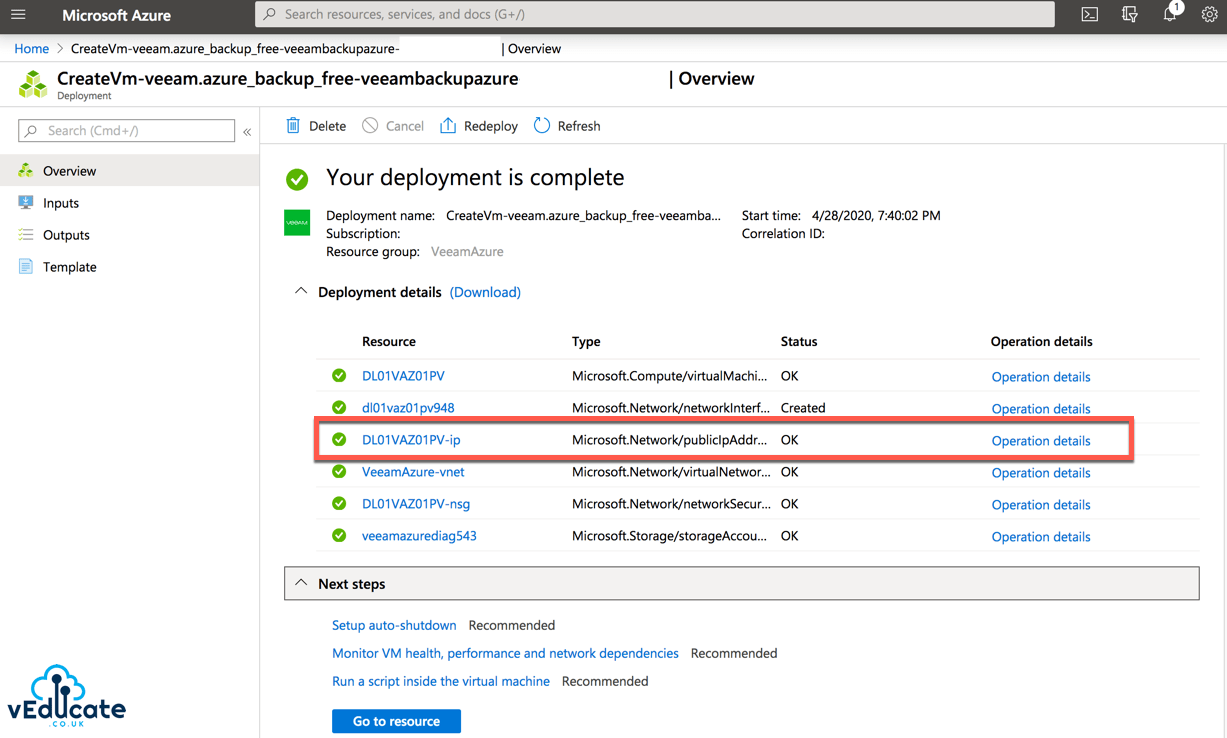
Veeam Azure Deploy from Marketplace Complete

Logging into the Veeam Backup for Azure Console

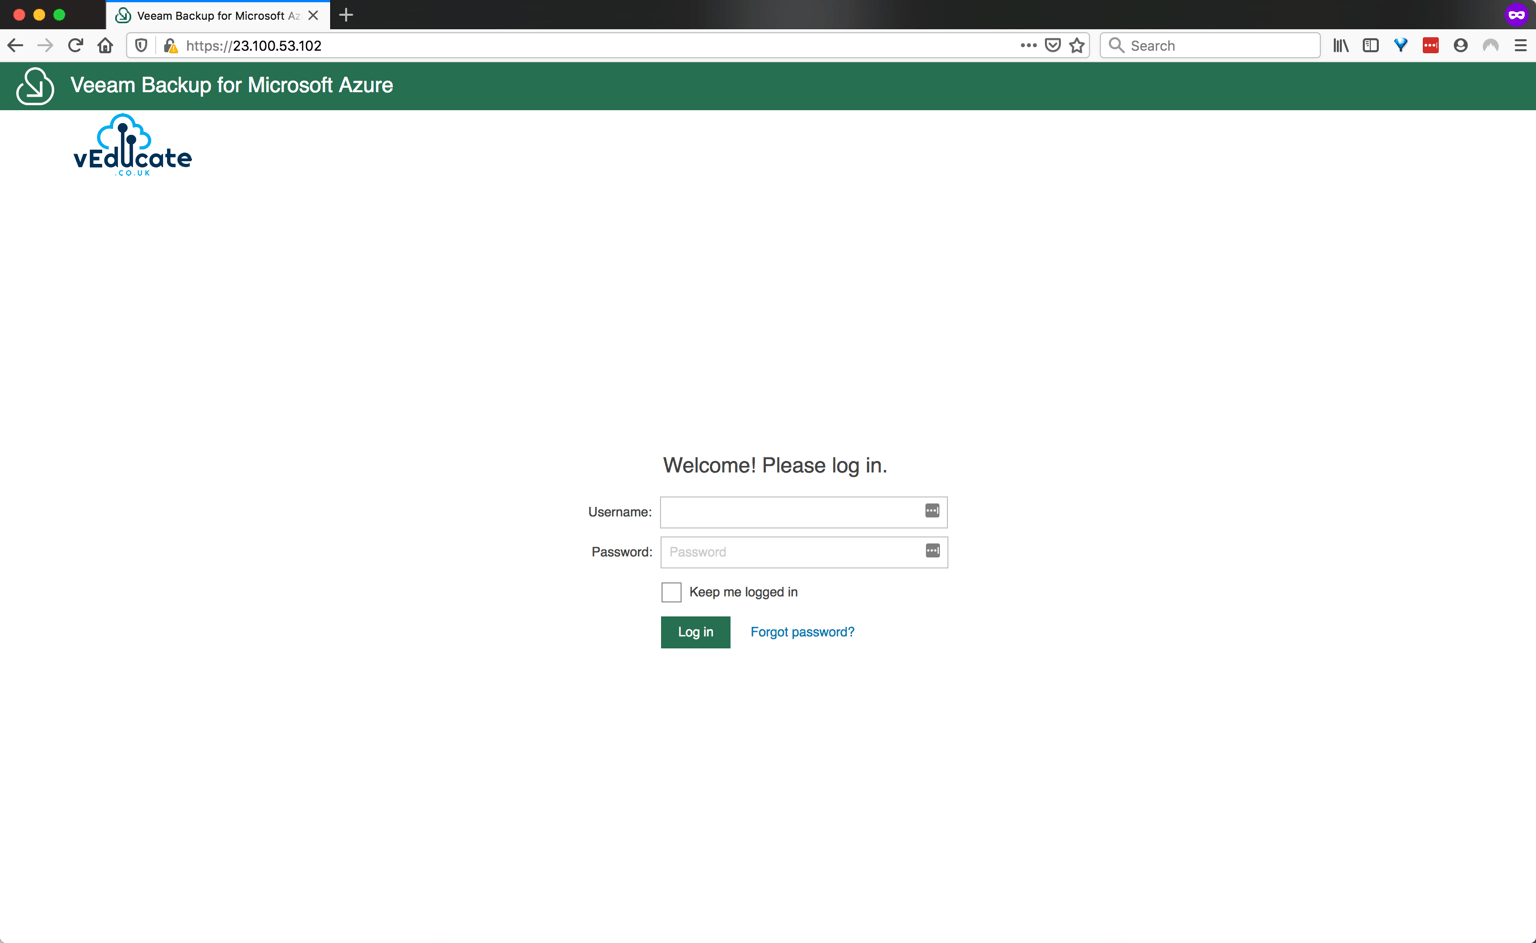
Your first login, you’ll provide the username and password configured during the deployment from the marketplace.

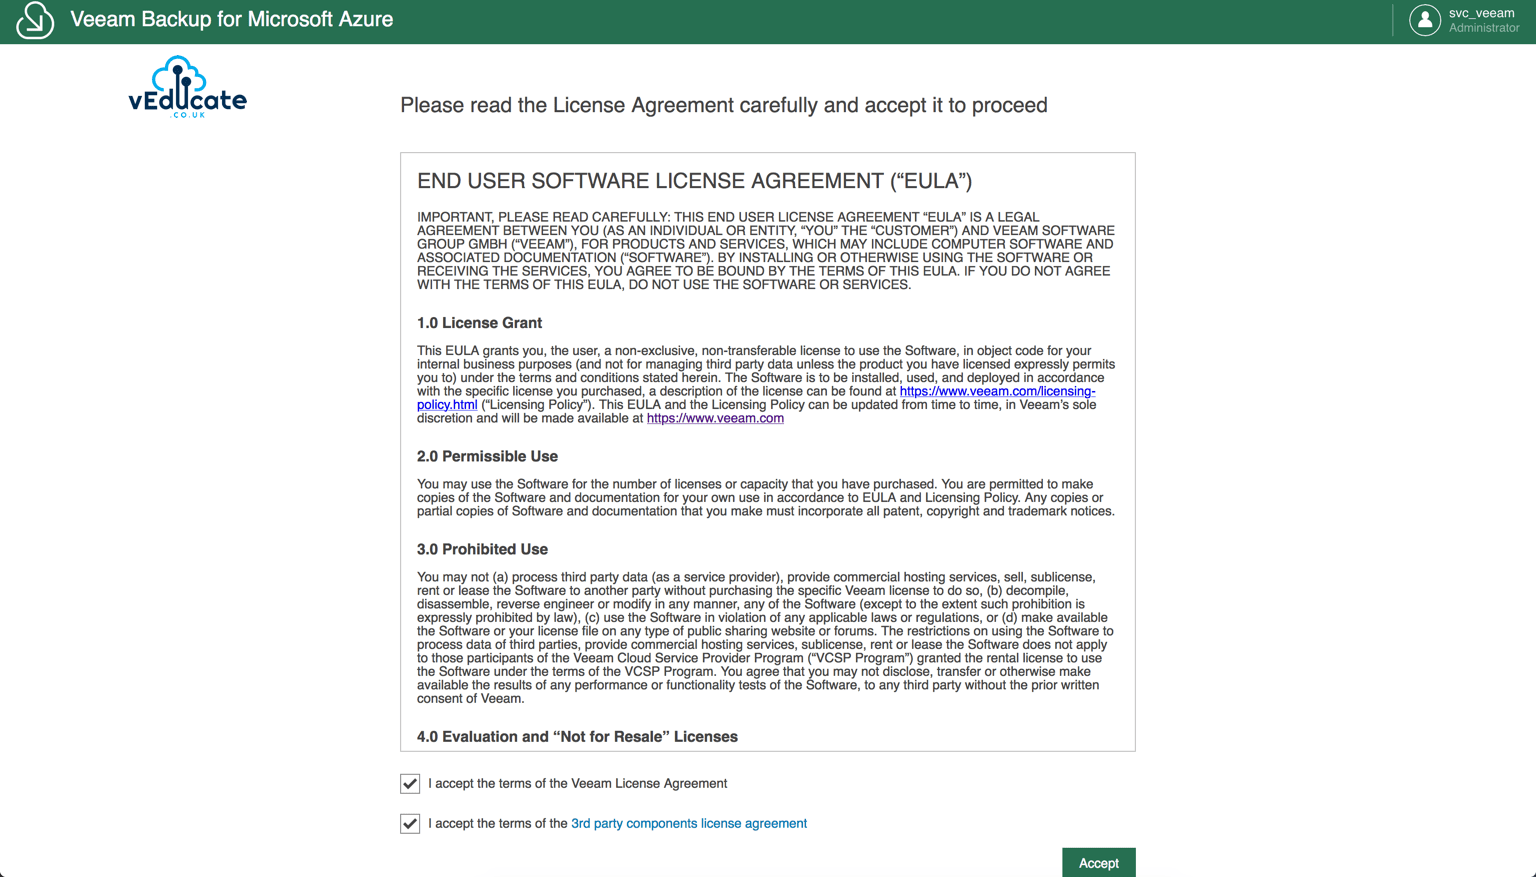
In my example, I will be using the publicly assigned IP address to log into the Portal UI. Upon first logon you will need to accept the EULA.

Veeam Azure First UI logon Veeam Azure Accept EULA

The interface is heavily wizard driven, which makes it simple to use and consume as a solution. If you’ve used Veeam Availability Orchestrator in the past, you’ll recognise similarities with the interface.

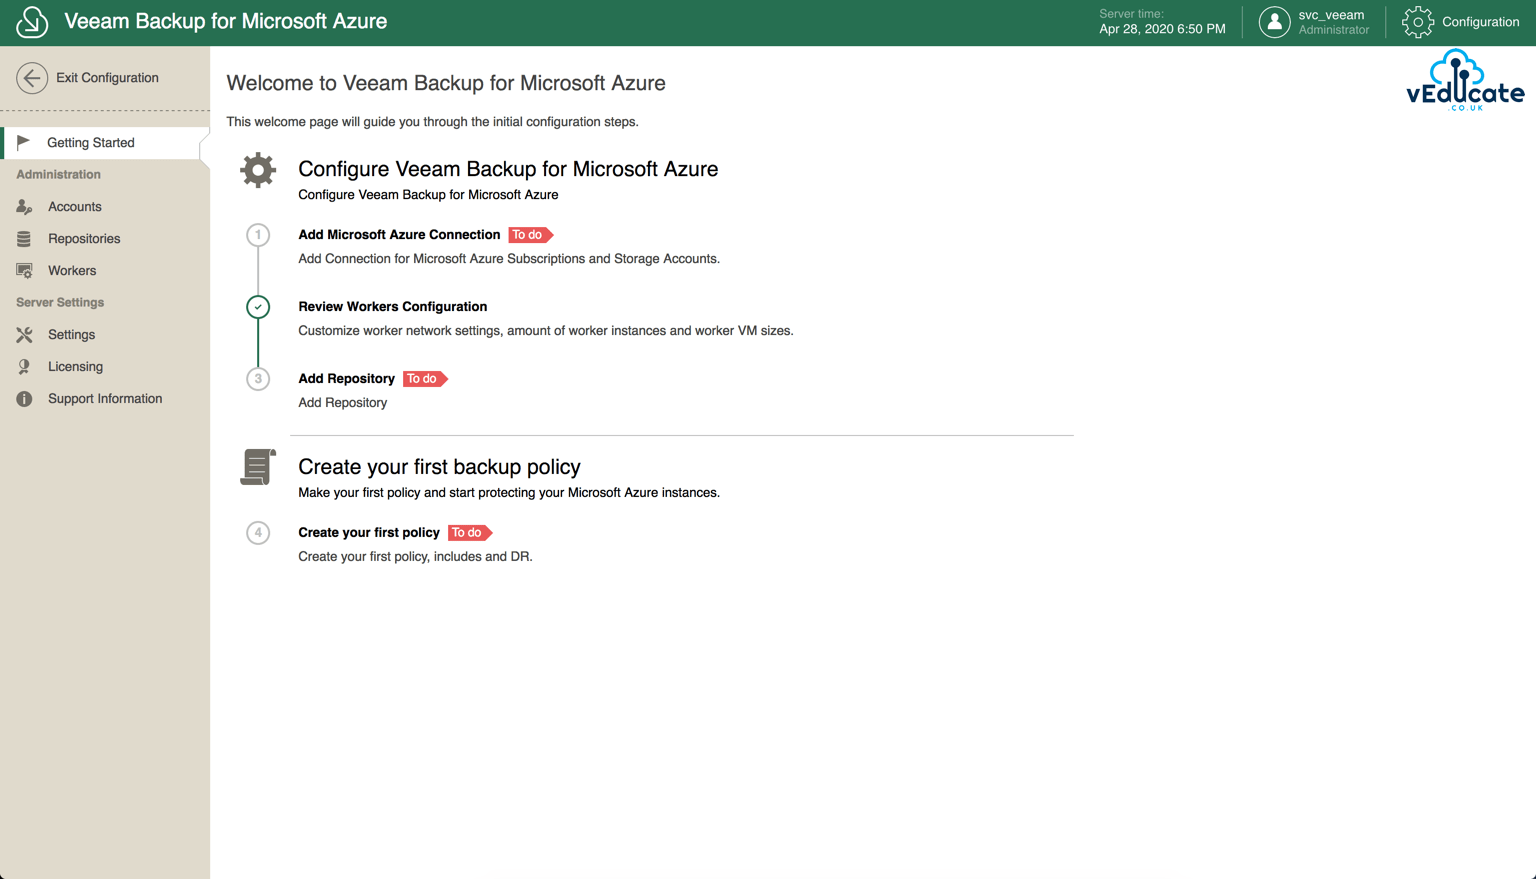
Logging into the solution for the first time, you’ll see this getting started screen, which makes it easy to understand how to operationalise the solution and start protecting your data.

Veeam Azure First Logon Getting started

Connecting to your Microsoft Azure Subscriptions and Storage Accounts

From the getting started page, we’ll click the first task to connect our Veeam Backup for Azure solution to our Microsoft Azure platform, which takes us to the screen shown below.

Veeam Azure Getting started Add Microsoft Azure Account Continue reading Veeam Backup for Microsoft Azure – Getting Started: Setting up the Infrastructure