Tag Archives: restore

kasten by veeam header

How to backup and restore your container workloads using Kasten by Veeam

This blog posts covers using Kasten by Veeam to create backup policies for data protection, and how to restore your data. This blog post follows on from the two installation guides;

Deploying a PacMan browser game as test application

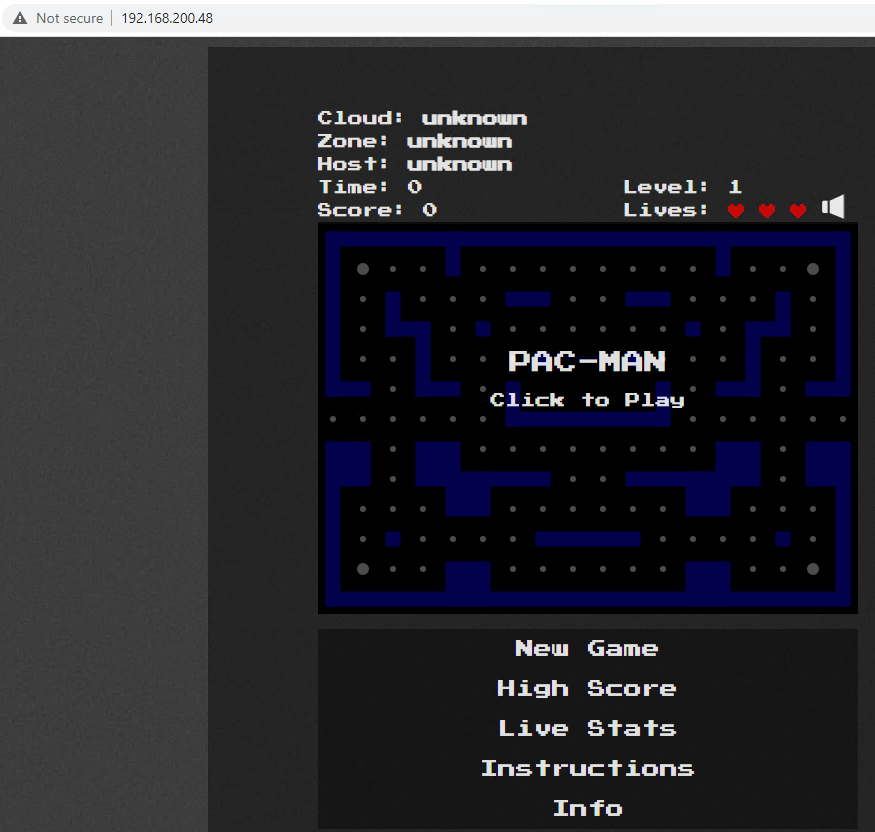
To provide a demo mission critical application for this blog post, I’ve deployed PacMan into my OpenShift cluster, which is accessible via a web browser to play. You can find the files from this GitHub repo to deploy into your own environment.

pacman

This application uses MongoDB to store the scores from the games to give me persistent data stored on a PVC.

pacman high scores

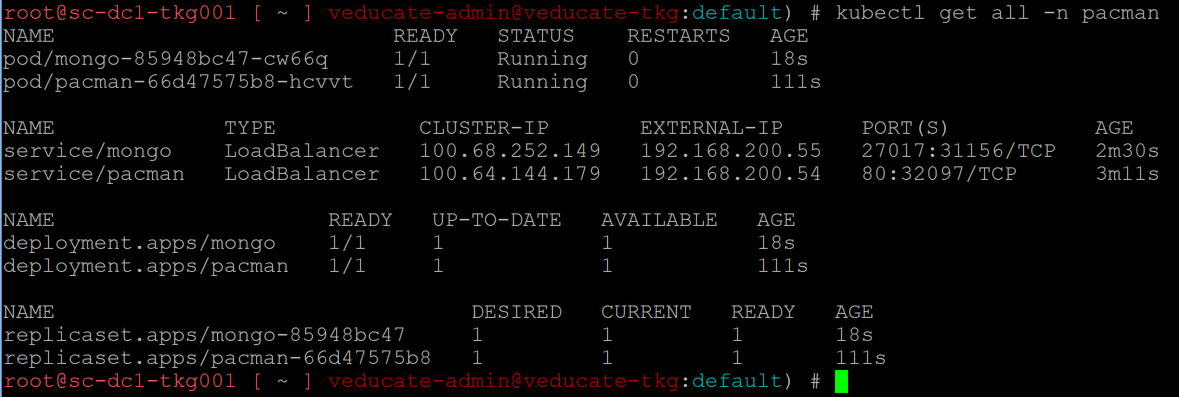
You can see all of the PacMan resources below by running:

kubectl get all -n pacman

kubectl get all -n pacman

Creating a Policy to protect your deployment and data

Log into your Kasten Dashboard.

If you have not yet deployed and configured Kasten, please see these earlier blog posts.

- Installing Kasten for Red Hat OpenShift
- Installing Kasten for VMware Tanzu Kubernetes

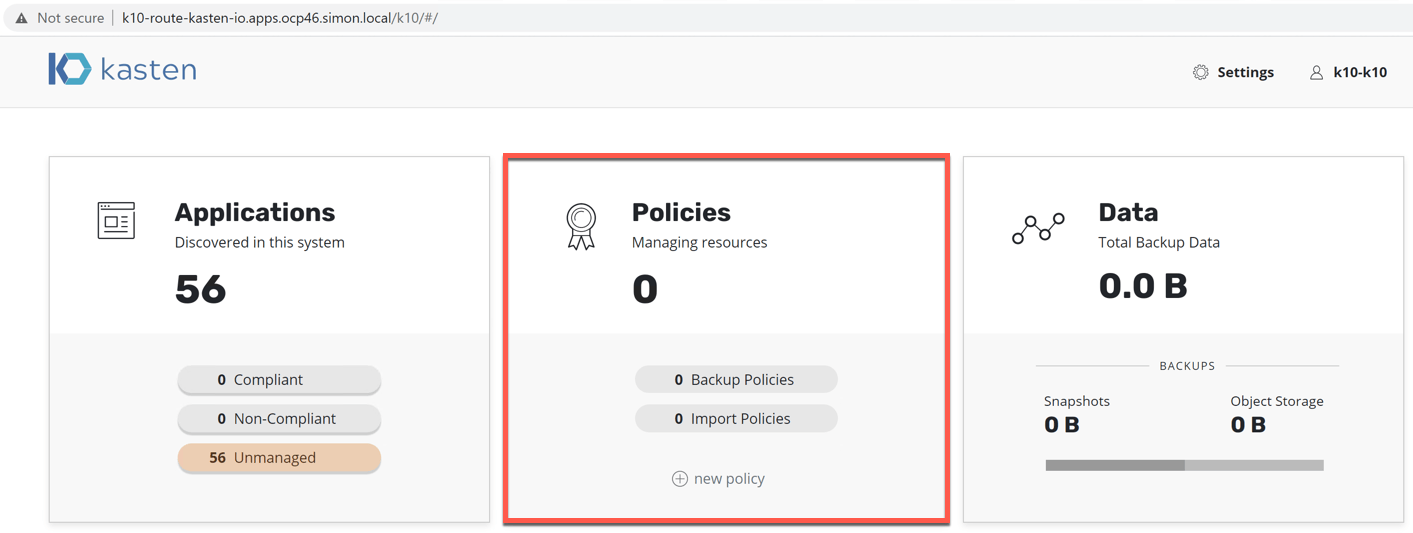
On the Kasten dashboard, click the Policy tile (or new policy link within the tile).

Kasten Dashboard create policy Continue reading How to backup and restore your container workloads using Kasten by Veeam

kasten vmware red hat openshift header

How to install and configure Kasten to protect container workloads on Red Hat OpenShift and VMware vSphere

In this blog post I’m going to cover deploying and configuring Kasten, the container based enterprise backup software now owned by Veeam Software.

This deployment will be inside my Red Hat OpenShift Environment which is running on top of VMware vSphere.

I’ll be protecting a cool gaming application that has data persistence using MongoDB.

Installing Kasten on Red Hat OpenShift

In this guide, I am going to use Helm, you can learn how to install it here.

Create a OpenShift project (Kubernetes namespace) called “kasten-io”

oc new-project kasten-io

oc new project kasten-io

Next we are going to use Helm to install the Kasten software into our OpenShift cluster.

helm install k10 kasten/k10 --namespace=kasten-io --set scc.create=true --set route.enabled=true --set route.path="/k10" --set auth.tokenAuth.enabled=true

Breaking down the command arguments;

  • –set scc.create=true
    • This creates the correct Security Contexts against the users created by the install. This is needed in OpenShift as the security context stance is higher OOTB than that of a vanilla Kubernetes install.
  • –set route.enabled=true
    • This creates a route in OpenShift using the default ingress, so that the Kasten dashboard is accessible externally. This will use the default cluster ID domain name.
  • –set route.path=”/k10″
    • This sets the route path for the redirection of the dashboard. Without this, your users will need to go to http://{FQDN}/ and append the path to the end (k10).
  • –set auth.tokenAuth.enabled=true

helm install k10 kasten kasten-io Continue reading How to install and configure Kasten to protect container workloads on Red Hat OpenShift and VMware vSphere

VMware Tanzu Header

VMware Tanzu Mission Control – Using the Data Protection feature for backups and restores

In this blog post we will cover the following topics

- Data Protection Overview
- Create a AWS Data Protection Credential
- Enable Data Protection on a Cluster
- Running a backup manually or via an automatic schedule
- Restoring your data

The follow up blog posts are;

Tanzu Mission Control 
- Getting Started Tanzu Mission Control 
- Cluster Inspections 
- Workspaces and Policies  
- Data Protection 
- Deploying TKG clusters to AWS 
- Upgrading a provisioned cluster 
- Delete a provisioned cluster 
- TKG Management support and provisioning new clusters
- TMC REST API - Postman Collection
- Using custom policies to ensure Kasten protects a deployed application
TMC Data Protection Overview

Tanzu Mission Control implements data protection through the inclusion of the Project Velero,  this tool is not enabled by default. This blog post will take you through the setup.

Data is stored externally to a AWS location, with volume backups remaining as part of the cluster where you’ve connected TMC.

Currently there is no ability to backup and restore data between Kubernetes clusters managed by TMC.

Create a AWS Data Protection Credential

First we need to create a AWS data protection credential, so that TMC can configure Velero within your cluster to save the data externally to AWS.

If you are looking for supported options for protecting data to other locations, I recommend you either look at deploying Project Velero manually outside of TMC (losing access to the data protection features in the UI) or look at another enterprise service such as Kasten.io.

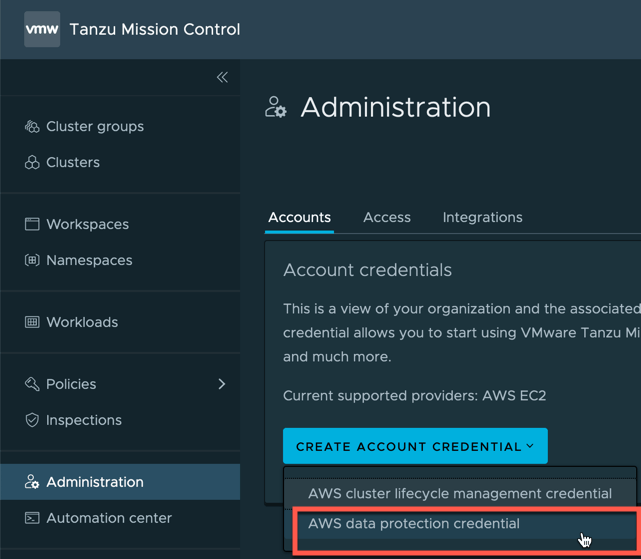
  • On the Administration screen, click Accounts, and Create Account Credential.
  • Select > AWS data protection credential

TMC Data Protection Create Account Credential AWS data protection credential

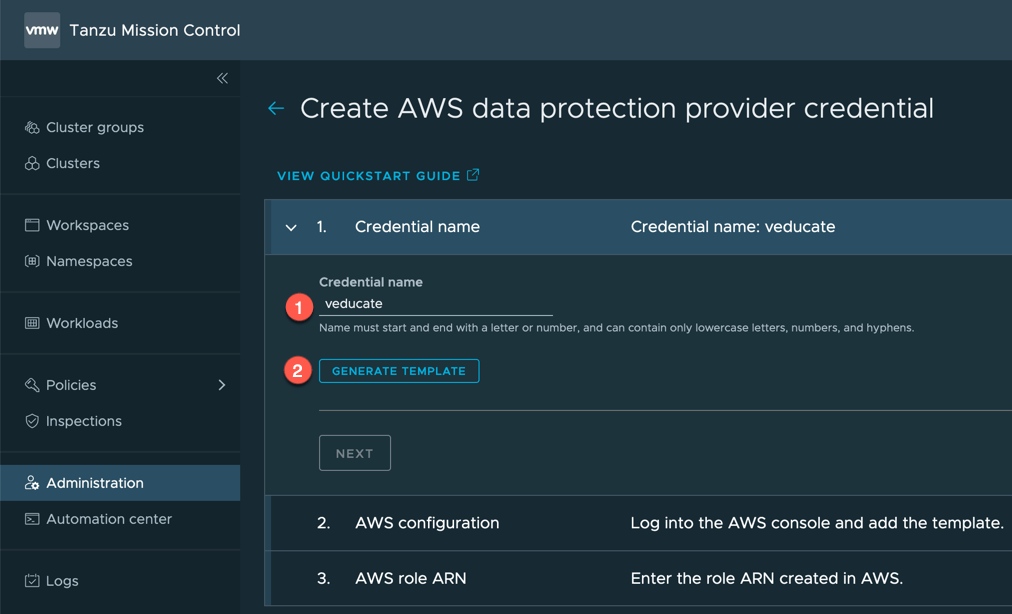
  • Set your account name for easy identification and click to generate template and save this file to your machine.

TMC Data Protection Create AWS Data protection credential Credential Name Generate template

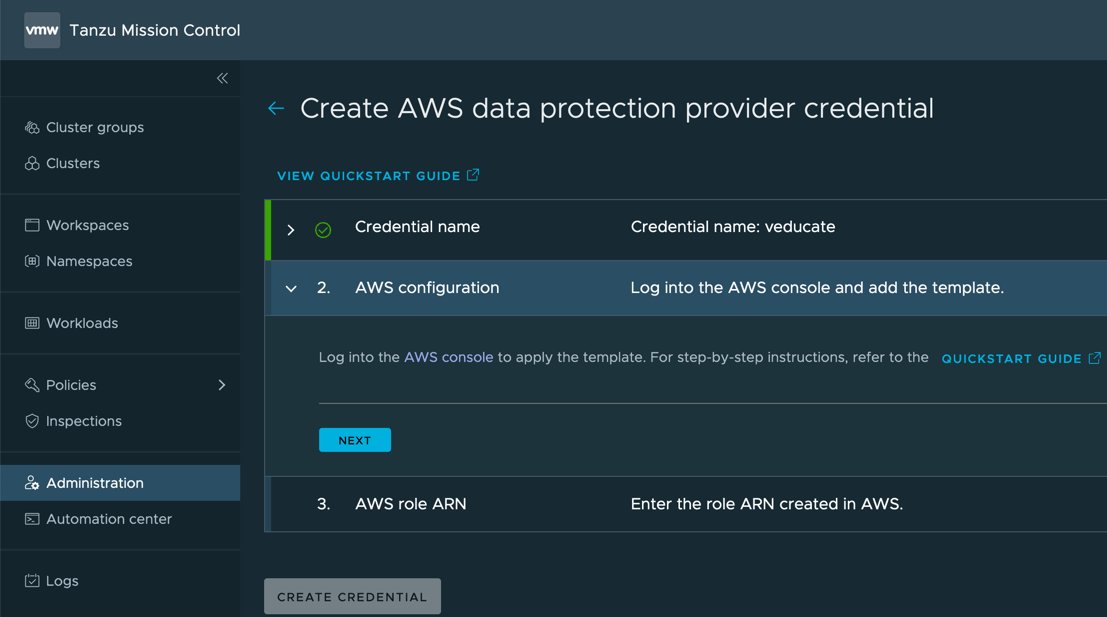
The next steps will require configuration in the AWS console to create resources using CloudFormation so that Project Velero can export data to AWS. Here is the official VMware documentation on this configuration.

TMC Data Protection Create AWS Data protection credential log into the AWS console

  • In the AWS Console, go to the CloudFormation service

TMC Data Protection AWS Console Cloud Formation

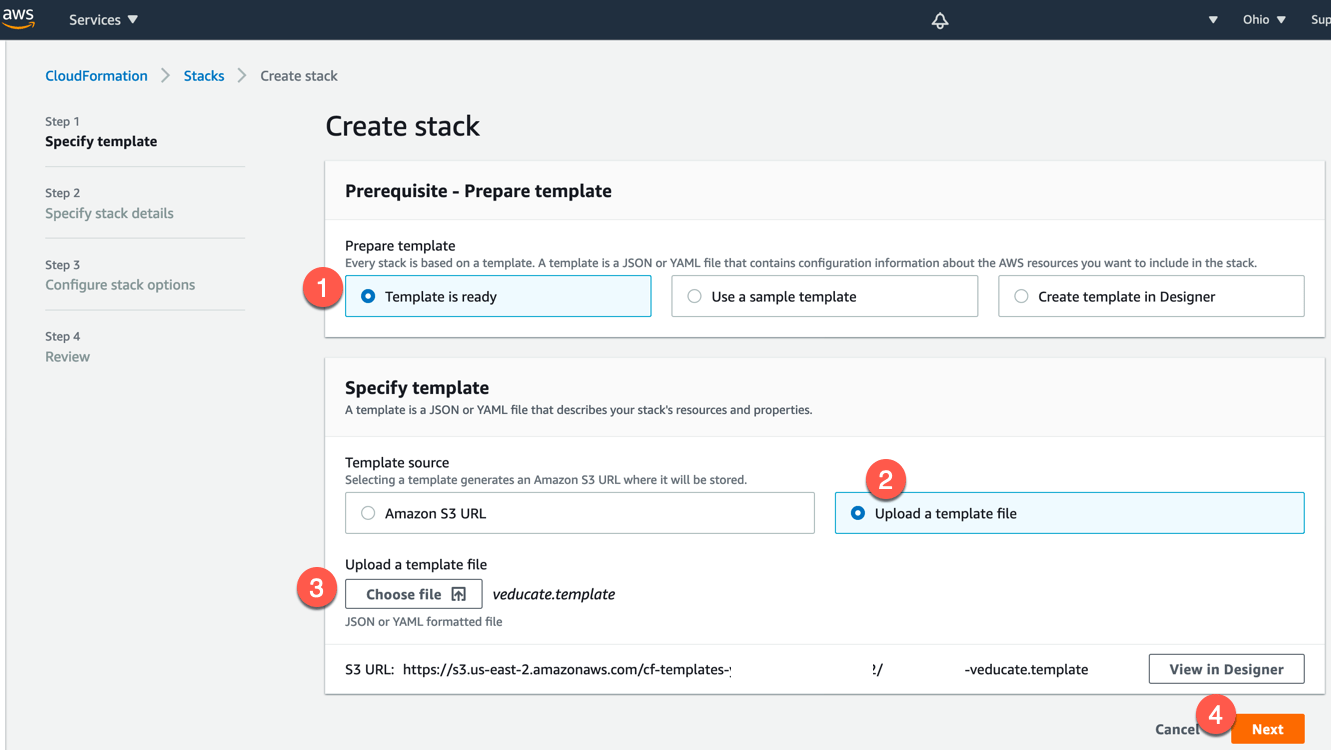
  • Click to create a new stack
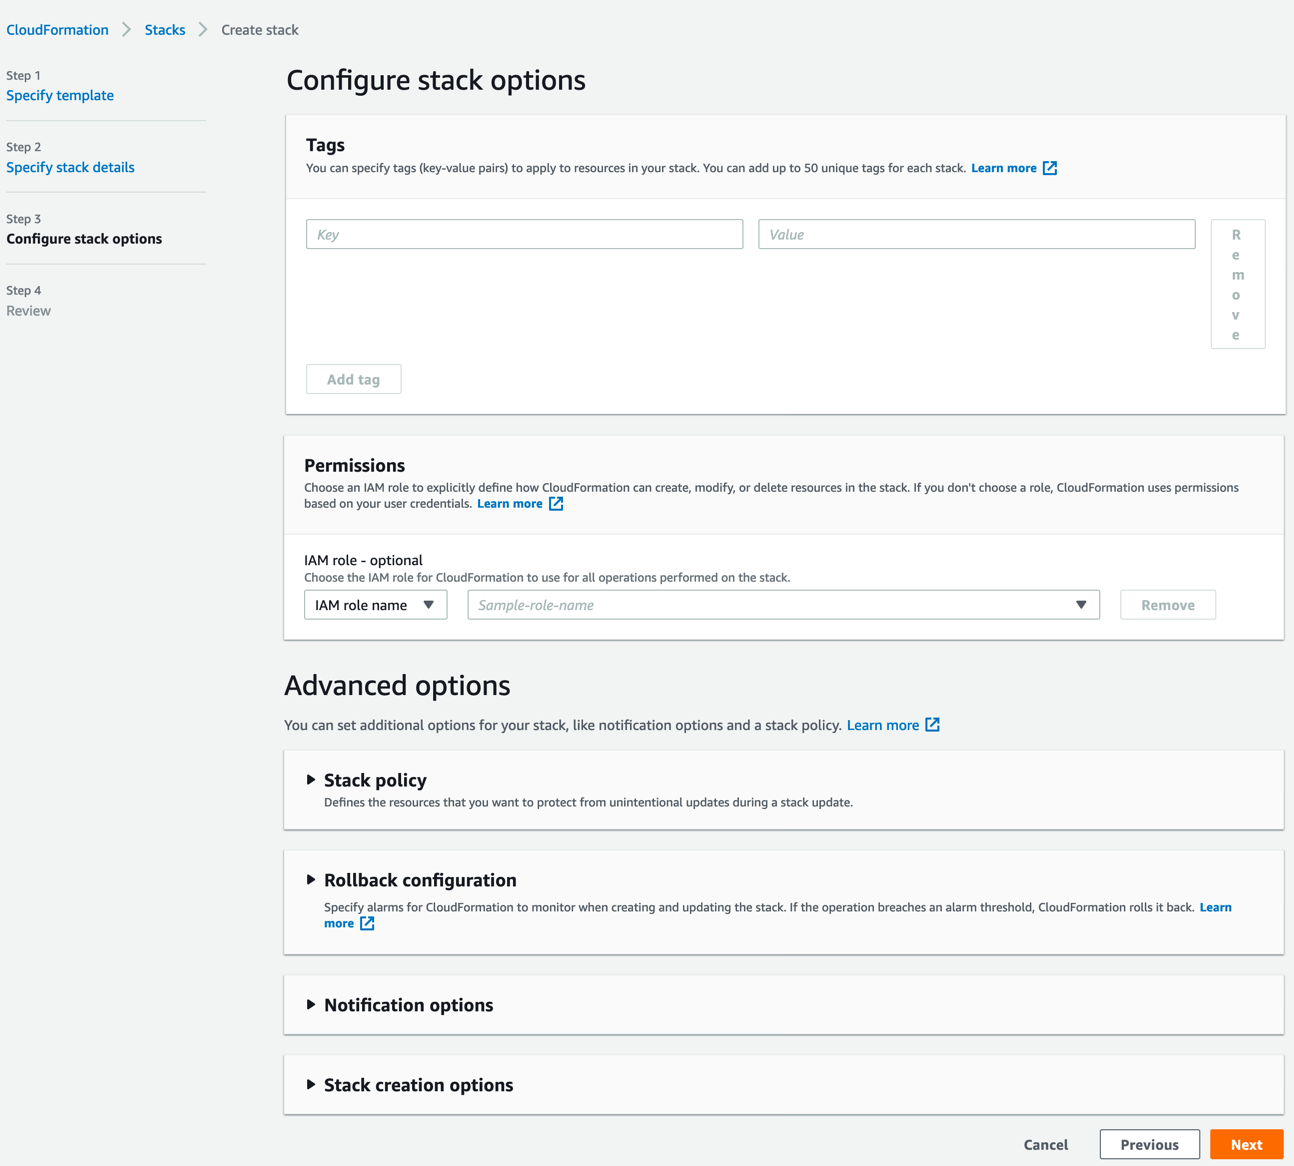
  1. Click “Template is ready” as we will provide our template file from earlier.
  2. Click to upload a template file
  3. Select the file from your machine
  4. Click next

TMC Data Protection AWS Console CloudFormation Create a Stack Specify template

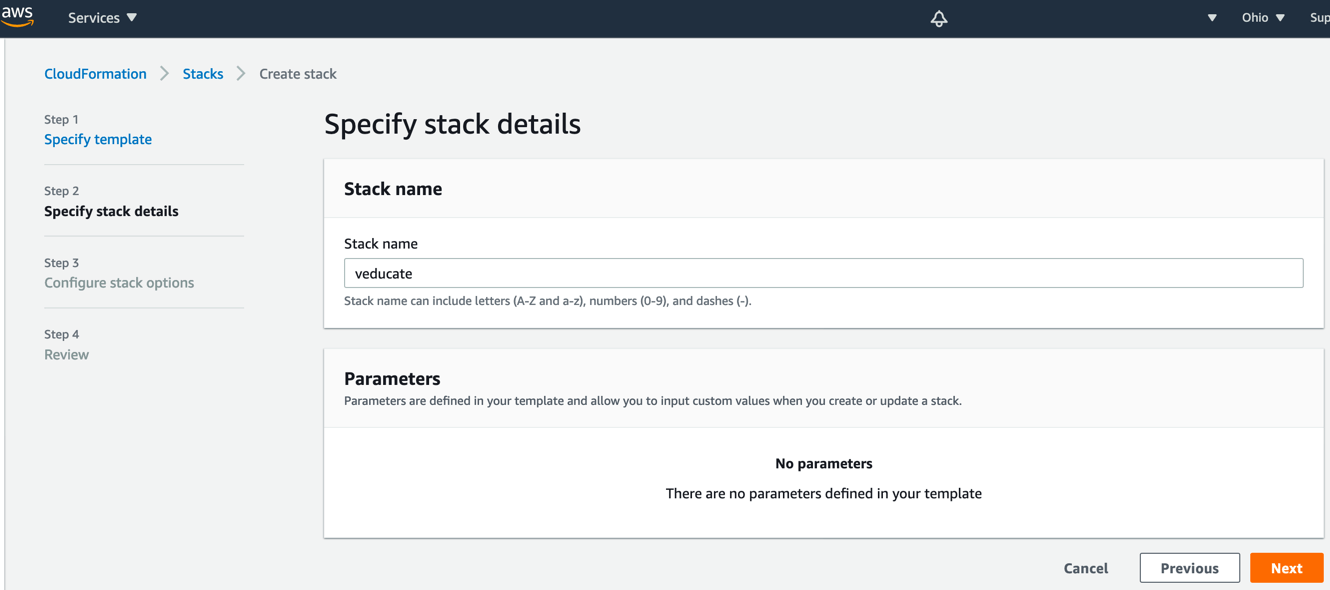
  • Provide a stack name and click next

TMC Data Protection AWS Console CloudFormation Create a Stack Specify stack details

  • Ignore all the items on this page and click next
  • Review your configuration and click finish.

TMC Data Protection AWS Console CloudFormation Create a Stack Configure Stack Options

  • Once you’ve reviewed and clicked create/finish. You will be taken into the Stack itself.
  • You can click the Events tab and the refresh button to see the progress.

Continue reading VMware Tanzu Mission Control – Using the Data Protection feature for backups and restores

Veeam Backup for Azure Header 605

Veeam Backup for Microsoft Azure – Restoring a Backup

In this blog post we will cover the following topics

- Restoring a Backup
- - Viewing protected data
- - File Level Recovery
- - - File Level Recovery Session Log
- - Virtual Machine Disk Restore
- - Full VM Restore

The follow up blog posts are;

- Getting started with Veeam Backup for Azure
- - Configuring the backup infrastructure
- - Monitoring
- - Protecting your installation
- - System and session logs
- Configuring a backup policy
- - How a backup policy works 
- - Creating a Backup Policy 
- - Viewing and Running a Backup Policy
- Integrating with Veeam Backup and Replication
- - Adding your Azure Repository to Veeam Backup and Replication
- - Viewing your protected data
- - What can you do with your data?
- - - Restore/Recover/Protect
Viewing Protected Data

Once you have a successful backup policy run, you will find that by navigating to “Protected Data” in the left-hand navigation pane, you will find details of your protected workloads and the backups stored.

Veeam Backup for Azure Protected Data

Highlighted in the purple box above, we are able to click on each of our protected virtual machines and see the details of the restore points held.

The available restore options are;

  • VM Restore
    • Restore a full virtual machine to the same or a different location. This restore uses both the VM configuration and VHD backups.
  • Disk Restore
    • Restore only a virtual machines hard drive to the same or a different location, these will not be attached to any virtual machines when the restore is complete.
  • File-Level Recovery
    • Restore of files and folders from protected instances, which are available to download to your local machine.

Veeam Backup for Azure Protected Data Viewing available restore points Restore Options

Below, we can see the available restore points for my “Ubuntu01” virtual machine. As the backup policy has only run once, I have a single snapshot held with the VM itself, and a single backup of the full virtual machine (VHDS and VM configuration, which are located in my configured Repository.

  • Backups – Both managed/unmanaged VHDs are saved to the configured Backup Repository.
  • Snapshots
    • Managed VHDs – snapshot saved to resource group of source VM,
    • Unmanaged VHDs – snapshots saved to Azure Storage Account of source VHD

From this view, we can select to restore the Full VM, the individual VHDs, under the Restore option, or we can perform a file-level Recovery under the second self-named option.

Veeam Backup for Azure Protected Data Viewing available restore points

File Level Recovery

You can enter a file level recovery as per the above screenshot, or from the main screen by highlighting your protected VMs and clicking file level recovery.

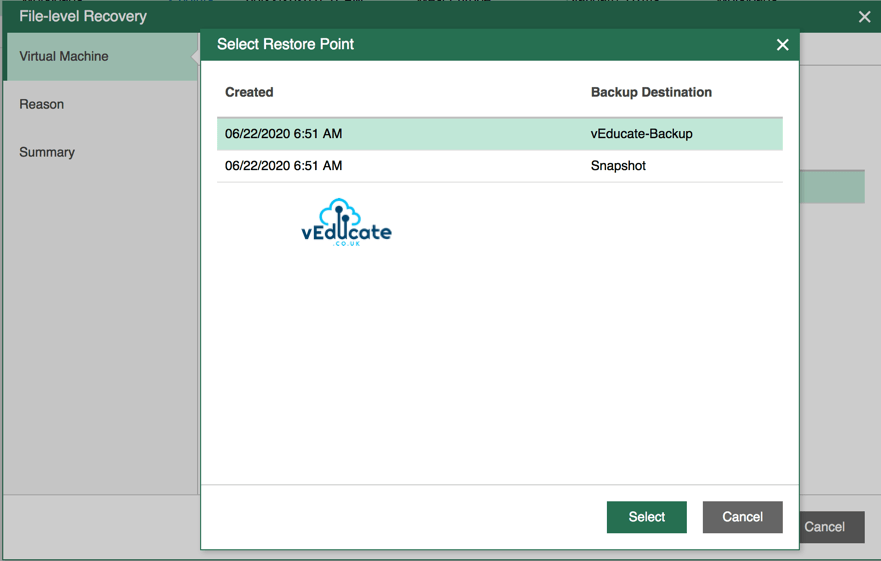
By clicking “Change Restore Point” you will of course see the various points in time available.
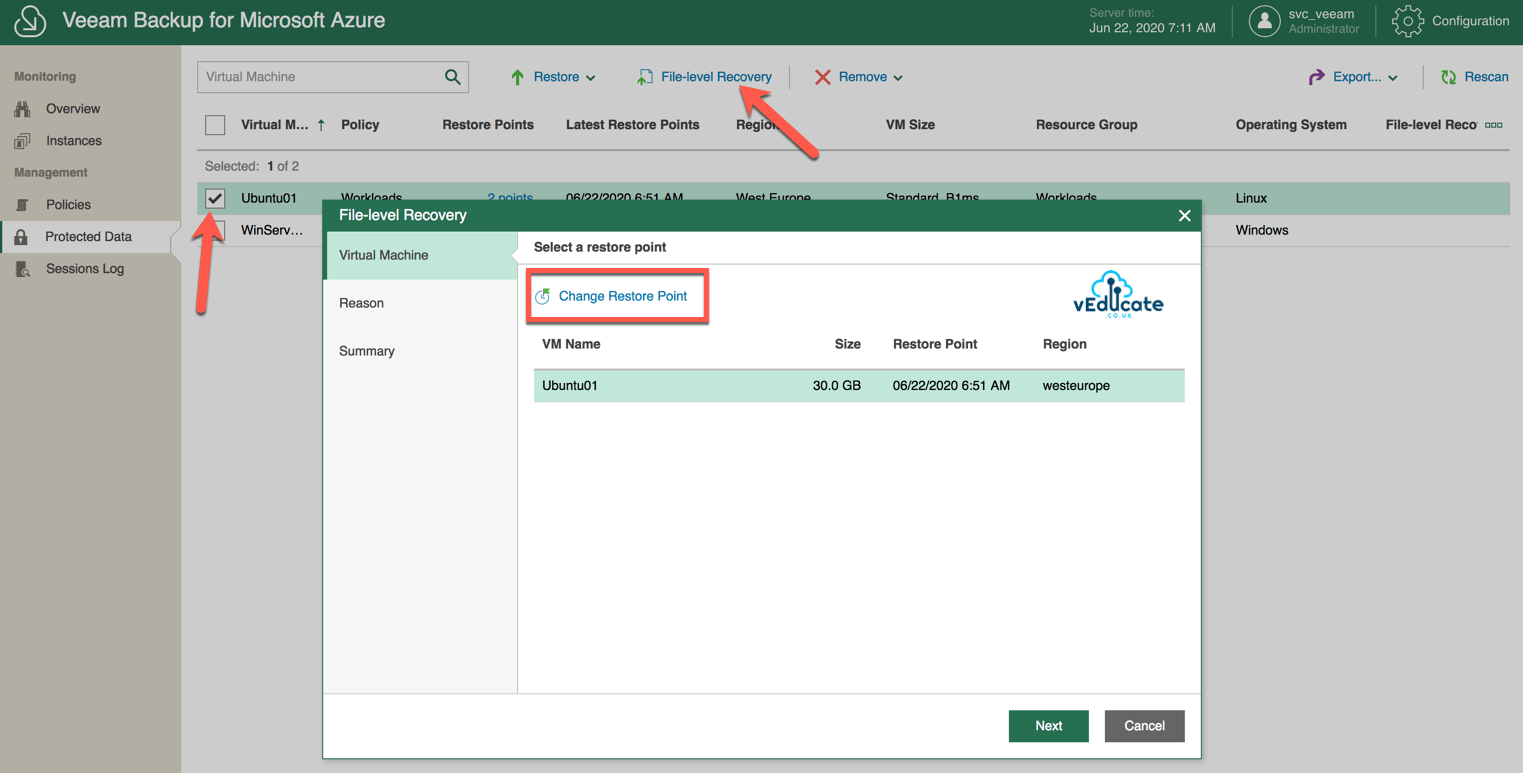
Veeam Backup for Azure Restore File Level Recovery Virtual Machine

Veeam Backup for Azure Restore File Level Recovery Virtual Machine Select Restore Point Continue reading Veeam Backup for Microsoft Azure – Restoring a Backup

Veeam new logo featured image

Building a Veeam Lab – Testing Scenarios

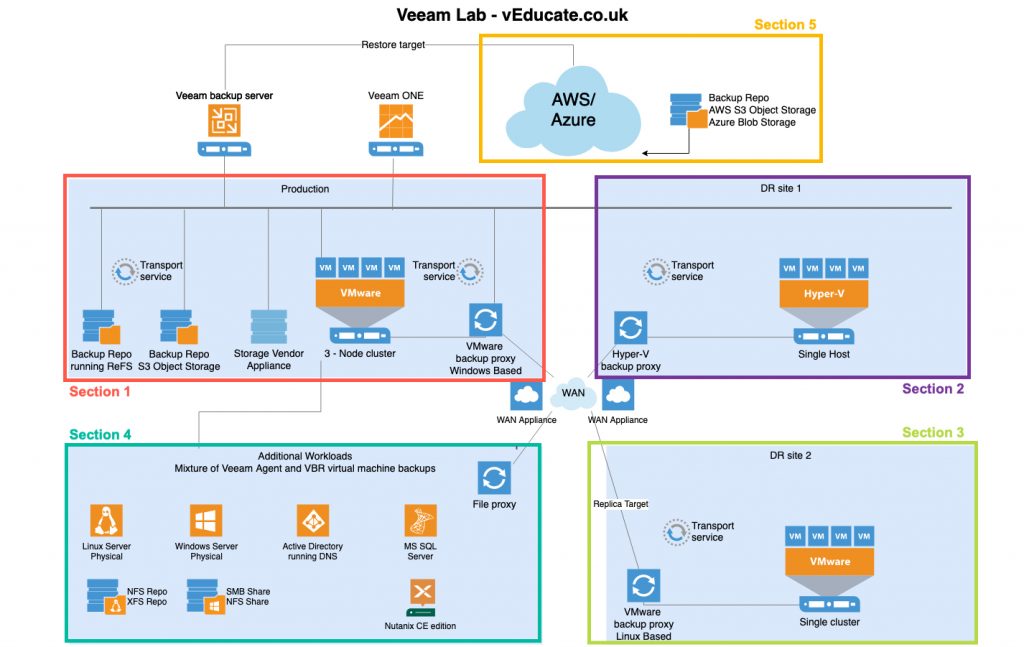
In my previous post, I looked at the architecture you may want to implement to test the various features of Veeam Backup and Replication, including features from v10.

I thought it would be a good idea to break down the architecture into sections, and provide some ideas of what features/configurations can be tested in each section. This of course is not an exhaustive list.

I’ve broken down the original diagram into 5 Sections.

Veeam Lab Architecture in Sections

Section 1 – VMware Cluster Continue reading Building a Veeam Lab – Testing Scenarios