
In this blog post we will cover the following topics
- Tanzu Mission Control
- - Workspaces
- - - Creating a workspace
- - - Creating a managed Namespace
- - - Viewing a managed Namespace
- - Policy Driven Cluster Management
- - - Creating a Image Registry Policy
- - - Creating a Network Policy
The follow up blog posts are;
Tanzu Mission Control
- Getting Started Tanzu Mission Control
- Cluster Inspections
- Workspaces and Policies
- Data Protection
- Deploying TKG clusters to AWS
- Upgrading a provisioned cluster
- Delete a provisioned cluster
- TKG Management support and provisioning new clusters
- TMC REST API - Postman Collection
- Using custom policies to ensure Kasten protects a deployed application
Workspaces
Workspaces provide an application view, where you logically group Kubernetes Namespaces together, regardless of the cluster to which they are attached.
This is in contrast to Cluster Groups, which are focused on the infrastructure view.
These Workspaces can be created to align to your projects or applications, from a hierarchy point of view, you would then authorize your users to these Workspaces, so that they can monitor and manage the namespaces related to their function.
Creating a Workspace
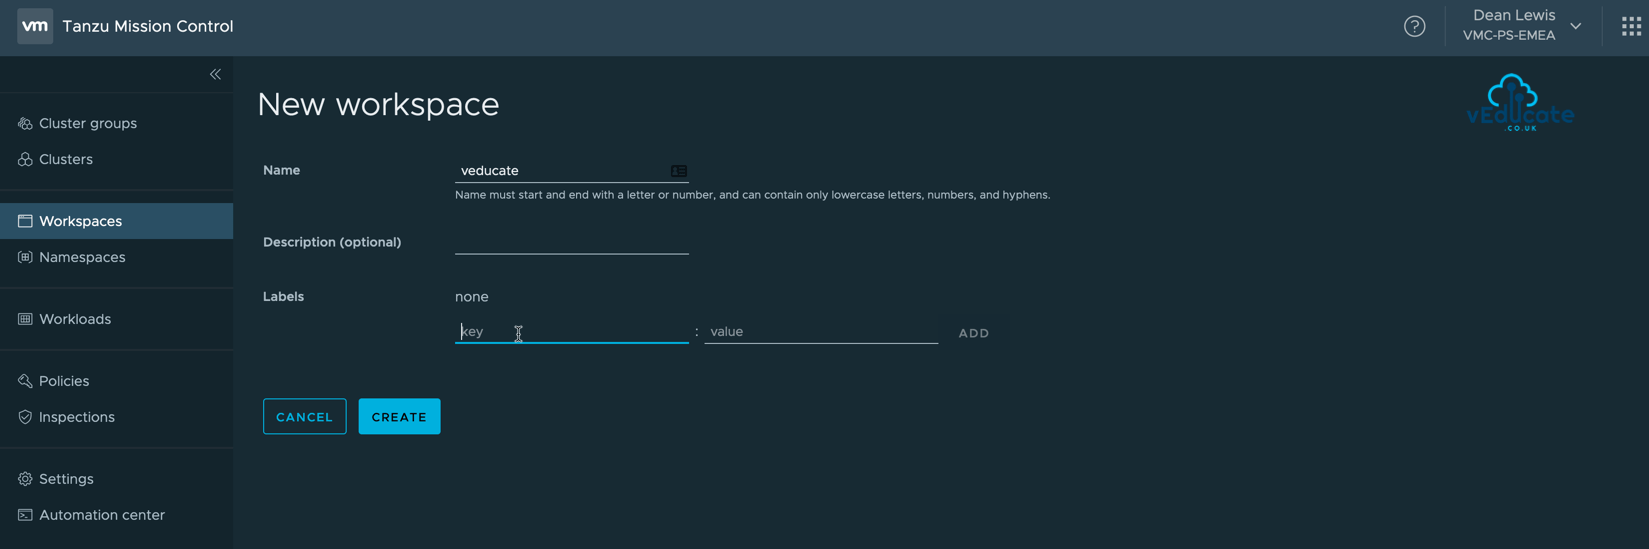
Click the Workspace navigation view on the left-hand side, and then New Workspace.
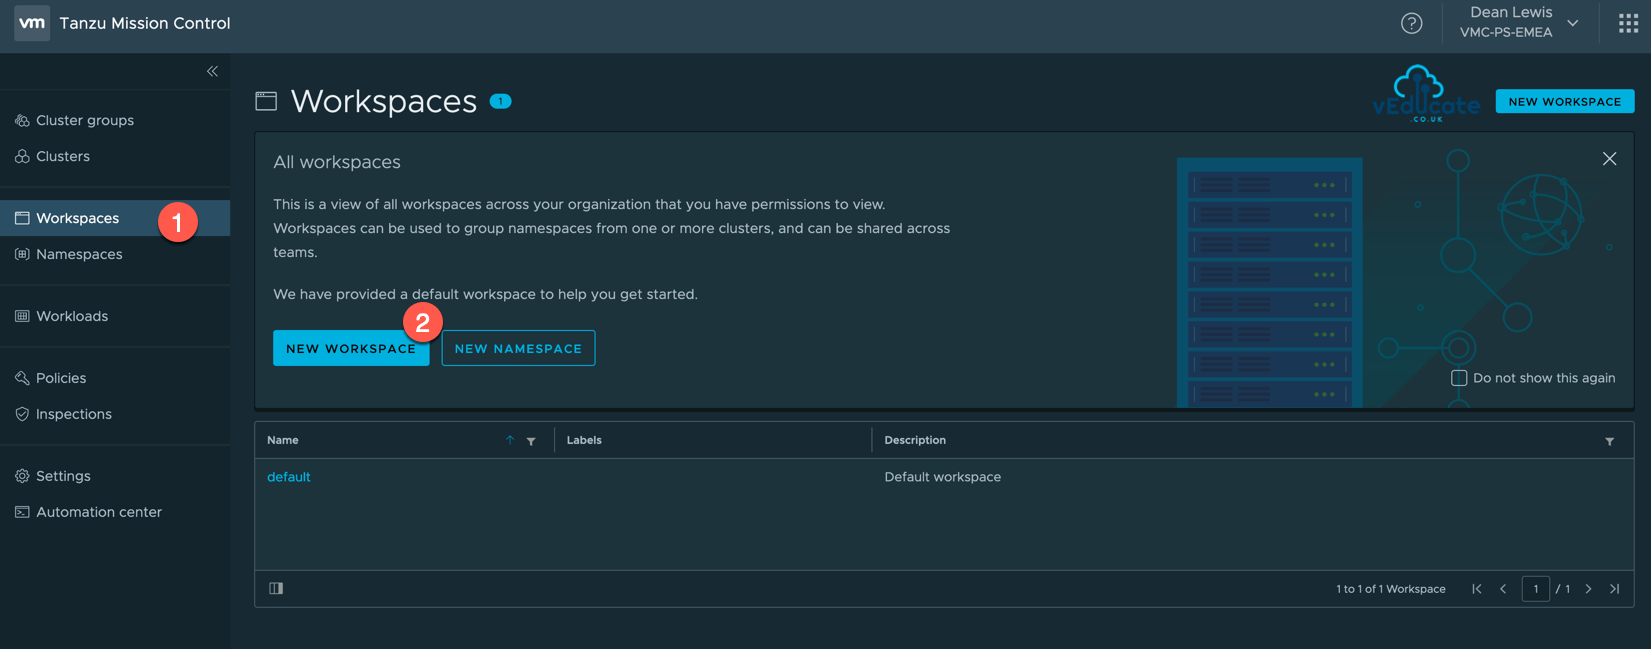
Specify your Workspace name, and provide the optional description and labels, these can be added after creation if needed.
Now you have a Workspace, it's no good without any associated Namespaces, so let's continue.
Creating a managed Namespace
All Namespaces attached to a Workspace will be managed Namespaces under TMC.
To create a managed Namespace, you can do this in one of four places;
- Within the Workspace Navigation view
- Inside the Workspace Object itself
- On the Namespace Navigation view
- On the Cluster Object > Navigation Tab
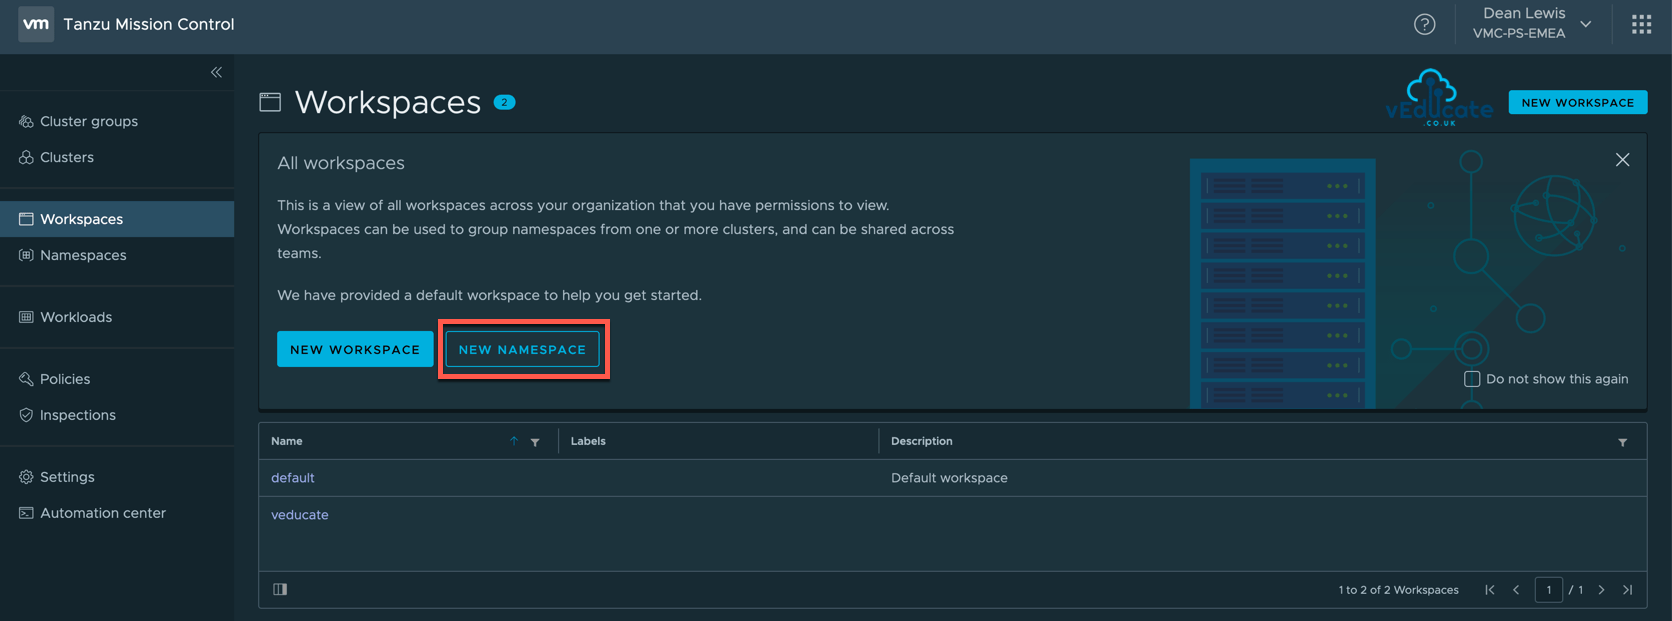
Each option will bring you back to this New Namespace page.
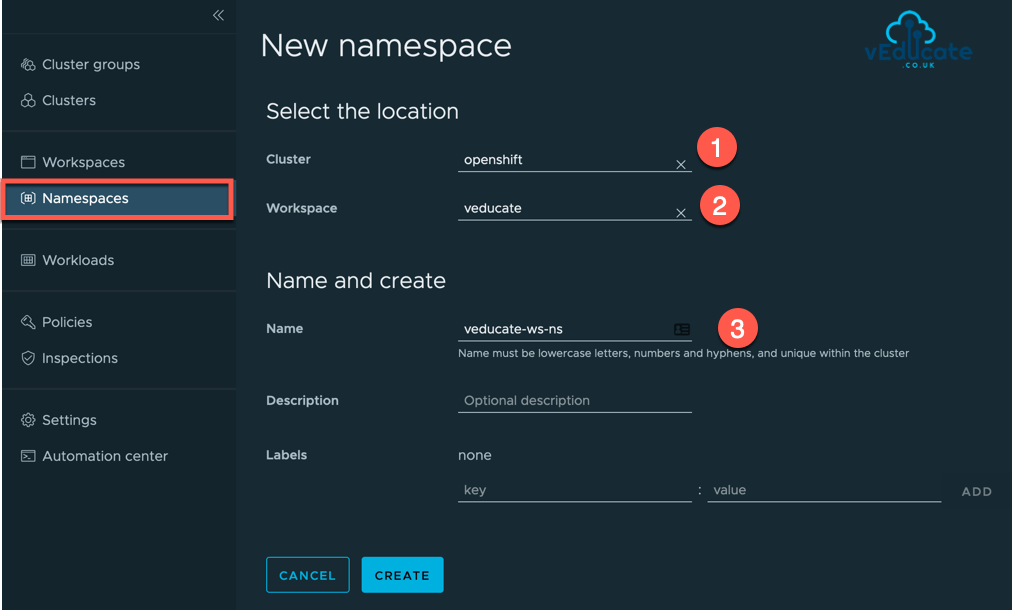
At minimum you need to input the mandatory fields;
- Cluster Object
- Workspace
- Namespace Name
As usual, description and labels are optional and can be edited after creation. If you get any of the mandatory parameters incorrect, you will need to delete the Namespace and start again.
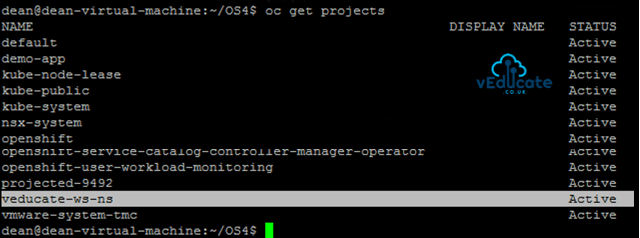
If I view all my namespaces on my Kubernetes cluster, we can see the new Namespace has been created, for my testing, this was done straight away.
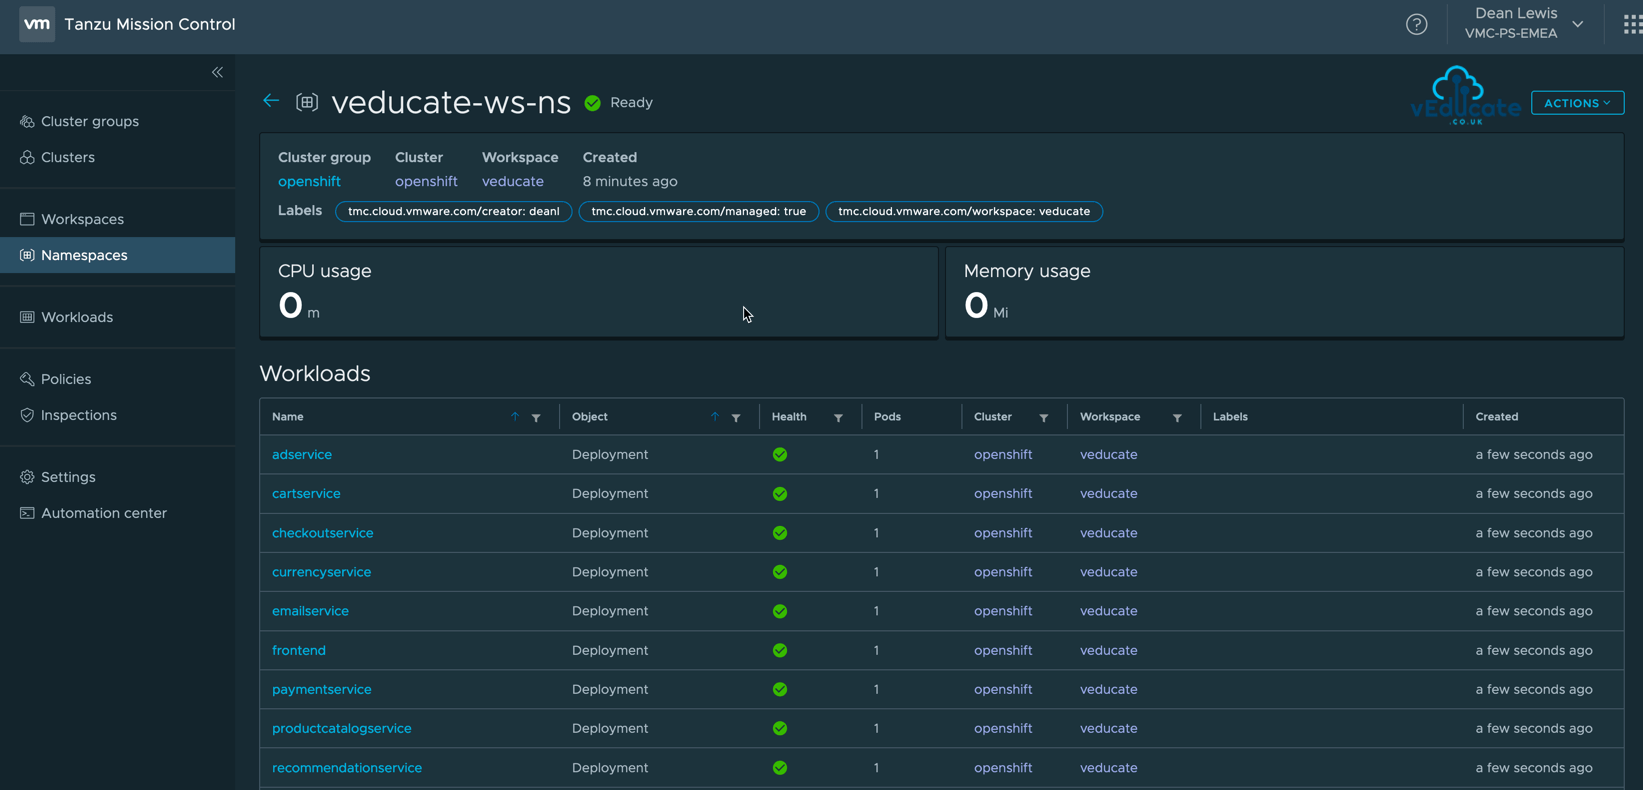
Viewing a managed Namespace
Once my Namespace is deployed, I created a quick Demo app.
Clicking on a Namespace via either the Workspaces navigation view or Namespaces navigation view, will take you to Namespace object page, whereas below you can see the workloads deployed.
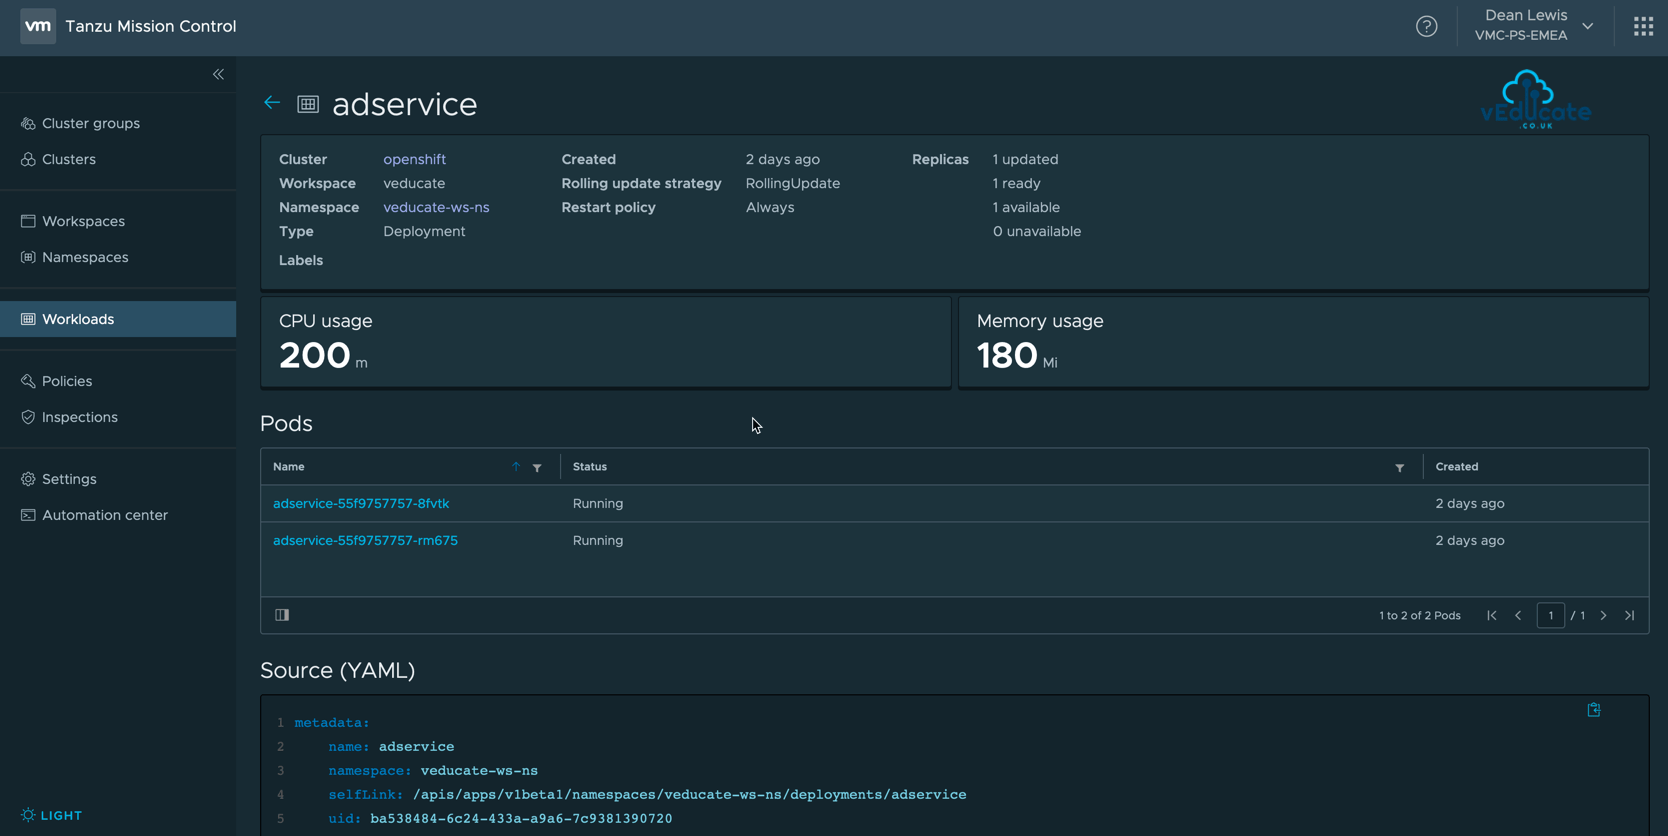
Clicking on a Workload will then show you the relative details including the configuration YAML. In the below screenshot, you can also see Workloads relation to Cluster, Workspace and Namespace.
Policy-Driven Cluster Management
One of the standout features of Tanzu Mission Control, is the ability to create policies to manage the operation and security of your Kubernetes environments.
The below available policies allow you to provide a set of rules that govern your organization and all the objects it contains.
The policy types available in Tanzu Mission Control include the following:
- Access Policy
Access policies allow you to use predefined roles to specify which identities (individuals and groups) have what level of access to a given resource. For more information, see the official product documentation for access control.
- Image Registry Policy
Image registry policies allow you to specify the source registries from which an image can be pulled.
- Network Policy
Network policies allow you to use pre-configured templates to define how pods communicate with each other and other network endpoints.
All three policy types can be applied to a Workspace, only the Access policy can be applied at cluster level.
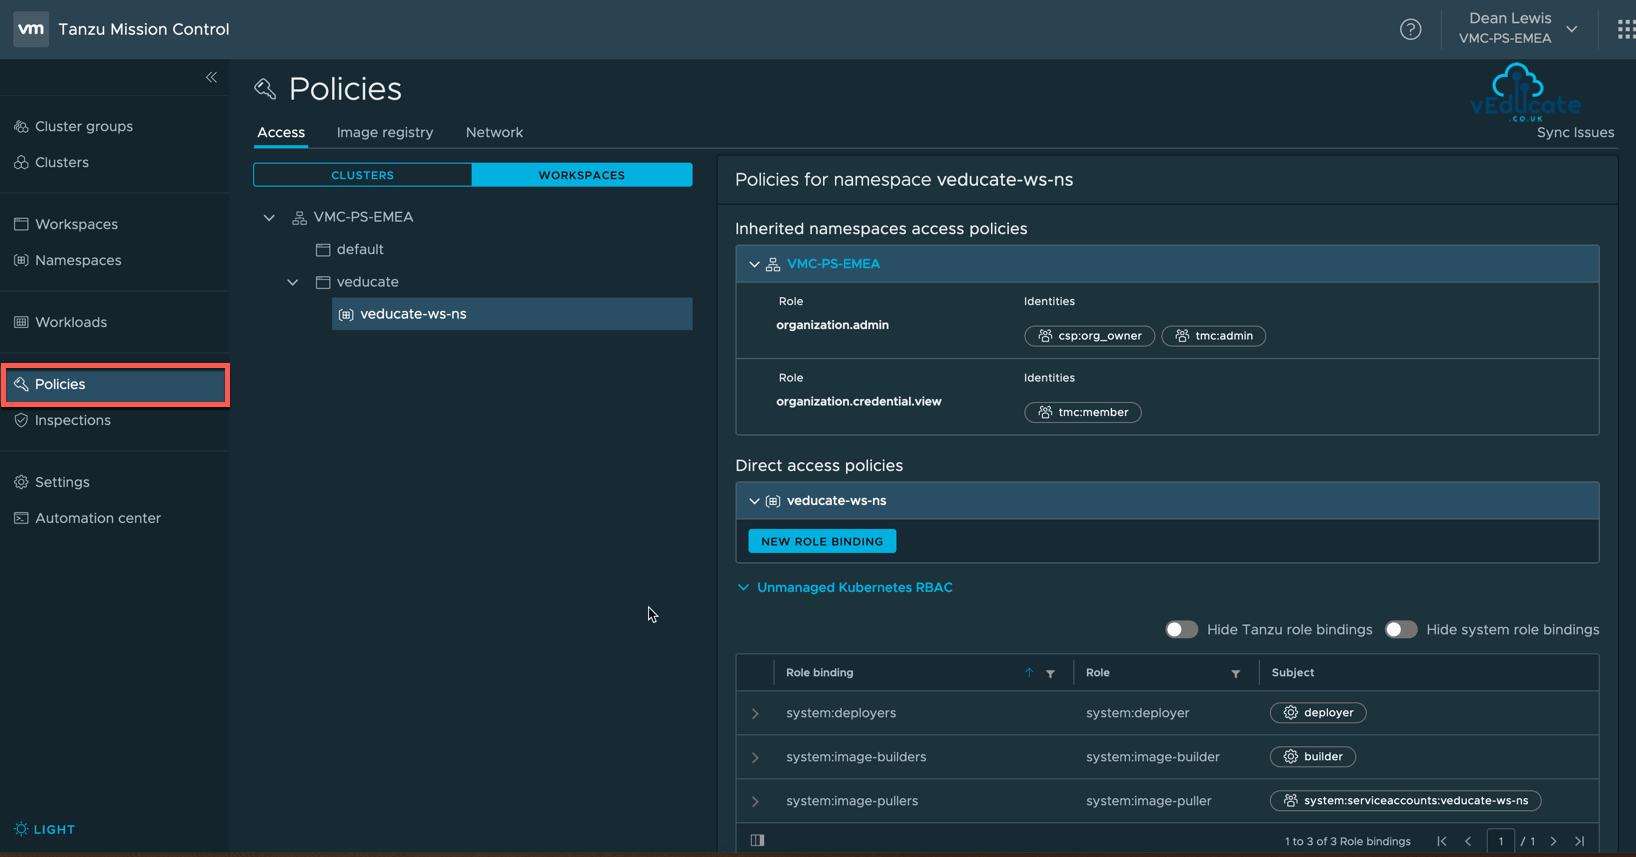
Below we can see the access policy view with a namespace selected under its linked Workspace.
I can see the access authorization that is inherited from the Customer Organisation itself (vmc-ps-emea). And I have the option to create further direct access policies unique to the Namespace itself.
The below screenshots show the options for creating a Direct Access Policy and the available role settings at Namespace level.


There are three hierarchy objects of role settings;
- Cluster.
- Workspace.
- Namespace.
And follow the basic principle of;
- Admin - Full rights on object and policies.
- Edit - Editing rights on object but lacks editing of policies.
- View - Read access to objects.
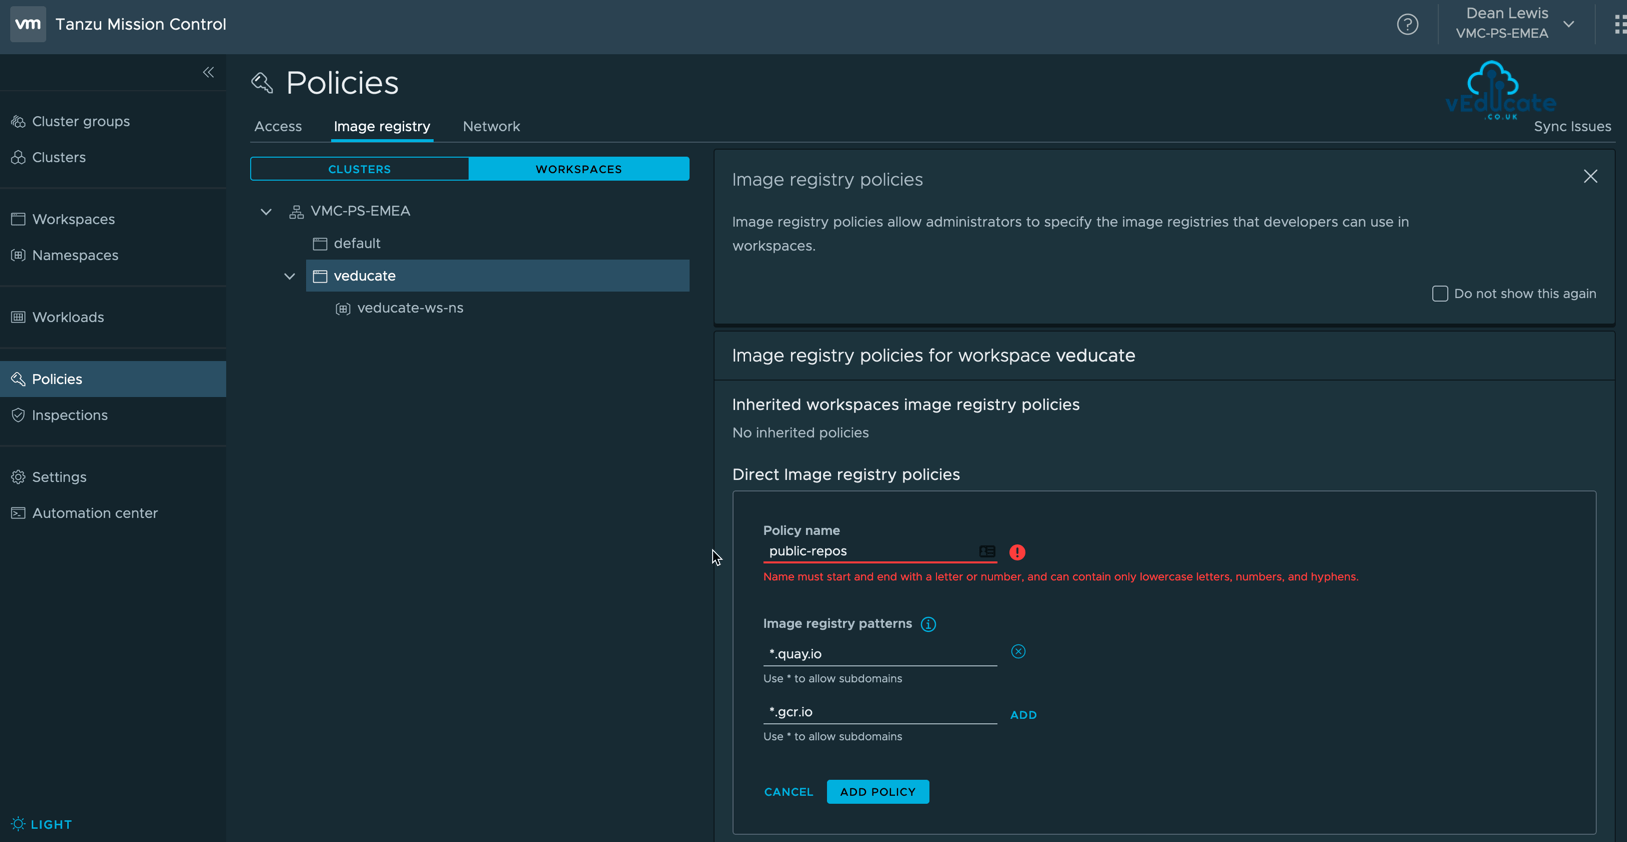
Creating an Image Registry Policy
Creating an image registry policy is simple. Provide a name, and include URLs to whitelist, using * for subdomain wildcard. Anything not specified is blocked.
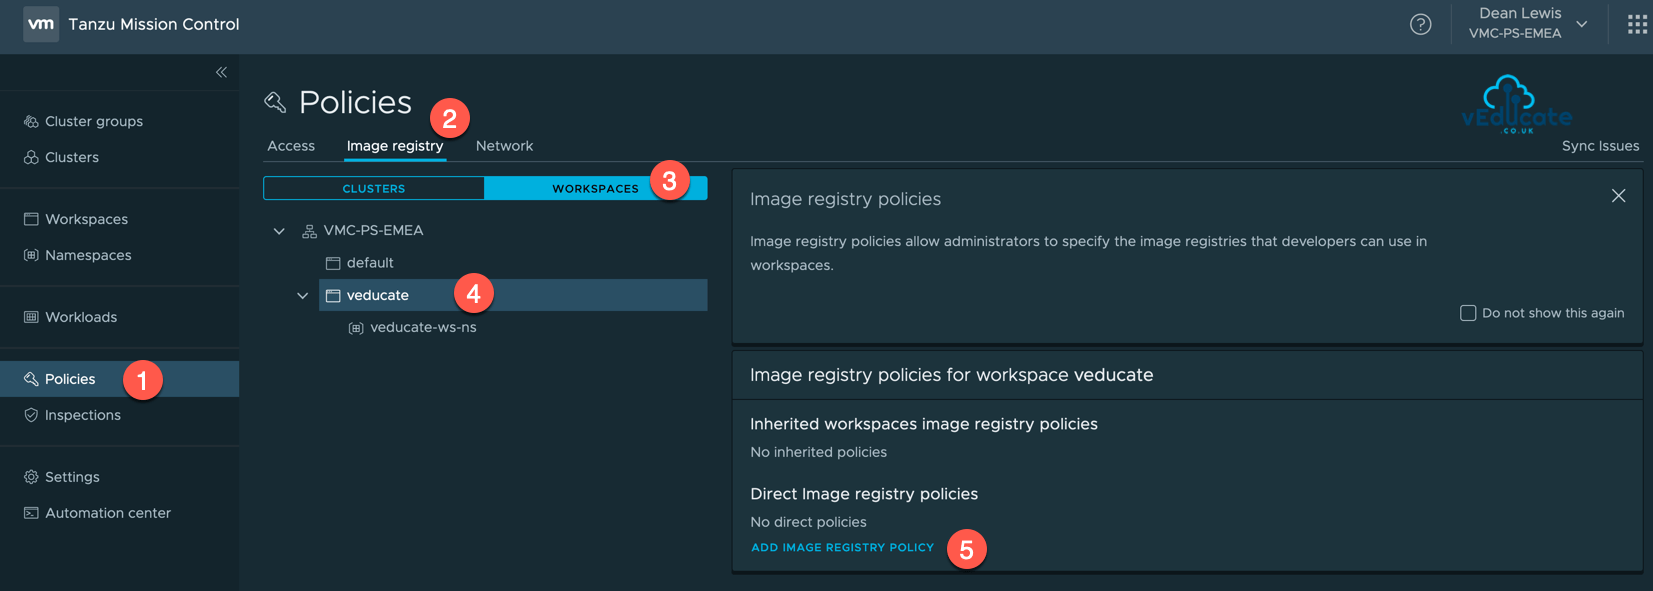
For this example, I've created two policies attached to my Workspace called vEducate.
- Policy 1 - Private Repos > Allow *.veducate.local
- Policy 2 - Public Repos > Allow *.quay.io
Remember, if its not specified in the policy, its blocked.
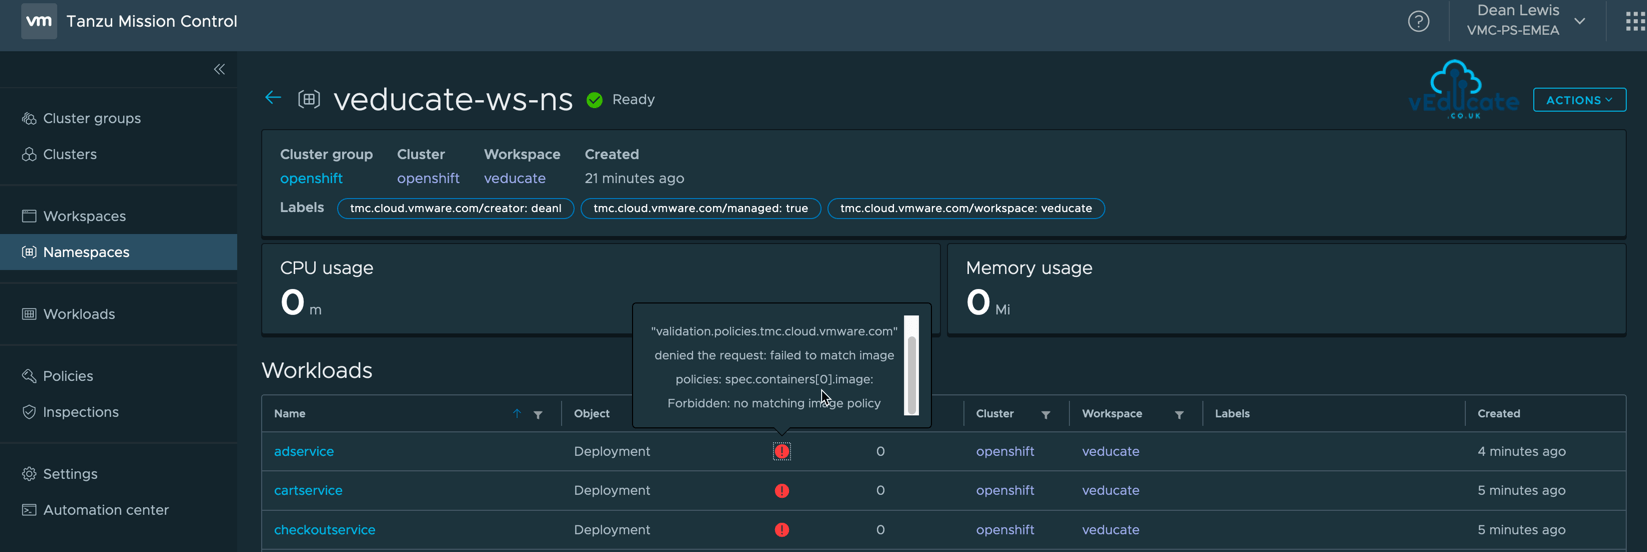
When I view some of my workloads in my Namespace under the Workspace, I can see failures for deployments
The Health error message text is below;
admission webhook
"validation.policies.tmc.cloud.vmware.com" denied the request: failed to match image policies: spec.initContainers[0].image: Forbidden: no matching image policy
The error clearly states the failure is due to the image policy, we can simply click the workload to view the YAML to see which image registry it is trying to use and whitelist if needed.
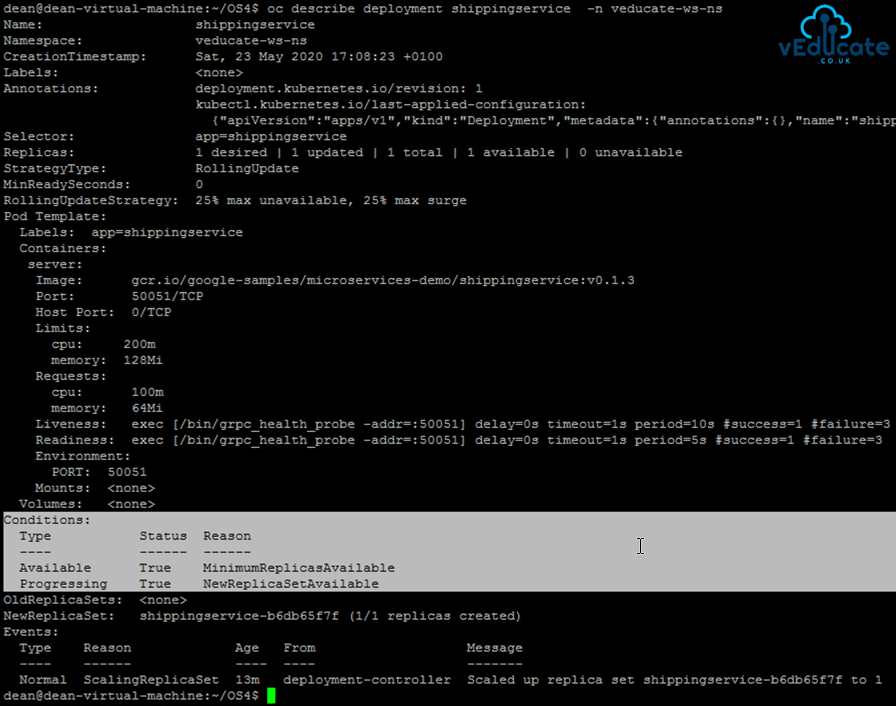
Below I've logged onto my cluster and ran;
kubectl describe deployment {deployment_name}
We can see the failedcreate message, showing our container have not created.
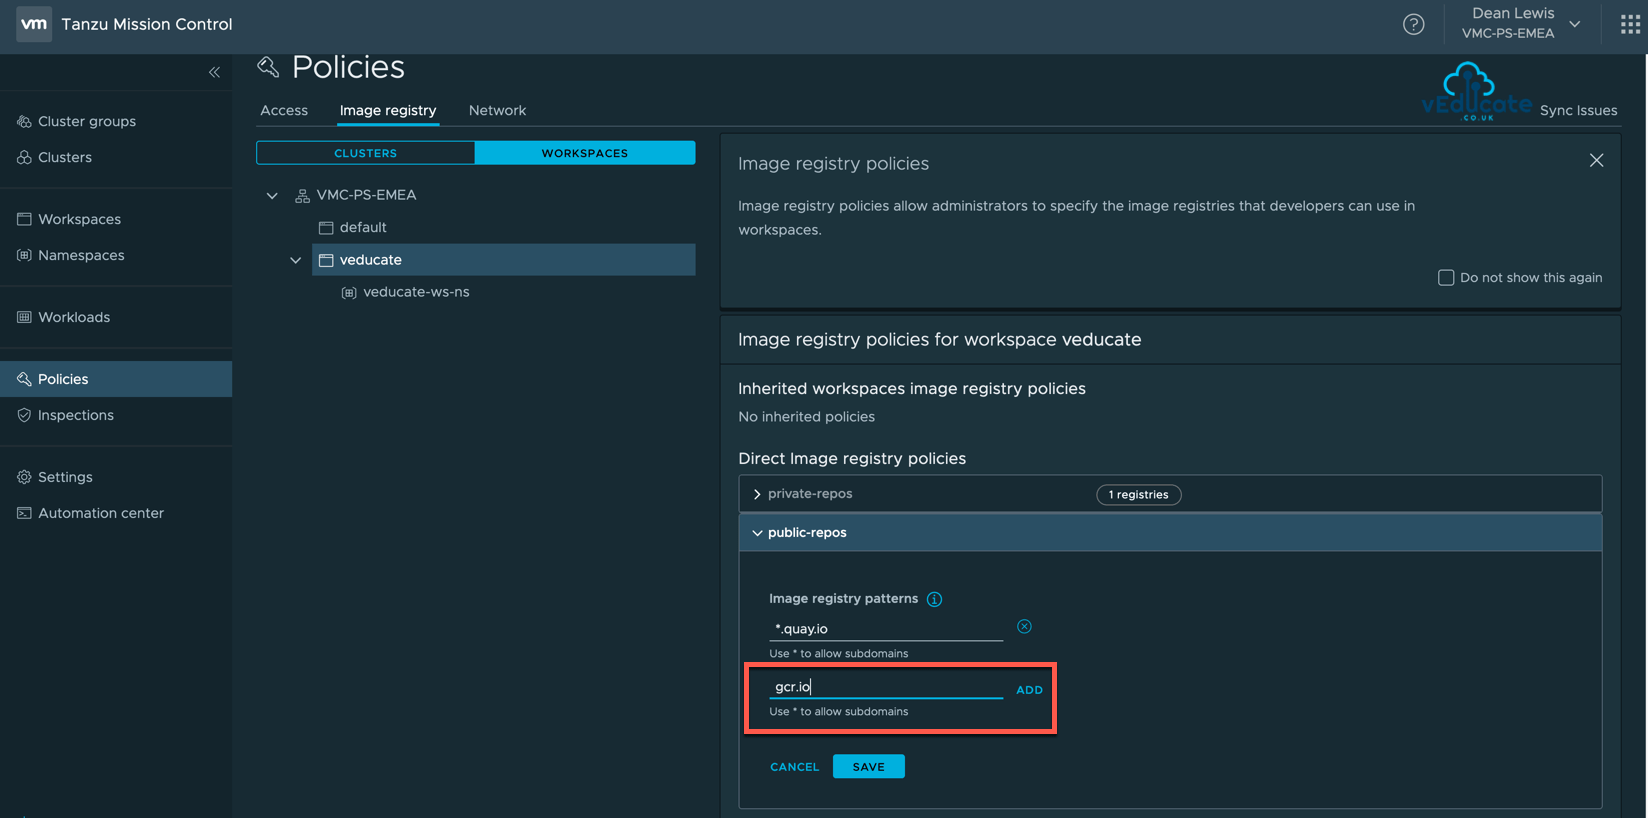
I've also highlighted in yellow the image repository, which we know is not allowed in my image policy created earlier.

Allowing this registry in an existing policy or new policy attached to the relevant workspace, will resolve this issue. As Kubernetes works off remediating to a declarative state, the deployment will continue in the background, and once the changes have been made the containers will create.
Checking the status of my deployment I can see it is now successful
![]()
kubectl rollout status deploy/shippingservice

kubectl describe deployment shippingservice -n veducate-ws-ns
Creating a Network Policy
Network policies allow administrators to specify default network rules on Workspaces.
Note: Based on the current Kubernetes implementation, your team members may be able to override these policies. This policy is only meant to serve as a default that administrators can set.
- Allow-all-to-pods
- This recipe can be used to allow all ingress traffic to the pods selected using a set of labels within resource(s)
- Deny-All
- This recipe can be used to deny all ingress traffic on resource(s)
- Allow-All
- This recipe can be used to allow all ingress traffic on resource(s)
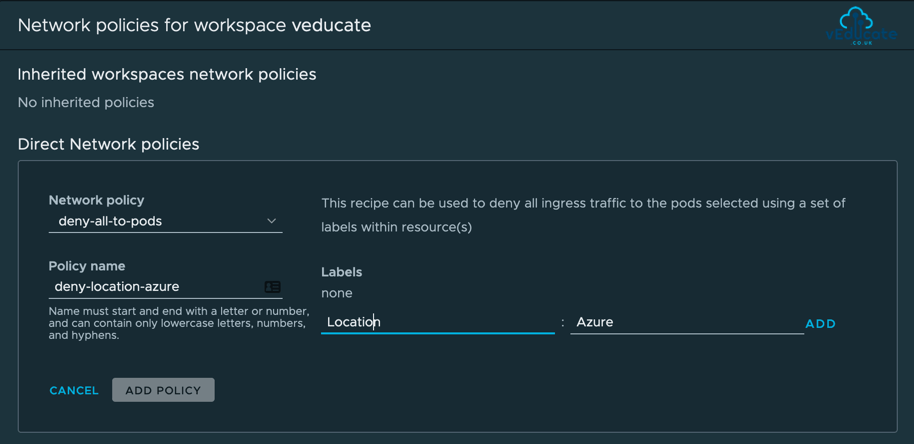
- Deny-all-to-pods
- This recipe can be used to deny all ingress traffic to the pods selected using a set of labels within resource(s)
When planning to use network policies, this is where planning for the use of Labels for your objects in TMC will come into fruition.
Wrap-up and Resources
In the three blog posts, I've looked at the main areas of TMC, Monitoring, Inspection and Control. If I had to pick which feature I like the most, it would be a hard contest. All three mainstays are very powerful for the Kubernetes administrator and operator teams.
However, the Workspace objects and policies really bring TMC into its own, giving simple high level control options which can be applied to any Kubernetes platform.
As a reminder, to take real advantage of TMC I recommend you read the follow posts;
Tanzu Mission Control
- Getting Started Tanzu Mission Control
- Cluster Inspections
- Workspaces and Policies
- Data Protection
- Deploying TKG clusters to AWS
- Upgrading a provisioned cluster
- Delete a provisioned cluster
- TKG Management support and provisioning new clusters
- TMC REST API - Postman Collection
- Using custom policies to ensure Kasten protects a deployed application
You can get hands on experience of Tanzu Mission Control yourself over on the VMware Hands-on-Lab website, which is always free!
HOL-2032-01-CNA - VMware Tanzu Mission Control
- In this lab you will be exposed to various aspects of VMware's Tanzu Mission Control including Kubernetes cluster lifecycle management, health checks, environment at a glance monitoring, access policies, and conformance testing.
And I'll sign off with links to the official resources.
- Tanzu Mission Control
Regards