Tag Archives: Deployment

Kubernetes

Quick Tip: Supercharge Kubernetes Resource Retrieval with ‘kubectl get -f’

Did you know you can use the -f argument with kubectl get? Yep me either.

It’s pretty handy actually, as it will provide the status for all your Kubernetes resources deployed using that file or even file from hyperlink!

Below is a screenshot example using a file.

kubectl get -f

You can also specify multiple files by adding -f {file}for each file you want to check (this also works when deploying resources too!).

kubect get -f multiple files

And another example, using a hyperlink as the file location.

kubectl get -f from url

Hope this little tip helps someone!

Just for fun, here’s the ChatGPT write-up!

The command “kubectl get -f” is used in Kubernetes to retrieve information about Kubernetes resources defined in a file or multiple files. Let’s break down the command and its components:

  • “kubectl”: It is the command-line interface (CLI) tool for interacting with Kubernetes clusters. It allows you to manage and control Kubernetes resources.
  • “get”: It is the action or subcommand used to retrieve information about Kubernetes resources.
  • “-f”: It is a flag that specifies that the input will be provided from a file or multiple files rather than directly on the command line. It is followed by the path to the file(s) containing the Kubernetes resource definitions.

When you use “kubectl get -f <file>”, Kubernetes reads the file(s) provided and retrieves the information about the resources defined within those files. The information can include the names, statuses, and other details of the resources.

For example, if you have a file named “deployment.yaml” that defines a Kubernetes Deployment resource, you can use the command “kubectl get -f deployment.yaml” to retrieve information about that specific Deployment resource.

You can also provide multiple files by separating them with commas or specifying a directory containing multiple resource files. For instance, “kubectl get -f file1.yaml,file2.yaml” or “kubectl get -f /path/to/files” (where /path/to/files is the directory path).

By using this command, you can quickly retrieve information about Kubernetes resources defined in files without needing to manually create or modify resources using the command line.

Regards
Dean Lewis

Tanzu Blog Logo Header

Tanzu Kubernetes Grid 1.6 – Management Cluster deployment failure – unable to patch the cluster object

The Issue

When deploying a brand new Tanzu Kubernete Grid Management Cluster to a vSphere environment we kept hitting failures like the below. The deployment was very vanilla with the default settings, no extra metadata inputted into the build.

!! [1223 15:26:17.84239]: init.go:732] Failure while deploying management cluster, Here are some steps to investigate the cause:
!! [1223 15:26:17.84256]: init.go:733] Debug:
!! [1223 15:26:17.84262]: init.go:734] kubectl get po,deploy,cluster,kubeadmcontrolplane,machine,machinedeployment -A --kubeconfig /home/michael/.kube-tkg/tmp/config_Qd01VhPd
!! [1223 15:26:17.84272]: init.go:735] kubectl logs deployment.apps/ -n  manager --kubeconfig /home/michael/.kube-tkg/tmp/config_Qd01VhPd
!! [1223 15:26:17.84278]: init.go:738] To clean up the resources created by the management cluster:
!! [1223 15:26:17.84283]: init.go:739] tanzu management-cluster delete
✘ [1223 15:26:17.84291]: init.go:91] unable to set up management cluster, : unable to patch cluster object: unable to patch optional metadata under labels: unable to patch the management cluster object with optional metadata: unable to patch the cluster object: error while applying patch for "&TypeMeta{Kind:,APIVersion:,}" tkg-system/tkg-mgmt-vsphere-20221223151757: Cluster.cluster.x-k8s.io "tkg-mgmt-vsphere-20221223151757" is invalid: [metadata.labels: Invalid value: "": name part must be non-empty, metadata.labels: Invalid value: "": name part must consist of alphanumeric characters, '-', '_' or '.', and must start and end with an alphanumeric character (e.g. 'MyName', or 'my.name', or '123-abc', regex used for validation is '([A-Za-z0-9][-A-Za-z0-9_.]*)?[A-Za-z0-9]')]

The Cause

The tooling creates an erronous value in the cluster config file, which causes the build error.

The Fix

Search for the latest yaml file created in:

~/.config/tanzu/tkg/clusterconfigs/

and comment out the following line:

CLUSTER_LABELS: :,

# The line will now look like this:

#CLUSTER_LABELS: :,

Now re-run the creation of your cluster using the CLI

tanzu mc create --file {file_name.yaml}

Regards

Dean Lewis

Kubernetes

Kubernetes Troubleshooting – Kubelet Unable to attach or mount volumes – timed out waiting for the condition

The Issue

When I updated my Kasten application in my Kubernetes cluster, I found that one of the pods was stuck in “init” status.

dean@dean [ ~ ] (⎈ |tkg-wld-01-admin@tkg-wld-01:default) # k get pods -n kasten-io -w
NAME READY STATUS RESTARTS AGE
aggregatedapis-svc-78564d4697-wl9wg 1/1 Running 0 3m9s
auth-svc-7977b9684b-zph27 1/1 Running 0 3m11s
catalog-svc-7ff7779b75-kmvsr 0/2 Init:0/2 0 2m43s

kubectl get pods - status init

Running a describe on that pod pointed to the fact the volume could not be attached.

Events:
Type Reason Age From Message
---- ------ ---- ---- -------
Normal Scheduled 2m58s default-scheduler Successfully assigned kasten-io/catalog-svc-7ff7779b75-kmvsr to tkg-wld-01-md-0-54598b8d99-rpqjf
Warning FailedMount 55s kubelet Unable to attach or mount volumes: unmounted volumes=[catalog-persistent-storage], unattached volumes=[k10-k10-token-lbqpw catalog-persistent-storage]: timed out waiting for the condition
kubelet Unable to attach or mount volumes- unmounted volumes=[catalog-persistent-storage], unattached volumes=[k10-k10-token-lbqpw catalog-persistent-storage]- timed out waiting for the condition
The Cause

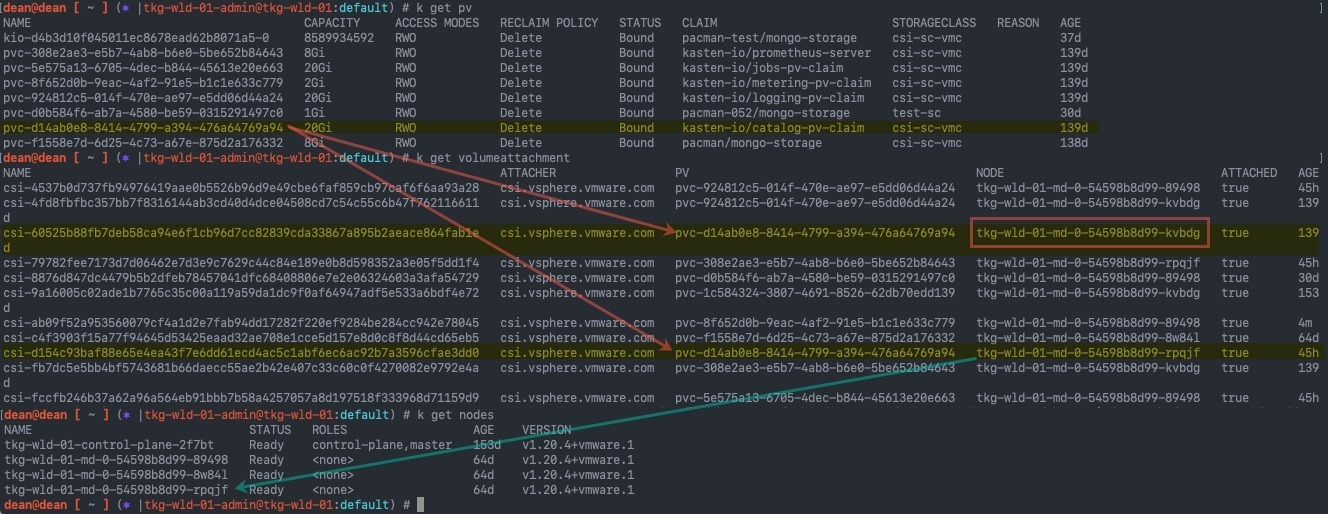
Some where along the line I found some stale volumeattachments linked to Kubernetes node that no longer exist in my cluster. This looks to be causing some confusion in the cluster who should be attaching the volume

The image below shows:

  • Find the Persistent Volume name linked to the associated claim for the failure in the pod events
  • Map this to the available VolumeAttachments
  • Reference VolumeAttachments for each node to available nodes in the cluster
    • I’ve highlighted the missing node in the red box

kubectl get pv - get volumeattachment - get nodes

The Fix

The fix is to remove the stale VolumeAttachment.

kubectl delete volumeattachment [volumeattachment_name]

kubectl delete volumeattachment

After this your pod should eventually pick up and retry, or you could remove the pod and let Kubernetes replace it for you (so long as it’s part of a deployment or other configuration managing your application).

Regards

Dean Lewis

VMware Tanzu Header

Tanzu Mission Control – Deploying TKG Clusters to AWS

This blog post will cover a technical walk-through on using Tanzu Mission Control to deploy Tanzu Kubernetes clusters to AWS.

The follow up blog posts in this series are:

Tanzu Mission Control 
- Getting Started Tanzu Mission Control 
- Cluster Inspections 
- Workspaces and Policies  
- Data Protection 
- Deploying TKG clusters to AWS 
- Upgrading a provisioned cluster 
- Delete a provisioned cluster 
- TKG Management support and provisioning new clusters
- TMC REST API - Postman Collection
- Using custom policies to ensure Kasten protects a deployed application
Using the AWS Hosted Management Cluster

In this example, we will use the default provided AWS Hosted Management cluster.

Alternatively, you can use the Tanzu CLI to provision a TKG Management cluster into AWS and attach this to Tanzu Mission Control.

Currently it is not supported to have a Management Cluster manage clusters across platforms.

  • I.e. Management Cluster in AWS that manages workload clusters in Azure.

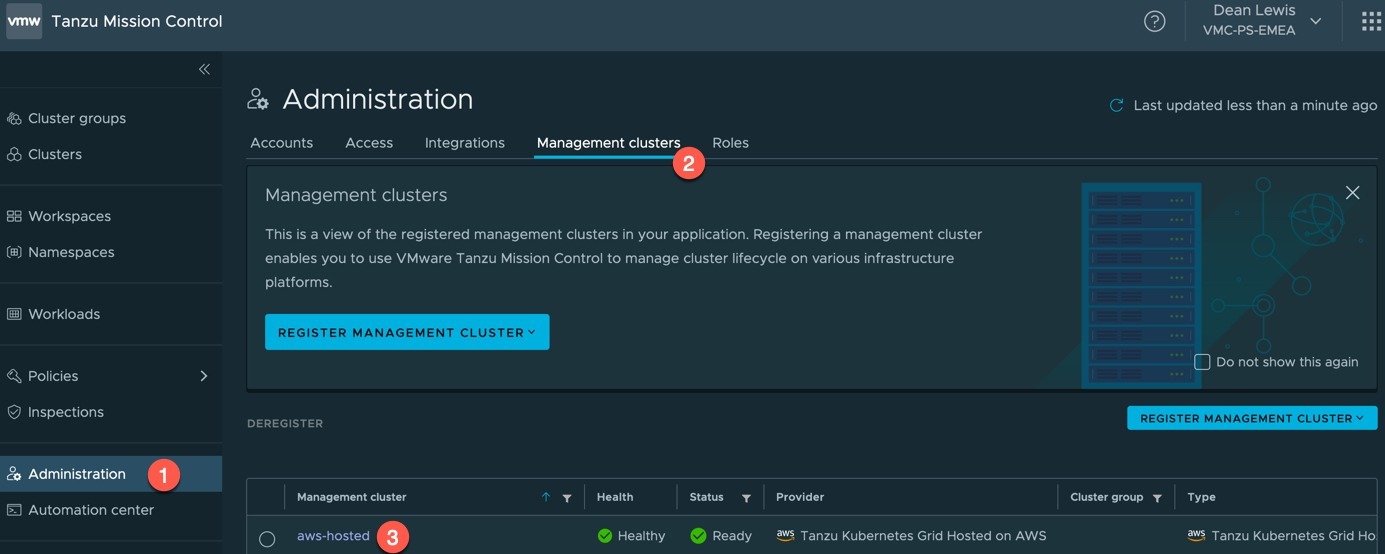
To get started:

  1. Go to Administration
  2. Click the Management Clusters Tab
  3. Click on the “aws-hosted” cluster object name

TMC - Administration - Management Clusters

Create a provisioner

The default tab when selecting the “aws-hosted” management cluster object is the provisioner tab.

  • Click create provisioner

TMC - aws-hosted - provisioners - create provisioner

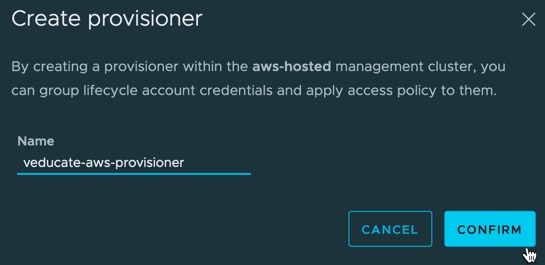
  • Provide a name for the provisioner
  • Click confirm

TMC - aws-hosted - provisioners - create provisioner - provide name

You will be taken back to your provisioner object which is created. Using the radio button to select the object will allow you to delete it. No other action is available.

TMC - aws-hosted - provisioners - provisioner created

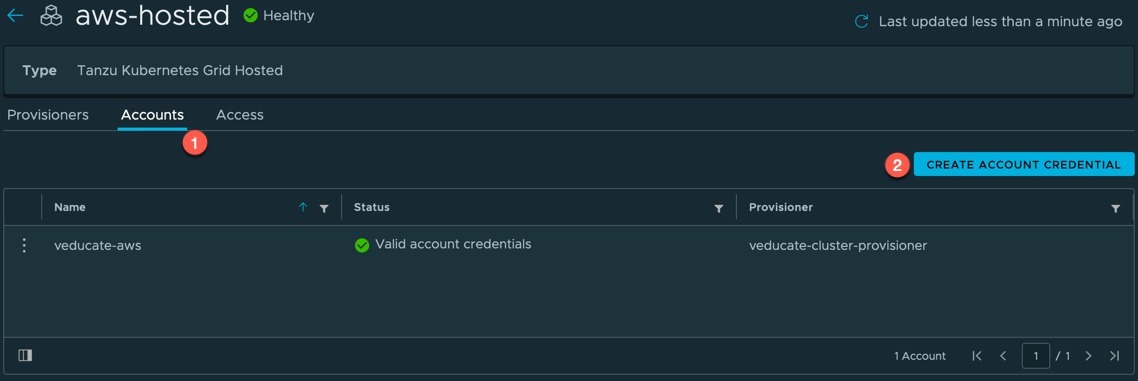
Create the AWS account
  1. Click on accounts tab
  2. Click the “Create Account Credential” Button

TMC - aws-hosted - accounts - create account credential Continue reading Tanzu Mission Control – Deploying TKG Clusters to AWS

2015 03 12 23 16 34

Deploying VCSA 6.0 fails with supplied system name is invalid

2015-04-14_16-28-02_01


A nice and simple one, the supplied system name (which is the FQDN of the VCSA)  is invalid.

This is because when deploying a new VCSA from scratch, your DNS records should already be created, as the new ISO based installer for the appliance runs a number of scripts to setup vCenter services and the Platform Services Controller.

So you get this error either because your DNS Settings are wrong, or you have not created your DNS records for your vCenter and PSC if it is an external server.


Regards

Dean