Tag Archives: vSphere

vSphere Kubernetes Drivers Operator - Red Hat OpenShift - Header

Using the new vSphere Kubernetes Driver Operator with Red Hat OpenShift via Operator Hub

What is the vSphere Kubernetes Driver Operator (VDO)?

This Kubernetes Operator has been designed and created as part of the VMware and IBM Joint Innovation Labs program. We also talked about this at VMworld 2021 in a joint session with IBM and Red Hat. With the aim of simplifying the deployment and lifecycle of VMware Storage and Networking Kubernetes driver plugins on any Kubernetes platform, including Red Hat OpenShift.

This vSphere Kubernetes Driver Operator (VDO) exposes custom resources to configure the CSI and CNS drivers, and using Go Lang based CLI tool, introduces validation and error checking as well. Making it simple for the Kubernetes Operator to deploy and configure.

The Kubernetes Operator currently covers the following existing CPI, CSI and CNI drivers, which are separately maintained projects found on GitHub.

This operator will remain CNI agnostic, therefore CNI management will not be included, and for example Antrea already has an operator.

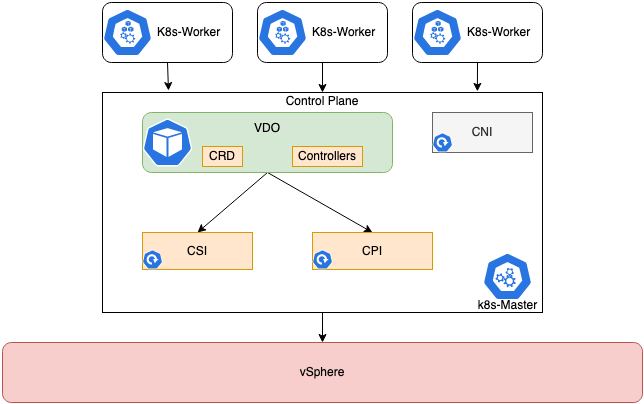
Below is the high level architecture, you can read a more detailed deep dive here.

vSphere Kubernetes Drivers Operator - Architecture Topology

Installation Methods

You have two main installation methods, which will also affect the pre-requisites below.

If using Red Hat OpenShift, you can install the Operator via Operator Hub as this is a certified Red Hat Operator. You can also configure the CPI and CSI driver installations via the UI as well.

  • Supported for OpenShift 4.9 currently.

Alternatively, you can install the manual way and use the vdoctl cli tool, this method would also be your route if using a Vanilla Kubernetes installation.

This blog post will cover the UI method using Operator Hub.

Pre-requisites

Continue reading Using the new vSphere Kubernetes Driver Operator with Red Hat OpenShift via Operator Hub

vSphere and CSI Header

Upgrading the vSphere CSI Driver (Storage Container Plugin) from v2.1.0 to latest

In this post I’m just documenting the steps on how to upgrade the vSphere CSI Driver, especially if you must make a jump in versioning to the latest version.

Upgrade from pre-v2.3.0 CSI Driver version to v2.3.0

You need to figure out what version of the vSphere CSI Driver you are running.

For me it was easy as I could look up the Tanzu Kubernetes Grid release notes. Please refer to your deployment manifests in your cluster. If you are still unsure, contact VMware Support for assistance.

Then you need to find your manifests for your associated version. You can do this by viewing the releases by tag. 

Then remove the resources created by the associated manifests. Below are the commands to remove the version 2.1.0 installation of the CSI.

kubectl delete -f https://raw.githubusercontent.com/kubernetes-sigs/vsphere-csi-driver/v2.1.0/manifests/latest/vsphere-7.0u1/vanilla/deploy/vsphere-csi-controller-deployment.yaml

kubectl delete -f https://raw.githubusercontent.com/kubernetes-sigs/vsphere-csi-driver/v2.1.0/manifests/latest/vsphere-7.0u1/vanilla/deploy/vsphere-csi-node-ds.yaml

kubectl delete -f https://raw.githubusercontent.com/kubernetes-sigs/vsphere-csi-driver/v2.1.0/manifests/latest/vsphere-7.0u1/vanilla/rbac/vsphere-csi-controller-rbac.yaml

vsphere-csi - delete manifests

Now we need to create the new namespace, “vmware-system-csi”, where all new and future vSphere CSI Driver components will run. Continue reading Upgrading the vSphere CSI Driver (Storage Container Plugin) from v2.1.0 to latest

Terraform Header

Terraform vSphere Provider – Error while creating vApp properties

The Issue

When using Terraform to deploy a virtual machine OVA using Terraform, I kept hitting the below error:

Error: error while creating vapp properties config unsupported vApp properties in vapp.properties: [vm.vmname vami.gateway.DMS_agent_VA vami.netmask0.DMS_Agent_VA vami.DNS.DMS_Agent_VA vami.searchpath.DMS_Agent_VA vami.ip0.DMS_Agent_VA vami.domain.DMS_Agent_VA]

  on Agent_appliance/main.tf line 20, in resource "vsphere_virtual_machine" "vm":
  20: resource "vsphere_virtual_machine" "vm"

Pretty simple right? In my Terraform file I was trying to use OVF Properties that were not valid. Getting the debug/trace logs from terraform also just showed the same error output.

However running ovftool, confirmed my properties were correct. (shortened output example).

ClassId:     vami
  Key:         searchpath
  InstanceId   DMS_Agent_VA
  Category:    Networking Properties
  Label:       Domain Search Path
  Type:        string
  Description: The domain search path (comma or space separated domain names) 
               for this VM. Leave blank if DHCP is desired.

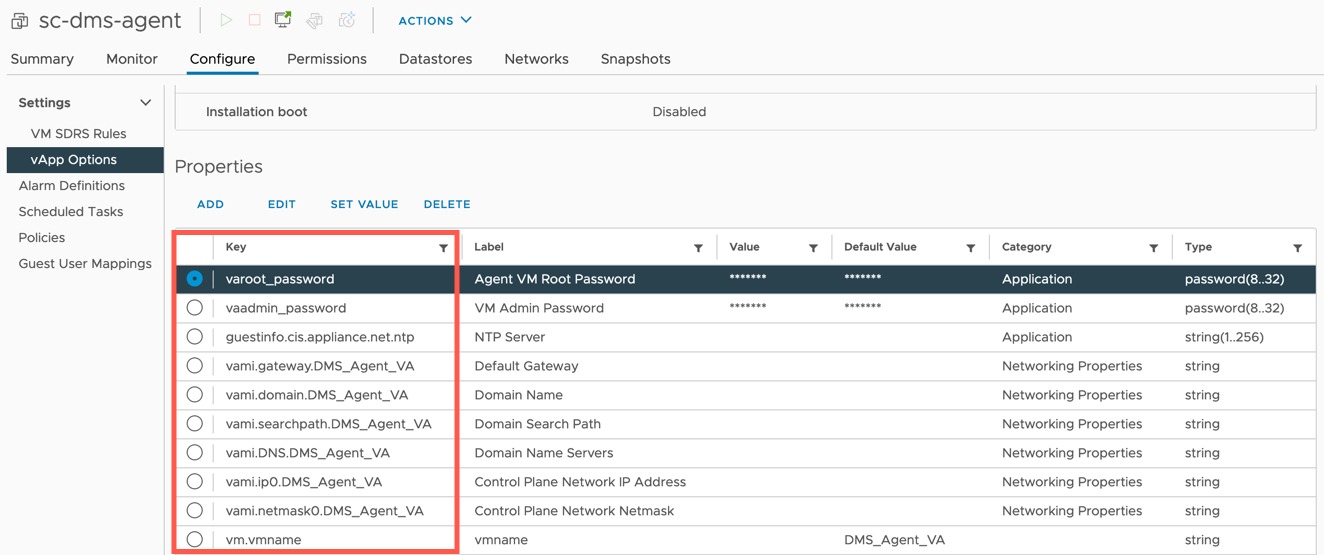
But also in the vCenter UI, looking at the vApp Properties of a the OVA once deployed, again I could validate the the properties I was using were correct.

vCenter - Virtual Machine vApp Options Properties

Finally an example of the vSphere_virtual_machine resource I was trying to deploy that was causing me issues:

resource "vsphere_virtual_machine" "vm" {
  name             = "${var.agent_vm_name}"
  resource_pool_id = "${var.resource_pool_id}"
  datastore_id     = "${data.vsphere_datastore.datastore.id}"
  folder           = "${var.folder}"
  wait_for_guest_net_timeout = 0
  wait_for_guest_ip_timeout  = 0
  datacenter_id    = "${data.vsphere_datacenter.dc.id}"
  host_system_id = "${data.vsphere_host.host.id}"

  dynamic "ovf_deploy" {
  for_each = "${var.agent_local_ovf_path}" != "" || "${var.agent_remote_ovf_path}" != "" ? [0] : []
  content {
  // Path to local or remote ovf/ova file
  local_ovf_path = "${var.agent_local_ovf_path}" != "" ? "${var.agent_local_ovf_path}" : null
  remote_ovf_url = "${var.agent_remote_ovf_path}" != "" ? "${var.agent_remote_ovf_path}" : null
   disk_provisioning    = "thin"
   ovf_network_map = {
        "Control Plane Network" = data.vsphere_network.network.id
    }
   }
  }

  vapp {
    properties = {
      "vm.vmname" =  "${var.agent_vm_name}",
      "varoot_password" = "${var.varoot_password}",
      "vaadmin_password" = "${var.va_admin_password}",
      "guestinfo.cis.appliance.net.ntp" = "${var.ntp}",
      "vami.gateway.DMS_agent_VA" = "${var.controlplanenetworkgateway}",
      "vami.DNS.DMS_Agent_VA" = "${var.dns}",
      "vami.domain.DMS_Agent_VA" = "${var.domain}",
      "vami.searchpath.DMS_Agent_VA" = "${var.searchpath}",
      "vami.ip0.DMS_Agent_VA" = "${var.agentip0}",
      "vami.netmask0.DMS_Agent_VA" = "${var.agentip0netmask}"
    }
  }
}
The Cause

Yep, you guessed it, there was something wrong with the properties I was trying to configure.

The Fix

Continue reading Terraform vSphere Provider – Error while creating vApp properties

VMware Tanzu Header

vSphere with Tanzu – cidrBlocks intersects with the network range of the external ip pools

The Issue

When deploying a vSphere with Tanzu guest cluster via the command line, I hit the following error:

kubectl apply -f cluster.yaml

Error from server (spec.settings.network.pods.cidrBlocks intersects with the network range of the external ip pools in network provider's configuration, spec.settings.network.pods.cidrBlocks intersects with the network range of the external ip pools LB in network provider's configuration): 

error when creating "cluster.yaml": admission webhook "default.validating.tanzukubernetescluster.run.tanzu.vmware.com" denied the request: spec.settings.network.pods.cidrBlocks intersects with the network range of the external ip pools in network provider's configuration, spec.settings.network.pods.cidrBlocks intersects with the network range of the external ip pools LB in network provider's configuration

The Cause

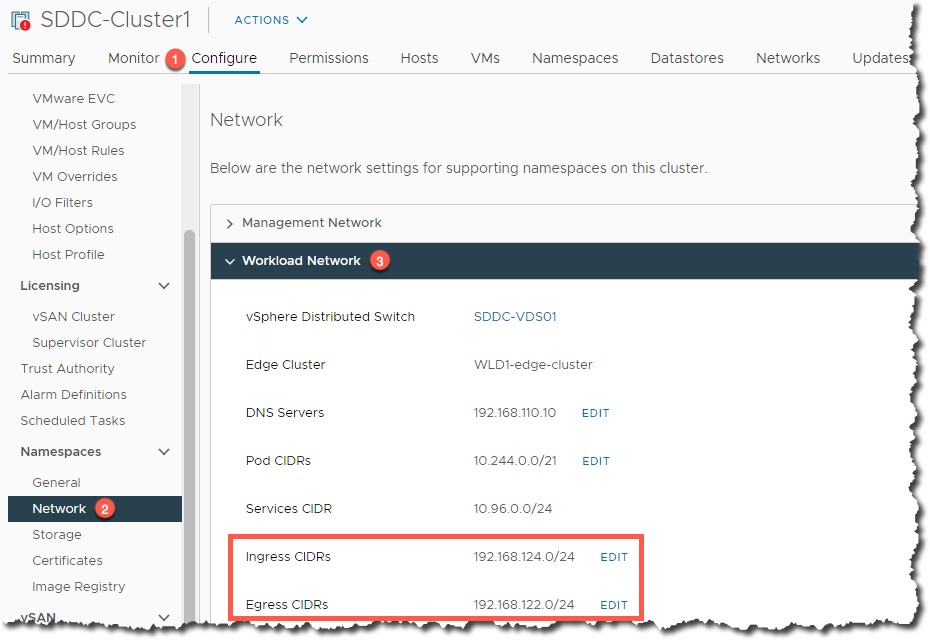
The default CIDR Block used by vSphere with Tanzu for the Pod Networking is 192.168.0.0/16 and for Services Networking is 10.96.0.0/12. Therefore if you have any over laps with this in your Workload Management setup, such as, in my case the Load Balancing configuration when integrating with NSX-T. You will end up with a failure.

Cluster - Namespace - Network - workload configuration

This will happen if you use a deployment YAML for your cluster such as the below, there is no pod/service networking settings specified, so the default is chosen.

apiVersion: run.tanzu.vmware.com/v1alpha1
kind: TanzuKubernetesCluster
metadata:
  name: veducate-cluster
  namespace: deanl
spec:
  distribution:
    version: v1.18.15
  topology:
    controlPlane:
      class: best-effort-small
      count: 1
      storageClass: management-storage-policy-thin
    workers:
      class: best-effort-small
      count: 3
      storageClass: management-storage-policy-thin
  settings:
    network:
      cni:
        name: calico
    storage:
      defaultClass: management-storage-policy-thin
The Fix

Continue reading vSphere with Tanzu – cidrBlocks intersects with the network range of the external ip pools

OpenShift

How to specify your vSphere virtual machine resources when deploying Red Hat OpenShift

When deploying Red Hat OpenShift to VMware vSphere platform, there are two methods:

  • User Provisioned Infrastructure (UPI)
  • Installer Provisioned Infrastructure (IPI)

There are several great blogs covering both options and deployment methods.

In this blog, we are going to use the IPI method but customize the settings of our Virtual Machines that are deployed setting CPU and Memory that is different from the default settings.

Getting Started
Setting up your Jump host Machine

I’ll be using an Ubuntu Machine as my jumphost for the deployment.

Download the OpenShift-Install tool and OC command line tool. (I’ve used version 4.6.4 in my install)

Extract the files and copy to your /usr/bin/local directory

tar -zxvf openshift-client-linux.tar.gz
tar -zxvf openshift-install-linux.tar.gz

Have an available SSH key from your jump box, so that you can connect to your CoreOS VMs one they are deployed for troubleshooting purposes.

You need to download the vCenter trusted root certificates from your instance and import them to your Jump Host.

curl -O https://{vCenter_FQDN}/certs/download.zip

Then the following to import (ubuntu uses the .crt files, hence importing the win folder);

unzip download.zip
cp certs/win/* /usr/local/share/ca-certificates
update-ca-certificates

You will need an account to connect to vCenter with the correct permissions for the OpenShift-Install to deploy the cluster. If you do not want to use an existing account and permissions, you can use this PowerCLI script to create the roles with the correct privileges based on the Red Hat documentation.

If you are installing into VMware Cloud on AWS, like myself, you will also need to allow connectivity from your segments as follows:

  • Compute gateway
    • OCP Cluster network to the internet
    • OCP Cluster network to your SDDC Management Network
  • Management gateway
    • OCP Cluster network to ESXi – HTTPs traffic

DNS Records – You will need the two following records to be available on your OCP Cluster network in the same IP address space that your nodes will be deployed to.

  • {clusterID}.{domain_name}
    • example: ocp46.veducate.local
  • *.apps.{clusterID}.{domain_name}
    • example: *.apps.ocp46.veducate.local

If your DNS is a Windows server, you can use this script here. Continue reading How to specify your vSphere virtual machine resources when deploying Red Hat OpenShift