Tag Archives: vSphere

VMware Tanzu Header

A guide to vSphere with Tanzu Kubernetes – Day 2 Operations for the VI Admin

Intro

This blog post is an accompaniment to the session “vSphere with Tanzu Kubernetes – Day 2 Operations for the VI Admin” created by myself and Simon Conyard, with special thanks to the VMware LiveFire Team for allowing us access to their lab environments to create the technical demo recordings.

You can see the full video with technical demos below (1hr 4 minutes). This blog post acts a supplement to the recording.


This session recording was first shown at the Canada VMUG Usercon.

  • You can watch the VMUG session on-demand here.
  • This session is 44 minutes long (and is a little shorter than the one above).

The basic premise of the presentation was set at around a level-100/150 introduction to the Kubernetes world and marrying that to your knowledge of VMware vSphere as a VI Admin. Giving you an insight into most of the common areas you will need to think about when all of a sudden you are asked to deploy Tanzu Kubernetes and support a team of developers.
Help I need somebody I am a Tanzu Admin

Scene Setting

So why are we talking about VMware and Kubernetes? Isn’t VMware the place where I run those legacy things called virtual machines?

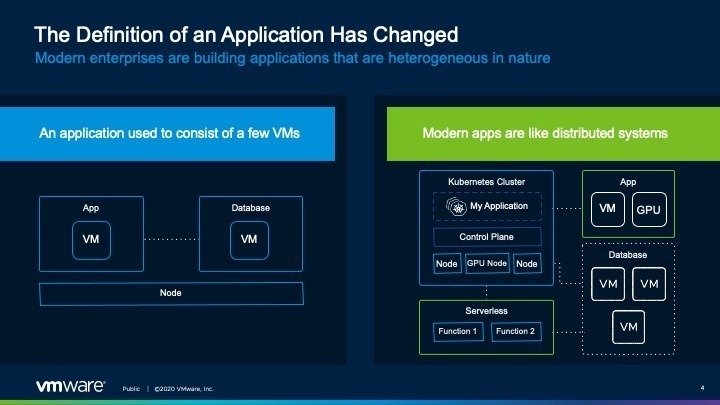
Essentially the definition of an application has changed. On the left of the below image, we have the typical Application, we usually talk about the three tier model (Web, App, DB).

However, the landscape is moving towards the right hand side, applications running more like distributed systems. Where the data your need to function is being served, serviced, recorded, and presented not only by virtual machines, but Kubernetes services as well. Kubernetes introduces its own architectures and frameworks, and finally this new buzzword, serverless and functions.

Although you may not be seeing this change happen immediately in your workplace and infrastructure today. It is the direction of the industry.

Did you know, vRealize Automation 8 is built on a modern container-based micro-services architecture.

The defintion of an application has changed

VMware’s Kubernetes offerings

VMware has two core offerings;

  • vSphere Native
  • Multi-Cloud Aligned

Within vSphere there are two types of Kubernetes clusters that run natively within ESXi.

  • Supervisor Kubernetes cluster control plane for vSphere
  • Tanzu Kubernetes Cluster, sometimes also referred to as a “Guest Cluster.”

Supervisor Kubernetes Cluster

This is a special Kubernetes cluster that uses ESXi as its worker nodes instead of Linux.

This is achieved by integrating the Kubernetes worker agents, Spherelets, directly into the ESXi hypervisor. This cluster uses vSphere Pod Service to run container workloads natively on the vSphere host, taking advantage of the security, availability, and performance of the ESXi hypervisor.

The supervisor cluster is not a conformant Kubernetes cluster, by design, using Kubernetes to enhance vSphere. This ultimately provides you the ability to run pods directly on the ESXi host alongside virtual machines, and as the management of Tanzu Kubernetes Clusters.

Tanzu Kubernetes Cluster

To deliver Kubernetes clusters to your developers, that are standards aligned and fully conformant with upstream Kubernetes, you can use Tanzu Kubernetes Clusters (also referred to as “Guest” clusters.)

A Tanzu Kubernetes Cluster is a Kubernetes cluster that runs inside virtual machines on the Supervisor layer and not on vSphere Pods.

As a fully upstream-compliant Kubernetes it is guaranteed to work with all your Kubernetes applications and tools. Tanzu Kubernetes Clusters in vSphere use the open source Cluster API project for lifecycle management, which in turn uses the VM Operator to manage the VMs that make up the cluster.

Supervisor Cluster or Tanzu Kubernetes Cluster, which one should I choose to run my application?

Supervisor Cluster:

Tanzu Kubernetes Cluster:

  • Kubernetes clusters that are fully conformant with upstream Kubernetes
  • Flexible cluster lifecycle management independent of vSphere, including upgrades
  • Ability to add or customize open source & ecosystem tools like Helm Charts
  • Broad support for open-source networking technologies such as Antrea

For further information check out the Whitepaper – VMware vSphere with Kubernetes 101

vSphere Native Deployment Options

The above information covers running Kubernetes on your vSphere platform natively. You can deploy as follows;

VMware Cloud Foundation is an integrated full stack solution, delivering customers a validated architecture bringing together vSphere, NSX for software defined networking, vSAN for software defined storage, and the vRealize Suite for Cloud Management automation and operation capabilities.

Deploying the vSphere Tanzu Kubernetes solution is as simple as a few clicks in a deployment wizard, providing you a fully integrated Kubernetes deployment into the VMware solutions.

Don’t have VCF? Then you can still enable Kubernetes yourself in your vSphere environment using vSphere 7.0 U1 and beyond. There will be extra steps for you to do this, and some of the integrations to the VMware software stack will not be automatic.

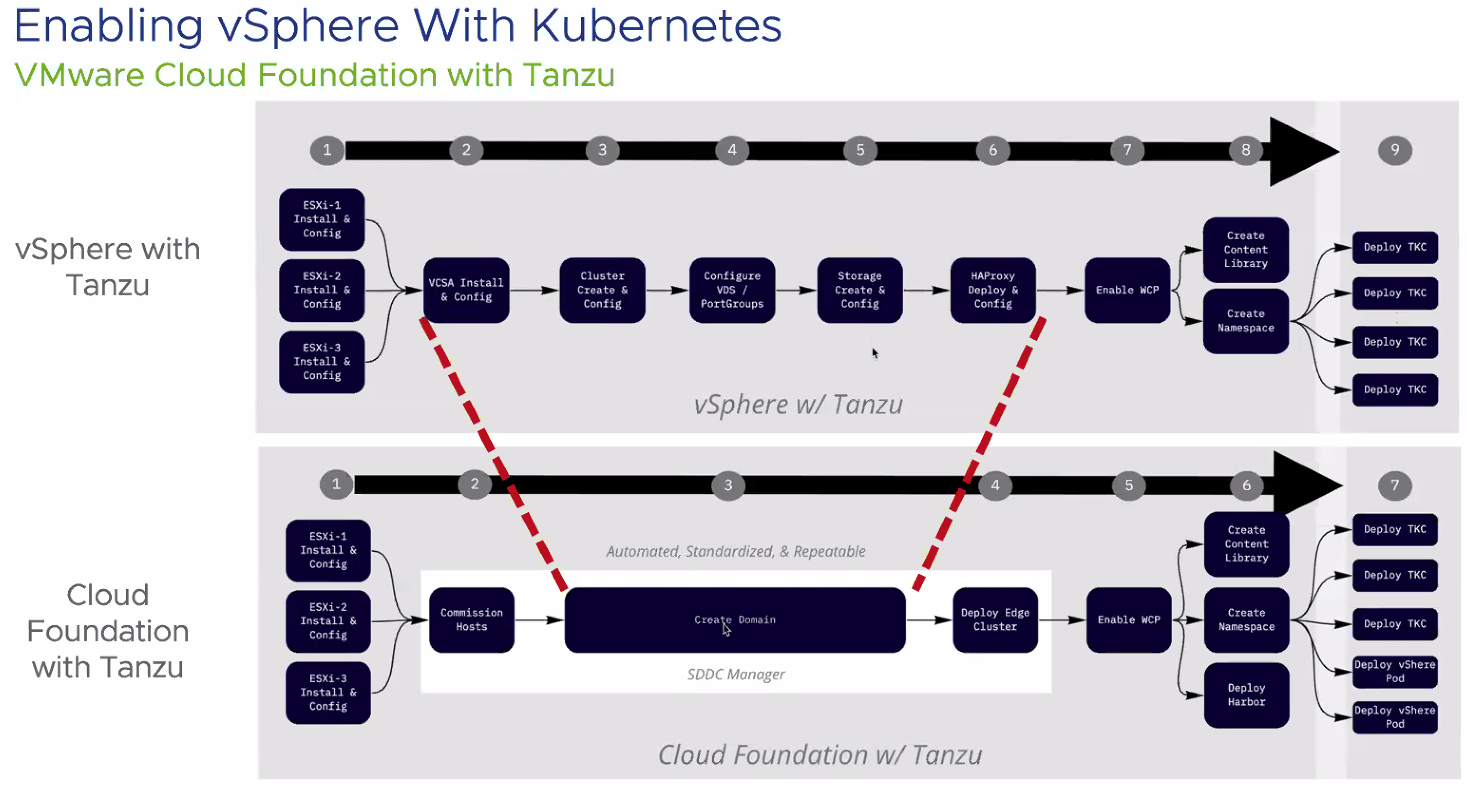
The below graphic summarises the deployment steps between both options discussed.

Enabling vSphere with Kubernetes

Multi-cloud Deployment Options

Building on top of the explanation of Tanzu Kubernetes Cluster explained earlier, Tanzu Kubernetes Grid (TKG) is the same easy-to-upgrade, conformant Kubernetes, with pre-integrated and validated components. This multi-cloud Kubernetes offering that you can run both on-premises in vSphere and in the public cloud on Amazon and Microsoft Azure, fully supported by VMware.

  • Tanzu Kubernetes Grid (TKG) is the name used for the deployment option which is multi-cloud focused.
  • Tanzu Kubernetes Cluster (TKC) is the name used for a Tanzu Kubernetes deployment deployed and managed by vSphere Namespace.
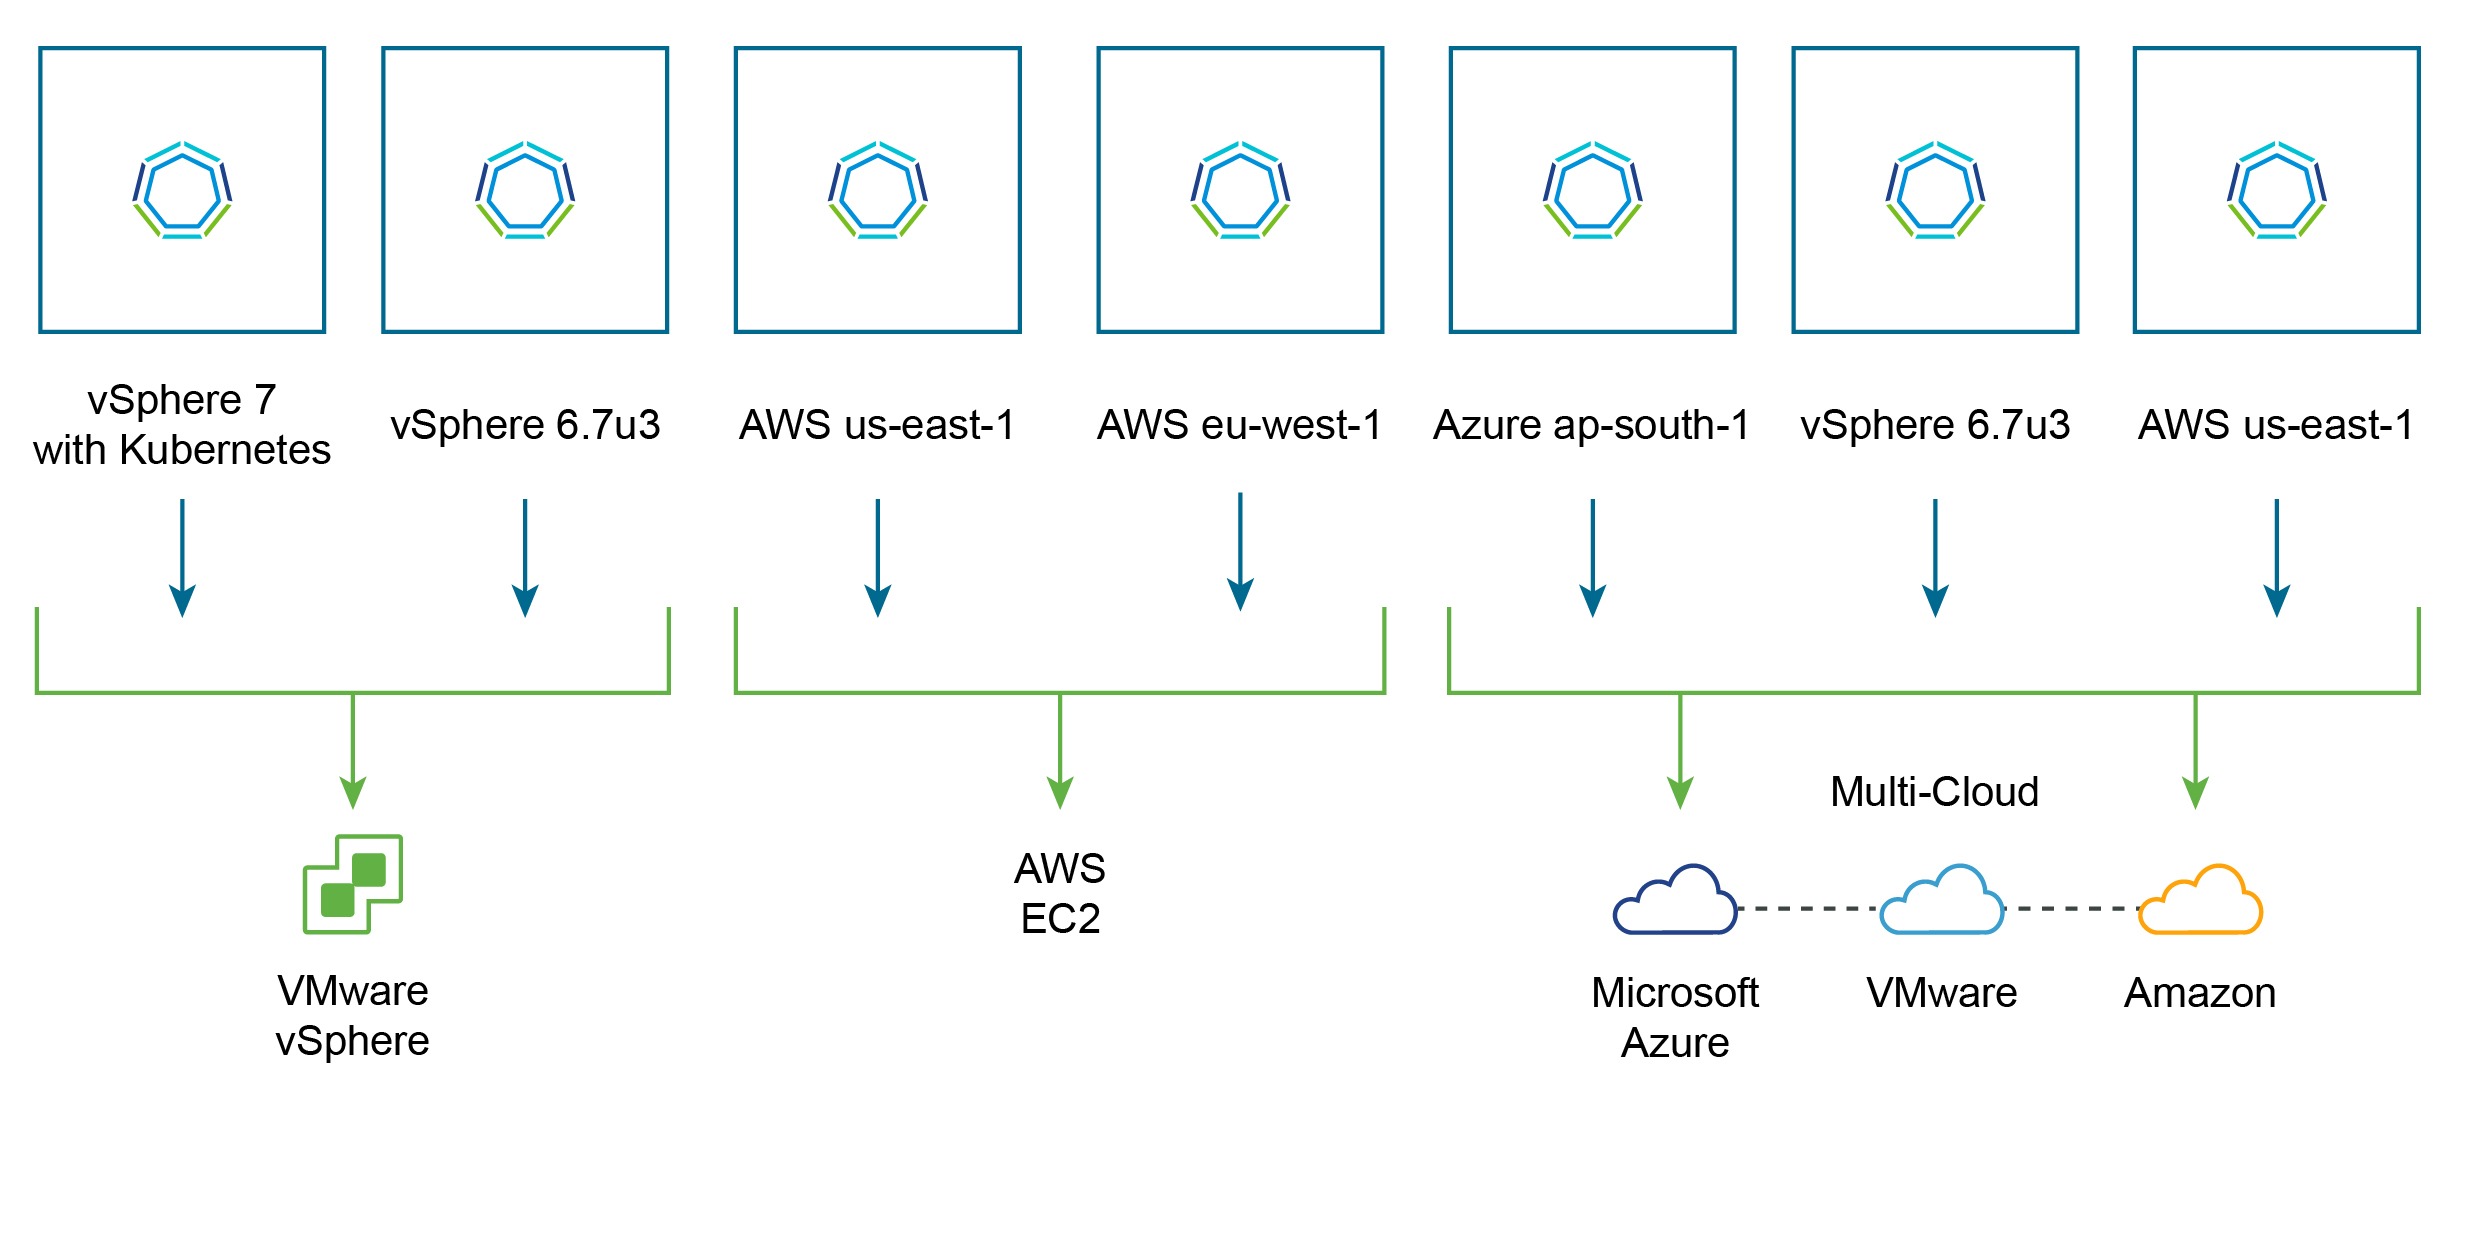
tkg platforms

Introducing vSphere Namespaces

When enabling Kubernetes within a vSphere environment a supervisor cluster is created within the VMware Data Center.  This supervisor cluster is responsible for managing all Kubernetes objects within the VMware Data Center, including vSphere Namespaces.  The supervisor cluster communicating with ESXi forms the Kubernetes control plane, for enabled clusters.
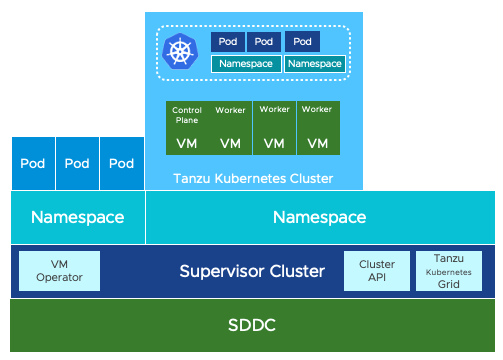
sddc running vsphere with kubernetes

A vSphere Namespace is a logical object that is created on the vSphere Kubernetes supervisor cluster.  This object tracks and provides a mechanism to edit the assignment of resources (Compute, Memory, Storage & Network) and access control to Kubernetes resources, such as containers or virtual machines.

You can provide the URL of the Kubernetes control plane to developers as required, where they can then deploy containers to the vSphere Namespaces for which they have permissions.

Resources and permissions are defined on a vSphere Namespace for both Kubernetes containers, consuming resources directly via vSphere, or Virtual Machines configured and provisioned to operate Tanzu Kubernetes Grid (TKG).

Access control

For a Virtual Administrator the way access can be assigned to various Tanzu elements within the Virtual Infrastructure is very similar to any other logical object.

  • Create Roles
  • Assign Permissions to the Role
  • Allocate the Role to Groups or Individuals
  • Link the Group or Individual to inventory objects

With Tanzu those inventory objects include Namespaces’ and Resources.

What I also wanted to highlight was if a Virtual Administrator gave administrative permissions to a Kubernetes cluster, then this has similarities to granting ‘root’ or ‘administrator’ access to a virtual machine.  An individual with these permissions could create and grant permissions themselves, outside of the virtual infrastructure.

Documentation
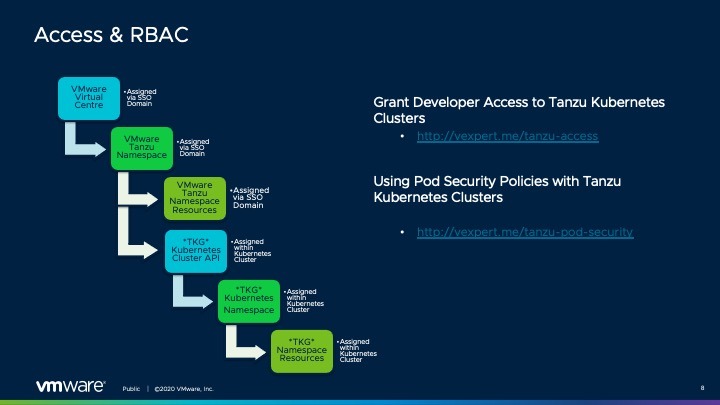
Access and RBAC Continue reading A guide to vSphere with Tanzu Kubernetes – Day 2 Operations for the VI Admin

OpenShift

Using the vSphere CSI Driver with OpenShift 4.x and VSAN File Services

You may have seen my blog post “How to Install and configure vSphere CSI Driver on OpenShift 4.x“.

Here I updated the vSphere CSI driver to work the additional security constraints that are baked into OpenShift 4.x.

Since then, once of the things that has been on my list to test is file volumes backed by vSAN File shares. This feature is available in vSphere 7.0.

Well I’m glad to report it does in fact work, by using my CSI driver (see above blog or my github), you can simply deploy consume VSAN File services, as per the documentation here. 

I’ve updated my examples in my github repository to get this working.

OK just tell me what to do…

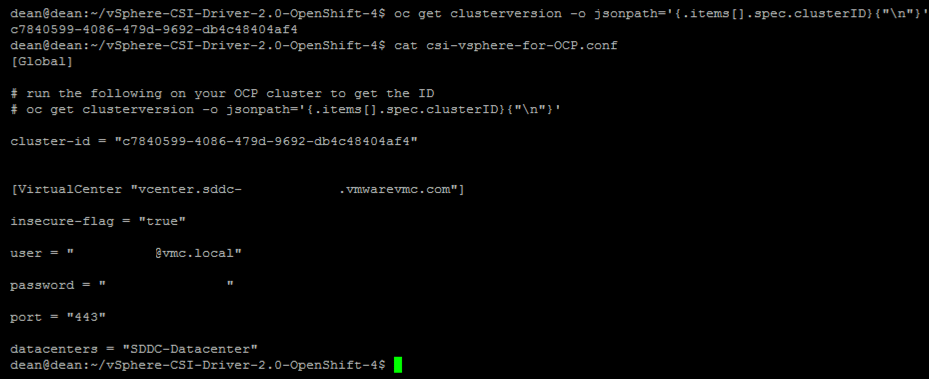
First and foremost, you need to add additional configuration to the csi conf file (csi-vsphere-for-ocp.conf).

If you do not, the defaults will be assumed which is full read-write access from any IP to the file shares created.

[Global]

# run the following on your OCP cluster to get the ID 
# oc get clusterversion -o jsonpath='{.items[].spec.clusterID}{"\n"}'
cluster-id = c6d41ba1-3b67-4ae4-ab1e-3cd2e730e1f2

[NetPermissions "A"]
ips = "*"
permissions = "READ_WRITE"
rootsquash = false

[VirtualCenter "10.198.17.253"]
insecure-flag = "true"
user = "[email protected]"
password = "Admin!23"
port = "443"
datacenters = "vSAN-DC"
targetvSANFileShareDatastoreURLs = "ds:///vmfs/volumes/vsan:52c229eaf3afcda6-7c4116754aded2de/"

Next, create a storage class which is configured to consume VSAN File services.

kind: StorageClass
apiVersion: storage.k8s.io/v1
metadata:
name: file-services-sc
annotations:
storageclass.kubernetes.io/is-default-class: "false"
provisioner: csi.vsphere.vmware.com
parameters:
storagepolicyname: "vSAN Default Storage Policy" # Optional Parameter
csi.storage.k8s.io/fstype: "nfs4" # Optional Parameter

Then create a PVC to prove it works. Continue reading Using the vSphere CSI Driver with OpenShift 4.x and VSAN File Services

OpenShift

How to Install and configure vSphere CSI Driver on OpenShift 4.x

Note2: December 2021 VMware released the Red Hat Certified Operator "vSphere Kubernetes Driver Operator", which is now the preferred and recommended way to install CPI and CSI in your OpenShift environment.
- Using the new vSphere Kubernetes Driver Operator with Red Hat OpenShift via Operator Hub

Note: This blog post was updated in February 2021 to use the new driver manifests from the Official VMware CSI Driver repository, which now provides support for OpenShift

Introduction

In this post I am going to install the vSphere CSI Driver version 2.1.0 with OpenShift 4.x, in my demo environment I’m connecting to a VMware Cloud on AWS SDDC and vCenter, however the steps are the same for an on-prem deployment.

We will be using the vSphere CSI Driver which now supports OpenShift.

- Pre-Reqs
- - vCenter Server Role
- - Download the deployment files
- - Create the vSphere CSI secret in OpenShift
- - Create Roles, ServiceAccount and ClusterRoleBinding for vSphere CSI Driver
- Installation
- - Install vSphere CSI driver
- - Verify Deployment
- Create a persistent volume claim
- Using Labels
- Troubleshooting

In your environment, cluster VMs will need “disk.enableUUID” and VM hardware version 15 or higher.

Pre-Reqs
vCenter Server Role

In my environment I will use the default administrator account, however in production environments I recommend you follow a strict RBAC procedure and configure the necessary roles and use a dedicated account for the CSI driver to connect to your vCenter.

To make life easier I have created a PowerCLI script to create the necessary roles in vCenter based on the vSphere CSI documentation;

Download the deployment files

Run the following;

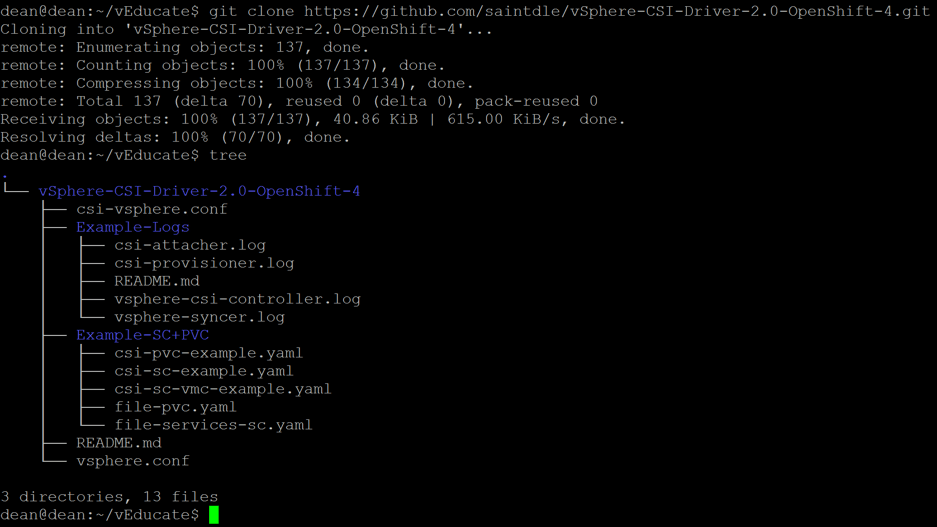
git clone https://github.com/saintdle/vSphere-CSI-Driver-2.0-OpenShift-4.git

vSphere CSI OpenShift git clone

Create the vSphere CSI Secret + CPI ConfigMap in OpenShift

Edit the two files “csi-vsphere.conf” + “vsphere.conf” with your vCenter infrastructure details. These two files may have the same information in them, but in the example of using VSAN File Services, then you may include further configuration in your CSI conf file, as an example.

[Global]
 
# run the following on your OCP cluster to get the ID
# oc get clusterversion -o jsonpath='{.items[].spec.clusterID}{"\n"}'
#Your OCP cluster name provided below can just be a human readable name but needs to be unique when running different OCP clusters on the same vSphere environment.
cluster-id = "OCP_CLUSTER_ID"

[VirtualCenter "VC_FQDN"]
insecure-flag = "true"
user = "USER"
password = "PASSWORD"
port = "443"
datacenters = "VC_DATACENTER"

vSphere CSI with Openshift configure vSphere Secret in OpenShift

Create the CSI secret + CPI configmap;

oc create secret generic vsphere-config-secret --from-file=csi-vsphere.conf --namespace=kube-system

oc create configmap cloud-config --from-file=vsphere.conf --namespace=kube-system

To validate:
oc get secret vsphere-config-secret --namespace=kube-system
oc get configmap cloud-config --namespace=kube-syste

This configuration is for block volumes, it is also supported to configure access to VSAN File volumes, and you can see an example of the configuration here;

Remove the two local .conf files form your machine once the secret is created, as it contains your password in clear text for vCenter.

Installation
Install the vSphere CPI

Taint all OpenShift Nodes.

kubectl taint nodes --all 'node.cloudprovider.kubernetes.io/uninitialized=true:NoSchedule'

Install the vSphere CPI (RBAC, Bindings, DaemonSet)

oc apply -f https://raw.githubusercontent.com/kubernetes/cloud-provider-vsphere/master/manifests/controller-manager/cloud-controller-manager-roles.yaml

oc apply -f https://raw.githubusercontent.com/kubernetes/cloud-provider-vsphere/master/manifests/controller-manager/cloud-controller-manager-role-bindings.yaml

oc apply -f https://github.com/kubernetes/cloud-provider-vsphere/raw/master/manifests/controller-manager/vsphere-cloud-controller-manager-ds.yaml

You can verify the installation by viewing the providerID for the nodes, which must reference “vSphere”.

oc describe nodes | grep "ProviderID"

vSphere CSI CPI OpenShift ProviderID

Install vSphere CSI driver

The driver is made up of the following components

  • CSI Controller runs as a Kubernetes deployment, with a replica count of 1.
  • For version v2.1.0, the vsphere-csi-controller Pod consists of 6 containers
    • CSI controller, External Provisioner, External Attacher, External Resizer, Liveness probe and vSphere Syncer.
Note: This example shows the newer driver manifests for vSphere 7.0 U1. 
Use the correct vSphere version manifests as per this link.

Create the CSI artifacts.

oc apply -f https://raw.githubusercontent.com/kubernetes-sigs/vsphere-csi-driver/master/manifests/v2.1.0/vsphere-7.0u1/rbac/vsphere-csi-controller-rbac.yaml

oc apply -f https://raw.githubusercontent.com/kubernetes-sigs/vsphere-csi-driver/master/manifests/v2.1.0/vsphere-7.0u1/deploy/vsphere-csi-node-ds.yaml

oc apply -f https://raw.githubusercontent.com/kubernetes-sigs/vsphere-csi-driver/master/manifests/v2.1.0/vsphere-7.0u1/deploy/vsphere-csi-controller-deployment.yaml
Verify the deployment

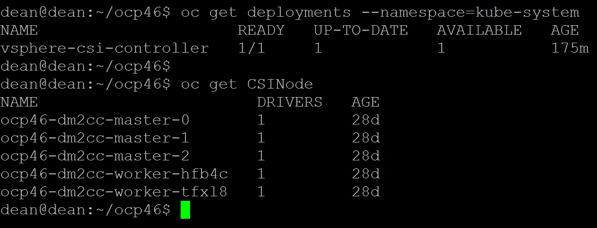
You can verify the deployment with the two below commands

oc get deployments --namespace=kube-system

oc get CSINode
vSphere CSI oc get deployments oc get CSInode
Creating a Storage Class that uses the CSI-Driver

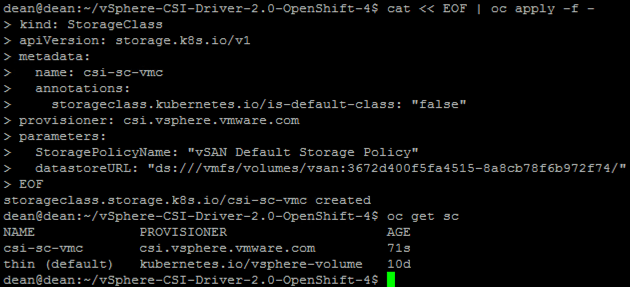
Create a storage class to test the deployment. As I am using VMC as my test environment, I must use some additional optional parameters to ensure that I use the correct VSAN datastore (WorkloadDatastore). You can visit the references below for more information.

In the VMC vCenter UI, you can get this by going to the Datastore summary page.

VMC get WorkloadDatastore VSAN URL

To get my datastore URL I need to reference, I will use PowerCLI

get-datastore work* | Select -ExpandProperty ExtensionData | select -ExpandProperty Info
vSphere CSI with Openshift Get VMC Datastore URL

I’m going to create my StorageClass on the fly, but you can find my example YAMLs here;

cat << EOF | oc apply -f -
kind: StorageClass
apiVersion: storage.k8s.io/v1
metadata:
  name: csi-sc-vmc
  annotations:
    storageclass.kubernetes.io/is-default-class: "false"
provisioner: csi.vsphere.vmware.com
parameters:
  StoragePolicyName: "vSAN Default Storage Policy"
  datastoreURL: "ds:///vmfs/volumes/vsan:3672d400f5fa4515-8a8cb78f6b972f74/"
EOF
vSphere CSI with Openshift Create StorageClass
Create a Persistent Volume Claim

Finally, we are going to create a PVC. You can find my example PVC files at the same link above.

cat << EOF | oc apply -f -
apiVersion: v1
kind: PersistentVolumeClaim
metadata:
  name: example-openshift-vmc-block-pvc
spec:
  accessModes:
    - ReadWriteOnce
  resources:
    requests:
      storage: 5Gi
  storageClassName: csi-sc-vmc
EOF
vSphere CSI with Openshift PVC Created

You can see the PVC created under my cluster > Monitor Tab > Cloud Native Storage in vCenter.

vSphere CSI with Openshift PVC in vCenter Console

Using Labels

Thanks to one of my colleagues (Jason Monger), who asked me if we could use labels with this integration. And the answer is yes you can.

When creating your PVC, under metadata including your labels such as the able below. These will be pulled into your vCenter UI making it easier to associate your volumes.

kind: PersistentVolumeClaim
apiVersion: v1
metadata:
  name: csi-pvc-test
  annotations:
    volume.beta.kubernetes.io/storage-class: csi-sc-vmc
  labels:
    appname: veducate
spec:
  accessModes:
  - ReadWriteOnce
  resources:
    requests:
      storage: 30Gi
vSphere CSI with Openshift PVC Labels
Troubleshooting

For troubleshooting, you need to be aware of the four main containers that run in the vSphere CSI Controller pod and you should investigate the logs from these when you run into issues;

  • CSI-Attacher
  • CSI-Provisoner
  • vSphere-CSI-Controller
  • vSphere-Syncer

Below I have uploaded some of the logs from a successful setup and creation of a persistent volume.

Resources

Regards

OpenShift

How to deploy OpenShift 4.3 on VMware vSphere with Static IP addresses using Terraform

Install OpenShift 4.x on vSphere 6.x/7.x

The following procedure is intended to create VM’s from an OVA template booting with static IP’s when the DHCP server can not reserve the IP addresses.

The Problem

OCP requires that all DNS configurations be in place. VMware requires that the DHCP assign the correct IPs to the VM. Since many real installations require the coordination with different teams in an organization, many times we don’t have control of DNS, DHCP or Load balancer configurations.

The CoreOS documentation explain how to create configurations using ignition files. I created a python script to put the network configuration using the ignition files created by the openshift-install program.

Reference Architecture

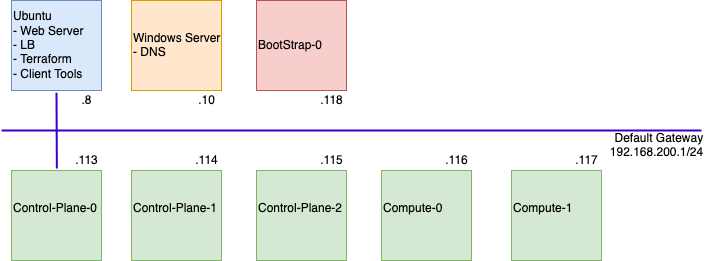
For this guide, we are going to deploy 3 master nodes (control-plane) and 2 worker nodes (compute This guide uses RHEL CoreOS 4.3 as the virtual machine image, deploying Red Hat OCP 4.3, as per the support of N-1 from Red Hat.

We will use a centralised Linux server (Ubuntu) that will perform the following functions;

  • Load Balancer – HAProxy
  • Web Server – Apache2
  • Terraform automation host – version 0.11.14
    • The deployment will be semi-automated using Terraform, so that we can easily build configuration files used by the CoreOS VM’s that have Static IP settings.
    • Using a later version of Terraform will cause failures.
  • Client Tools for OpenShift deployment
    • OC
    • Kubectl
    • Openshift-install

DNS will be provided by a Windows Server.

The installation will use a Bootstrap server to bring the cluster online, which will be removed at the end of the build process.

OpenShift Deployment Arch Diagram

Deployment Steps

In this guide we will deploy our environment in the following order;

  • Configure DNS
  • Import Red Hat Core OS image into vCenter
  • Deploy Ubuntu Host
    • Configure Apache
    • Configure HAProxy
    • Install Client-Tools
    • Install Terraform
  • Build OpenShift Cluster configuration
  • Configuring the Terraform deployment
  • Running the Terraform deployment
DNS

Openshift uses a “clusterName.BaseDomain” format.

For example; I want to call my Openshift cluster Demo. And my DNS Domain is Simon.local, then my full format used by Openshift is “demo.simon.local”

Below is a table plan of the IP addresses you will use to build the environment.

The last three addresses are cluster level resources that are available on each control-plane node, accessible via the load balancer.

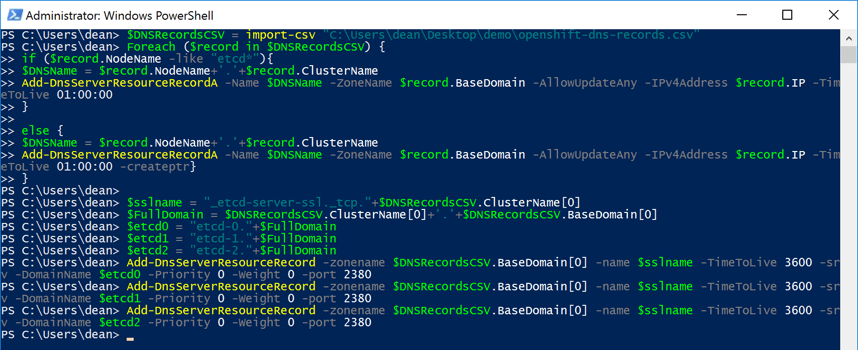
To configure the DNS records in Windows, you can use the Script and CSV file here

Deploy OpenShift VMware Static IP PowerShell Configure DNS Records

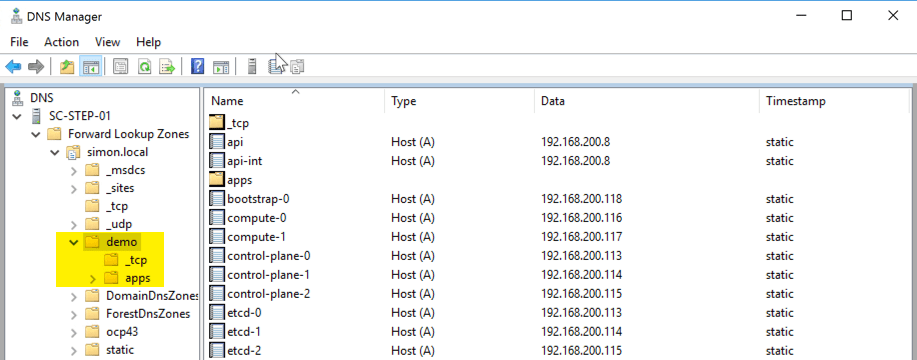
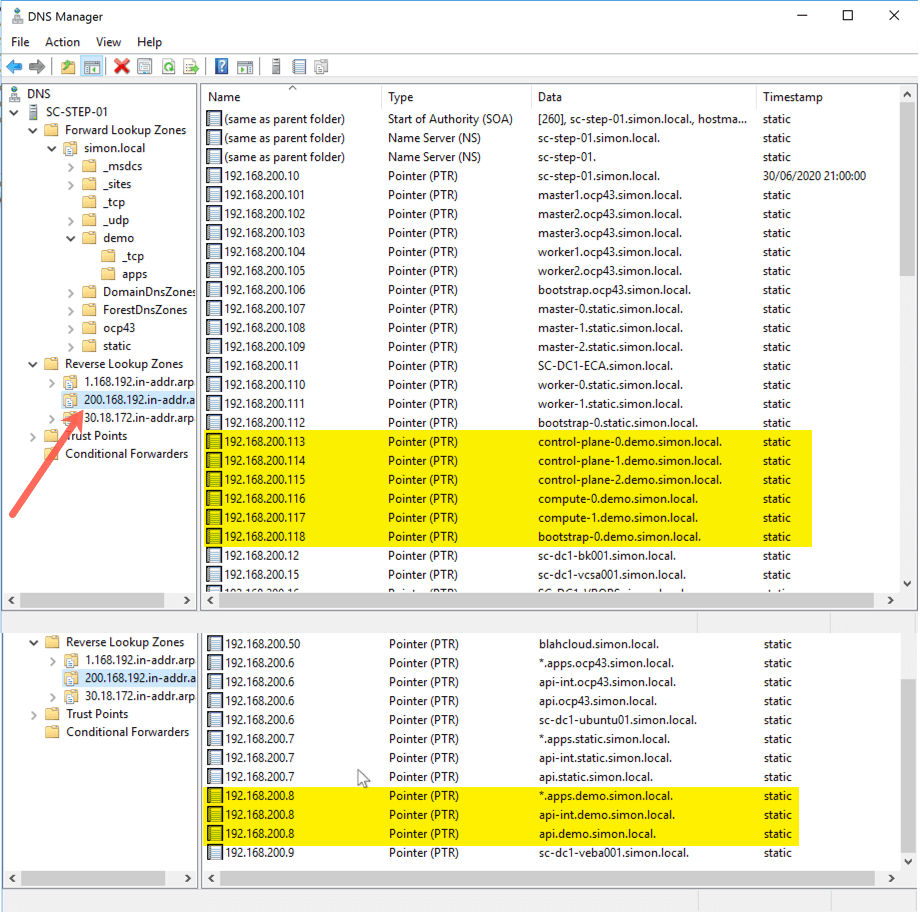
In the below screenshot, the script has created the “demo” domain folder and entered my records. It is important that you have PTR records setup for everything apart from the “etcd-X” records.

Deploy OpenShift VMware Static IP DNS Records Deploy OpenShift VMware Static IP DNS Records 2 Deploy OpenShift VMware Static IP DNS Records 3 Deploy OpenShift VMware Static IP Configure Reverse DNS Records

Import Red Hat CoreOS Image into vCenter

Continue reading How to deploy OpenShift 4.3 on VMware vSphere with Static IP addresses using Terraform

vSphere upgrade blog post header

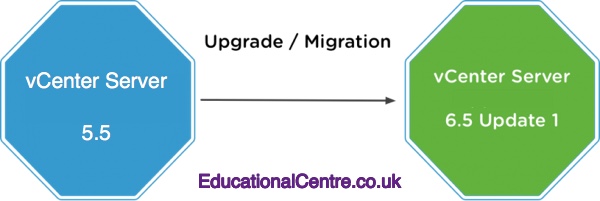
vBrownbag Session – Upgrading from vSphere 5.5 to 6.x

VMworld 2018, I was lucky enough to get my name down on the list to present on the vBrownbag stage, a community driven source of brilliant knowledge articles, videos, and web meetings, for the community by the community. Read more about vBrownbag here

In the below session I took on the session that had proved to be a hit at VMUGs around the UK. “Upgrading from vSphere 5.5 to 6.x”

This session focuses less on the “how to upgrade the components themselves” but more what you need to cover for planning and preparation, considerations during the upgrades, and calling out known gotchas.

Since the above video, I’ve since joined VMware, and presented the official slide deck covering this subject at the UK VMUG Usercon with Kev Johnson, Technical Marketing Engineer – vSphere Lifecycle.

You can find the official free e-book that accompanies the VMware presentations here;

Regards

Dean