VMware Tanzu Header

Tanzu Mission Control – Deploying TKG Clusters to AWS

This blog post will cover a technical walk-through on using Tanzu Mission Control to deploy Tanzu Kubernetes clusters to AWS.

The follow up blog posts in this series are:

Tanzu Mission Control 
- Getting Started Tanzu Mission Control 
- Cluster Inspections 
- Workspaces and Policies  
- Data Protection 
- Deploying TKG clusters to AWS 
- Upgrading a provisioned cluster 
- Delete a provisioned cluster 
- TKG Management support and provisioning new clusters
- TMC REST API - Postman Collection
- Using custom policies to ensure Kasten protects a deployed application
Using the AWS Hosted Management Cluster

In this example, we will use the default provided AWS Hosted Management cluster.

Alternatively, you can use the Tanzu CLI to provision a TKG Management cluster into AWS and attach this to Tanzu Mission Control.

Currently it is not supported to have a Management Cluster manage clusters across platforms.

  • I.e. Management Cluster in AWS that manages workload clusters in Azure.

To get started:

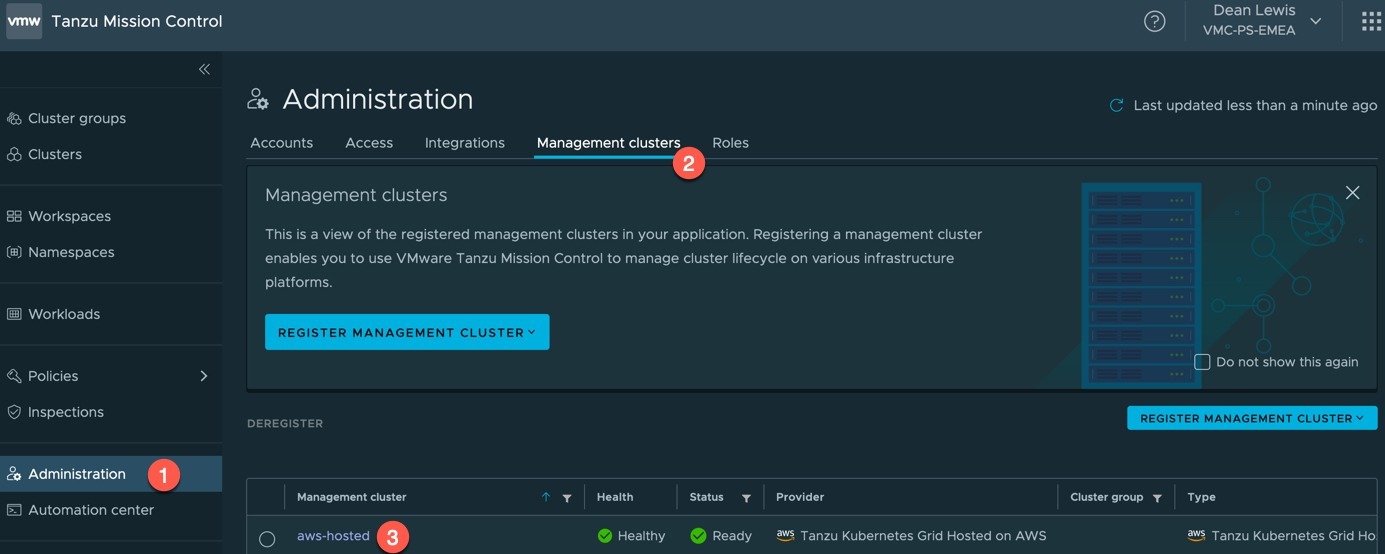
  1. Go to Administration
  2. Click the Management Clusters Tab
  3. Click on the “aws-hosted” cluster object name

TMC - Administration - Management Clusters

Create a provisioner

The default tab when selecting the “aws-hosted” management cluster object is the provisioner tab.

  • Click create provisioner

TMC - aws-hosted - provisioners - create provisioner

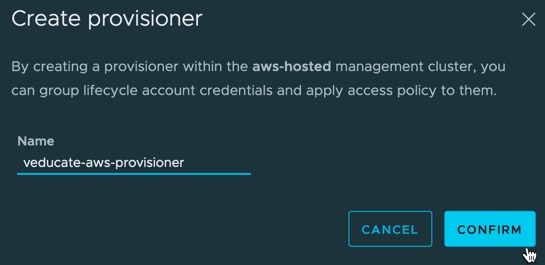
  • Provide a name for the provisioner
  • Click confirm

TMC - aws-hosted - provisioners - create provisioner - provide name

You will be taken back to your provisioner object which is created. Using the radio button to select the object will allow you to delete it. No other action is available.

TMC - aws-hosted - provisioners - provisioner created

Create the AWS account
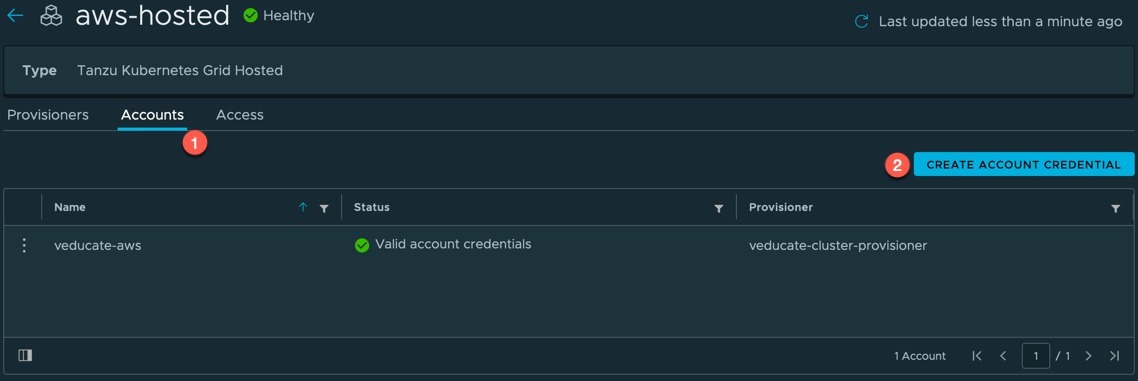
  1. Click on accounts tab
  2. Click the “Create Account Credential” Button

TMC - aws-hosted - accounts - create account credential Continue reading Tanzu Mission Control – Deploying TKG Clusters to AWS

github logo

Download Releases from Github using Curl and Wget

The issue

I was trying to download a software release from GitHub using Curl and hitting an issue, the file wasn’t large enough for a start, it was unusable and clearly not the file I expected.

curl -O https://github.com/kastenhq/external-tools/releases/download/3.0.12/k10tools_3.0.12_linux_amd64


% Total % Received % Xferd Average Speed Time Time Time Current
Dload Upload Total Spent Left Speed
100 635 100 635 0 0 2387 0 --:--:-- --:--:-- --:--:-- 2387

I tested this in a browser and found the link redirects elsewhere, hence the issue.

The Fix

Just needed to specify a few extra arguments.

curl -LJO https://github.com/kastenhq/external-tools/releases/download/3.0.12/k10tools_3.0.12_linux_amd64

# Explanation of the arguments

-L, --location      Follow redirects
-J, --remote-header-name Use the header-provided filename
-O, --remote-name   Write output to a file named as the remote file

If you wish to use wget instead.

wget --content-disposition https://github.com/kastenhq/external-tools/releases/download/3.0.12/k10tools_3.0.12_linux_amd64

# Explanation of the argument 
--content-disposition        honor the Content-Disposition header when choosing local file names (EXPERIMENTAL)

Regards

Docker Header

Using Docker to update and commit to a container image

I was helping a customer build some customized automation tasks using vRealize Automation Codestream. These tasks required the use of a container image with certain tools installed, usually we can include a CI task to download the tools into the container image on the fly. However, my customer’s environment is offline, so I needed to provide them a container image with everything installed by default.

Before we dive into the process of running a container and committing the changes, it is recommended where possible to create a new docker file that would build your docker image as needed with the associated commands such as the below:

FROM node:12-alpine
RUN apk add --no-cache python g++ make
WORKDIR /app
COPY . .
RUN yarn install --production
CMD ["node", "src/index.js"]

Committing changes to a container image in this way can cause the image to become bloated. But sometimes there’s a need to do just do it this way.

Prerequisites
Pull the image you want to update
docker pull {image location/name}

docker pull image

Check your images and get the ID
docker images

For the next command, we will need the Image ID.docker images

Run your image as an active container
docker run -it {Image_ID} /bin/bash

This will then drop you into the tty of the running container.

docker run -it image_id bash

Modify your container

Continue reading Using Docker to update and commit to a container image

kubestr header

Kubestr – Open-Source Kubernetes Storage benchmarking tool

Kubernetes is a platform which is starting to lose the need for introduction in most settings. However, it still can be a complex beast to get to grips with, and getting your infrastructure components configured correctly is key to providing a successful Kubernetes environment for your applications.

One of these such areas is storage.

With your Kubernetes platform, you need to ensure a correct storage configuration, and benchmark your storage performance, like you would with any other platform. Then test the container storage features such as snapshots of the persistent volumes.

The configuration for each vendor when integrating with Kubernetes will be different, but the outcomes should be the same.

What is Kubestr?

Enter Kubestr, the Open-Source project tool from Kasten by Veeam, designed to help with ensuring your storage is configured correctly, help you benchmark the performance and test features such as snapshots.

Getting started with Kubestr

Simply Download Kubestr for the platform you wish to run the tool from. For me I’ll be running it from my Mac OS X machine, which has connectivity to my Kubernetes platform (AWS EKS, I used this blog to create it).

I extracted the zip file and have the Kubestr command line tool available in the output folder.

kubestr download and extract

Running the tool for the first time will run some tests and output a number of useful items of information on how we can use the tool. Which I will start to breakdown as we continue.

For Kubestr to run, it will use the active context in your kubectl configuration file.

kubestr first run

Green Box – we have our initial checks.

  • Kubernetes version
  • RBAC check
  • Kubernetes Aggregated layer check

Then we have the details from our available storage provisioners that are installed for our cluster. You can see what I have two installed. Continue reading Kubestr – Open-Source Kubernetes Storage benchmarking tool

vRealize Operations Tanzu Mission Control Header

vRealize Operations integration with Tanzu Mission Control for auto cluster discovery

A while ago I wrote about the vRealize Operations Kubernetes Management pack which works for all CNCF conformant Kubernetes platforms.

One of the best features of this management pack is the Tanzu Mission Control (TMC) integration it offers with vRealize Operations (vROPs).

This means when you use TMC to provision Tanzu Kubernetes Grid (TKG) clusters, currently on AWS or on vSphere, they will be automatically registered within vROPs as well.

Install the Management Pack
  1. Download the management pack pak file.
  2. Within vROPs go to Administration
  3. Click on Repository
  4. Scroll to the bottom of the page, and select “Add/Upgrade”
  5. Select the pak file for installation and follow the wizard.
Create a CSP API Token

For the vROPs management pack adapter to be able to communicate with TMC, we need an API token.

  1. Log into https://console.cloud.vmware.com
  2. Change to correct organisation that contains your TMC instance
  3. Click your name in the top right hand corner and select “My Account”vROps TMC Integration - creating a CSP Token - Select my account
  4. Select the “API Tokens” tab, and then “Generate a new API Token” button.vROps TMC Integration - creating a CSP Token - API Tokens
  5. Set your API Token name, expiry, and access control as required. Then click the generate button. vROps TMC Integration - creating a CSP Token - Generate a new api token
  6. You will be shown a dialog box with your generated token. Save this in a safe space we will use it later on. vROps TMC Integration - creating a CSP Token - Token Generated
Connect vRealize Operations management pack adapter to Tanzu Mission Control
  1. In vROPs UI go to Administration > Under Solutions, choose “Other Accounts” and click the “Add account” button. vROps TMC Integration - Add Account in vROPs
  2. From the account type list, choose Tanzu Mission Control. vROps TMC Integration - Add Account in vROPs - Account Type Tanzu Mission Control
  3. Fill out the necessary details on the New Account screen.
    1. For the credential click the + symbol, add in a name for the credential, and the CSP token you created earlier.
    2. Select your newly created credential.
  4. Select the validate button.vROps TMC Integration - Add Account in vROPs - New Account
  5. Hopefully you get a successful message. vROps TMC Integration - Add Account in vROPs - New Account - Test Connection Successful
  6. You will see the account object in the Other Accounts view. vROps TMC Integration - Add Account in vROPs - New Account - Newly created account
Auto-Discovering Tanzu Kubernetes Grid Clusters

Now you have your account added, whenever you provision a new cluster using Tanzu Mission Control, cAdvisor will be configured in the Kubernetes cluster and a Kubernetes account type will be created in vROps automatically for you.

Below I’ve created a cluster in AWS, and we can see the object has been created in vROPs.

vROps TMC Integration - Provisioned cluster auto discovered

And finally, here is my cluster showing in the one of the Kubernetes Dashboards. vROps TMC Integration - Kubernetes Dashboard

This is a simple to implement feature but can make a massive difference in your ability to monitor your TKG clusters from the infrastructure view that vROPs provides. As your users create clusters via TMC, they don’t need to interact with the monitoring platform to ensure visibility.

Regards